Leaderboard


Popular Content
Showing content with the highest reputation on 07/06/2020 in all areas
-
It does feel good to savor a bike ride . To listen to the pathetic racket of the clutch sounds , feel the short (now) throw of the shifter , the crazy MG sound , the odd looks and enjoying exclusivity .3 points
-
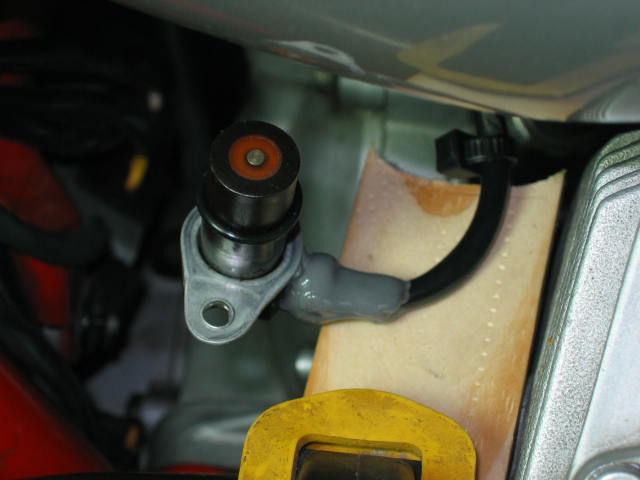
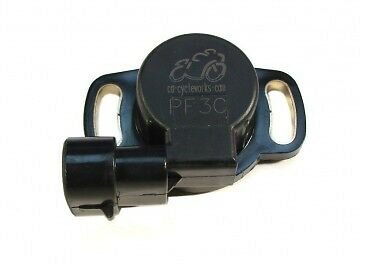
The problem is found and resolved. Everything turned out to be very banal: the TPS sensor died. I checked all the relays, sensor resistances, ignition coils and all harness connections, grounding, fuses, and only at the end I decided to check the TPS. You may ask: "why I did not check it first"? Last year I had a very similar problem and then I ordered a new PF3C sensor. As it turned out then, it was a wire to the relay, and I left this new TPS. And I did not expect that he will serve me less than a year, I traveled on it for about 4,000 km. He returned his old PF4C sensor from Harley and everything is great again! In fact, I thought that I would sell it to hell and buy a Japanese motorcycle. He got scared and earned
 3 points
 -
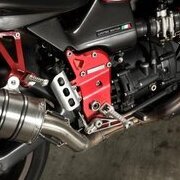
If you're doing the timing cover gasket( front engine cover gasket?) you now use the metal gasket with the pressure sensitive sealant also sold by MG cycles for the later big block engines. Totally bullet proof and the same as Ducati twins have been using for years on their valve cover gaskets and head gaskets. I havent used one of those horrid old composite gaskets that blow out on a front engine cover for years. Ciao3 points
-
Decided it was the day to play with maps and tuning. Did the Decent Tune Up route a few weeks ago and valves to 0.007/0.009", idle bypass full closed. Coppa with Ti mufflers and front crossover. I've not been able to match the map up on it with anything out there, ran decently except for the occasional 3k blip and stubborn cold start. First up was Meinolf's 2017.08.31_#93_6. Cured the cold start issue, fired up right off. Set idle to 1100 rpm and went for a ride. Huge improvement at 4-5000 rpm up. Only problem was 3k rpm cruising, stumbling and missing like crazy. Roll on a little and it would go away. Next was V11 IAW 15M ECU Titanium 2 from the file uploads. I'm assuming this is the stock bin as described, if anyone can compare it to a stock Ti bin to confirm I'd appreciate it. Cold start was good, without changing the idle screw the idle was now up to 1400 rpm from 1100, thought that was interesting. 3-4000 rpm 6th gear roll on was a little better than Meinolf's, 4-5000 rpm was almost as good. 3k cruising and it never missed a lick. I'm going to stick with the Ti bin for the time being, very happy with it. Two questions I'd like answers for: 1. What's the difference between the two that accounts for the difference in idle speeds without changing the idle set screw? 2. Why did Meinolf's stumble so much at 3k but the Ti didn't? This really surprised me since I'd read nothing but good about it. Maybe the valve settings?2 points
-
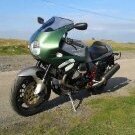
Finally reunited with my LeMans! Have not seen nor rode it since last October! I had done an oil and filter change last fall so the fluids were ok. Tires needed a bit of air but still look good with just over 5k miles on them. Put a good charge on the battery over a couple days. Rolled it out in the driveway, pushed the go button and it fired right up. Rode the long way from Hiawassee down towards Helen, Ga. Immediately after tuning south on Hwy 17 had to wait for the traffic jam caused by a loose steer. Luckily the steer moved into someone's front yard allowing traffic to clear. Continued down 17 , then onto SR348 and Wolfpen Gap over to Two Wheels of Suchess. Low and behold amongst the crowd set TWO MORE Guzzi! A Balibio and a new 850. Chatted with the guys for a bit then headed back to the house via SR60, Skeenah Pass Rd. and Hwy 76. One hundred eighteen miles of great roads and an awesome bike!2 points
-
You would be surprised at what can turn up in the South. With the distributor gone in that area there is little to no support and even less knowledge about those bikes there.2 points
-
Hey Docc, Tbh, when I thought I was simply bypassing the safety switch, I didn't look that hard for it the 2nd time, knowing that I needed that little bit to get the bike going, changed the urgency level of the search. I pulled out one of my bright LED work lights, and after crawling on the floor for 2 minutes, I now have that little black plug in ,my hand again,lol. I've read some of your posts on keeping that area clean and lubed, what would be appropriate, a little dab of silicon grease to lube it up and help hold it in place while I jam the lever and perch back together? Tks Kelly2 points
-
Use valpolini gaskets, they won't squeeze out and last pretty much forever.2 points
-
You've probably all seen this already. It came up on the FB group. Almost reminds me of a Bol d'or bike. https://www.facebook.com/photo.php?fbid=3235658873151161&set=pcb.3235660023151046&type=3&theater&ifg=11 point
-
Damn, right on!!! That was great!1 point
-
Possibly... one could drop him an email I suppose and see what happened to the business or specifically the foot control portion. I certainly can't speak for him, but if no one picked up the entire business, he may be interested in doing something with the foot control licensing & plans on their own. He was very active and helpful here for a long while, but hasn't logged in since March 2019. So along with retiring from the MC accessory business, it looks like he may not be that active with motorcycling and the V11 community at all anymore either? I too take long breaks over the last years, and it seems that every time I pop back in after a year or three break that several of the top contributors and old-timers have moved on and themselves not logged in for a year+ It seems like an ever shrinking audience, but then again these bikes are now at their youngest 15 year old models, and at their oldest over 20 years. Hard to believe that much time has passed so quickly. For nostalgia, here is a snapshot of what the old Motratech webpage for the MGC-SB10 controls used to look like, with a little info about them:
 1 point
 -
Well, like many things I'm sure this will fall into the "love it" and "hate it" camps of aesthetic taste .... but I love it. It looks very Mad Max. Is that available off the shelf from somewhere? I don't have a naked V11, nor a Magni fairing, so not applicable to me. But I'd consider it if I did just because it is so odd1 point
-
I bought the HD black textured paint as well, but also haven't given it a try yet. It is supposed to be the same texture used on all HD engines for the last decade or so to present, and looking at the current HD bikes at the dealership the other day... the texture looks very similar to the "fuzzy" MG paint. The HD part number that I bought is 98606BF "Texture Black" Again, I haven't tested it yet.1 point
-
I have a feeling it's next to that place that the sun don't shine.1 point
-
I had success with JB Weld epoxy sealing the wire coming out of the sensor years ago. It ain't purty, but works. (Fitting a new O-ring is good, as well, but didn't fix my leak.)
 1 point
 -
Probably when they had the gearbox out and apart for the recall. Ciao1 point
-
The latest version. Normally comes with the female blade connector to use on the wire. https://www.mgcycle.com/index.php?main_page=product_info&cPath=37_140&products_id=2387 Ciao1 point
-
Mistral reverse cone with cross over.1 point
-
The bike runs and idles fine but I suspect the slight popping on the overrun which seems to come from the right side is due to the air leaking past the shaft. Greater vacuum and airflow due to 3000 rpm with idle fuel values equals lean mixture on the overrun. I've dialled it out with the CO trim although I could also do it on the main fuel map on the closed throttle value at 2-3500 rpm where you notice it. The most noticeable thing though is the tapping sound at idle, sounds like tappet noise but its the throttle valve moving. The other thing is it affects the initial throttle response as the left valve moves it needs to overcome the wear in the r/h t/b shaft so you can never get it to carburate perfectly off idle. The left opens fractionally before the right. None of this is terrible but I can feel it and hear it. Loctite red is high strength and requires heat for hand tool removal. Green thread locker is medium to high and for use on already assembled parts,ie it's a wicking compound. Green is also the colour of bearing mount loctite. Personally the only place i can see a need for red Loctite on the throttle bodies is the throttle plate attachment screws the rest only need Blue. Manufacturers are more concerned about averting risk than future maintenance so if they can liquid weld the things together thats the way they'll go. Minimise their risk and maximise your future maintenance headaches. Ciao1 point
-
Tried to turn the knurled knob a couple years ago out of curiosity, it wouldn't budge with my fingers. Didn't use tools on it and left it alone. Felt I might open a bag of worms if I proceeded. Omrons ordered from online components & Casper's breakout harness (thanks Docc), Caig Deoxit on the way also. Once my Buell is back in action, the tank is coming off and a decent tune-up will commence, minus CO adjustment. Don't have necessary soft and hardware for that. Thanks.1 point
-
Sounds like a good plan. Doesn't take much grease to keep that together for assembly.1 point
-
Seems it would not be difficult to fashion a little pusher from a scrap of Delrin or such. I would be concerned Nylon might swell from moisture exposure there. I suppose lots of folks have defeated their clutch lock-out by shorting the connectors. Even with the Neutral Switch/ Neutral Relay functional, the bike could then start in gear with the sidestand up. Simple enough to keep the habit of holding the clutch for start-up.1 point
-
Yes I tried the heat gun method to no avail. When I pulled the injectors during the Daytona build with the T/B's on the bench the retaining screws were a pain and I sheared the head off one and was lucky to be able to get the remaining piece out. It took a lot more heat than a heat gun though. My r'h throttle body shaft bushes are badly worn and require replacement. I assessed them years ago and should have revisited the wear issue before I fitted them. I've scoped out the bushes and seals by stripping down an old spare set of Ducati bodies and am awaiting another set of throttle bodies from Paul to arrive. I'll then decide on which set to use, I may need to rebuild both sets, dont know. When the new set show up I'was going the experiment with how much heat was going to be needed to get the support screws to loosen. At the end of the day I'll do a tutorial on how to replace the bushes. What Snapon assistance was the key? just a better fitting allen key? Ciao1 point
-
Hmm, actually no. That interface button is used to close the switch so the starter will engage.1 point
-
There could well be a lot of air trapped at the top hose connection to the master cylinder. Unbolt the master and carefully with the cap off tilt it so the reservoir is higher than the banjo connection and jiggle the lever. By jiggle the lever I mean just that, dont attempt to actuate the lever just jiggle it in it's play region. You will see air bubbles come into the reservoir. You can also while you have it in this position tap the accessible clutch line with the handle of a screwdriver to break free any air bubbles. They will come into the reservoir once again. Ciao1 point
-
Kelly , whatever you do , you keep this device dedicated to brake fluid ONLY . No mixing brake fluid with any petroleum products . Good luck . When Ford first started using hydraulic clutches on trucks , there was NO procedure that worked 100 % of the time .1 point
-
A KTM trick is to zip tie the lever to bar overnight. Turn bars so reservoir is highest. It has worked for me, on my KTM anyway. Even after rebuilding brake M/C and bleeding, it still had spongy lever. Did this trick, and next day had full operation.1 point
-
There's a Harley Davidson textured paint that is meant to be similar. I bought a touch up pen some time ago after someone recommended it, but I haven't tried it yet. Sent from my SM-G925F using Tapatalk1 point
-
This was a JOB . I purchased rubber boots to try them to fix my misfire , popping , running like shite , crummy performance , etc. I got no advice on how to swap them out & decided to DIY . I separated the throttle bodies and pulled them out of the way and took a razor blade and split the boots . I realized I wasted my time with them and got to looking at the fuel injectors \ throttle body walls . The l.h. side showed flooding and the r.h. side was ultra-lean . Then it was X to do something . I just started taking things apart . short term memory loss ( I bought/lost 3 of the 3mm sockets while doing this ) and the fact it took way too long on the injector travel time made it an adventure on reassembly . When you do this you will need an empty fuel tank , a 2.5mm and a 3mm (stubby) SnapOn allen socket & a 45 degree external snap ring pliers , picks and regular tools . Do not ever go cheap $ on tools . I will come up with a procedure when I do the red frame injectors and get them done . If I ever get smart enough I will learn to transfer phone to computer photos. If anyone wants to PM their # I can send ( today ) a pic of the throttle bores to see WHY I did this .1 point
-
Well, if a guy *has* to have a V11S, I suppose those two are ok...1 point
-
PERFECTION . Today my bike attained perfection . I finally got my injectors back from RC Fuel Injection and finished the installation & adjustments . After two days of no-starts I realized I had a f'd up PowerCommander . Removed the PC and the first cylinder that came up , ZOOOM . It started like it never started before . I let it warm-up and took off to get gas . 1/2 mile before I get to the station , I ran out of fuel . Laid the bike over to get as much fuel as possible on the left side , restarted and on to the gas pump . A full tank of fuel and the long way home made me smile . NO hick-ups , nothing but perfect throttle response and perfect stop sign take-off and acceleration . 16k miles and a lot of sitting had me a clogged injector on one side and a poor spray pattern on the other . For anyone on this site w/any drivability or performance issues , please remove the throttle bodies and have your injectors serviced . This was NOT an easy task , be sure and take 1,000 pictures to know how things are supposed to come apart / go back together .1 point
-
Good question, I'd really love to get a set. Maybe if there's enough interest some one with the skills will start making them again. We can only hope.1 point
-
Always glad to see a satisfied customer..1 point
-
I have had that problem with a leaking "candle" boot.. but you said you'd checked the wires. It's really hard to diagnose this problem from a continent away, though. Only starting with the throttle open a bit is normal. Not idling, of course, is not. Coughing and unevenly firing, combined with not idling "sounds" like a vacuum leak.. but maybe not. My guess is you will find your problem there.. but maybe not.1 point
-
Nope, not yet. Not really surprising either, given current circumstances. It'll get here eventually.😊1 point
-
1 point
-
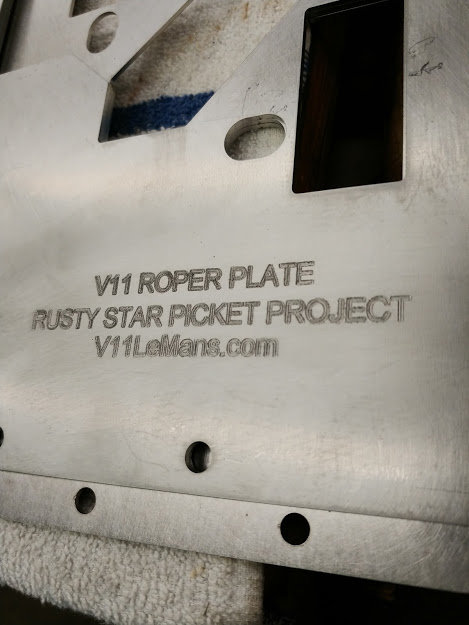
So here's the installation video for the preproduction plate. The fit was excellent. Obviously this was the first time I installed one of these plates. It took me a couple minutes to figure out how to remove the oil filter assembly. Cleaning the gasket surfaces probably took the most time (aside from all the filming). With this plate you don't need to make any modifications to the side stand bracket. Just loosen the large bolt onto the crankshaft, install the smaller M6 bolt and then go back and tighten the large bolt. Same with the plate, I had to have the plate loose in order to install the oil filter assembly. It was relatively easy to do, just take your time. Upper Gaskets (two required): http://www.mgcycle.com/index.php?main_page=product_info&products_id=34 Oil Pan Gasket (one required): http://www.mgcycle.com/index.php?main_page=product_info&products_id=33 Hopefully we'll have an update on the production plates soon.1 point
-
I use the risers from a California 1100, and many other Guzzi which use risers. My top yoke had the holes in it. Seems like some of the V11s had that top yoke, some didn't. Part number is 01.49.31.00, photo below (cropped on the edges of the photo you can just barely make out the riser bolts on the under side of the yoke) Guzzi risers part numbers are here: http://www.harpermoto.com/parts-by-motorcycle/2000-up-moto-guzzi-motorcycles/california-vintage-1100-2006-2008/front-fork-en-california-vintage-1100.html1 point
-
I actually tried test fitting that setup about 10 yrs ago. The Rox risers will hold the clipon bars but the plate between the clamp and the stub is way too thin to adequately support the clipon so it was dangerously flexible. They will only work safely with standard handlebars. I have no doubt they would bend or break if used with clipons.1 point
-
I tried to fit some Rox Speed risers to my Sport, but didn't want to change the lines and cabling. They're nice looking pieces (at least on the shelf!), but the cockpit on the early Sport is pretty tight and close. http://www.revzilla.com/motorcycle/rox-2-pivot-risers-for-1-18-handlebars?utm_source=product&kwd=&gclid=CjwKEAjwguu5BRDq8uSKhaKIzDkSJACQ7WJlFQojc2pGNUBV885WZnZkMN_ywyP_m2Te40bFO-ssDxoC-JLw_wcB1 point