Leaderboard


Popular Content
Showing content with the highest reputation on 03/22/2021 in all areas
-
Ooh nice thread. Just purchased some TI cans with a couple of small dings. Now to find some PVC pipe and more importantly some IPA. The dents are removed more easily with some throat lubricant I take it!3 points
-
2 points
-
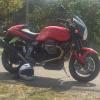
Love that bike. I've had one for about 7 years and it runs and rides like the day it left the factory. Bullet proof. (powder puff garage queen that it is)2 points
-
V11 bevelbox is completely different. It's a real 'Weird Harold' design where the pinion is supported in a strange '2-Part/Combination Bearing'. It has a big roller bearing to take the rotational loads and then in front of it a caged ball bearing with a split outer race. I've never seen anything like it in any other application, (Perhaps Phil has?). It's a real exemplar of how Guzzi engineers used to approach some things from completely left field. No, this particular issue doesn't occur with V11 boxes. Their major weirdness is the fact the pinion nose bearings always get starved of oil and they have that stupid needle roller in the outside of the box where the spindle goes through that will turn into a filigree of rust in weeks if you ride in the rain!2 points
-
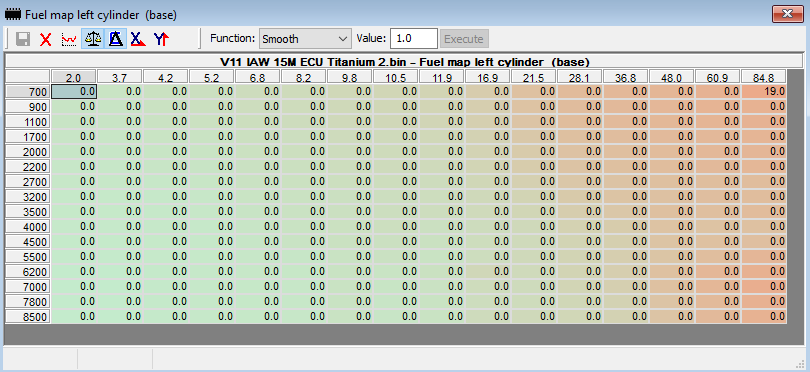
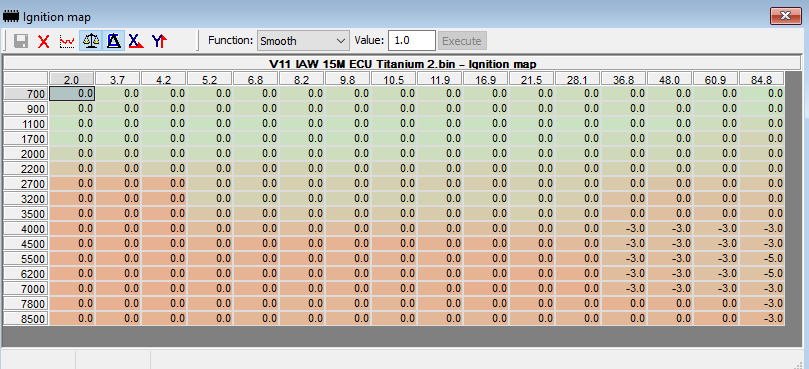
Probably because the stumble is dependant on a few different parameters working together and unless they are it doesn't do it. So when my V11 was standard it used to have the stumble at times. When I changed to gear driven cam I went out and tried my best on several different rides to reproduce it to no avail and I reported here that it looked like the theory it was caused by cam chain slack might be correct. A ride or two later it was back again which I reported here. So a combination of rpm, oat, engine temp throttle position and baro pressure all influence the fuel injector duty cycle hence the fuel mixture and the ignition timing. Somewhere it seems when the combination of all or a few of these is aligned you get the stumble. So in my case I couldn't get it to stumble but then, different oat/engine temp and condition it's back. I think it's unlikely the Ti ecu fixes it or that would have been figured out 20 years ago. The fuel and ignition maps don't lie that's for sure. So here are the Delta fuel and ignition maps for a std 2000 V11 Sport and the Titanium ecu map. The delta map is a comparison map between the 2 maps you have loaded in Tunerpro to look at not the raw data but the difference between the two. The minus figures here indicate the original map being compared to is a lesser value than the comparison map which in this case is the Ti map as can be seen in the header. The all zero's indicates the maps are identical, no differences. The stumble is always down at very low throttle openings and usually around 2800-3200 rpm. Could also be a combination of the above AND the TPS and airscrew and TB balance factored in as well. Ciao
 2 points
 -
If you don't find those bracket adapters, they'll be easy to make. Pictured is stock. The offset holes are 23mm center-center with an overall height of 46.80 (no need for accuracy with the height) on a flat steel plate (these are 6.25 thick but anything close will work) Just eyeball the general shape and length. They barely show when installed. The nut you see is welded on but it's not necessary - easy to get to. All holes are the same size as the hanger. The cans are an easy job too. Drill them out, rub out the dings, reassemble. I used alm rivets because I figured I'd dent them again - which I did!. Polish? I didn't have any luck with that, so I used fine scotchbright as a buffer in the same direction of the grain to try to duplicate the orig brushed finish. There are a couple of forum threads on Ti can repair.2 points
-
Oh duh, shows what I know, I was thinking from center stem to center tube. Always ready to learn from you guys, thanks!2 points
-
sorry , resized pic
 2 points
 -
The bevelbox on the CARC system is generally pretty robust. The one Achilles Heel it has is the light preload on the pinion bearings supplied by the nut and the fact that it is held there simply by a lockwasher. For some bizarre reason Guzzi don't Loctite it and if the bearings settle or wear the preload is lost, the nut comes loose and things go pear shaped fairly quickly. First symptom will be noise from the final drive on the over-run. If you notice this stop riding immediately. Not only could it preceed a catastrophic failure but also if you stop it there and then it may well be possible to save your final drive. I can't stress how important catching it early is. If you don't and continue to ride the consequences may be terminal. Michael has just stripped Peter Hughes's box after he continued riding it for a while. Unfortunately it's fed bits of lockwasher all through everything and the results are terminal. Sorry but there's no saving this one. This is the pinion nose bearing. Most of the other bearings in the box and reactive bridge look much the same. Now if you do catch it early and there is no crownwheel or pinion damage it is, despite what the factory may try to tell you, quite possible to rebuild the entire reactive bridge and therefore the bevelbox. My guess though is that very few shops would be willing to try it, either because they don't have anyone with the skills or for liability reasons. It's this sort of numbskull 'Built in obsolescence' that makes my blood boil and we won't have a bar of it. We can at least look at your box and tell if it's salvageable and if we can rebuild it you can bet your arse we'll be Loctiting the living Bejasus out of the pinion nut as it's preloaded so the bastard won't be coming undone again! Oh, and as an indicator that this sort of repair is quite possible my box on my GRiSO played exactly the same trick. I caught it early, cleaned everything thoroughly and didn't even replace any of the support bearings! Just replaced the nut and lockwasher, Loctited and preloaded to about 120 inch pounds on the nut before bending up the tang on the new lockwasher. That was nearly 50,000km ago and it's still running silent and strong.1 point
-
I personally use moly grease here. The rational for locking washers with tabs isn't to prevent the loss of torque on the nut it's to retain the nut and stop a total catastrophe until the issue is isolated and that's often through routine maintenance checks. They are old and somewhat unreliable technology. Personally I think Loctite is a far better way to go on most stuff like this with the lock washer as the backup. I've seen the internal tab on the lock washer broken or partially broken many times during the torquing up but you tend not to notice unless you put a witness mark on the lock washer and the housing when you torque up. That way you can see if the internal tab has deformed or broken. Ciao1 point
-
Rolf, on the contrary, I mentioned a very low torque for the nut. This is made particularly confusing because the manual, written in usual, rather vague, Guzzi fashion does mention a very high torque for a nut in the CARC but this is in fact not one of the crownwheel or pinion nuts, (They aren't mentioned because the whole reactive bridge is a non repairable item according to them!) that high torque is in fact for the seal holder which also compresses the outer races of the pinion bearings and seats them.1 point
-
Yes, I believe #93_6 is Meinolf’s latest V11 map.1 point
-
Coming back from Deals Gap one of the bikes in the trailer got loose and fell into my Rosso Corsa. Fortunatly for him my helmet and Ti can broke the fall of his SV sport. Unfortunately for me my helmet and Ti can broke the fall of his bike! I pulled it apart to start the repair and thought it may be of interest to others so I took a few pics of the inside and how the repar went. I thought of the idea after having most of the work done so no pic of the actual damage but there was a large dent from top to bottom on an angle right by the logo. All I did was drill out the rivets and pull the Ti sleeve out and worked it over with a wooden hammer handle on a piece of 2 inch pipe. Some of the dent popped out initially but the crease was still there and I had to work it for a while using armstrong to smooth it out. Its not perfect but you can't tell unless you reallly look for it and rub your hand along the affected area and feel a few ripples. Hal drilling out the rivets all the iside stuff working the sleeve with a hammer handle reinstalling new rivets Done!1 point
-
Excellent! Thanks, I worry about the comment re how thin the TI is. Where the straps meet at the top there is some wear into the can. Must be this there!1 point
-
Here you go, Paul! Cheers, Cliff https://blog.motorcycle.com/2009/10/28/manufacturers/ducati/ducati-welcomes-sex-pistols-guitarist-steve-jones-into-the-family/ https://www.cycleworld.com/talking-motorcycles-music-and-mayhem-with-sex-pistols-guitarist-steve-jones/1 point
-
Thank you. I hope he’s well. The man has been through a lot, and has earned his place.1 point
-
Nah, nothing so sophisticated. They're just a strap with a couple of bend down tangs after the buckle. You wind them down with a tightening tool, ($25 at 'Wottalottacrap Auto') bend the end over 180, snip the excess length off with the tool and then use the tangs to hold the end back at 180. If you want them tighter? Just wind the band around the shaft twice before tightening. Hard to explain. Needs a video.1 point
-
Well yes, and no. The thing is that to tackle it you really need to split the case. Then you need a special peg socket to remove the seal holder and then another peg socket to remove the nut after biffing down the tang on the lock washer. Then you have to replace the lockwasher, apply Loctite to the pinion threads and re-torque the nut to its very low torque figure and lock it. After which you reassemble the CARC. Is it difficult? Not really, but the consequences of getting it wrong will be horribly expensive and there is no published torque figure, (That I know of.) so I just use the industry standard for these sorts of applications. If you don't know what they are and don't have prior experience it can all be a bit fraught and daunting. Put it this way. If you feel you are technically competent and would have no qualms about tackling a major engine or gearbox rebuild then I'd say probably yes, you could safely do it, (Cue someone to say their four year old does them in his cot at night!). If though you find yourself stressed by doing your valve clearances and changing brake pads? I'd probably advise against trying it. Remember, Piaggio won't sell some parts even to their shops, and suggest that the reactive bridge is 'Non Rebuildable' which would seem to indicate that they think that rebuilding one is beyond the Ken of the average shaved ape employed in a 'Box Shop' dealership. Certainly if anybody does undertake it they do so entirely at their own risk and if the whole thing goes 'Udders Skywards' afterwards they have to be willing to wear the consequences of their own actions.1 point
-
Fantastic! Thanks Footgoose. I can make those up easily. All I needed was the 23mm distance. The rest I could get from both brackets. Thanks a bunch!1 point
-
Hey Bob! Glad you made it here.1 point
-
I see I left out one other measurement - the wide set holes. That's the same as your frame mount AND the oem 'low' bracket. I can give more detail if you go that rout and need it.1 point
-
Moderator magic! Images fixed. All you really need to do when posting an image that is hosted (like yours, Pete, on flikr) is right click on the open image and select "copy image location" then paste into your post. Image addresses that begin and end with [img] (BBCode) won't display.1 point
-
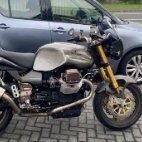
This is the V11 Sport I wish I had bought. Lesson learned - buy the $6k bike with >$10k already spent on it rather than the $3k bike that needs $6k just to get "right". VT4L1 point