

Rolf Halvorsen
-
Posts
121 -
Joined
-
Last visited
-
Days Won
3
Content Type
Profiles
Forums
Events
Gallery
Community Map
Posts posted by Rolf Halvorsen
-
-
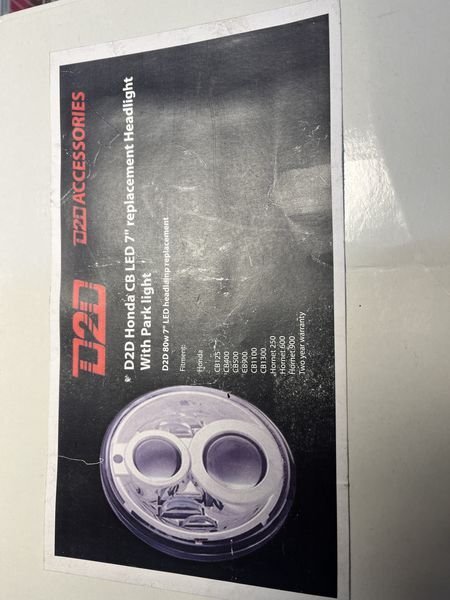
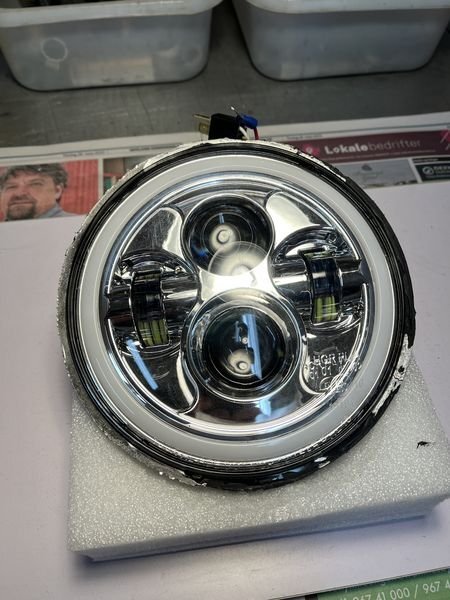
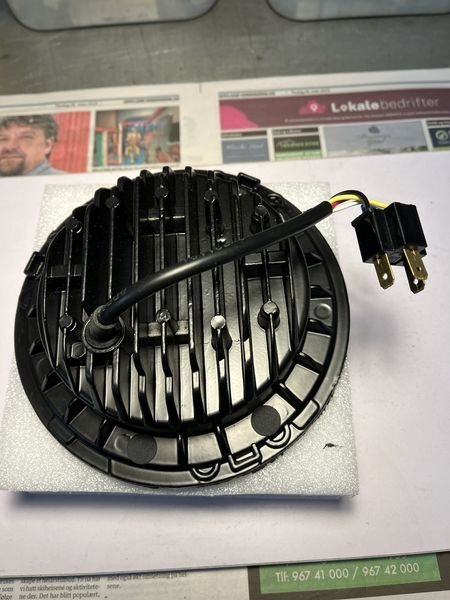
A friend of mine here in Norway bouth this insert for his V11 Sport Rosso Mandello.
He bought it from Australia. Forgetting that they drive (mostly) on the left side of the roads.
After a few days testing - he found out that the light did not work well when driving on the norwegian right sides of the roads.
So this advertisment is mainly for UK and Australia (pluss any other country that drives on the left side of the roads).
Price would be 75 Euros + shipping.
According to the box, it has the following text:
D2D Honda CB LED 7" replacement Headlight with Park light
(Honda: CB125, CB400, CB500, CB900, CB1300, Hornet 250, Hornet 600, Hornet 900)
According to what he paid for it - this price should be very attractive.
-
 1
1
-
-
Scud
You can do it for me if you want.
Rolf
-
 2
2
-
-
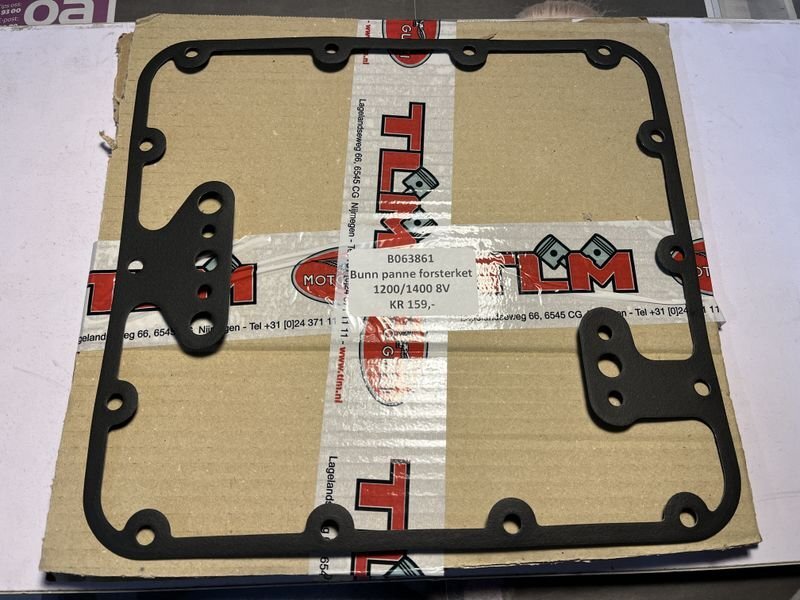
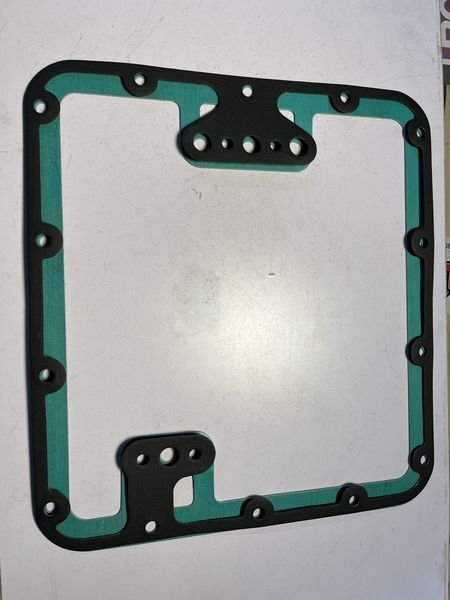
In general - a simple paper gasket between 2 very small surfaces where you have a a varm oil pressure, are not the best choise of materials. A reinforced steel gasket is in my oppinion the better solution.
-
3
-
1
-
-
The 1400 models uses a steel reinforced bottom gasket - to prevent a "blow out" of internal oil - resulting in loss of oil pressure.
This gasket has No: B063861
I will advise this gasket to be used on all big Guzzi's from 1965 and up.
-
1
-
5
-
-
No, @rossoandy, I do not have any more such decals.
-
1
-
-
Yes
-
4
-
1
-
-
-
Pete
I am to purchase the 8V Griso 2010 - which needs the C-kit.
I have found the C-kit in Europe, but price around 1200 GBP.
The B-kit is available for around half this price. Since you informed me that the B-kit can be made to a C-kit - if you purchase some extra parts. Which parts are needed - and can you tell me the article numbers for these parts?
Is it wise to buy the B-kit + the extra parts, or is there any "problems" connected to this?
Rolf
-
Have you destroyed your rotor? I might know of one in Norway that can be for sale, I will have to ask the owner if you are interested.
-
And another small thing: The 4 shims - I have noted article number 487127.
But searching for this number - gives me nothing.
Do I have wrong article number?
-
Pete
My friend has a Griso 2010 without a drill mark - so he needs a C-kit. I understand that the difference between the B and the C kits are the 4 shims + 4 valve caps + 2 intake sealings + 2 exhast sealings.
If you have a B-kit with only 3 shims, I could still be intersted. Anything can be made. I suppose it is a steel shim of a specific thichness - this can me made by a machinist friend of mine. Please send me an offer on my private mailbox: rolf.halvorsen@mail.com
In the meantime I will ask my friend if he would buy yours - or "wait" for an application to the factory to get a free kit.
Regarding the computer stuff you are talking about - I have younger people around me for that "thing". I am 73 and started my hobby with the restoration of a 1923 Ford model T some 45 years ago. Computers is not my favorite.
Swingarm and shock linkage bearings - I understand - and it will be delt with, together with the 2 drains from the air filter box.
Is it more difficult now than before to "find" these A, B, C and D-kits?
Rolf
-
I think my friend needs a C-kit for his Griso 2010 with non floating head. I have an A-kit myself. Lets wait a few days to see whats pops up.
Is it correct that you need to update the software when you put in roller tappets? Someone from a dealer told me this.
Rolf
-
Searching for a C-kit: 1A002082 and maybe also for a B-kit: 1A002063
Anyone - anywhere?
Rolf
(In Norway)
-
The one one my 2005 Coppa Italia seems to be made of aluminium. Use a 6-corners pipe of 20mm (not a 12 corners pipe).
Then you could clean it from the inside. I think pressurized air would do the job. (Not acetone - since that would destroy the window of plastic)
The part number should be 01205730 according to my book.
Rolf
-
2
-
-
Send me a mail (rolf.halvorsen@mail.com) and I will send the picture to you.
Then you can do this for me. (Thats why we have friends.)
-
1
-
-
Please help me. I am too old to know how to increase the picture.
-
 1
1
-
-
12 hours ago, docc said:
The gear that drives the vertical shaft (bottom pointer of #5, is that the helical gear?), is left in my gearbox to spin, but with nothing to engage.
Is it rattling around? Like a blender blade in a margarita mix?


For the 6-speed gearboxes it has a similar locking mechanism. So you can just leave it - it will make no problem for you.
-
2
-
1
-
-
The special wascher are hardened steel waschers of 1,0mm thickness. (You can get them with a magnet)
1,0 + 1,0 = 2,0 (I have bought about 100 of these - so contact me if you need some).
Since the inner and outher diameter are close to identical with a standard 6mm washer - DO NEVER USE ONE OF THEM!
The standard wascher are 1,2mm thick.
1,2 + 1,2 = 2,4
THIS WILL SQUEESE THE AXLE SO THAT IT CANNOT ROTATE!
5- and 6-speed gearboxes uses the same technic, but the axle has different number of tooths.
-
3
-
-
This is a complete kit! A new cable and special adapter is included! This will completely replace the always breaking angel drive!
-
04768300-TLM is the correct number.
-
Article No: 04768300 is the replacement speedo cable. tlm.nl
Rolf
-
1
-
-
Do NOT remove the part on the gearbox.
Remove the thread part on the wrecked angel drive - and put a rubber disc (which you can make yourself) onto the male part on the gearbox - and screw on the female part.
Thereby you seal from water to enter the gearbox.
I hope you understand what I mean.
Teo Lamers (Holland) has a replacement wire that works without the angel drive. I do not have the article number at hand. Maybe tomorrow.
-
2
-
1
-
-
12 hours ago, docc said:
One of the confusions is that the later, black LongFrame, V11 have "extra gearbox support" consisting of tubes from the lower rear subrame to the lower rear of the engine case. Short Frames (RedFarme + Rosso Mandello/black frame) do not have the boss on the engine case to accept the later braced subframe, while later V11 do not have the mounting bracket beneath the spine for the center mounting plate vestigial from the 1990's Sport 1100.
These arm to the engine case will help stabilize the engine from rotating - and thereby reducing the load on the top gearbox fixing point (where the cracking problem has been).
-
On 2/9/2022 at 2:53 AM, Lucky Phil said:
This theory's been mentioned before and I'm not convinced this is the issue. I believe it's a micro crack initiated when the casting cools and is due to the sharp edge at this point and the large cross sectional change which causes a differential cooling rate. The crack then propagates over the miles and heating/cooling cycles. Yours is way worse than mine and well beyond any JBweld temporary solution. You may as well get it properly repaired because the chances of buying a second hand one that already has a latent crack is high. Part of owning an old classic like a V11. You need to do some "engineering" eventually and more often than not on a few different areas.
To effectively repair this you need to chase out the crack with a die grinder and get it welded by someone that knows what they are doing. The idea is to heat the case to around 150 C before the welding starts and in your case half way through the weld repair stop and peen the weld to stress relieve the area and then finish it off and peen the finishing weld. It's not a complex scenario to someone that knows what they are doing.
My gearbox mount showed no signs of any cracking, I just checked it because I'm a physco and knew of the issue. Seems it was a good decision. My original gearbox needs the same done to it as well.
Ciao
What is the different between my theory about the casting prosess that may have been changed - and what you wrote?
-
1
-
Headlamp LED insert for V11 Sport - sale cancelled
in Personal Ads
Posted
The latest information on this lamp is that it is not asymetric - so it can be used on vehicles driving both on the left and the right sides of the road.
The sale is cancelled.
Rolf