Revilo
-
Posts
23 -
Joined
-
Last visited
Content Type
Profiles
Forums
Events
Gallery
Community Map
Everything posted by Revilo
-
Thanks 80cx100. Some sound advice there. I am trawling through eBay, and have been contacting Gutsibits in the UK who have a few of the bits and pieces I need. I have used tlm before, but hadn't thought about them for used parts. Will update when I make progress. It has to be on the back burner for a few weeks. Busy with too many other projects. Cheers
-
Hi fotoguzzi Thanks for the kind offer. I'm one day into this so will look locally (UK) for the parts I need
-
Also, thanks for your tips about the ignition switch. I'll be disassembling and having a look in the next few days.
-
Thanks Audiomick for helping show my image. Im not sure what I did wrong.
-
IMG_9112.HEICIMG_9112.HEIC Hi Folks. I had my 2003 Cafe Sport returned to me today looking somewhat the worse for wear nerving been stolen, and later recovered about 2 months ago. I was offered a sum from the insurance company but chose the buy it back option. Now I have it and see it in the cold light of day I can't help wondering if I've done the right thing. Everything is a bit knocked about, but the real damage seems to be fairly superficial. It's going to need some TLC, and I'm going to need a new head lamp, mirrors, indicators, fuel filler cap, ignition barrel and keys, clip-on bars, levers, L/H switch gear, Seat cover and cowl (bum stop), rear brake pedal, and somehow fix the side stand which has lost the weak lower mounting bolt and the bracket is quite bent out of alignment. If all that is all there is I think I'll have got away lightly! I'd like to keep things fairly original but I'm going to have to keep the costs down. I'd be interested in any spare parts people may have gathering dust, or suggestions(especially about the head lamp and the side stand). I think some parts may be common to some Ducati's of the same vintage. Any thoughts very welcome. Happier days ahead I hope.
-
Ahh. One of those! Thanks for the suggestion. I'll take a good look at it. Looking at the wiring diagram I can see now why that might be the problem. Thanks
-
Hi All. Sorry to be bringing this up again, but I still seem to be having problems with the charging and regulator on my 2003 cafe sport. I have fitted a new Electrosport rectifier/ regulator ESR515. See above. The connectors and wiring are as the OEM unit.On initial fitting I think all was well well, although the battery wasn’t up to the job of cranking the engine in our uk damp and cold winter. Then discovered that the odyssey Pc545 was dated 2009 so figured it was due a replaced so bought a new Motobatt. Now the bike starts easily but alternator / battery, and oil pressure warning lights fail to come on (before starting). Also no head lamp (dip or main). No Tachometer. Using circuit diagram (Thanks go to Carl Allison) I can see that they connect to the reg rec unit but don’t really understand how. Fuses all look good. If I bypass the regulator these functions seem to work. I have tested alternator. Ignition off. battery voltage is 12.93VTick over voltage is 13.47VRises to 13.66V @5000rpmAlternator disconnected reads 0.3 ohms both ways. No continuity between alternator cables and engine casing. Voltage across disconnected alternator wires is. 25V (AC) Rising to 65V So all this suggests to me the alternator and Reg/Rec are working ok. Am I right?But why are the warnings light etc not working too?Can anybody help me here? Thanks for reading
-
Thanks for all your thoughts on this. For what its worth I went with the Electrosport 515 as recommended by Stugnu. I managed to get it for £10.00 less (£120) from M&P here in the UK. Fitted and working well...no more flickering battery light. Thanks for the recommendation. Speedo 60 degree bevel madness next....... I bought a new one from Stein Dinse. It broke within 20miles. Aaaaagh!
-
Thanks TomChri. That may be a good option for me. I'll look into postage costs. The Shindengen 847 look interesting and I suppose not much more than the OEM type products. Thanks for your suggestion.
-
Hi Stewgnu. Good to hear from a local. Thanks for sharing your experience. The Electrosport 515 certainly looks the part, and there seem to be a few others about the same price. (I hadn't come across that particular one) I also found this one from a UK supplier in UK... for £60. Undoubtably Cheneesium as you say but isn't everything else? I guess it's just a case of am I prepared to take the rest. https://www.ebay.co.uk/itm/144650269909?hash=item21add3f4d5:g:TjEAAOSwVD9gSEd5&amdata=enc%3AAQAHAAAAsHW74XlAjp5yf4ZrOfm7ocfYQj%2BWpNL7ulKJKzZI43yIOuugzX4YKGcYLIraWGajAdsBC0w3Yl%2F9%2BgYoXYD3rXFYLf2grEt5gqx9tqENqFgqj4lNXlXseXQYH9p5%2BO1xqv3RkkIkpB6S75AQMjd1rYl1ezOLbxbw3Tq2cw7Rwv8cHT4wEY2Epk2g49Jnf5jjwakr12Gbr1%2FSDtG6eoT1NI1lxwWRIEwJ3v9RNX%2BhlQ9m|tkp%3ABk9SR-a36O7sYA
-
Hi. Thanks Docc and Speedfrog. So my understanding from Docc is that your suggestion for regulator would be a direct replacement, but that you also upgraded the stator as well? I think I will isolate the battery next time I'm charging the battery. Sounds like a sensible precaution. I wonder if any fellow UK siders have found a reliable source?
-
Hi Folks. I seem to have well and truly fried my original voltage regulator. I think because I left the Odyssey battery on charge for too long without disconnecting from the bike. Symptoms were that it ran, but red ignition light was burning very bright, and subsequent testing for continuity suggest it is useless. I know that there has been discussion before but perhaps not for a while so I'm looking for advice in choosing a (not too expensive) alternative to get me back on the road. I've seen cheap eBay options...has anyone any experience of these?or similar?
-
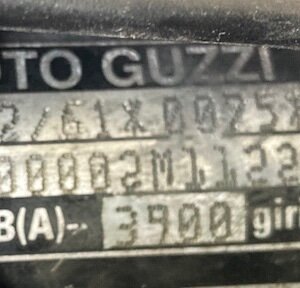
HI Docc. Thanks. From the photo year of manufacture would seem to be 2002..which makes sense given it was first registered in the UK in March 2003. Does this tell me anything else I need to know? Thanks for your interest
-
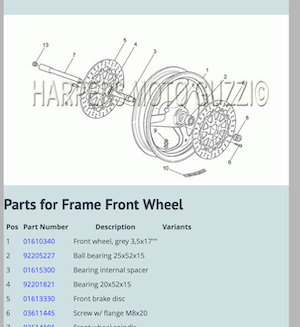
Hello again fellow puzzle solvers. Thanks again for your interest and input. Docc. Yes my bike has a chin pad and white dials. The VIN number on the log book begins ZGUKS000.... which matches the numbers on the headstock. Im not sure how to decode the year of manufacture. The other long number begins e3*92/..... Weegie, LuckyPhil, 80CX100..You all seem to have this right in describing my set up which does fit with the diagram found on the Harpers site ..see above. 20mm bearing on RHS. 25mm on LHS. No nut, but axle spindle threads directly into left leg. Spindle passes through 25 mm drilling in RH fork leg, shoulder of spindle butts up against outer face of RH bearing. through inner sleeve which has an internal diameter of 20mm. and external diameter of 25mm, with a wider shoulder which butts against the inner side of the LH bearing. This inner sleeve protrudes about 13 mm through the LH bearing, the 15mm aluminium (int dia. 25mm) spacer slips over that, and butts up against the outer face of the LH bearing and the inner face of the LH fork leg. Everything tightens together when the spindle is torqued up with the 14mm hex allen key from the right. Two screws on the RH leg lock the spindle. This does seem an odd design to me too, partly because it is possible to assemble things incorrectly, as I have discovered. If I understand it correctly now it perhaps offers the advantage that both bearings inner races are supported on both their inner and outer faces......but the "whats in the parts bin this week?" also seems plausible? I'm just glad to have it all back together...new rubber and bearings, new shock (another story!) improved mud protection, and sundry other detailing points.
-
Hi Folks. Thanks for all your input on this. It was the wrong R/H bearing. Should be 20mm int dia. on right, 25mm on left. Bought one, fitted and ridden. Obvious really. Thank you @Lucky Phil. I think my bike fits your description of for the KS although the engine number is prefixed KR........ I can add that the clip ons are fitted above the triple clamps. But two further points of interest. (to some?) 1. The bike came to me with both, clip ons (in a box) and what look to be MG full handlebars with riser clamps, and the necessary drillings in the top triple clamp which led me to think that my bike is actually a Ballabio, but why the MG marked clip ons?...... I prefer it with the clip ons and but with lowered foot pegs. 2. The rear bevel transmission box is painted Black, but has definite signs of bright red under the black which makes me wonder what's been occuring? First registered in UK in March 2003. 3 former keepers so who actually knows? A few people have suggested that things were in flux at this time at the factory. Feels a bit like it. On the plus side the bike rides well and feels good...so..
-
Hi. Thanks LuckyPhil. Your knowledge of the model range is a lot better than mine. Ive had the bike since 2018 and have no reason to think that the front end is not original, although I do get the sense that some of these bikes were put together with what was in the store. The image from Harpers website is for V 11 LE MANS/SPORT NAKED 1100 2001-2002 https://www.harpermoto.com/parts-lookup/2000-2009-moto-guzzis/v-11-le-mans-sport-naked-1100-2001-2002/front-wheel-en-2-3-4-5-6-7-8-9-10-11-12-13-14-15-16-17-18-19-20-21-22-23-24-25-26-27-28-29-30-31-32-33-34-35-36-37-38-39-40-41-42-43-44-45-46-47/ Interestingly the diagram doesn't show a nut. So my assembly fits with the Harpers image. Curiouser and curiouser.
-
Hi. Thanks for all your thoughts. In the process I think I had thunk it through, and it looks like the (odd) different sized bearings is correct. Just dug a but deeper on Harpers and found this which seems to fit with our combined deductions and what I actually have...no missing spacer pandemic! Down to the local bearing factors in the morning. Will report back and include some images for others who find themselves on this confusing path.
-
I'm now pretty confident its the wrong bearing on the RH side. Will replace it and update this thread.
-
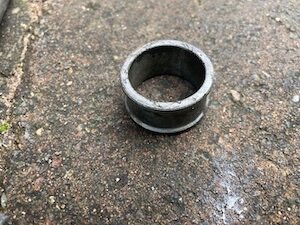
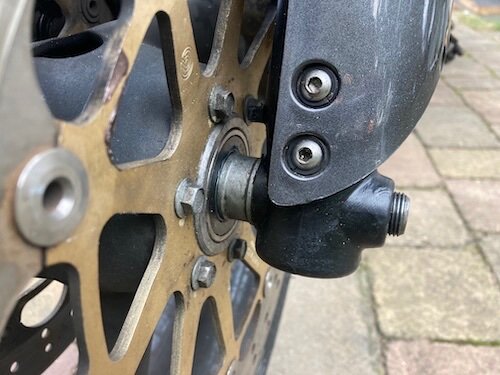
Thanks 80CX100 What you say concurs with my own thinking ie the 25mm shoulder should sit against the outer edge of the RH bearing....if only I'd kept the originals. Here's a photo of the spacer.
-
Oh heck. Next thing we know there'll be a pandemic missing spacers! Stewgnu...maybe. All the diagrams and everything I have seen so far says spacer on the left side. Ill post a clearer pic of my spacer. Thanks Chuck. I've looked at parts manuals that I have access to which don't show a second spacer. I have seen some talk of different sized internal dimensions for the wheel bearings (which seems a strange approach to me, but it would all tighten up properly. That would be a int. diameter of 20mm on the R/H side and 25mm on the L/H side as fitted now. the internal sleeve arrangement making up the difference. I must admit that I didn't check the new ones against the old (now long gone). Idiot. I was handed the new bearings at my last MOT on the understanding that I would fit them straight away! So the guy there may have just assumed a standard size. Thanks for all you thoughts
-
Yes Thanks Gents. Yes Weegie, you analysis of the situation is bang on, and accounts for my confusion over this. The wider part of the axle bolt does indeed screw into the centre of the RHS bearing...so it can't be right the way that it is. Yes. Hoping someone who knows this set up will chip in...
-
Hi. Thanks. The axle bolt is 25mm diameter at the R/H end and 20mm diameter at the left hand side. It threads directly into the left fork leg. The spacer has in internal diameter of 20mm and is about 15mm long, so will fit over the bigger R/H end of the axle, or (as I have it in the photo) over the inner sleeve that fits between the two (new) bearings, and protrudes through the L/H bearing. It is possible that I've mislaid something...or it was never there, but I'm usually pretty careful about stuff like this. Very puzzled. Would love to hear from someone with the same fork arrangement.
-
Hi. New to posting but not to the forum. I have usually found advice and information to help with any issues I have had but this time I’m driving myself bonkers trying to sort out the simplest reassembly of the front wheel spindle. Ive read through tis and several other threads but don't seem to be able to find the complete answer. I have a 2003 cafe sport with black mazocchi forks and a spindle axle that threads directly into the left hand leg (ie no nut) with two clamp bolts on the right hand leg (from the riders point of view).The thing is I can’t see an order of assembly that makes complete sense unless I have mislaid a spacer. There seem to be quite a few different arrangements. Assembling the parts and tightening up as illustrated in the workshop manual results in the spacer seeming to be loose, and the head of the spindle deeper into the fork leg than I remember at disassembly. Can anyone advise me on this? Have I mislaid a second spacer?
-
Hi Steve
I came across your post about paddock stand bobbins, and was interested to see that you have done what I was thinking about doing to my 2003 Cafe Sport. I've had to do quite a bit of work on the way to replacing the rear shock absorber, so have the swing arm out, and now ready for re-assembly.
I'd thought about using/enlarging the hole provided for fixing the hugger/mud-gaurd, but when I look closely I see that this is a bit close to the upper edge of the swing arm. Your pic looks like you've drilled nearer the middle, perhaps closer to the wheel spindle? I'm also wondering if there are any clearance issues on the inside. I'm assuming you used a nut on the inside, or did you find enough metal to tap a thread?
Just hoping I can benefit from your experience to avoid mucking it up. Any advice would be much appreciated.
Best wishes
Oliver
fultonoliver@yahoo.co.uk