kjaj97
-
Posts
12 -
Joined
-
Last visited
kjaj97's Achievements
Rookie (1/5)
0
Reputation
-
13km/l is 30-31 mpg. 1 kilometer/liter (km/l) = 2.352 miles/US gallon (mpg). Unless you ride very aggressively, this fuel consumption indicates that your bike may be set up to run richer that normal. Milage has been discussed in other threads, but I get between 35 and 40 mpg or about 16 km/l with my PCIII
-
I did similar modifications on my V-11 sport and it ran quite lean. I had several signs of a lean mixture - chaulky plugs, pinging, and discolored pipes (although pipes discolor even with a correct mixture). I added a PCIII and played with the map until I was satisfied with how the bike was running. My map (and other V11 PCIII maps) typically have enrichments of 15%-25% at midrange rpms and throttle settings. A few questions for others who know more than I: 1. Did you modify the TPS setting or the fuel pressure to richen the mixture? 2. Does your bike have an oxygen sensor - do all European bikes have O2 sensors? If not, how does the ECU adapt? 3. If the bike does have an oxygen sensor can the ECU actually "learn" and create the 20% enrichments required. From reading other posts I had assumed it cannot. Anyway, I agree with the people at AGOSTINI´s - if it's not broke - don't fix it. If your bike was running lean enough to hole a piston, there would be other indications of a lean mixture.
-
The wiring outlined on the thread below worked for me. I did not have to cut into the harness though?? I think I recall crimping some compatable female connectors onto the Ferracci light wires to make the installation easily reversable. http://www.v11lemans.com/forums/index.php?...erracci++fender By the way if you ride in winter/wet/dirty conditions be prepared for a bunch of crud on the passenger seat and body work surrounding it....the price we pay for a sleek rear end
-
Jason, The use of lightweight aerodynamic foot coverings is often overlooked by performance enthusiasts. I find the 3-4 tenths gained in my commute well worth the slight discomfort and safety compromises.
-
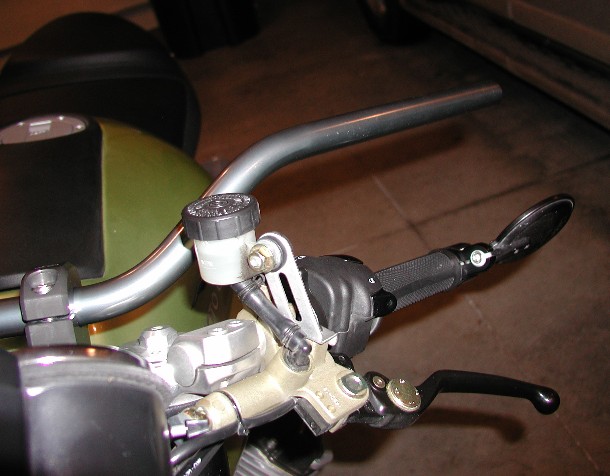
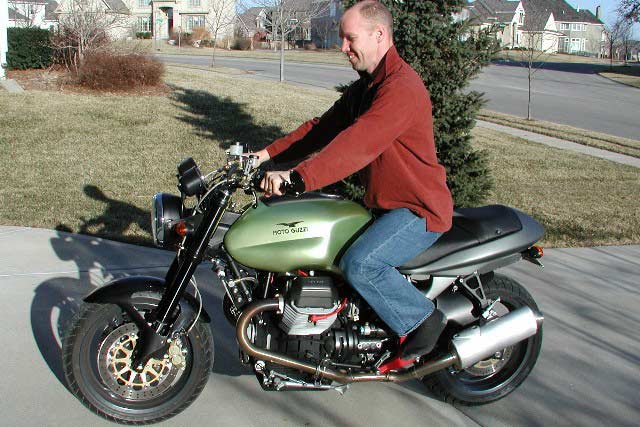
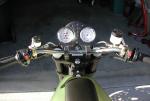
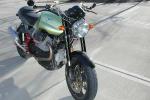
After checking the ergonomics of the Ballabio, I thought for my type of riding (and my less than limber back) I might prefer a more upright riding position than that provided by the stock V11 sport. I was quoted $650 for the Moto Guzzi parts to complete the Ballabio conversion so I put the idea on the back burner until I found a good deal on a set of LSL L02 bars and Oberon long risers on ebay. After the successful transaction, I received the parts in the mail and checked the fit – about 3” to 4” up and about 3” to 4” back. This was a little higher than I wanted, but I had the parts so I plowed forward. Here’s a summary of my project for anyone else considering a similar modification. I’m an amateur mechanic at best so follow these guidelines at your own risk. If anyone recognizes something I’ve done as excessively stupid or dangerous, please let me know and warn others not to do it. 1. I removed the headlight, gages and headlight bracket and discovered the control cable situation. a. Starter, horn, turn signal wiring: all long enough – yes! b. Clutch line: not close, even taking it outside of the headlight bracket – damn! c. Brake line: routing behind the triple clamps has worked for others, but about an inch short for my application. d. Throttle cable: long enough if routed behind the triple clamp. I notched the plastic cable shroud at the front of the fuel tank to avoid any sharp bends. 2. Two 25/64” holes are necessary for mounting the risers in the upper triple clamps. I thought for a moment about drilling these the while the clamp was installed on my bike… and then I figured out where I could find a drill press. It’s important to drill out the cast in bosses in the triple clamp accurately or your new bars will never be straight. The upper triple clamp was a bear to get off, until I lightly tapped a few flat head screwdrivers into the clamp slots to loosen them up. 3. I mounted the risers on the triple clamp using two 1/16” thick relatively stiff rubber washers. The first washer was cut to fill in the depressed area on the triple clamp and the second was cut to match the area of the bottom of riser. The washers allow a reasonably firm attachment to the triple clamp and most likely a slight vibration reduction. They could probably be omitted without problem. 4. For expediency, I elected to have custom hydraulic lines made. a. I used Galfer components since that is what my dealer had. b. The front brake could be a “T’ line similar to stock, a single line with a line connecting the calipers, or a dual line system. I used the dual line system due to its simplicity. There were still several issues: i. My lines ended up being approximately 28” and 30.5” long – not including the banjo fittings. ii. I used to one straight fitting and one 45 deg banjo fitting at the lever because parallel 45’s didn’t fit. iii. I needed extra thick 10 mm crush washers from my local auto parts store because the Galfer double banjo bolt at the brake lever was a little long. iv. I used longer lower headlight bracket mounting bolts with spacers and 3/8” electrical wiring clamps for the brake line guides – see pics. c. The clutch line needed to be about 48” long not including the banjo fittings. The Galfer straight fitting (similar to stock at the slave cylinder end) did not fit (too short to bottom out and seal) so I substituted a 90 deg. Banjo fitting and used the stock front brake banjo bolt. By the way, the clutch cable is a pain to get off. The tank, airbox and shock reservoir all had to be removed. d. It’s a good idea to leave the banjo fittings on the custom Galfer lines a little loose until they are in place. Once they are in place they can be tightened so the orientation is correct. 5. I drilled 3/16” holes for the starter and turn signal control module mounting tabs. Measure twice – drill once. 6. I reamed out the aluminum bars and tapped them with an 18mm tap so the stock bar ends would work. I had to remove the stock rubber pieces from the bar ends and replace these pieces with less thick tubing so the dampers would slide into the new bars. I’ve only ridden about sixty miles with the new bars, so I have not finalized my opinion on the new ergonomics. The riding position is similar to a ZX1200 or a Bandit 1200 - very comfortable. Almost comfortable enough to make my bike feel slower, well maybe not slower but certainly less racy. I’m going to ride a couple hundred more miles before I do anything, but I may change to the LSL L01 bars with slightly less rise and pull back. Then again, the low speed control is improved and if one is inclined toward any hooligan type antics the new set up is ideal with its more dirtbike type layout. After a little acclimation, I may really like the new set up.

-
The OEM mufflers have a lot going on internally. Here are few threads with pictures: http://www.v11lemans.com/forums/index.php?...haust++pictures http://www.v11lemans.com/forums/index.php?...haust++pictures I cut the back 6" off my mufflers in search of the weight and performance benefit of aftermarket cans without the expense. My bike ran well with no other modifications except the modified exhaust, but if you reduce restriction on the intake side (remove the air box lid/pods) you will need to richen the mixture via a PCIII or other means or the bike will run lean. Welcome to the forum! - If you like to tinker with your bike, Ive found the people and information here are invaluable.
-
I agree. Exhaust gas analyzers, dyno’s, and maps are great tuning aids, but the old fashion way works too. Changing the map is much easier that changing jets. Start by adding 5%-10% or so, in the ranges that bike seems lean in. Save your maps and experiment. You can check your plugs or look for excessive exhaust soot too verify that you are not to rich. Use the old “butt dyno” to judge how your bike is running, although calibration of this instrument can be questionable. I opened my airbox and noticed a decrease in performance and possible knocking sounds. I richened my map 5-10% and the performance increased. I tried it again and it was too rich. I will probably get a custom map made when I’m done modifying the bike, but for now I’m happy. I also used the “map compare” function of the PCIII software on the published maps to make sure I was not too far off what others have done. It gives a great graphical comparison that makes it easy to compare maps. Beware of some of the maps on published on guzzitech.com as they seem pretty wacky. I assume they were done with non-standard TPS voltages or some other issue, but Todd at guzzitech would probably know better.
-
I bought my V11 sport at Orange County Motors last summer. I picked it up in person when I was out in California, but I live in Kansas and purchased the bike over the phone. I can vouch for the fact that they delivered my bike in reasonably good condition. Their customer service during my transaction was average, but I was buying one of their "blow-out" specials so their attitude was basically "take it or leave it." Make sure they are shipping an owner's manual and tool kit becuase they were in short supply when I picked up my bike. I have used Allied shipping (a company Orange County Motors has also used) several times and they do a good job inspecting the bike for blemishes when they pick it up. If you are using them as a shipper, you could probably ask that they fax you a copy of the inspection report prior to shipping the bike, although by the time they look at it you will probably be committed. Also, make sure your local dealer will be reasonable about warranty work on a bike delivered from elsewhere. I had some issues with this, but the people at MGUSA were helpful. Good luck and enjoy your bike.
-
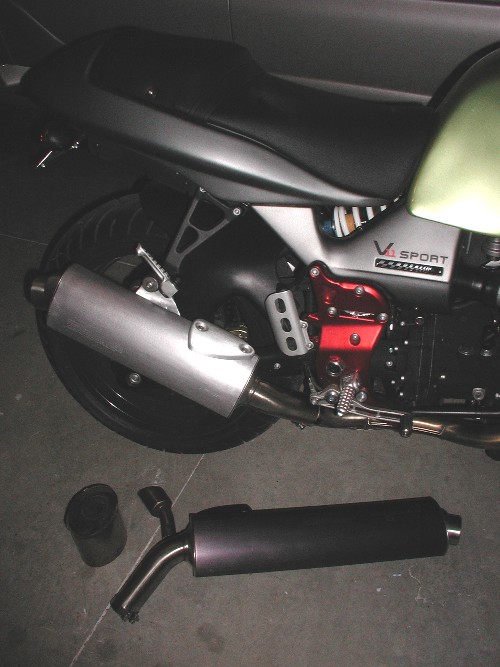
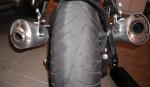
You could just cut 6" off the back of the stock mufflers - durable, reasonably good sounding, less back pressure than stock and cheap. The cut mufflers even end up the about the same size a Staintunes.
-
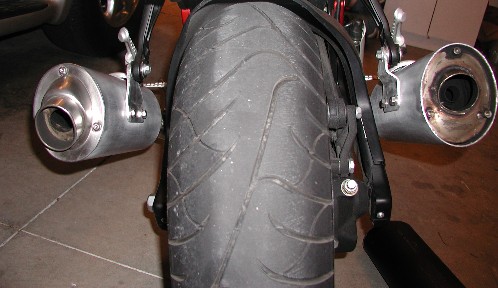
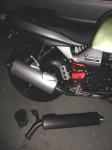
Since Pipe C was my problem, I decided to take the blunt approach - I cut it out. Three cuts were required: 1. Cut the muffler in half just in front of the rear spot welds. 2. Cut the welded rear end cap off behind the weld so the cap can be welded back on. 3. Cut the angled pipe extending out of the cap just ahead of the radius. This is a little tricky and required the use of a cut off wheel as well as the chop saw. By the way – a chop saw makes these cuts pretty easy and fast. Other tools might be more difficult to keep square or slower Then I dumped the rear section of the muffler, had the end cap welded back on to the now shorter cans (easier weld - only $20) cut the aluminum cover to the right length, installed the cover, and bolted the “bolt-on” end caps on. Now the exhaust flows out pipe A and out of the end cap. It has a slight mechanically baffled sound (sort of similar to a Flowmaster) but I like it. One could even tune the exhaust sound by modifying the opening of the bolt on end caps. I ran the bike without the bolt on end caps and it was a little loud, so I left the opening stock. I suppose I could modify one set of end caps and then use the stock ones if I wanted a quieter exhaust. I have not decided whether to leave cans silver, paint them black or polish them to give them that fake Staintune look.
-
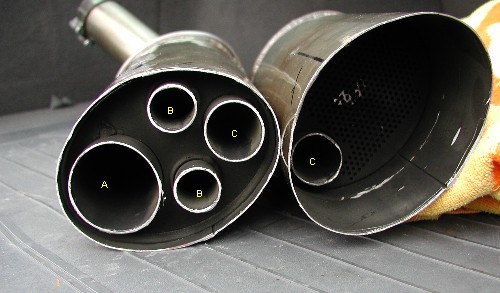
Wanting the improved performance and throatier sound of performance mufflers, but not able to justify the $700-$900 expense, I bought a used pair of mufflers and started to chop. Actually, I spent an hour trying to get the aluminum covers off the stock mufflers (probably the hardest part of the job) and then chopped. I thought about drilling holes in the back wall of the muffler as others have done, but after looking at various pictures (FAQ exhaust thread – thank you al roethlisberger and contributors) I thought modifying the internals might work better. My first attempt (which I hope I can illustrate with a picture below) involved cutting the muffler in half near the middle. The stock muffler is a semi standard design. Exhaust flows into a chamber through a pipe "A", backwards through two pipes"B" into another chamber, and then out through a heavily muffled pipe"C". I removed a section of pipe C (you can see how deep C is in the picture – it was flush with the main cut originally) so the exhaust gas could flow directly from A to C with no back flow. I got the pipes welded back to together at a muffler shop ($40 – a difficult weld due to the thin material) and got ready for aural bliss and high performance. It didn’t work. The exhaust sound was similar to stock with a somewhat annoying back rap on deceleration. I read somewhere that a guy actually designed a performance exhaust system with smaller diameter pipe to get that 50’s sounding back rap. Pipe C is small diameter and heavily muffled so that is what I got. I was ready to trash the whole thing, but then I got another idea – next post

-
I’ve had my V11 sport for 4 months now and I’d like to thank all the contributors to this forum for all the information. This site has been invaluable for someone like me who likes to tinker with bikes. As way of introduction I thought I’d go through my recent motorcycle history: Year 2000, age 34, one kid - another on the way, I sell my Ducati Monster and move from Northern California to Kansas. I’m done with bikes and my wife is happy. 2001, major bike withdrawal, wife relents; I buy the perfect bike for me - a Yamaha R1. Wow, fast bike. A short time later, some kid on a CBR wheelies by me pulling away from a stop light and I find myself going well over 100 mph on a semi residential street. Not wanting to call my wife from jail (or worse) the next weekend, I trade my R1 on a BMW F650GS. The GS is light, nimble and not too fast – the perfect bike for me. Eight months later, I make the mistake of test riding an R1150GS at the BMW dealer. Ah…. torque….good. Shortly thereafter, I “accidentally” purchase an R1150GS on Ebay from a guy in North Carolina. It all works out well and I own the perfect all-around bike for me. Later, I notice that while the 1150 may be the perfect bike to ride to Alaska, it’s a little cumbersome to ride to work. So thinking I’ll make the wife happy, I buy a new Mini Cooper and sell the bike. What was I thinking?! I need a bike. I’m now moving into the cruiser demographic and want something low and cool. But it has got to handle reasonably well – a Yamaha Roadstar Warrior – the perfect bike for me. I do the cruiser thing for a while. I buy new bars and seats in an attempt to make it comfortable, but soon I realize I’ll never be comfortable riding a motorcycle in roughly the same position as a woman getting a gynecological exam. So… back to my youth, a sport bike, but not too radical and with a little more cachet than your typical Honyamakawazuki – a Triumph Speed 4 – the perfect bike for me. Now the Triumph was good (although a little frenetic at 7000 rpm at 75 mph), but I’ve had my eye on the V-11 sport since came out in 2000. A deal came up this year that I couldn’t pass up. Now I can say I truly I have the perfect bike for me. Seriously - really – it is. My wife doesn’t believe me either.