Mr. Bean
-
Posts
193 -
Joined
-
Last visited
Content Type
Profiles
Forums
Events
Gallery
Community Map
Everything posted by Mr. Bean
-
Hi all, So I pulled the trigger on a purchase of a new Aprilia Mana. I first saw this bike at the International Motorcycle Show last December and it stole the show for me. Spent a very busy winter looking up everything I could on it when I got a chance and finally took one for a test ride at Moto International. As much as I like the Ballabio, the Mana is going to be a much better bike for my typical commuting in rush hour around here. Unfortunately I just don't get to go out and ride in the mountains much anymore...only once all last year. So if you or someone you know has been looking for a good, well sorted Ballabio, there will soon be one at Moto International. I took the Hepco and Becker bags and rack off to sell separately but otherwise it is equipped with Hyperpro springs and rear shock, Mistral crossover, PCIII with custom map. It only has about 15K on it's original odometer. I'll still be lurking about here once in a while, but wanted to thank everyone who answered my questions and gave advice over the last few years with this bike. This is a great forum! Randy
-
Not sure about the 2000 model forks...I believe those are different from my 04 model ones. Mine did require spacers. Originally I simply matched the same length as the spring / spacer combo that was stock. Since that time...and the above posting, I have added about 20 mm more to the spacers to get it just where I wanted it. I should add that to the steps above...if I get a few moments I will. Randy
-
A lot of us have had the same thing...I solved it by placing small pieces of rubber between the fairing and the headlight ring. See the topic here: http://www.v11lemans.com/forums/index.php?...&hl=fairing Randy
-
I don't know about everyone else here...but I ALWAYS crack my throttle open 1/8 to 1/4 inch whenever I start mine, warm or cold and it fires right away everytime. Not sure if I'm reading your statement above right..but you might give that a try? Randy
-
I suspect there won't be a specific length spec'd for the adjustment rod. When you use the white knob of the left side to synchronize the throttle bodies, you are effectively changing the length of the rod to do it. One side is fixed and turning the screw adjusts the rod left or right changing it's length relative to the other end where it connects to the other throttle body. Randy
-
Thanks for adding in the details Dave. At the risk of adding to the nine pages my only quible with the above would be your added step 4 point 1. By balancing the TB's under step 3 at 1800 rpm and only 1800 rpm with the bleed screws open, you are already taking them into account with the balancing. If you adjust the bleed screws at this later point, would you not be offsetting the balance you have already done? R
-
It requires the use of either the Axone or the much more reasonably priced VDSTS software from TechnoResearch. GuzziTech sells it.
-
The bike was a stock Ballabio when I first tried his tuning method. Now it has a Mistral crossover on it, otherwise it is still a stock drivetrain. I used the same tuning procedure both before and after with the same excellent results. I have not noticed any substantial change with the new crossover, just some better sound, better torque, same mileage. Randy
-
Tom, The idle trim requires the use of the VDSTS software or I assume an Axone would work as well. If you have a dealer close by, it should not cost too much to just have them set it. Or maybe someone else close by has the software? You can get it from Guzzitech as well...not too expensive compared to other accessories or tools and I think it is indespensible. Randy
-
After trying different things I assumed this was the case on my bike as well. I went so far as to slip the boot off the TB and look to make sure it was closed. It was actually very clean, just some oil buildup that I wiped off and the choke wasn't interfering. (I completely disengaged it.) Not sure if my bike is just a unique "Monday" bike or what...but the behavior I was getting was as follows: If I set the TPS to 150 with throttle closed and everything disconnected, and the bleeds open 1/2 turn, I would have to set my idle to 2.6 degrees to keep 1050 to 1100 rpm at idle. This resulted in a very "rough" take off from a stop and poor idling speed variation with temperature. It was difficult to ride the bike in commuting traffic. The bike also was very buzzy at higher RPMs. (A "buzziness" that I could not get rid off with synch adjustments) I also got a lot of pinging north of 4000 RPM. If I adjusted the TPS to 3.4 to 3.6 degrees, I had to completely close the bleed screws in order to obtain a 1100 rpm idle. The bike ran better at higher RPMs but was even worse taking off from a stop or at low RPMs and the idle speed was even more varied with temperature. My mileage with these settings varied from the low to mid 30's. With the settings recommended by MI, I find I have a very stable idle speed in all weather conditions, the bike is very easy to ride smoothly in slow traffic and there are no more hiccups in the 3000 rpm range. I also don't get near as much pinging anymore...now it just limited to really whacking open the throttle in the 3500 to 4000 rpm range (something I probably shouldn't do anyway! ) The bike is also much smoother in the higher RPM ranges...not nearly as buzzy. What is curious is that this all sounds as if it is running much richer. What is odd is that my plugs are cleaner and my mileage is up to the high 30's now in my normal mixed commute riding. I hate to mess with it now that it is running so well, but is there an easy way to test the TPS? I can't think of any other component that could cause the variations that I get besides the TPS. Randy
-
I had the same problem you have...I was constantly chasing one setting or the other trying to get everything close but never could get the bike to run the way it should using the settings from the book. I know it goes against the method pinned on this site for how to set the tuning settings but may I suggest you try something completely different? I learned the following method from Micha at Moto International. Step one - Set your valves to world settings Step two - Set your bleed screws to open 1 full turn Step three - Synch throttle bodies at just off idle (around 1800 rpm) Step four - Set idle to 1100 using left idle screw adjuster only Step five - Set TPS to 3.6 degrees (I forget what that translates to in mv..someone here will know) Step six - Ensure idle trim is set to zero These settings made my bike run like I expect the factory wanted it to run. No more coughing, excessive vibrations at speed, or unstable idle speeds. It honestly was like night and day! Randy
-
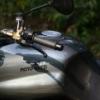
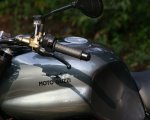
I decided to replace the fork springs in the Ballabio for something better matched to my weight and our wonderful NW roads. After checking around, I settled on the Hyperpro forks springs from GuzziTech. Todd asked me if I wouldn’t mind writing up some instructions with some pictures…so here we go! The Hyperpro springs are not drop-in replacements for the 43mm Marz forks. In fact, when they first arrived, I assumed they sent the wrong ones. The instructions referred to features and settings from the earlier 40mm Marz forks. Todd assured me they were correct and that they used the same springs for both the earlier and later models. They simply required a bit of additional work to install. As you can see in the picture below, the new springs were not the same overall length as the stock spring with it’s stock spacer. Also, the diameter of the new spring did not match that of the old one. The stock spring is tapered over it’s full length. From the bottom where it mates with the spacer it is 1.5 inches in outside diameter to the top where it nestles into a groove in the fork cap it is 1.3 inches. The new Hyperpro springs were an even 1.4 inches outside diameter end to end. Because of this, they did not correctly match either the spacer at the bottom or the cap at the top. I acquired some special 1.5 inch outside / 1 inch inside diameter washers from our friends at McMaster-Carr to provide a better mating surface for the spring to rest against the spacer. For the top where the spring meets the fork cap, Todd recommended I place a 5/8 inch washer on the cap to provide a flat area for the spring to rest against. As you can see in the picture below, the stock spring is designed to fit on the flat surface just inside the outer lip. The washer provides a flat surface for the spring to rest against. Once I completed the build using the washer though, I discovered that I lost all but three turns of preload adjustability. As you turn the preload adjuster, it pushes the hexagonal spring mating surface down against the spring. With the washer in place, it could only go down until the washer hit the jamb nut holding the fork cap in place. The regular amount of adjustability for the preload on these forks is 15 turns. I was not willing to lose that much adjusting ability so I looked for another option. I figured that if I could remove the “lip” around the outer edge of the preload adjuster the new spring would have flat surface to rest against…and…the adjuster would be able to slide down past the jamb nut as it is designed to do. The metal that it is made out of is a very light and soft aluminum. Some quick work with a metal file and then a parts washer had the lip filed down flush with the mating surface. So with that information behind us…the actual steps involved are: Steps: 1) Back both the Pre-Load and the Rebound adjusters fully. 2) Loosen the fork caps while the tubes were still in the triple tree. 3) Remove the brake calipers and hang them up from the oil cooler mounts using small bungee cords or similar. 4) Remove the mudguard. 5) Remove the wheel, noting where the spacer fits first. 6) Loosen the triple tree screws and slide the fork tubes out. 7) Block up the tubes from below and place a 19mm wrench on the jamb nut. Using the preload adjuster on the top of the fork cap, spin the cap off. 8) Pull out the rebound adjuster rod from the center of the assembly and set it aside. 9) Remove the stock spring. 10) Tip the tube over to pour out the old oil. Watch out, as the spacer that sits below the spring will slide out as well. Pump as much of the old oil out as you can by pumping the internal rod assembly as you keep the tube tipped over. I also left mine upside down in a pan while it was leaned in corner for a while to get more out. 11) Measure the length of the stock spring and spacer and compare with new spring. The difference is what you need to cut the old spacer down to. Be sure to include the thickness of the washer that goes between the spacer and spring in your calculation. 12) File down the lip flush to preload surface on the fork cap. Thoroughly clean the entire fork cap assembly afterward using a parts washer if you have access to one, or a lot of metal parts cleaner. 13) Hold the fork tube vertical in a vise and block up the bottom fully. Fill the tube with your choice of folk oil or synthetic. I just used the 10 weight oil that came with the springs. After putting few hundred ml of oil in the tube, be sure to purge all air out by pumping the internal rod until it moves smoothly through its full travel and no more air is bubbling out. 14) Top off the tube with oil using the air-gap method. For me, Todd recommended 125mm of air gap for my 180lb weight with full gear on. Others recommend 100mm for average build. Go with what you think…it’s easy to add more later if needed. One thing you do not want to do is use the Guzzi recommended 400 ml. Doing this will likely result in a different air-gap for each fork leg. 15) Once you have to correct amount of oil in the tube, slide the spacer down along with the washer on top of it. 16) Slide the new spring down into the tube with the progressive (close-ratio coils) toward the top. 17) Place the rebound adjuster rod back into the center of the tube. 18) Screw the fork cap back onto the assembly and tighten down against the jam nut. 19) Remove the tube from the vise and screw the fork cap back down onto the tube. 20) Repeat Steps 17 thru 19 with the other fork tube. 21) Insert both fork tubes back into the triple trees. Hyperpro recommends raising the tubes 10mm in the triple trees. On my bike keeping them at the stock 22mm above the triple trees kept the ride height exactly the same as before. 22) To keep from causing binding and increased stiction, you must assemble the forks in the proper order. a. Lower Triple clamp b. Upper Triple clamp c. Axle Spindle nut d. Bounce the suspension a few times to center everything. e. Axle spindle pinch bolts f. Fender assembly g. Brake calipers. 23) Tighten the fork caps back up. 24) Set your sag to where you want it. I set mine to 32mm laden. (There is a ton of info on this site detailing the correct setting of laden and unladen suspension sag. I won't go into any detail here.) Hopefully this will helpful to anyone looking to install these springs on the later forks. It is actually quite straightforward once I got past the early confusion. The benefits are definitely worth it! It is like a new bike now! Randy
-
Thanks for the offer Greg ! I'm good though. I think i'm going to use this opportunity to get the whole suspension upgraded with a new proper shock in the back and springs for my weight in the front. I'll be out of town for a period of time anyway while I'm waiting for the parts so I won't miss too much quality riding time. R
-
That is great idea...It would be nice to do something with front at the same time and end up with a complete package rather than just a part replacement. If I could fit it all into the same budget that may be the way to go. I found myself in this same situation with the original Sachs. I first played with the settings a lot until I got them where I wanted them...(or as close as I could get with stock equipment)...and then have pretty much left them alone for the last 10K or so. Thanks for the feedback y'all...keep it coming...especially if anyone has any experience with the HyperPro shocks? Randy
-
Hello all, Looking for opinions here. The perfect dual-sport environment that Seattle calls it's streets have taken their toll on my rear shock. It has died leaving a nice puddle on the garage floor. I spoke to M.I. and they recommended GP Suspension down in Portland for a rebuild. I talked to them today and they advised they cannot get parts for Sachs anymore. Firstly, does anyone know who might still work on these things for a reasonable price? As I'm also looking for a replacement.... Any feedback good, bad, or indifferent on the Wilbers 640 or 641? Is there a real-world advantage to the $300 remote compression adjustment? Does anyone have experience with the Hyperpro 30 or 31? Apparently they are very similar to the Wilbers. Any other good options for a drop in replacement? Ohlins sound nice but I'm not sure I want to spend that much...looking more for the value end of the range of options. All ideas welcome! Randy
-
I am swamped for the next couple weekends...but I gotta admit this has my curiosity peaked. I will try and get a few moments in the next couple weeks to disconnect everything and close the butterfly fully and see what it shows. I remember when I was doing the procedure I thought about doing it then just to see, but never got around to it. Does anyone know what the effect the TPS has on ignition timing? I assume as we back it off it retards the timing and advancing the TPS in turn advances the timing? One of the items I always fought on my bike was pinging...especially in the 3500 to 5000 rpm range. I've tried to resolve it with a PCIII even going as high as +35 or 40 on the map in those areas to no avail. I began to believe that my timing was more the cause than mixture. Before when my idle would show around 525mv I could not get the bike to stop pinging in that rpm range. Now with the current setting it doesn't ping anymore...I assume because the timing is now retarded from where it was before? Randy
-
That is exactly what I did based on what MI told me. They don't use the 150mv starting point. They had me set all the engine parameters to what they said. Bleeds to 1 turn open, idle at 1050 +- 50, balanced at 1800 to 2000rpm and THEN set the TPS to 3.6 deg. Which he said would be around 485mv. Mine was spot on this when I tested it. (Well actually it read 483mv...but very close anyway.) On my bike I could never get the "stock factory settings to work at all. If I set my TPS to 150mv with everything disconnected, then hooked everything up and tried to set the idle to 1050 and the TPS to 525mv...my bleed screws would have to be all the way closed! I tried it a number of times changing and tweaking things to get all the "suggested" factory parameters to work. Nothing worked well for me until I did it Micha's way. Finally I have a bike with a stable idle speed regardless of temperature and FINALLY it doesn't ping anymore under hard acceleration. It is also much smoother taking off from a standing start than before. Given that...I'll keep the 485mv setting! But of course your mileage may vary. I may have a wonky TPS for all I know. Randy
-
Good question...Only passing along what I've been told, is that the bypass screws provide a reliable method of allowing a fixed amount of air at idle. It is more reliable for the majority of air needed at idle because it is not as subject to variances in things like temp and pressure as the multi-part mechanical throttle linkage assembly is. I used to keep my by-pass screws open 1/2 turn per the Guzzi manual. My idle speed now is MUCH more consistent regardless of engine temperature or weather with them open 1 full turn. Before, my idle speed could vary anywhere from 950 to 1200 rpms depending on how I was riding...cold weather, stuck in heavy traffic, cruising along and coming to stop, etc. Now it is very consistent at around 1150. The guys at MI told me that setting the TB balance at around 1800 rpm is much more accurate than above 3000 rpm. They said that at higher rpms, the balance is effected more by basic combustion chamber properties and the like than the throttle flaps themselves. My own deduction in this (take it for what it costs..nothing!) is that the percentage difference in each opening causes way more effect when they are each just barely open than they do when they are open more. For example, a variation of 1/2 mm between them is very noticeable when each is only open 1mm, versus the same 1/2 mm variation when each is open 20mm. I used to set my balance at between 3000-4000rpm. At take off from a standing start, the engine wasn't very smooth until the rpm's got up to around 2500 or more. Now with the TB's balanced at 1800, it is very smooth at 2000 to 2500 without losing any smoothness at the 3000-4000 range. I also screw in the right set screw just to the point where it touches the plate to "take the load" of the linkage. Probably doesn't really accomplish anything for the linkage since anytime the throttle is opened at all, the full "weight" of the right side is being born by the linkage anyway...but it makes me feel better . On my bike, it also doesn't do anything for the balance at idle either since my right TB would need to be backed off a bit to be perfect at idle..not advanced. I assume each bike would be slight different in this case since these are all essentially handmade parts on a handmade bike. I tried to compensate for this very slight misbalance at idle with the bypass screws but then I had to readjust the linkage rod for the critical 1800 rpm balance...which had the effect of eliminating the effect of the bypass screw....this is how I end up chasing my tail if I start messing with the bypass screws. Again...I can't take credit for this procedure, but after trying many different tuning methods I felt the need to talk the folks at the dealer...this is what they do and it sure works the best of anything I've tried before on my 04 model. Randy
-
Mine has never lined up like the list you posted. It was one of things that always confused me when I was trying to tune my bike according to settings like this. When I spoke to the folks at MI, they told me 3.6 degrees should be around 485ish. On my bike it is right at that. I thought it sounded too low also, so I tested it after I set it to 3.6. Now I jut use the software and ignore the mv settings altogether. I've noticed in looking thru various manuals...even the ones from Guzzi that they specify different degree settings for idle. Anywhere from 3.2 to 3.8 depending on which manual I'm looking at. I'm guessing that there must be different CPU versions...not sure though Randy
-
Hubert, By opening the bypass screws BEFORE balancing the TB's you are taking any mismatch into account. If you open them up afterward now your balance can be off as you mentioned. As I have understood, and found in my own tuning, using the bypass screws AND the TB synch knob to get a balance can result in chasing one's tail to get it balanced across various RPM's. If one uses the bypass screws only for the purpose of allowing a fixed amount of air past at idle to match a given mixture setting on the CPU to get a given A/F ratio...then one can eliminate them from the TB balance equation. By only using the TB balance knob to control balance it makes it easier to separate each issue. Again, I admit it is different from some procedures but it sure worked on my bike. YMMV Randy
-
Michael, The balance of the TB's is directly related to the synch rod between the TB's. You'll notice that the throttle only directly controls the left TB. The right TB is driven by the synch rod so all the synchronization between the TB's is controlled only by this. Once you set the bypass screws to 1 turn out (the ones beneath the TB that use a flat blade screwdriver) leave them alone. Then I back the right set screw off a bit since it really does nothing on my bike once the synch rod is set right. I move the left set screw to get an idle around 1000 or so enough to keep the engine running is all...doesn't matter since it is not related at all to TB balance. Then using the throttle, I rev the engine up and hold it around 1800 to 2000 and see where my balance is on my TwinMax. I adjust the white knob until the TB's are balanced. I don't do it any higher than that. Micha told me that at higher revs you are not accomplishing anything by trying to get a balance with the TB's adjustment rod. At this point I simply use the left set screw to bump my idle to where I want it. 1100 +/- 50 RPM. The right set screw is not touching the throttle plate at all. If you want, you can use the right screw to try and get perfect at-idle balance since the moment you touch the throttle it is lifting off of both set screws anyway. Just don't touch the left one anymore OR the white knob! Then when I have the idle speed right, I loosen the TPS and set it to 3.6 degrees...or roughly 485mv. The idle mixture is adjusted via the computer. I use the VDST software from TechnoResearch to do that. Hope this helps. Randy
-
My Ballabio is stock and the only way I ever found to get it to run right was a method told to me by Micha at Moto International. It is somewhat basakwards from the manual and the normal procedures I've found on this and other sites but it sure does work. Step 1) Set valves to world specs. 2) Open bleed screws 1 turn out 3) Synch TB's at just off idle. Approx 1800 to 2000 rpm 4) Set idle to 1100 +/- 50 rpm using the set screws 5) NOW, and only now, set the TPS to 3.6 degrees (485 mv) 6) Set fuel trim to 0 My bike has never run better. I have a PCIII but I have a zero map loaded on it right now. I'm still going to get a dyno map built someday just to see, but I tell you those guys at MI know their stuff. Randy
-
Greg, Where did you go to have the mapping done? Randy
-
Ahhh yes. Battery Street tunnel? I hate that thing! I cannot get used to the bike squirming around so much as I'm leaned over going into or out of there. I always feel like I'm hitting a patch of oil or grease that I can't see. Maybe I'll go with the Metzelers next time too.