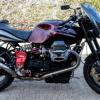
BLIGHT Posted June 16, 2017 Author Share Posted June 16, 2017 Hello! Did a rear 'fender-ectomy' today at lunchtime. Not all that difficult.... I removed the unnecessary parts, and used the steel hanger to mount an aftermarket LED cat-eye tail light and plate holder. I bent the steel tabs on the hanger slightly to tilt the light and plate holder assy. about 15 deg. Soldered the wires for running, ground and brake circuits and shrink-wrapped 'em. Looks much better to me anyway... I have some small but bright LED turn-signals on the way and will use the other 2 tabs on the steel hanger for mounting them. They should be here in a couple of days. These are poor indoor cell phone pics.... I'll drag it outside after I get the turn signals mounted & wired for some better photos. By the way, nothing at all was cut.... large parts just removed and new lamp bolted in place. Link to comment Share on other sites More sharing options...
Chuck Posted June 16, 2017 Share Posted June 16, 2017 By the way, nothing at all was cut.... large parts just removed and new lamp bolted in place. Attaboy. I was laying in a hospital bed near death.. when the Kid says, "haven't you been looking for a Monza for years? There's one on ebay that appears to be original if you really look." It had bags and a rack on it, but no holes had been drilled to do that.. If it had been cut up, I'd never have looked at it. Link to comment Share on other sites More sharing options...
footgoose Posted June 17, 2017 Share Posted June 17, 2017 that bright red is awesome Italiano. The orig "grape" does not look the best with the 2 tone, but on it's own... the entire bike... that color is gorgeous imo. The cans are nice but I'd do reverse cones instead of the slash cuts. But.. it's not my bleeding bike, is it? Great job btw. Enthusiasm is fun! I'm with Chuck... "bolt on" is good! Link to comment Share on other sites More sharing options...
Scud Posted June 17, 2017 Share Posted June 17, 2017 Looking forward to the project. I also found the bright rear brake master cylinder guard distracting (over the black drivetrain). I dealt with it by powdercoating it flat black. I like the small carbon fiber rear fender by Ghezz-Brian (they also sell belly pans if that interests you). Not everybody likes that fender, though. Here's a thread about it: http://www.v11lemans.com/forums/index.php?showtopic=18833 Short term plans are to paint it 'Guards Red' (Porsche color) which is a bit 'redder' than the Corsa red, according to my paint guru. I bought an ebay V11 tank that was all scratched-up... already stripped it and primed it... ready for paint. (gold-black emblems) I will keep the OEM 'grape Jelly-Belly' tank unless someone here wants it or put it up on ebay. After removing and painting the remaining bodywork it will look something like this, in this somewhat-poorly photo-edited image: (please visually-omit the plastic swingarm cover and heel guard over rear master cylinder) BLIGHT Hmm... all that darkening reminds me of something. How about some black passenger pegs, foot levers, alternator cover, fluid reservoirs... welcome to the dark and slippery slope. Link to comment Share on other sites More sharing options...
footgoose Posted June 17, 2017 Share Posted June 17, 2017 Looking forward to the project. I also found the bright rear brake master cylinder guard distracting (over the black drivetrain). I dealt with it by powdercoating it flat black. I like the small carbon fiber rear fender by Ghezz-Brian (they also sell belly pans if that interests you). Not everybody likes that fender, though. Here's a thread about it: http://www.v11lemans.com/forums/index.php?showtopic=18833 Short term plans are to paint it 'Guards Red' (Porsche color) which is a bit 'redder' than the Corsa red, according to my paint guru. I bought an ebay V11 tank that was all scratched-up... already stripped it and primed it... ready for paint. (gold-black emblems) I will keep the OEM 'grape Jelly-Belly' tank unless someone here wants it or put it up on ebay. After removing and painting the remaining bodywork it will look something like this, in this somewhat-poorly photo-edited image: (please visually-omit the plastic swingarm cover and heel guard over rear master cylinder) BLIGHT Hmm... all that darkening reminds me of something. How about some black passenger pegs, foot levers, alternator cover, fluid reservoirs... welcome to the dark and slippery slope. Hmmmm.... "Black Chrome" mufflers?? Link to comment Share on other sites More sharing options...
BLIGHT Posted June 17, 2017 Author Share Posted June 17, 2017 I wish the rear seat-cowl fit the seat better.... the gaps are pretty large and uneven just about everywhere. It's like the seat foam is too fat and the cowl is being pushed outward in several directions. I'm just used to motorcycle seat-cowls fitting like a glove... do I need to trim the foam under the vinyl to let it sit down where it belongs? Electric 'turkey-carving' knife is good for this sort of foam carving work... done it before. My plan is to paint the 'seat fairing' and the seat cowl Guards Red, and I want the look to be seamless. BLIGHT Link to comment Share on other sites More sharing options...
BLIGHT Posted June 17, 2017 Author Share Posted June 17, 2017 that bright red is awesome Italiano. The orig "grape" does not look the best with the 2 tone, but on it's own... the entire bike... that color is gorgeous imo. The cans are nice but I'd do reverse cones instead of the slash cuts. But.. it's not my bleeding bike, is it? Great job btw. Enthusiasm is fun! I'm with Chuck... "bolt on" is good! Cheers.... I feel standard rev-cones are a bit 'over done' these days in customizing (by me especially!) I have them on 4 of my bikes, and while I love the look, wanted to try a bit of a different look in the 'manger'.... They will 'grow' on you, I'm sure... if not, then see your post above, re: 'bleeding' BLIGHT Link to comment Share on other sites More sharing options...
footgoose Posted June 17, 2017 Share Posted June 17, 2017 I wish the rear seat-cowl fit the seat better.... the gaps are pretty large and uneven just about everywhere. It's like the seat foam is too fat and the cowl is being pushed outward in several directions. I'm just used to motorcycle seat-cowls fitting like a glove... do I need to trim the foam under the vinyl to let it sit down where it belongs? Electric 'turkey-carving' knife is good for this sort of foam carving work... done it before. My plan is to paint the 'seat fairing' and the seat cowl Guards Red, and I want the look to be seamless. BLIGHT First try adjusting the seat latch. It's hard to explain but you'll figure it out when you dig into it. The seat can be made to "snug down" tighter into it's place with some fiddling. Link to comment Share on other sites More sharing options...
BLIGHT Posted June 17, 2017 Author Share Posted June 17, 2017 Looking forward to the project. I also found the bright rear brake master cylinder guard distracting (over the black drivetrain). I dealt with it by powdercoating it flat black. I like the small carbon fiber rear fender by Ghezz-Brian (they also sell belly pans if that interests you). Not everybody likes that fender, though. Here's a thread about it: http://www.v11lemans.com/forums/index.php?showtopic=18833 Short term plans are to paint it 'Guards Red' (Porsche color) which is a bit 'redder' than the Corsa red, according to my paint guru. I bought an ebay V11 tank that was all scratched-up... already stripped it and primed it... ready for paint. (gold-black emblems) I will keep the OEM 'grape Jelly-Belly' tank unless someone here wants it or put it up on ebay. After removing and painting the remaining bodywork it will look something like this, in this somewhat-poorly photo-edited image: (please visually-omit the plastic swingarm cover and heel guard over rear master cylinder) BLIGHT Hmm... all that darkening reminds me of something. How about some black passenger pegs, foot levers, alternator cover, fluid reservoirs... welcome to the dark and slippery slope. I do like to 'black out' things I don't like to see on all of my projects... the passenger pegs will definitely be sprayed with satin black 'Plasti-Dip'. It's durable, but future owner can remove it with some persistent peeling if needed. My Harley XR1200 engine cases are now pretty well blacked-out in wrinkle black... it had acres of bead-blasted silver alloy in the engine bay as a stocker... ayeeee... too much! Naturally, I left the finned barrels and rocker covers in the alloy finish... gee, kinda like the V11!! I also typically leave chrome or silver bolts alone, as I like the look of fasteners contrasting against the black. BLIGHT Link to comment Share on other sites More sharing options...
BLIGHT Posted June 18, 2017 Author Share Posted June 18, 2017 I fixed the seat rear-cowl gaps in two ways: First, the seat wasn't latching on the 2 steel hooks 100%. It was hitting the over-stuffed tool kit tray! I removed the plastic tray and just laid the tool pouch on the flat area under it, and laid the PCIII next to it, snugly. Second, I removed the rear-most 10 upholstery staples and peeled back the seat vinyl to expose the foam. I took a 100 grit sandpaper sponge block to the foam and slightly dropped the profile at the rear of the foam and along the rear edge. Didn't take off a whole lot, and was careful to smooth it as to be undetectable. Pulled the vinyl back snugly and re-stapled the seat cover on the underside. Looks OEM, but the plastic cowl now fits a lot better! I think now after it's painted all the same color it will look more 'pulled-together'. My grey rear 'seat fairing' is scratched and chipped by PO, so it needs paint anyway. BLIGHT Link to comment Share on other sites More sharing options...
BLIGHT Posted June 19, 2017 Author Share Posted June 19, 2017 Hi guys, I got the poor running and starting issues fixed too, at least it's wayyyy better. Turns out the PCIII installed by the P.O. had no map installed. I would guess that pretty much lets it run thru the OEM ECU without any changes. Since it has very free flow pipes, there was that common flat spot-cutting out at part-throttle midrange. I downloaded the M706-002 map for a '2001 V11 with stock crossover and Mistral pipes'. It now runs great, and feels every bit as fast as my XR1200... maybe even faster than the Harley! The HD is a long-stroke engine, (stroke longer than bore mm) so naturally makes a lot of low and midrange torque, and feels deceptively more powerful in normal street riding. The XR1200 does have a relatively high redline for a Harley (7000 rpm) so it makes pretty good max. power too. With the new map, gone is that stumble on the V11, now it makes good power all thru the powerband to redline... starts easier too. I was cruising on Hwy. 1 thru Monterey yesterday at 70-75 and amazed it was turning 4000 rpm in top gear! Seems high for a big twin to run that fast at California cruising speed, but I hear these motors are robust. The V11 by contrast to the Harley is a 'short-stroke' engine (stroke shorter than bore mm) so you would expect it to rev higher, and make less low and mid-range torque, but still producing a high max hp number. Horsepower, after all, is the amount of torque delivered at a given rpm. I'm much happier with the V11 Sport now!!... it was a disappointing 1st ride. It felt like an old Honda 450 power-wise... maybe 45 hp? Feels more like 80 or 90 hp now... it's great fun, and that is a great transmission too.. shifts like buttah! Gear ratios are spaced just right to keep it in the power-band. BLIGHT Link to comment Share on other sites More sharing options...
swooshdave Posted June 19, 2017 Share Posted June 19, 2017 I fixed the seat rear-cowl gaps in two ways: First, the seat wasn't latching on the 2 steel hooks 100%. It was hitting the over-stuffed tool kit tray! I removed the plastic tray and just laid the tool pouch on the flat area under it, and laid the PCIII next to it, snugly. Second, I removed the rear-most 10 upholstery staples and peeled back the seat vinyl to expose the foam. I took a 100 grit sandpaper sponge block to the foam and slightly dropped the profile at the rear of the foam and along the rear edge. Didn't take off a whole lot, and was careful to smooth it as to be undetectable. Pulled the vinyl back snugly and re-stapled the seat cover on the underside. Looks OEM, but the plastic cowl now fits a lot better! I think now after it's painted all the same color it will look more 'pulled-together'. My grey rear 'seat fairing' is scratched and chipped by PO, so it needs paint anyway. BLIGHT Pics? Link to comment Share on other sites More sharing options...
BLIGHT Posted June 19, 2017 Author Share Posted June 19, 2017 I fixed the seat rear-cowl gaps in two ways: First, the seat wasn't latching on the 2 steel hooks 100%. It was hitting the over-stuffed tool kit tray! I removed the plastic tray and just laid the tool pouch on the flat area under it, and laid the PCIII next to it, snugly. Second, I removed the rear-most 10 upholstery staples and peeled back the seat vinyl to expose the foam. I took a 100 grit sandpaper sponge block to the foam and slightly dropped the profile at the rear of the foam and along the rear edge. Didn't take off a whole lot, and was careful to smooth it as to be undetectable. Pulled the vinyl back snugly and re-stapled the seat cover on the underside. Looks OEM, but the plastic cowl now fits a lot better! I think now after it's painted all the same color it will look more 'pulled-together'. My grey rear 'seat fairing' is scratched and chipped by PO, so it needs paint anyway. BLIGHT Pics? Look at the pics in post #16 above for the 'before' fit. Here are a couple of 'after' pics for comparison.... mind you I took off just a little foam. If I wanted to take some more off the rear, and some along off the sides I could make it even better. Looks a lot better now at least the gap is more even all around: [/url] hmmm, I might take just a tiny bit more off the rear.... takes about 10 minutes or so. Cheers, BLIGHT Link to comment Share on other sites More sharing options...
swooshdave Posted June 19, 2017 Share Posted June 19, 2017 I have a noticeable gap. Link to comment Share on other sites More sharing options...
Kiwi_Roy Posted June 19, 2017 Share Posted June 19, 2017 I would ditch the power commander, those wer ok as a stop gap measure before we got Guzzidiag. I went with a MyECU kit so I could make adjustments but now I'm thinking of changing back to stock Link to comment Share on other sites More sharing options...
Recommended Posts
Create an account or sign in to comment
You need to be a member in order to leave a comment
Create an account
Sign up for a new account in our community. It's easy!
Register a new accountSign in
Already have an account? Sign in here.
Sign In Now