worthyperformance
-
Posts
7 -
Joined
-
Last visited
Content Type
Profiles
Forums
Events
Gallery
Community Map
Everything posted by worthyperformance
-

Re-assembling the Tranny Pre Selector Assembly
worthyperformance replied to mznyc's topic in Technical Topics
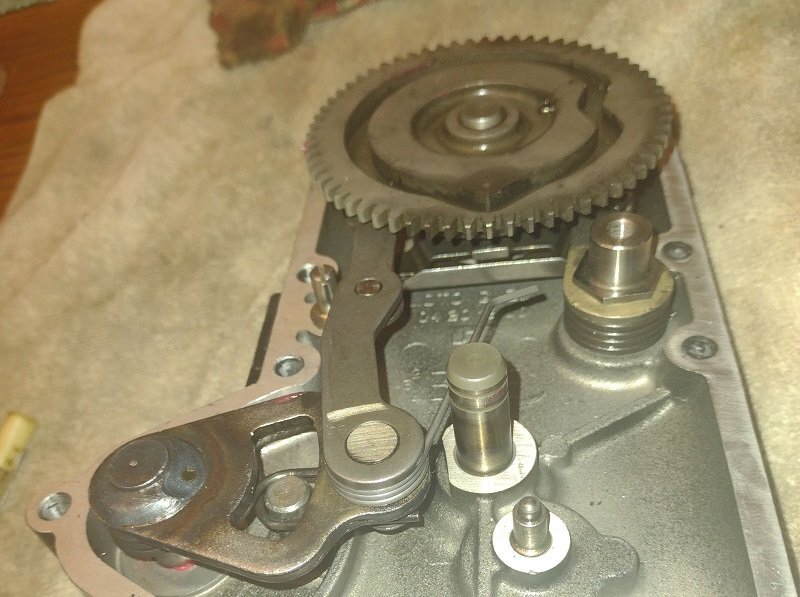
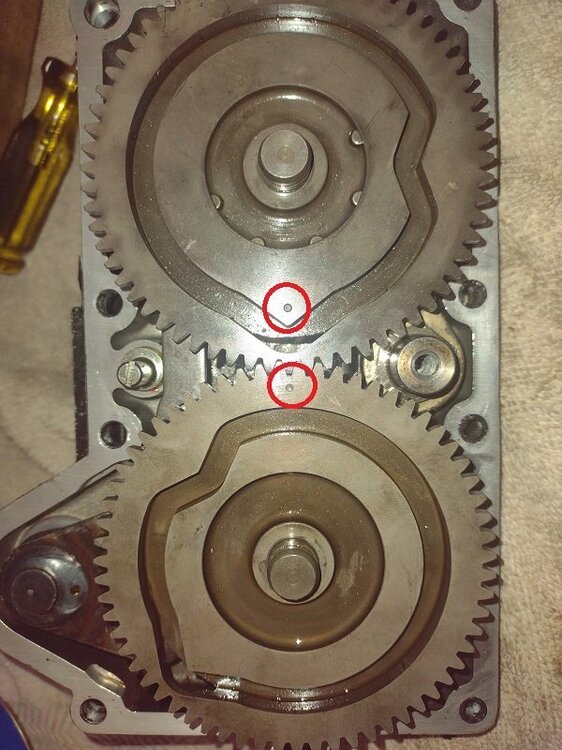
These are my notes from replacing the pawl spring in my 2004 V11 LeMans Nero Corsa: Removing the plate 1. Unbolt the Ohlins shock reservoir cannister then secure it out of the way. 2. Disconnect negative battery terminal. 3. Take off starter cover, disconnect then remove the starter. Tape over the now-open clutch cover to prevent wayward hardware from dropping in. 4. Disconnect the neutral switch. 5. Discontent the shifter rod then remove the gear change lever from the shifter plate. 6. Put a pan under the transmission. Optionally, drain the transmission fluid. Plan on replacing the fluid with Red Line Heavy Shockproof gear oil. 7. Remove the 11 socket-head screws that hold on cover. It may be necessary to shorten the hex key to get to the screw in the lower left corner. It will be necessary to shorten the hex wrench to get at least the screw in the lower left corner. Tap the edge of the plate with a rubber mallet to loosen it. Disassembly 1. Remove selector retaining plate. Use a 19mm wrench to prevent the lever while removing the slotted screw. Plan on replacing the slotted screw with a hex screw. 2. Remove the plate. 3. Remove the 2 snap-rings on top of the selectors. 4. Plan on replacing all 4 snap-ring retainers as they may become stretched. Note: The selector shafts are 12mm. Correct snap-rings do not seem to be commonly available in the US so it may be necessary to order from a Moto Guzzi parts dealer. 5. Remove the lower 2nd-4th-6th selector. 6. Remove the upper 1st-3rd-5th selector along with the selector shaft. Both may come out by pushing on the outside end of the shaft but it may be necessary to use a screwdriver to lift the indent roller lever away from the selector. 7. Inspect shifter shaft seal and order replacement if necessary. Assembly 1. Set the selector lever spring on the selector shaft by hooking each end of selector spring over the pin on the selector lever. Do not hook the shifter pawl spring onto the pawl yet. Note: The "newest" replacement spring from MG Cycle looked identical to the broken one so I obtained a "scud" super spring, which was obviously more robust. 2. Lubricate the selector lever shaft then partially insert it into the shifter cover. Make sure the pawl spring is in position to hook it onto the pawl. 3. Lubricate the upper upper 1st-3rd-5th selector shaft, slide the selector into position on the shaft with the indexing mark facing toward the lower selector shaft then slip the shifter pawl into place behind the selector gear. 4. Slide the selector lever and the upper selector down simultaneously making sure the selector lever spring does not bind and the tab on the selector stop plate is aligning with the corresponding notch on the bottom of the selector. Use pliers to move the indent roller away from the selector to allow it to slip into place. 5. Hook the pawl spring onto the pawl. 6. Lubricate the lower 2nd-4th-6th selector shaft then slide the selector onto the shaft making sure to align the indexing marks on both selectors. 7. Secure both selectors on their shafts with new snap rings. 8. Install the selector plate using new snap rings. Put a dab of Loctite on the screw. Use a 19mm open end wrench to prevent the lever pin/detent lever shaft from turning while you tighten the screw. This is easier if you replace the slotted screw with a hex head screw. 9. Rotate the selectors until the pawl is at its closet point to the adjustable eccentric then adjust the eccentric to a 0.30-0.40mm gap. 10. Rotate the selectors to the neutral position so the neutral sensor is aligned with the hole on the back of the lower 2nd-4th-6th selector. Installation · It's a good idea to dry-fit it first (without sealant) so you have a feel for it and don't get sealant everywhere · Insert the lower left scew into its hole. · Longer screws in the lower-middle and upper left corner where the locating tubes are. · You want as clear and straight an approach as possible so you don't get sealant everywhere. · Wedge a screwdriver under the fuel line to keep it above the transmission case. · Turn on the bike then confirm that the neutral light is working by shifting to first and second. If the light does not work, it is possible that one of the circlips failed to stay in its groove and allowed the cam wheel to shift inboard where it did not contact the neutral switch.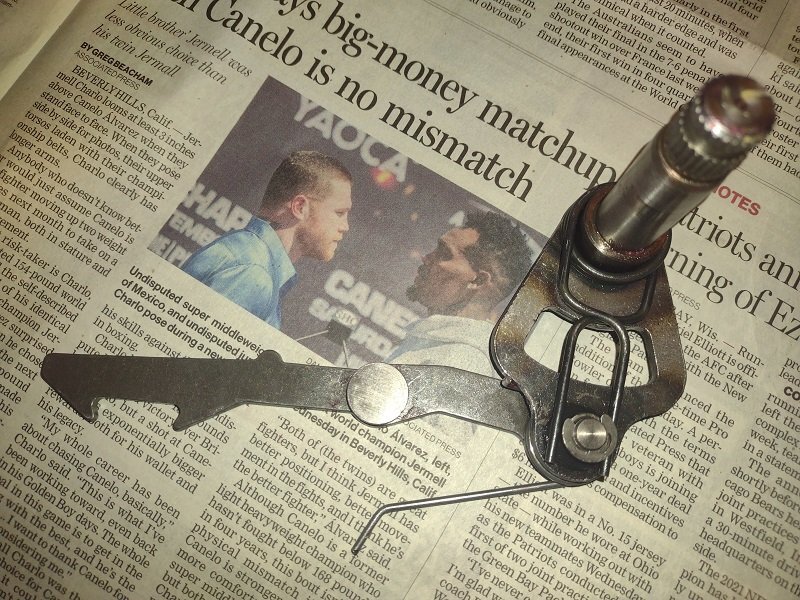
-
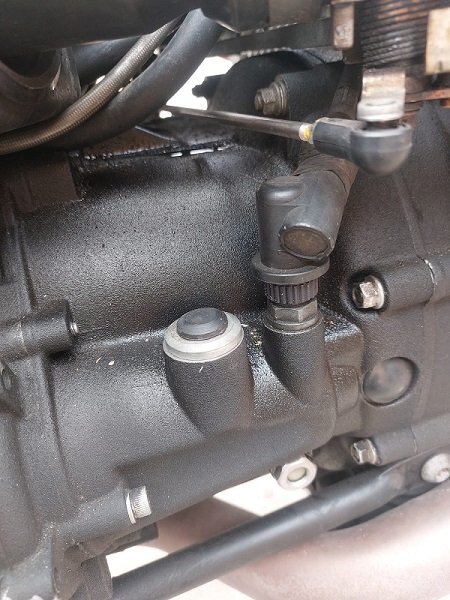
From Moto Guzzi V11 LeMans Riders Facebook: Q: So have my bike a day, done 300 km, ive noticed a little bit of oil on top of engine. Under the airbox. Drops down on the right side of the block above the gearbox. I figured it was the crankcase vent piping but although it needs changing doesn't seem to be the cause. The return to the airbox is on the other side of the airbox in relation to where the little puddle of oil is. What can it be from? A1: Look at the hose from the top of gearbox to the spine breather which I replaced and also I flushed the breather thru the frame by taking the big return pipe off at the banjo return to sump EDIT I pushed the kero thru the frame via the banjo near steering head Then i flushed thru with kerosene gun under air pressure to flush all the mayonnaise etc out of frame breather. I caught the old mayonnaise and oil as it came out of frame. Then pushed compressed air thru to blow all kero out etc. New crush washers on the banjo and then I did an oil change A lot of yucky mayonnaise and oil came out of frame. Once clear havent had any issues since Hope this makes sense. It clears out the breathing path from crankcase etc so bike breathes better when vapours circulated A2: when i first got the bike, none of the hoses were attached to the airbox, there was oil leaking all over the left cylinder, from the look of the pictures yours might just be from poor seals or cracked hoses. https://www.facebook.com/groups/129462630430089/permalink/6511112688931686/
-
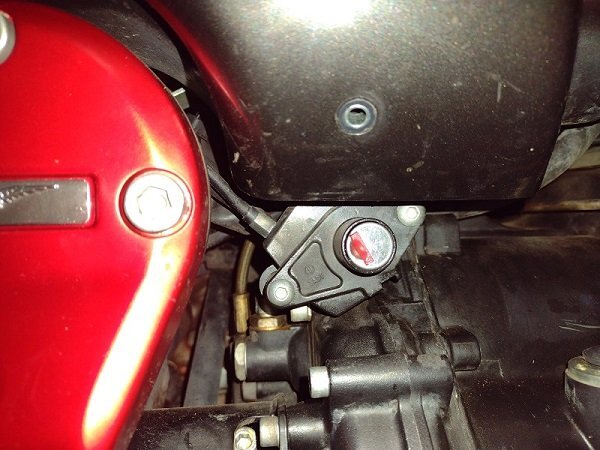
From Facebook re: bleeding the clutch Q: OK folks who has a tip on bleeding the clutch without removing the wheel? Last time i did it my son learned some new ”expressions” A: i added a braided extension hose off a Breva that fits so now the bleed nipple is out near where the sidestand foot sits when lifted up/moving/ riding Cost me $50. Now bleeding the clutch is a breeze Attaches to the bolt on sump that has the sidestand bash plate on it at the gear lever rear corner of sump I used a small rubber lined P clip to go from bolt around the hose A: Just ise 2 ring spanners to hold line and other to crack open/close the bleed nipple as needed A: You can fit a wrench on the bleed nipple and then just open, squeeze the clutch handle, then close and release the clutch handle. Cursing doesn’t make it any faster, just more enjoyable. A: You are better to not pump it just open the bleeder and let drip out and keep it topped up. Lock the bleeder off and give it a couple of pumps and release. Open bleeder let it drain and repeat till fluid is clean. That’s how I do it.
-
From Moto Guzzi V11 Facebook Question: Hello everyone, i’m looking for some advise regarding my V11 Le man. It’s a 2005 model. I took the battery out for the winter and today decided to put it back in. It was a new battery and it had about 12.2 V in it, after putting it on the trickle feed it started to increase. The battery is less than a year old. When i turned the ignition nothing was happening only the dash lights were company on and the red light. The neutral light wasn’t coming on either. When i hit start button it doesn’t even click. I looked at the relay and they all seemed in order. Connection were clean no issue. Bike was running fine when i put it into hibernation for the winter. If anyone can point me in the direction of the fix for this i would appreciate it. Answer 1: Charge battery and check the voltage drop when you turn the ignition on. Age of battery does not really indicate battery health. Had some last 1 year, some 7. The smaller motorcycle batteries are always more fickle than car batteries. Answer 2: Fuse box often suffers Answer 3: With the neutral light not coming on, that should give you a clue. Not sure if the side stand switch will give you that symptom, but I would start there, remove wires and jump out to eliminate. That issue would not be the battery, you should at least hear a click if the battery was weak. Again, neutral light is not on….. Answer 4: The relays are interchangeable .You can swap them but you won't have some of the lights. The starter relay has an extra post .You can put the Starter relay in any other position though. You can replace all the others with the Starter relay ,then you can swap them and everything will still work as it should. Answer 5: If the neutral light isn't on I'd try to find neutral with the green light. I've had false neutral/neutral without that light on. I've also had trouble with the earth strap that secures to the rhs transmission case (oil migrates up the bolt & insulates the earth). Answer 6: Make sure you have a good ground from your rectifier case to your engine case. I added a jumper wire and it has cured a lot of starting issues on my V11 Answer 7: Check the gear selector switch and side sand switch. I had a problem once after standing over winter with the side stand switch. Also as suggested rotate or refit the relays. Sometimes they don’t get a good connection. Do you hear the fuel pump prime when you turn the ignition on with clutch pulled in?
-
-
 Exan no longer lists V11 Le Mans exhausts on their website (https://shop.exanexhaust.com/en/product-category/moto-guzzi-en/)
 -
Delkevic no longer lists Moto Guzzi slip-ons on their website (https://delkevic.com/)
-
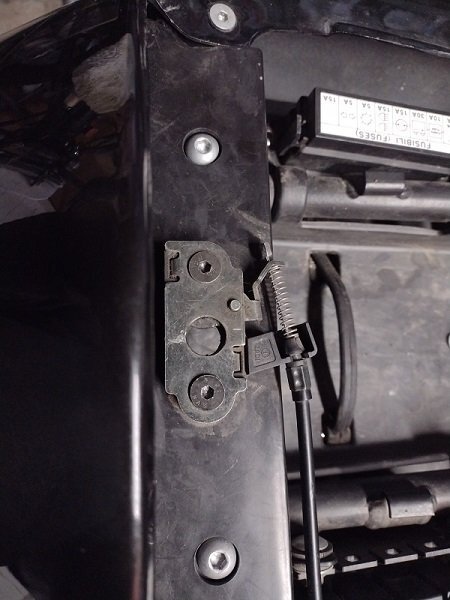
ratchethack's 11-JAN-2009 post worked for me: "1. To get out of your current fix, reach underneath the rear of the right-hand side cover where it meets the muffler/pillion peg hanger, where you will find the cable shroud for the seat release. While turning the seat release key full counter-clockwise as you normally would, pull the cable shroud down about an inch or so. This will give the cable a few mm more travel, and release the seat. Since this takes both hands, you might need someone else to push down and pull up gently on the rear of the seat at the same time for it to work." However, rather than employing his long-term fix, I simply bent the latch arm a bit (+/- 3mm) so the latch completely opens when I turn the key (counterclockwise). My latch arm was bent a bit the wrong way anyway so the cable angle is ever-so-slightly better now too.