Keith Foster
-
Posts
235 -
Joined
-
Last visited
Recent Profile Visitors
560 profile views
.thumb.JPG.c52e705e16530add655cc19e3d7da7a0.JPG)
Keith Foster's Achievements
Guzzisti (2/5)
1
Reputation
-
-
This link covers the Pork Chop removal. A good winter project. http://www.v11lemans.com/forums/index.php?showtopic=16542&page=1&&do=findComment&comment=177688
-
Similar story for me too. 67K miles and the rear shock hasn't been touched. That seems like a very reasonable price Tom M. I'll keep them in mind if I do something. I have had the forks serviced once, mainly due to a seal leaking. That was probably 6-7 years ago at an Ohlins truck at the AMA races at Barber.
-
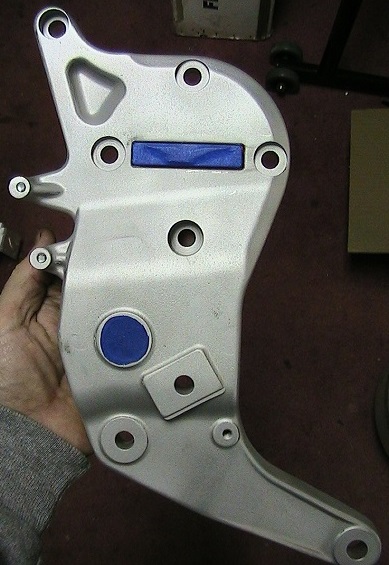
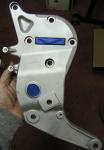
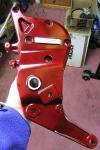
I knocked out this job over the last week or so. I understand now what you guys were saying about the threaded pin and the pork chop hole and the tricky reassembly. When reinstalling the RH side 'chop I lifted and tugged on the swing arm to align the bearing ID up with the pin hole as best I could. I enlisted the help of the wife to turn in the pin with the 8mm hex key while I tried my best to maintain position. The problem comes in that (I think) the slightest misalignment causes binding and the pin gets really hard to turn, much harder than what it should. I tried a couple of times with better alignment, lifting, etc, but not wanting to mess things up I took a break and re evaluated. Things just weren't going together right with what I was doing, then I hit upon something. I thought, what if I threaded the pin in like 90% of where it needed to be before I bring the 'chop to the frame? This way I can slide the pin into the bearing freely, then pull/tug/lift on the 'chop instead to line stuff up. Well, I recommend this technique - it worked on both sides for me like a charm. Like I said, thread in the pin most of the way it needs to be, slide the low boss of the 'chop on the end of the long thru bolt (this helps locate one end) then slide the 'chop toward the bike until it contacts the frame flange area. Next, pull and lift on either the rear wheel or the swing arm enough to get one of the 4 bolts started thru a flange hole, finger tighten a nut on the back side to keep it in place. Now, again lifting or tugging, and using a dead blow hammer or mallet, start to work the 'chop in place. Insert another bolt or two. The big tube sticking out of the flange area has a bevel that helps get the 'chop started on it, once you are up on that bevel snug down on two opposite bolts, all the while giving the 'chop a rap - and shazam - the 'chop will be mated up flush in no time. Once you have the 4 flange bolts snugged down or tightened, you can set the pin back to exactly its original position, (providing you measured), and made a 12 O'clock mark (thanks again Andy). The rest of reassembly is straightforward from here. The left hand side is a little easier to me as the nuts behind the flange are a little bit easier to get a wrench on. Anyway, here is a couple of pics with a pork chop after glass beading and after painting with Dupli-Color Metalcast MC-200 red paint. I've got a couple more things to I wrap up and I'll post a pic or two showing them mounted.
-
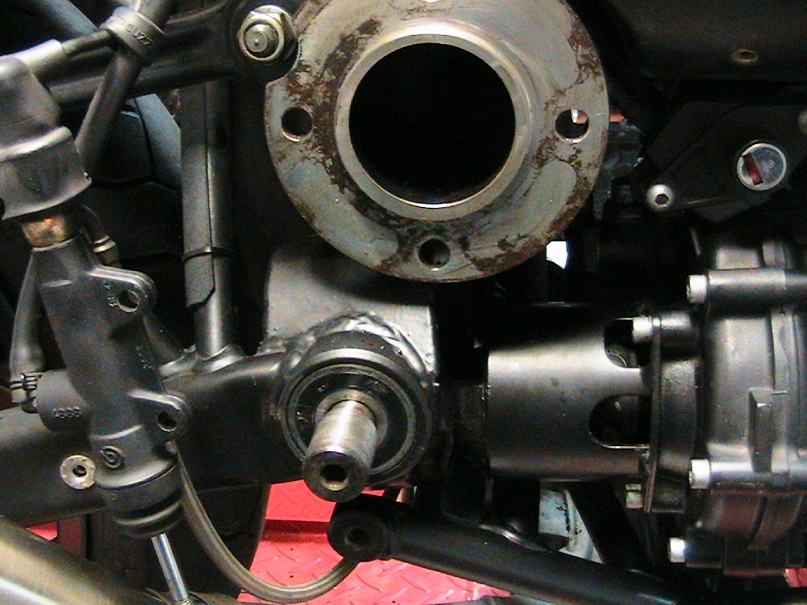
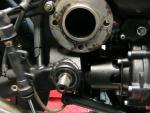
Here is a pic showing the threaded pin that people refer to, and how the ends interact with the swing arm bearing. Just imagine the pork chop in position, the big lock nut would be on the end of it..
-
The change to the frame geometry is on the site here somewhere. I've read it but I don't remember what production date it was. Search around and you'll find it. I'm thinking you might not follow my comment - my meaning was if your bike has the internal fuel pump, the later model tank would fit. But, since your bike has an external pump - then I'm not so sure that a later model tank (one with an internal fuel pump) would fit your bike. I don't have any direct experience with the early models. Someone more knowledgeable then me on that point should reply. I recently posted some pictures of my tank and pump in a thread about a leak. Take a look at these and you can see how it is different from your Scura. Good luck.
-
It would be an easy swap with another V11, does your '02 have the internal fuel pump? If so something from a later model, like an '03 or '04 should bolt right up.
-
Yes, that is a good tip Andy - thank you.
-
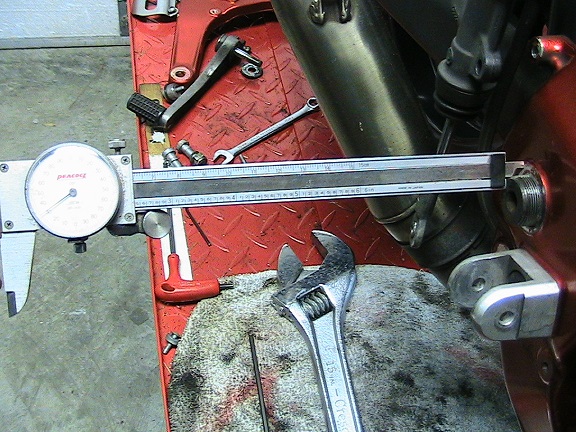
Lastly, from previous replies, I measured the distance the swing arm pivot pins stand proud above the face where the large lock nut seats. like so: I'll add some more detail maybe as I work through the rest of the job.

-
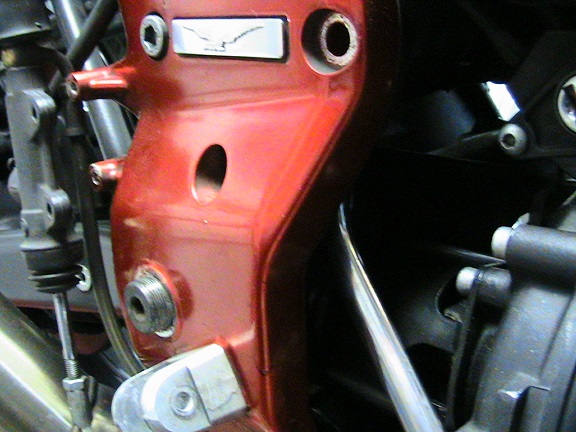
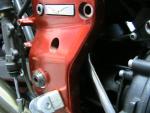
The 9 O'clock nut isn't too bad, but I still needed to remove the hugger (inner fender) to get a straight shot at it with the wrench. The next tricky one to get to is the 6 O'clock one. I ended up grinding the wrench a bit to get it in the small gap. While doing this I'm thinking, gee it would have made this job a lot easier if Guzzi had made the flange thicker and had tapped holes instead of a separate nut and washer. Anyway, positioning it like so:
-
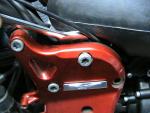
After painting the valve covers (which came out quite nicely) this made the porkchops rather scruffy looking in comparison. I've painted them in the past by leaving them intact and masking off everything. Being it's that lull after the holidays, this time I decided to tackle the job and do it right so I can glass bead them down to bare aluminum and repaint to really match the valve covers. That means removing them, which isn't all that complicated...but getting to the nuts on the back side of the plates can be quite the challenge. This is what has stopped me in the past, but tonight I conquered! I thought I'd post some pictures to help out those in the future, so here goes. The nut at the 12 O'clock position is really buried. After shoving some cables out of the way and sort of forcing the wrench (a 17mm by the way) into the remaining gap, it held the nut well enough to loosen it...next post...
-
Well, I made the call as "if it ain't broke, don't fix it" on the fuel filter. I wasn't able to source an automotive equivalent locally and I thought I'd rather not mess with cutting off the clamps, etc. so I left well enough alone. So, to fast forward several weeks, I installed the new gasket and tightened everything up. As this gasket gets a pretty good squeeze by the pump assembly flange, I looked at the pictures I took before disassembly and tightened up the bolts to give me about the same gap between the flange and the bottom of the tank. I took some time to do a valve clearance check, swap in some fresh brake and clutch fluid, paint the valve covers, and check some odds and ends per the "Tank off Checklist" and do a general cleaning with a rag and some WD40. Next it was time to button everything back up and test the repair. After plugging things back up (fuel lines, vent hose, electrical plugs, tank bolted down) I bought a gallon of non ethanol fuel (since it is winter) and poured it in. After a little bit of extra cranking she lit right off and ran normally, I got in a short test ride from home and everything behaved. The real proof of the pudding was a check this morning, there was no sign of any weeping or drips from the fuel pump area - success! In all a straight forward fix that should last for a good while, thanks for your help - regards.
-
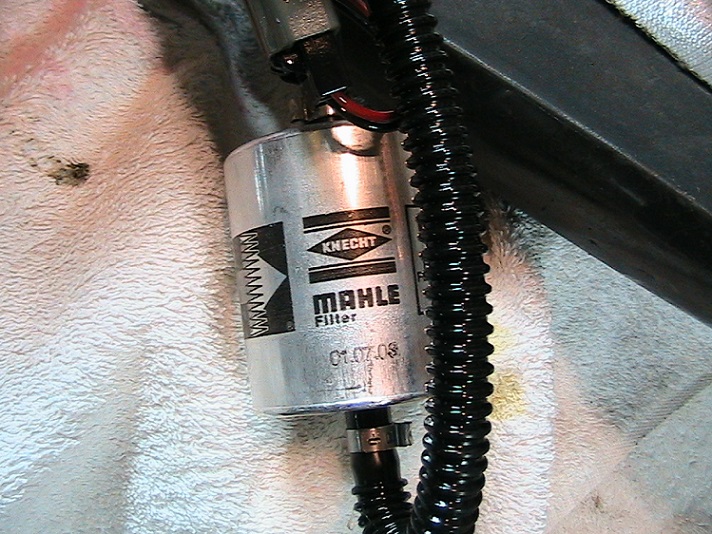
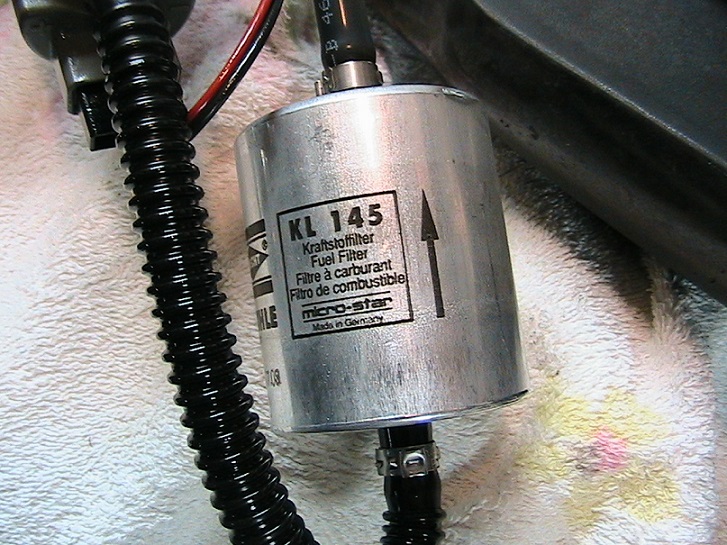
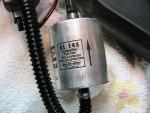
Fuel filter shot #2 - in the interest of full disclosure... You can see the manufacture date in this image, I assume arranged the Euro way, so July 1, 2003. I picked up the bike in April of 2004 so it makes sense.

-
Fuel filter shot #1, I'm going to print out the pictures and take them to my local import auto parts shop and see if they can order a replacement. It is a Knecht KL145. The corrugated hose in the picture is from the top of the fuel pump. It looks like I'll have to cut off those clamps to change the filter. YMMV, but this will be the 1st time this filter has been changed - ever (i.e. 64,000 +/- miles). I'm the original owner and never saw the need. I mean, how dirty is the gas in the US stations? OK, I know there are people that do get contaminated fuel, but for me, unless I had symptoms, I'll letting it stay put. Since it is out this far and easy to access, it's the old "I might as well while I'm in there" sort of thing.
-
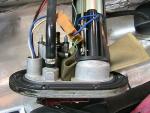
This is a close up of the pump assembly, my mind tells me electrical wiring sits in submerged gasoline all the time in millions of vehicles, but it still sort of freaks me out a little to see it. From the direction arrow on the fuel filter the black hose on the left carries pressurized fuel heading to the injectors. The tan fabric thing is the pre-filter on the fuel pump intake, get down to there and you are really "running on fumes". I wonder what the metal nipple thing is below the green loop of wire. It looks like a hose would connect to that, maybe for some other application. Wait, I think it is for the returning fuel as it lines up with the white elbow. More pictures next..