dlaing Posted April 13, 2007 Share Posted April 13, 2007 The rebound side was down about 7mm. Very interesting. It could be coincidental that you were down on the same side as FuelCooler, but I suspect the rebound side has harder to fill cavities. These observations and Ratchet's last post, give reason to re-evaluate how to fill the forks to the proper level. Certainly the method Ratchet just suggested of re-checking the level after some time of riding would probably work great, but I would suggest the following: 1 measure air gap before changing fluid and top off one to get them level 2 measure fluid extracted from each fork 3 re-fill with amount extracted 4 And just an idea, but it may be a perfectly fine strategy to do this method without completely disassembling the forks, as long as you do it at the factory recommeded 20,000km or atleast every year, and then maybe every fourth year do a complete disassembly and complete drain. Doing a complete disassembly every year seems like a real PITA to me, but I guess after 100,000 miles, you might feel the difference in fork slop. But I have not seen what comes out of the oil from a full disassembly...Is it a gnarly soup of pulverized metal flakes and rusty water? Link to comment Share on other sites More sharing options...
Tom M Posted April 13, 2007 Share Posted April 13, 2007 Not yet Tom, the motor is together but I'm waiting for my plastic parts to be painted. Hopefully (and I've been saying this for weeks) I'll have the stuff back next week. Newly painted plastic too? We're going to need some pictures along with your piston review! Sounds like you'll have a very nice bike when you're done...unless you're never done because you just can't leave well enough alone like me Link to comment Share on other sites More sharing options...
Guest ratchethack Posted April 13, 2007 Share Posted April 13, 2007 . . . Certainly the method Ratchet just suggested of re-checking the level after some time of riding would probably work great, but I would suggest the following: 1 measure air gap before changing fluid and top off one to get them level 2 measure fluid extracted from each fork 3 re-fill with amount extracted 4 This may be an option, and I'm not saying it's necessarily wrong, but having changed out fork oil 4 times now in my Guzzi (and maybe dozens of times with other bikes), here's why I won't ever attempt this with the Marz 040 USD: 1. The above assumes the levels of old oil are the levels you want after oil change. By my experience, this is hardly ever a valid or safe assumption, even when there has been low miles on the bike snce it was last known to have a verifiable correct air gap for the rider's needs -- perhaps an unexpected dismantling for a blown fork seal, for example (been there, done that - lost a bit of oil past the seal, too. ). Repeatedly replacing volume to wot's in there last presents the risk of compounding error. This may just be me, but in this case I find it's always best to index to a universal standard -- or to a known "best for me" level, as the case may be. 2. When dismantling these forks down to the cartridges, I found it literally impossible to capture an accurate enough amount of old oil in a container for purposes of volume measurement for a correct air gap. Having done a complete dismantling twice, I can assure you that I've tried my best and for the most part failed both times to get anything very close to ALL the oil in one drain pan. I did,however, have shop towels and newspapers on my shop bench that were for the most part SOAKED with an indeterminate (but quite impressive ) amount of oil in them both times -- enough to throw the air gap off very substantially if only the part in the pan had been measured and relied upon as a replacement volume reference. 3. IMHO the ONLY accurate way to be certain of getting the air gap correct for purposes of air spring is to measure the air gap directly after the air can be safely assumed to have been excluded from the forks and cartridge rod assemblies. And just an idea, but it may be a perfectly fine strategy to do this method without completely disassembling the forks, as long as you do it at the factory recommeded 20,000km or atleast every year, and then maybe every fourth year do a complete disassembly and complete drain. IMHO, it depends. I've done it both ways, as mentioned, alternating between. Some (perhaps many ) will not find enough justification for the extra effort of complete dismantling at all, possibly ever. I don't agree with this as previously posted numerous times, but it's a wide wide wonderful free world, ain't it , and we're all blessed with the ability to balance our rights and responsibilities exactly the way we see fit here, regardless of the blessing (or curse) of consensus , or wot anyone else thinks, n'est-ce pas? FWIW, the Guzzi Service manual calls for complete dismantling for fork oil changes. It makes no reference wotsoever to partial dismantling for a "less strenuous" or "less effective" oil change. It has been suggested on this Forum more than once that maintaining the Guzzi service schedule amounts to "Guzzichondria", the implication being that such behavior is "anal", "excessive", and even "pointless". While I cannot agree with this, I don't follow the schedule exactly, either (if anything, I do lots of stuff not listed on the schedule, which I consider critically important!), but I do try to use good judgment with an eye to the service schedule as an excellent guide, and generally speaking, I believe that, deliberate or otherwise, ignorance of this schedule carries certain risks regarding the level of performance as well as risks to the length of service life of the machine. But I have not seen what comes out of the oil from a full disassembly...Is it a gnarly soup of pulverized metal flakes and rusty water? Speaking only for myself, I've not seen any trace of rust or water. But per previous discussion on this a few years ago, a tiny "pile" of goop had settled at the bottom of both fork lowers at first complete dismantle. I didn't run a spectrum analysis on it, nor did I weigh or measure it for volume, but in my estimation it was composed of a lovely cocktail of slider bushing swarf, broken-down and oxidized long-carbon chain molecules from boundary surface heat and molecular shear degradation of fork oil/fluid, and perhaps a mini-dollop or two of abrasive road dust and bug exoskeleton that slipped past the scrapers and seals. I got a pretty good look at it with a rifle bore inspection tool, and used a stick to scrape it out of the fork lowers with a repeated rinse of kerosene poured in the top and out through the cartridge assembly bolt holes in the bottom. Yep, there was a bit of this crap in there at complete dismantling #2, but less than at complete dismantling #1. And of course, depending on the climate, roads, bug populations, seasons, and maybe even the manner in which the bike has been ridden, YMMV Link to comment Share on other sites More sharing options...
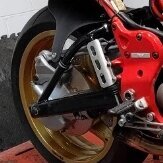
FuelCooler Posted April 13, 2007 Author Share Posted April 13, 2007 Before you take it to pieces, try this. With the fork caps off, springs out and the forks blocked up, grasp the threaded rod and feel how much damping action there is in each direction. You will see the center actuator rod "float" as you move the assembly. Then, while moving (I'm trying my best not to tell you to stroke your rod) the rod, apply pressure to the center actuator rod that acts on the damping valve. When you hold that actuator in (down) there is substantially more damping. You can compare the action from side, obviously it only makes a change on the push stroke on the compression side and on the pull stroke on the rebound side but the change is quite easy to feel. If you get increased damping while holding the center rod down then perhaps the adjuster in the cap is not acting on the rod (too much gap between the adjuster and the rod). If there is no change then you may indeed have a faulty valve. This is the beauty of this forum. I did exactly what you said before I put the caps back on. The rebound acted just like you described, but the compression side wouldn't push the actuator rod in response to the stroking motion (so to speak, of course). I thought it may just be hard to tell, but if you are sure you compression side moved the actuator rod in similar fashion to the rebound side, then that is where my trouble lies. FWIW the adjusters screws on the caps will continue to click way past 16 clicks (and continue to screw down) with the caps off. The adjusters are physically being stopped by either the actuator rod bottoming out (most likely) or the adjuster screw running into the very top of the threaded rod. Thanks Dan M. It looks like that fork is coming off this weekend. Cheers, Steve If I ran my compression adjuster all the way in I doubt that my forks would move at all! I think there's something wrong in there Steve. That said, if you ride the bike and it feels good I'd probably wait until a seal goes or it's time for a fork oil change before going back in there again. Thanks Tom M, If your compression damping is really firm (and this is the norm with these bikes) I have a problem. I have decided to have look inside that fork! Cheers, Steve Link to comment Share on other sites More sharing options...
Dan M Posted April 13, 2007 Share Posted April 13, 2007 This is the beauty of this forum. I did exactly what you said before I put the caps back on. The rebound acted just like you described, but the compression side wouldn't push the actuator rod in response to the stroking motion (so to speak, of course). I thought it may just be hard to tell, but if you are sure you compression side moved the actuator rod in similar fashion to the rebound side, then that is where my trouble lies. FWIW the adjusters screws on the caps will continue to click way past 16 clicks (and continue to screw down) with the caps off. The adjusters are physically being stopped by either the actuator rod bottoming out (most likely) or the adjuster screw running into the very top of the threaded rod. Thanks Dan M. It looks like that fork is coming off this weekend. Yea, with that adjuster bottomed it should be pretty stiff. I don't think it should be able to reach the threaded rod. The actuator rod stays proud of the threaded rod on mine. I haven't got a measurement but it seems to be about 1/16" when pushed all the way down by hand. Good luck & post what you find. Link to comment Share on other sites More sharing options...
dlaing Posted April 14, 2007 Share Posted April 14, 2007 1. The above assumes the levels of old oil are the levels you want after oil change. snip 2. When dismantling these forks down to the cartridges, I found it literally impossible to capture an accurate enough amount of old oil in a container for purposes of volume measurement for a correct air gap. snip 3. IMHO the ONLY accurate way to be certain of getting the air gap correct for purposes of air spring is to measure the air gap directly after the air can be safely assumed to have been excluded from the cartridges. 1. that would be easy to compensate for if you knew the target air gap. You could easily set the air gap before draining. 2. Excellent point, my measuring skills may only good enough to be accurate to within maybe 5mm of air gap, using the technique of measure old volume, replace with same new volume, method. I used the method with my Ohins and spilled no fluid on newspapers or garage floor, but a loss of a few CCs going from capture tray to measuring cylinder easily could have translated into an error of several mm of air gap. 3. The problem is that it is literally impossible to determine what air is left in the cartridges. Perhaps the best approach is the factory recommend full disassembly and 400ml fill combined with a hundred miles of rough roads, followed by an air gap reading and measured correction. Once the measured correction is known it could be added or removed from the 400ml at the next full disassembly. Link to comment Share on other sites More sharing options...
Guest ratchethack Posted April 14, 2007 Share Posted April 14, 2007 1. that would be easy to compensate for if you knew the target air gap. You could easily set the air gap before draining. Hmmm. I reckon the overriding Big Q here is, "Errr......WHY??" Just asking. If you actually do this, Dave, do you also do an oil change on the motor this way (assuming no oil filter change): 1. Before draining the oil, top up the old oil to the point on the dipstick that you consider "ideal". 2. Drain the old oil with the new oil just added. 3. As accurately as possible, measure the volume of wot came out. 4. Add new oil to the motor in the same volume as wot came out. 5. Run the motor until fully warm, check oil level, and adjust to desired level as necessary. Hmmm (Part II).... Now this may just be me, but while it would seem POSSIBLE to do oil changes to both the motor and to the forks this way and get it "in the ballpark", considering that as you've said above, "measuring skills may only [be] good enough to be accurate to within maybe 5mm of air gap" -- Don't you always have to do step #5 regardless, and isn't an oil change simple, easy and straightforward enough in the case of either the forks or the motor WITHOUT having to deal with the extra mess and tedium of #'s 1, 3 and 4? I reckon I've heard lots o' different oil change regimens, but AFAIK this'd be a new species not previously discovered in the wild. I guess I just don't quite see the point. Enquiring minds, so often rapt in wonder, (well you know). . . Link to comment Share on other sites More sharing options...
dlaing Posted April 14, 2007 Share Posted April 14, 2007 The reasons to do it another way are that there is a flaw in the method you have been advocating. Specifically, unless you ride it for some unknown amount of time on bumby roads, you are not going to get all the air out, and thus you are not going to know the proper air gap. I am looking for a better way to do it. As you pointed out, measuring the out going fluid accurately is problematic, and yet you seem critical of me acknowledging your valuable point???? Is my first suggested method better or worse than your method? I don't know. Probably worse. I really don't know how inaccurate my fluid measuring skills are, but I don't think it is troublesome to do when doing a partial for dissassembly. I am sure I initially underestimated the accuraccy required in measuring the fluid. One would at the least need a graduated cylinder To my mind the steps of measuring, if they could be done accurately, would allow one to skip the final step of the extended test ride to get the air out, a part of the process that I believe you did not advocate until it was pointed out that the air gap falls after riding. So since you said that it is impossible to measure the outgoing fluid accurately enough, I have taken the leap of faith and assumed maybe you are correct, and I suggested a third method, closer to the Guzzi recommended method, which would work flawlessly durring complete disassemblies. This method is clearly better than the Guzzi recommended method and in my opinion, better than your method when comparing complete disassemblies. To reiterate: the best approach is the factory recommend full disassembly and 400ml fill combined with a couple hundred miles of rough roads, followed by an air gap reading and measured correction. Once the measured correction is known it could be added or removed from the 400ml at the next full disassembly. But note, a graduated cylinder is still in order. Measuring from the marks on the side of the bottle is not accurate enough If you want to keep doing it with your tedious step 5, be my guest. Link to comment Share on other sites More sharing options...
Guest ratchethack Posted April 14, 2007 Share Posted April 14, 2007 [.....sigh.....] If you want to keep doing it with your tedious step 5, be my guest. Why thank you for granting your permission, Dave. I b'lieve I will. considering that as you've said above, "measuring skills may only [be] good enough to be accurate to within maybe 5mm of air gap" -- Don't you always have to do step #5 regardless.... As K. Vonnegut Jr. himself no doubt would've observed, were he still with us, this seems to've (d)evolved into a bit of a post-modernist's argument. . . And so it goes. . . Link to comment Share on other sites More sharing options...
dlaing Posted April 14, 2007 Share Posted April 14, 2007 I need to get out and ride.... Link to comment Share on other sites More sharing options...
Dan M Posted April 30, 2007 Share Posted April 30, 2007 Newly painted plastic too? We're going to need some pictures along with your piston review! Sounds like you'll have a very nice bike when you're done...unless you're never done because you just can't leave well enough alone like me Finally got all the plastic back, assembled and buffed. I'm very happy with the result. So far as the pistons go. It is tough to get a seat of the pants comparison since I haven't rode the V11 since December. But here is what I do know. The idle was about 200 rpm higher after the pistons. The only other thing I did over the winter is remove the air box snorkels and cut two 1" holes in the lid. (would have no effect on idle speed) On the road she runs very strong and today I rode about 200 miles with several of my regular riding mates. One guy has a 07 S2R that I had trouble keeping with last year. Today through a series of 4th gear sweepers and then a long straight he was hanging with me but could not catch up He said later that at high speed (100-120MPH) he was losing ground. Now it is entirely possible that he was sand bagging me but the V11 just felt more crisp especially at higher revs. One more thing, I broke it in like I stole it. I'm getting some pics together to post. Link to comment Share on other sites More sharing options...
FuelCooler Posted May 1, 2007 Author Share Posted May 1, 2007 Before you take it to pieces, try this. With the fork caps off, springs out and the forks blocked up, grasp the threaded rod and feel how much damping action there is in each direction. You will see the center actuator rod "float" as you move the assembly. Then, while moving (I'm trying my best not to tell you to stroke your rod) the rod, apply pressure to the center actuator rod that acts on the damping valve. When you hold that actuator in (down) there is substantially more damping. You can compare the action from each side, obviously it only makes a change on the push stroke on the compression side and on the pull stroke on the rebound side but the change is quite easy to feel. If you get increased damping while holding the center rod down then perhaps the adjuster in the cap is not acting on the rod (too much gap between the adjuster and the rod). If there is no change then you may indeed have a faulty valve. Compression fork has been stripped, cleaned, reassembled and re-installed. All the shims are fine, all the o-rings are fine and the adjustment method has been studied and its action has been verified. The compression adjuster is a simple tapered needle that partially restricts a fixed orifice in the center of the shim stack. The end of the needle that gets pushed by the long actuating rod is sealed with an o-ring. The bleed oil goes past the taper in the needle and out of a hole in the side of the cartridge tube. Full hard on the compression setting bottoms the needle against the orifice. There is a 'shoulder' that bottoms against a flat so the needle doesnt stick. Everthing is fine in the fork, but there is a little more damping now that it is all clean. My sag in the front is out of range now that my rear spring is right (or more likely my assistant read the tape measure wrong the first time I checked it and it was always bad!). So, my Wilbers progressives are on the way. In the meantime, I am showing my sidestand no mercy . Cheers, Steve Link to comment Share on other sites More sharing options...
FuelCooler Posted December 7, 2022 Author Share Posted December 7, 2022 14 years later, I just gave this a re-read! I remembered most, but all the little details covered will help this time around! Maybe it will help someone else. 1 Link to comment Share on other sites More sharing options...
Recommended Posts
Create an account or sign in to comment
You need to be a member in order to leave a comment
Create an account
Sign up for a new account in our community. It's easy!
Register a new accountSign in
Already have an account? Sign in here.
Sign In Now