

pShenk
-
Posts
109 -
Joined
-
Last visited
Content Type
Profiles
Forums
Events
Gallery
Community Map
Posts posted by pShenk
-
-
Hopefully there's a way to keep the stock bar ends, and not have to re-do the lathe work on new weights.
I had the same problem, and I tried a lot of things. I tried some duct tape around the weights, to get a tighter fit (it was hard to get the right amount, and still be able to get the weights in the bars... or OUT for that matter. And even when I got them pretty tight, the weights still spun around eventually.
This is going to sound pretty ghetto, but my solution was this. You know the pin that runs through the rod that goes through the bar cap on the end? Well you know how it lies against the big nut that screws into the end of the bar? I put a dab of glue on it... some epoxy, which then prevented the whole bar weight from spinning. It's just a dab, so I can chip it out later if I have to.
As far as what I actually clamp the mirror to, I think I got the things from CRG that work for that. THey are the bar weights that cap onto the end of the bar, and they have a little channel that the clamps attach to. But you're not using CRGs... maybe those end-caps would still work though. Greg's idea sounds good also.
On the CRGs I sell at Moto Intl., it works really well to use a 12mm nut inside the clamp part of the CRG. This acts as something for the mirror to clamp onto. Then, we use them in conjunction with a heavier set of bar-ends we sell, which use brash wedges as a means to grip the inside of the bar. Perhaps a 12mm nut would work on thse knockoffs, too?
Those heavier bar weights, with the brass wedges, sound great. Heh, I would have bought some of those when I got my rearsets yesterday, if I had known they existed
 How much are they?
 -
pShenk
I have to replace it today too.
My mechanic told me to simply unscrew it.
CYA!
Thanks, that worked. I'm out of town, so I wont get to replace it until I get back, but the old shattered one came off perfectly by unscrewing it
-
Oy everybody... I haven't been on here for a long time, I know. A lot has been going on, including a separation and move. I still have my V11, although I did wreck it a few months back
 Heh... chalk it up to city driving.
 Anyway, I have a question... the cap that goes on the spark plug, the part at the end of the sparkplug wire, how do you replace it without replacing the whole wire? Mine is busted, and to me, I can't see any easy way to disconnect the wire from it, without just cutting it. Right now, it's using the hard plastic NKG cap, not the stock rubber one.
Can anyone give me a walk-through on what I'll need, what tools, etc? I don't have easy access to my cool garage shop anymore, so I'll have to plan ahead
-
I used the motion-pro kit (PN 01-0107 -- 50 inches)
Very easy, just lay out the old cable and match the length (including the broken bit, natch).
I used a chisel to cut it and a vice to crimp the top piece on, took ten minutes.
I used Tri-flow cable lube (with Teflon!) and will be lubing more regularly as the last 10 inches of my broken cable were dry and rusty. Heat perhaps?
Next easy project will be my intermittent neutral light. I suspect a questionable ground at the trans...
DW

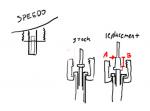
I tried this to replace the cable on my 03 V11 sport, and it didn't work. It comes with three fittings to connect into the speedometer, but the one that *should* fit, doesn't work. It's hard to explain, but it wouldn't fit. I'll draw a picture later, if anybody cares.
Maybe it only works on some models? Maybe I'm missing something.
EDIT
Here's what I found out:
In the replacment fitting, there is a shoulder at "A" that prevents it from going any further into the speedo fitting. But you can see that the distance "B" is greater than on the stock cable. So, the nut is offset from the threaded part on the speedo. Hence, the nut can't tighten the cable to the speedometer.
guzziownr, you didn't have this problem?
-
Well, the heating trick worked well for the bushing that was sticking out... I could grab it with a pliers and twist it. The other one, no dice. I couldn't grab hold of it with anything. I tried hammering it loose with a long piece of metal from the inside, but it didn't budge.
I guess I'll go try to look for bushings that match. Could I find these at just any hardware store? Like a Home Depot?
-
As I understand it (this is only based on reading, not actual use) the PC is not totally effective until it has been dynoed. This has to be repeated after any change. That gets really expensive really quickly. Unless you have a friend....
MyEcu is $270 (Australian...) as a kit, about $600 assembled. So it's a quite a bit cheaper if you wish to build it into your own ecu box and more expensive to buy assembled. But you don't need an unknown quantity of dyno time. Plus it deals with parameters that the PC does not.
It seems to me that your friend will be getting somone else to do the work whichever is bought but the MyEcu is a better deal.
I have a MyECU, and while I'm pretty happy with it, and it's tweakablility, it's not for the faint of heart. You can customize the map all you want, but unless you go to a dyno, or run it in closed-loop (and install an O2 sensor), that won't get you much.
The advantage I see of the PC is that there is a network of dyno operators that are already set up to tune it. If your friend isn't a tinkerer, and doesn't have a lot of time to spare, then I'd definitely go with the PC.

-
I laid my bike down (slow, not too much damage), ironically on the way home from picking it up at the suspension shop (it wasn't their fault... I was testing out the new ride a little too vigorously, in a parking lot that turned out to be covered in a fine layer of rock dust). The most-injured appendage was my rear brake lever... totally snapped off. I hobbled home with a sputtering engine (the right spark plug was also cracked), and bodged together the brake lever while I considered my options. Thank you to my old friend, PC-7!

I found some nice billet replacement levers from Harper's, and I figured I might as well replace the shifter while I'm at it. Get a matching set and all. Make it nice and pretty.
So I get the levers, and the brake one goes on about as easily as anything I've done on this bike. Nice improvement... simple, clean, and a step up from the cheap-ish cast stock part.

Now move onto the shifter side. I get the lever off without too much trouble. But then I notice two bushings in the stock part, that will have to be transfered to the replacement. One sticks out a bit so I can grab it, the other is flush, and I have no idea how to get it. Worse... the hole through the lever gets narrower inside, so the bushings rest against solid aluminum. I can't stick something in to knock out the bushings from the inside.
Turns out they are in TIGHT. I worry the one with a needle-nosed pliers for a bit, but I'm just buggering it up, so I douse it in penetrating oil, and leave it for a few hours.... STILL no luck. At this point, I don't think I'm ever going to get them out. I've messed the one up pretty badly, although I can probably get it back on the bike, temporary-like. It's not like it's a spinning part or anything. The only thing I can think to do at this point is order replacement bushings, which I imagine will take weeks.


Anyone ever successfully remove these? And HOW?

-
The "calibration" position powers the ECU from one of the relays that switches with the ignition key - I think I used the output from the flasher relay.
/Jens
Hm, I guess that makes more sense... I was wiring mine up to the battery, which would be bad if I bumped the switch.
-
What? the poor man's R1? With one cylinder missing?
Go for a real thing and you'll have it made, it is not much more and easier accessible. Surely the most beautiful sportsbike in the world made outside of Apennine Peninsula.
Comparing the 675 to an R1? Bullocks! They have very little to do with each other IMHO, other than they are racing geometry. The 675 is a beautiful bike in it's own genre-bending right. If anything, I'd compare it more to the 748/749. Or at the VERY least a 600cc 4... BUT, it totally has more quirk, chutzpah and iconoclastic roots than anything in that camp. Triumph is up to good things, and MG would be well to follow their example.
I'd say it has a good chance of joining my Guzzi in the garage... that or a Sprint ST.
-
Secondly both of the quick and smooth guys that i have ridden with trail brake their guzzis like crazy. After one spirited Malibu Canyons ride , Todd's rear brake was glowing blue. ...
Using the rear brake up to the Apex really settles the bikes down and helps maintain posture. I was a bit sceptical at first but quickly saw the error of my ways, it feels like so much more planted.
From what I understand, trail-braking just means braking farther into the corner. It lets you make a later apex. Using the *rear* brake to settle the bike, I'm skeptical about, since the whole point of settling a bike in a corner is about transfering the weight to the front contact patch.
OR am I missing what you're saying?
-
pShenk:
I just attached the three grounding wires to the same grounding point.
Having three different ground wires is just an attempt to make the device act corectly on vehicles that have multiple ground voltage levels, due to bad engineering or neglect.
Make sure your Guzzi have proper grounding wires (lots of models dont), and you will have no trouble when you connect the three ground wires to the same point.
I'm just getting back to this project (installing the LC-1), but I'm still wondering where to attach the grounds. Can I just wire them to the negative pole of the battery? That seems to be where all the other grounding wires are hooked up.
Also, Jens... what did you splice into for the switched power supply? I was thinking of maybe the running light.
-
& what about this theory that you're a better rider if you don't use your brakes anyway?
For the life of me I can't remember what it's called, Crash or, no, something else... I think it's largely a theory for Americans. Prob. something to do with Keith Code.
That does ring a bell... something I was reading recently in fact. The guy that wrote it talks about how he and a bunch of guys used to race downhill with the engine off, and that taught him not to use the brakes because it just bled off speed. It might have been Code, I'm not sure.
EDIT - OH, I think it was on the B.A.R.F. site (Bay Area Riders Forum), and I think it WAS Keith Code, posting in a thread that was set up to ask him questions. I'll see if I can dig it up.
EDIT2 "Coasting Races"
-
But if ever you consider to upgrade the calipers to the newer 4 pad version, then you need another one( they fit now to), because the floaters have to be more inside for that. STX73D
How much do I need the 4-pad version calipers? I know that's subjective, but hell... gimme a subjective answer

-
For me the coolest would be the Brake tech composite/ceramic discs. An awful price tag, but man are they light.
Yeah, the Brake Tech discs look cool. You're talking about BrakeTech USA right? It looks like they distribute AXIS rotors. These are pretty cool looking for $309 each. (They're not the ceramic ones, but cmon... seems like overkill for a street bike

-
yeah, I've cleaned my buttons in the past, but maybe not good enough. How freely should the rotor move on the buttons? Mine is somewhere between very stiff and perhaps siezed-up.
-
-
I have the Braking wave rotors. They are fabulous. Guzzi's even using them on the new 1200S. Aprilia uses them on the SXV supermotard.
Thanks... are there part numbers, or one size fits all?
-
I've tried lots of stuff and I'm still pretty sure my front rotors are warped slightly, so I'm looking for new rotors. Since I'm getting new ones, maybe get something a little fancy. Has anyone installed any cool-looking rotors on their V11? What about wave rotors, or color options? I'm looking for full-floating ones.
I saw the Moto-master "flame" ones, and they might be a bit much.
-
yeah, I saw them... looks like mostly big tourers and cruisers. I was hoping for like the Sprint or a VFR... or a Ducati S3. Something more sport than tourer.
-
I'm in Seattle for a week, and I was wondering if there was a place to rent a bike (NOT a Harley though)... specifically, I'd love to try a late-model Sprint ST.
I'm thinking this weekend, so if you know somewhere, tell me quick
-
See guys, that was just TOO easy. 100% handed to you on a plate
Glad to hear the bung is normal though... I'll do another check up at 40.
-
this is a picture of the bung plug removed from my Stucci crossover. I also notice that the inside of my pipes are quite black... would this be an indication of fuel mixture problems? Or would it be about normal?

-
Nice one George!
-
ok, ok...see if you can see the color in this pic..
I'm getting my seat done by Rich Mund, and he told me he can do the flag, or the piping, but to do both the flag and the piping would be too many folds at the seam. Besides, the piping will rub on your legs and stuff.
Oh, I forgot, this is the Monster... I guess you have a lot of other seat options then. Carry on.

Flag sure looks nice though.

V11 Titanium Racing Exhaust Kit
in Personal Ads
Posted
I have a Ti racing exhaust kit, complete with all parts (the kit comes with its own racing ECU). It works perfectly, but one of the silencers (the starboard one I think) has a cosmetic ding on the inboard side of the can.
I live in the Bay Area, USA, and I'll sell the kit for $800 (+ shipping).
They sound great, and they give a good boost