
moto fugazzi
-
Posts
432 -
Joined
-
Last visited
-
Days Won
12
Content Type
Profiles
Forums
Events
Gallery
Community Map
Posts posted by moto fugazzi
-
-
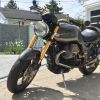
Located in Milwaukee, WII’m the second owner of this well sorted bike. I bought this in 2014 from a guy that had it in a storage facility in Michigan and it hadn’t been ridden in a few years. I bought it basically sight unseen, trailered it home and basically pulled it apart and cleaned every single bit of it. This bike has been at every WI Guzzi Rally from 2015-2019 and has been on several long weekend trips without issue. I unfortunately don’t have the time to ride much anymore, so it’s time to sell. I’ve never laid this bike down, and it doesn’t appear that the original has crashed it either. It starts within a few seconds and runs strong and shifts easily.New oils and oil filter this year. Air filter was replaced in 2019. Valves have been adjusted as needed, TPS set and everything has been regularly lubed and fluids replaced as needed or according to schedule.
Aprox. 20k miles. Purchased with bad odometer (original owner said he put about 10k miles on it). Has a Speed Hut mechanical Speedometer and tach on it which has a custom made GM speed sensor on it (see pic).
DM for more info and pics
Ohlins suspension and fork brace. Fork seals were replaced in 2019 when the tires were installed by Ducati Milwaukee.Battery is about 4 years old and has been on a Battery MINDer with desulfator. It’s as strong as ever.Meinholf fuel/air map on it and it runs great!Has a spare set of wheels on it powder coated in black with 90 degree angle valve stems. I also have matching black "pork chops” which I haven’t had time to install.The alternator cover has also been powder coated black, as well as the cylinder head covers.Cylinder head covers and engine crash barsShad top box and Hepco Becker side cases with keysTTO engine block thermometerOxford heated hand grips (best on the market IMHO)HID headlight (I have the original Bosch unit as well) as well as factory headlight mount. Current headlight mounts are from an EV model.Folding shift leverADV Monster LED driving lights with remote (see pics)Fuzeblock for all added accessoriesRoper slopper plateDucati Monster carbon fiber headlight flyscreenPirelli Angel GT II tires installed in 2019 with less than 2k miles on them. I believe I replaced the rear brake pads then, and the fronts are in great shape.CRG bar end mirrors (I believe I have the original mirrors). Pazzo adjustable leversGold handlebars have been painted blackAftermarket exhaust crossover (I think it’s Stucchi). The original is included with the sale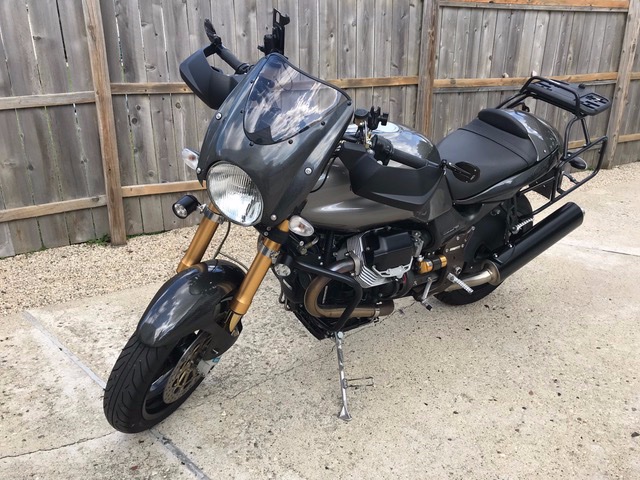
-
 2
2
-
-
$400 Shipped CONUS. I'll put them on eBay soon if nobody here wants them.
I'm done with loud pipes, so I went back to the factory units a few years ago. They do sound amazing!
Good overall condition, no road rash at all. They could use some good polishing to look great again. They are the stainless steel round version. Pics are too large to post here, so pm me for pics.
Ken
-
1
-
-
I have the GT2's on my V11 Sport, and I don't like the way they feel on grooved pavement. Haven't ridden much with them, but they seem acceptable on non grooved pavement.
I really did like the original GT's.
Ken
-
3
-
-
This would be the "bullet" connectors on the left side of the bike. There's a pic towards the bottom of this thread.
Check this as well
Ken
-
1
-
-
Simple things to check:
1. Make sure the hose on the new fuel filter isn't loose. If it's an external filter, it'll be easy enough to check. Might as well make sure the flow is the proper way as well. I'm sure you did it right the first time, but it doesn't hurt to double check.
2. Make sure nothing crawled inside your exhaust pipes or intake.
3. Did you fill up with gas right before this happened?
4. Make sure the throttle linkage moves freely with the throttle.
5. Check the fuel overflow hoses that connect to the underside of the tank. I don't know what happens if these aren't connected
6. Check the coil connections if you took the tank off. Hopefully you didn't bump a wire loose.
If you have guzzidiag, you can test the FI and the TPS with it, as well as check for faults. That would save some time vs. testing everything manually with a multi meter.
Hope this helps,
Ken
p.s. crank sensor is on the left side of the bike towards the front of the engine. 2 bolts hold it in, and it's oval shaped. I don't remember where the connector is, but you may have to lift up the tank a bit or remove it. I replaced one last year on a EV side car rig with Chris Collins, and I think it was somewhere under the ignition or behind the headlight on that bike.
Ken
-
Thanks so much, Marty! I just ordered the Moly dry lube and Kluber 30PTM. Should have them both on Friday.
Ken
-
Now that I have your attention, I had my wheels powder coated, and I was wondering if I need to put grease or anything on the cush drive rubber bits.
Thanks for your prompt response,
Ken
-
After using the BatteyMinder 12248 on both my bike batteries this winter (Odyssey in V11 and AGM in V7C), they are good to go. As of last fall, neither would hold a charge for 1 week. After leaving them connected to the Batteryminder for 2 weeks each (in desulfation mode), both bikes fired right up after 1 month on sitting in the garage while being connected to the bikes.
Ken
-
Honestly, I expect the name to change to "Jones fireworks sales.."
 Their inability to make a spring to print (twice) is hard to fathom. That said, the million cycles plus spring looks the same as before testing. They'll work.
Was it just Jones Spring Co. or was it part Joens Big ass truck rental and storage?
Or Jones Good Ass BBQ and Foot massage?
-
I have a nice metric tape by Starrett:
The cloth metric tape measures are good for measuring suspension sag:
20 year search is over.

Just ordered some...Thanks!
-
The US missed a great opportunity to go all metric in the 1970s. It's a far better system and easier to work with. Feet, fractional inches, quarts, tablespoons, miles, dozens, pounds, Fahrenheit temperatures... I'd gladly get rid of all of it (especially ounces, where we stupidly use the same word for weight and volume). Just make everything base-ten.
End of rant.
I remember those days in grade school, and it made so much sense. We should've just made the transition then.
FWIW, it's nearly impossible to find an all metric tape measure in the states...I've been searching for more than 20 years.
Ken
-
IIRC, Pete Roper mentioned not to run a wire directly to the battery. It was something like that if the wire burns up, it will cause more problems. A hefty wire directly to the engine block was his recommendation.
Ken
-
1
-
-
This thread has saved my Odyssey battery from my V11 and the AGM from my V7 Classic, so this lengthy thread is worth it. Last November neither battery was holding a charge. They're both doing well as of now. Thanks to docc and all of the others for their info!
Ken
-
USPS priority small box should be just under the $6.00, and the boxes are free from the post office.
Honestly, I think you guys should try to make some money from this for all of your time and effort. And if it saves others from having a spring break, it's totally worth paying extra for...just ask those who had a spring break on them.
Ken
-
2
-
-
I believe they should be there for all of our cast front wheels. MG part number 01615290 and they call it Front Internal Wheel Spacer.
I'm assuming Ken has a spare wheel with no bearings or spacer - and has a complete wheel on the bike, which he prefers to leave intact.
I say go ahead and powder coat the spare, knock a bearing out of the wheel that's on the bike now, and put the spacer and new bearings in the powder coated wheel. Then you'll know for sure what the spacer looks like - and if mine is a match. You can also put new bearings in the original front wheel.
After looking at the parts diagrams, I think yours is different. I'm assuming yours is for a solid axle, whereas I have the hollow axle on my 2004 Cafe. On the plus side, the 2002 and 2004 wheels have the same part number, so I'm thinking just the internal spacer is different, plus one different ID bearing on one side.
Taking my front wheel off now to check the spacer is something I don't have time for in this cold WI weather.
Ken
-
Yes, that must be in there. It keeps the bearings in place when tightening the axle nut. Yours not have one?
I have a spare wheel that I was going to powder coat, and I'd rather not take the spacer out of the original if I didn't have to. Just hoping someone has a spare from a wrecked wheel.
Ken
-
Wanted to buy:
I believe they should be there for all of our cast front wheels. MG part number 01615290 and they call it Front Internal Wheel Spacer.

-
I would like to buy a spring as well. 2 if you can spare an extra as I'll probably buy another V11 in the future.
Ken
-
There's so much happening in those circuits, that you may want to add a separate relay and new horns. The factory horns are weak at best, and most upgraded horns will require a relay anyway. My original horns only seemed to work when they wanted to, not when I wanted them to...
Ken
-
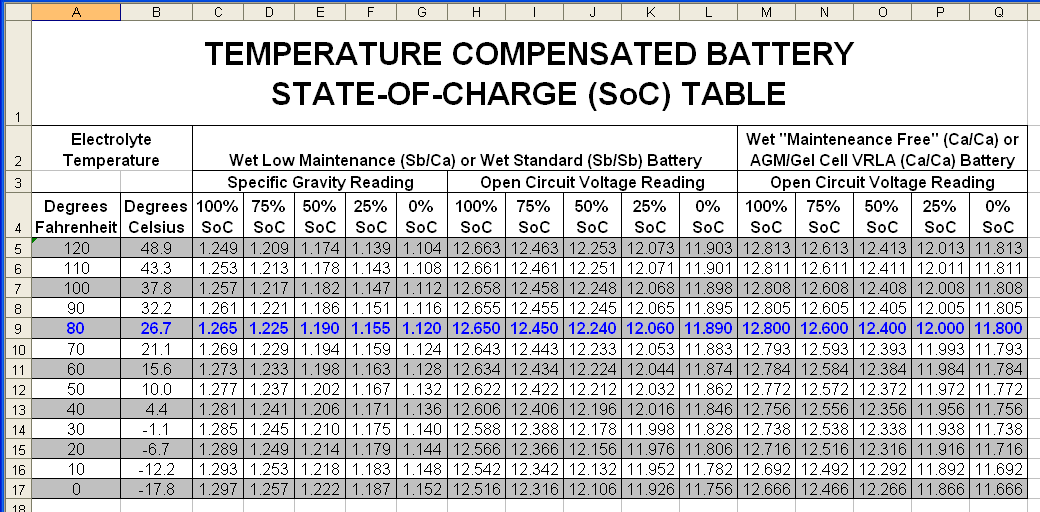
I'm not good at converting C to F.
-
Quote:
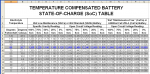
"Truly! Repeat when the battery drops to 12.65v at 77ºF/25ºC.
What's the ambient temperature where the battery is?"
It was 24f last night when I measured it. In the past 2 weeks, it's been around 20-35f.
Ken
-
I have done the discharge/charge cycles on my V11 (PC545) with the BatteyMinder 12248 3 times between 12/3-12/5/17. Here's the readings over the following days, and keep in mind that the battery is still in the bike, and there has always been a parasitic drain whilst connected.
12/6 13.0V
12/7 12.89
12/8 12.87
12/9 12.84
12/11 12.83
12/12-12/19- No data collected as it was too damn cold outside
12/20 12.74V
Prior to the discharge/charge cycles, my bike wouldn't start the day after I took it off of the Battery Tender trickle charger. All discharge cycles including dropping the volts to below 10, then followed by 8A charging and then letting it "float" until the next night.
This may have rejuvenated the PC545, but I'll know for sure in spring and I'll keep you all posted. As of the past 2 weeks, I've been trying to rejuvenate 5 year old AGM battery in my V7C, and I'll post the updates in a few days. So far, Docc's methods have been working.
Ken
-
In my experience, it is *pretty* effective to discharge to a point of stability (this might get higher and higher as the battery gets stronger).
In other words, turn the lights on for two or three minutes until the displayed voltage levels off. Terminate the discharge and monitor voltage until it rises and "levels off again.' Note the voltage. If under 12.65v, recharge (actually ->chargesufficient amperage and voltage up to, but no more than 15.0vDC.)
Monitor how long it takes for the battery to drop back to 12.65v (should take longer and longer with each *discharge-charge* cycle.
Be aware of the temperature adjusted voltage values.

[oh, and be certain your battery terminals and grounds are clean and sealed. Caig DeOxit rocks!]

I have Caig Deoxit at home and at work.
-
1
-
-
I fixed the above issues...not sure how that happened with copy and paste
Haha, I don;t know what the "typos" were, but you can't get away with much with these smart lads.
I'm hanging on Step#5:
"Performing more than one discharge and recharge cycle is beneficial to increasing restored capacity. "
After the first discharge/recharge cycle, the weak battery light went off on the charger. I did another cycle today, and we'll see what the volts are tomorrow night after I take the charger off in the morning and let it rest. With an HID headlight and LED fog lights, it takes quite a while to drain the battery to under 10V like Odyssey wants you do do before the recharge cycle.
Ken

F/S 2004 V11 Cafe Sport $5500 OBO
in Personal Ads
Posted
I still have it. He can reach me at 11moto11 at gmail
Ken