FuelCooler Posted June 30, 2008 Share Posted June 30, 2008 Ah, I didn't get the easy one this time. The leak is on the inner crown wheel seal. It is the one you need to change / pull the needle bearing to get to, not the big one you see when you pull off the rear wheel Well, I have it apart and I am going to try to post some photos of the leak path. To be brief , the fluid works its way past the inner seal, onto the bearing spacer that is between the crown wheel and the little needle bearing that sits next to the swing arm. Instead of working its way past that needling bearing, it works its way past the sealed (semi-sealed) axle bearing that is pressed into the crown wheel body, lubes the splines very nicely (Shockproof Heavy, in this instance) and deposits it's self on the rear wheel. I truely believed / hoped it was the outer seal, but to be sure, first I thoroughly cleaned all the grease (which is red, as well) out of and off of the splines and entire cush drive assembly and rear wheel. Then I put a very, very small amount of grease on the splines, reassembled everything, and went for a ride. Eventually (50 miles?) the wheel started to get oily again. Remove the rear wheel, and hey! Oil is puddling in the spline area, in the bevel box. The outer seal is dry as a bone. If I can get the photos posted, you will see Redline Oil where there shouldn't be any. I am going to the bearing supply house tomorrow to check on a seal and a bearing. I think I can borrow a puller. Let's see if the pics worked.. Steve Link to comment Share on other sites More sharing options...
FuelCooler Posted July 1, 2008 Author Share Posted July 1, 2008 Well, the pics aren't that nice. The spacer you see in the center of the open image should be dry. In the linked image, the opening in the center of the crown wheel assembly should be dry. Cheers, Steve Link to comment Share on other sites More sharing options...
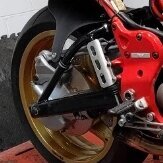
FuelCooler Posted July 1, 2008 Author Share Posted July 1, 2008 Alright, The bearing is out! I found a $6.00 US gear puller at Advance Auto Parts. I cut and shaped the ends for a 52mm ID (with my dremel tool) and mounted them backwards as close together as possible. To do it, I just knocked the pins out with a hammer and punch, then re-drilled the puller arms, and re-assembled the tool. I put the tool behind the bearing, and wedged a piece of aluminum between the arms so they couldn't slip out from behind the bearing. Then I placed a piece of metal on top of the bevel box housing (the bolt circle edges) and started tightening the puller up and heating the housing with a propane torch (carefully). Pop! Pretty easy, once I figured it out. I didn't even put a scratch in the bearing. I took a photo of the end result, with the tools used. Cheers for now, Steve Link to comment Share on other sites More sharing options...
Tom M Posted July 1, 2008 Share Posted July 1, 2008 Nice job Steve! Looks like you dove right into what had to be a PITA job. Too bad your pictures are so small. It would help the next guy who faces this a lot if you could put them up at photobucket or some other hosting site then link them in your post. edit: Nice job Link to comment Share on other sites More sharing options...
FuelCooler Posted July 2, 2008 Author Share Posted July 2, 2008 Updated the photos, as requested. The first ones I used Myspace to host! I used Photobucket this time. The seal will be here this morning, for reassembly. Cheers, Steve Link to comment Share on other sites More sharing options...
BRENTTODD Posted July 2, 2008 Share Posted July 2, 2008 Those pics are much better i really like the that I can see my jack without that the job would have been a total flop. Maybe now with the seal fixed we can go for a ride now. Link to comment Share on other sites More sharing options...
dlaing Posted July 3, 2008 Share Posted July 3, 2008 Be sure to pay attention to the direction the seal went in. I think I put mine in backwards the first time Also, I recall something about how deep you set the bearing or the seal.I think if something is too deep or too shallow, the bearing rubs against the seal or something bad. Sorry, I don't have more details than that. Just be careful, and ask the experts if in doubt.... Link to comment Share on other sites More sharing options...
FuelCooler Posted July 3, 2008 Author Share Posted July 3, 2008 Be sure to pay attention to the direction the seal went in.I think I put mine in backwards the first time Also, I recall something about how deep you set the bearing or the seal.I think if something is too deep or too shallow, the bearing rubs against the seal or something bad. Sorry, I don't have more details than that. Just be careful, and ask the experts if in doubt.... Thanks for the advice Dave, It is back together and after a couple of miles, no leaks. But it was taking about 50 miles to show before anyway (after I cleaned the splines and the cush drive). I will give it a better test tomorrow. If there could be an issue, it looks like too shallow of a seal installation would run the seal lip up into the race area of the shaft (I could see where the old seal was riding, and it was one or two millimeters away). I don't think it can go too deep, mine seemed to bottom out, squarely. And the seal went in with the 'spring' or open end toward the fluid, just like a typical engine / transmission shaft seal. I used a NAPA 14707 HMS4 'R' (Nitrile) seal. Less than $8.00. Counting the puller and new oil, less than $25 for the whole job. The bearing was installed flush, just like it was before I removed it. Also the correct seal is 7mm wide. I think the 8mm is more common, and NAPA asked if I could use the 8mm instead. No thanks, I could see that being the same issue as too shallow of an install. This job was relatively easy. If I had the proper puller it would have been a piece of cake. Plus I got to see how my gears and bearings were doing. Time will tell how I did, but I am pretty confident I got it right. If not, I ain't scared of doing it again! Cheers, Steve Link to comment Share on other sites More sharing options...
Guest ratchethack Posted July 3, 2008 Share Posted July 3, 2008 Steve, I'd be mighty keen to understand what caused the seal to fail. Any indicators? Link to comment Share on other sites More sharing options...
FuelCooler Posted July 3, 2008 Author Share Posted July 3, 2008 Steve, I'd be mighty keen to understand what caused the seal to fail. Any indicators? It was the calcium in the Redline oil, of course....... But seriously, yes Ratchethack, I think I know why it failed. The surface finish where the seal rides appears to lathe turned, not ground. My guess, with out a profilometer, is 30 micro. For comparison, I would estimate the surface finish of the needle bearing race at 5-10 micro. I simply think the seal lip wore out. If I had a lathe handy, I probably would have worked that area with some 600, 800, 1000 grit wet sand paper, which, in my experience can get you down to 10 micro (as long as it's not Rockwell C scale hard!). But a 26,000 mile change interval doesn't worry me too much, considering the relative ease of changing it. At my current 8,000 mile annual mileage, puts it at once every 3 years. Next time I go in there, I will plan some lathe access. I wouldn't be too surprised if it doesn't leak for 50,000 miles. Sometimes seals can get a bit of trash in them (from either side), and the seals have manufacturing tolerances as well. Anyway, I'm going for a nice long ride today. I've got to wear out these Pilot Powers and try the Diablo Stradas I have had sitting in my closet since February! Cheers, Steve Link to comment Share on other sites More sharing options...
Recommended Posts
Create an account or sign in to comment
You need to be a member in order to leave a comment
Create an account
Sign up for a new account in our community. It's easy!
Register a new accountSign in
Already have an account? Sign in here.
Sign In Now