
SMDL
-
Posts
75 -
Joined
-
Last visited
-
Days Won
2
Content Type
Profiles
Forums
Events
Gallery
Community Map
Posts posted by SMDL
-
-
Thanks! Actually, I am fortunate to have a great family, so am looking forward to seeing them all. I lived in Langley until I moved to Toronto a few years ago, and will be staying in Cloverdale when I'm there this time. We also have a trip to the Island planned to visit the clan over there. Should be a great trip -- now if I only still had a motorcycle out there...
-
 1
1
-
-
Excellent -- I'll be the first to buy you a pint. By the way, I'm actually from BC, and will be out there for a family reunion in late July. Can you put on a rally then so I can escape, too?

Shaun
-
1
-
-
Hi, Jim.
Well, we'd be happy to have you! Looks like we're going to have a great turnout, judging from the level of interest.
By the way, how did that titanium exhaust I sold you work out?
Cheers,
Shaun
-
Hi, folks.
I'm sure most people already know about the upcoming MGNOC National Rally in Lavigne, Ontario, but wanted to put up a post just in case. You can find detailed information, pre-register online or download a registration form here:
http://ontarioguzziriders.com/2013_mgnoc_national_rally.html
Looking forward to seeing everyone at the rally!
Cheers,
Shaun
-
HaydnR,
From what I understand, the metal fittings for Triumph are a direct swap without any requirement for tapping, etc. Perhaps exact matches to the Guzzi pieces could be located, as well?
Cheers,
Shaun
-
I know that many people have expressed frustration with the plastic fuel line couplings on our bikes. This has been a problem or many years on Hinckley Triumphs, as well, with many a broken fitting resulting from the application of too much pressure. As a result, the community came up with a better solution about 10 years ago, and these metal fittings are available in a kit:
http://www.rideteamtriumph.com/images/TTFKD.jpg
These apparently work much better.
Has anyone tried something similar for Guzzis?
Thanks,
Shaun
-
Hi, folks.
I am happy to report that the cush drive service was conducted without issue, and that the result is... fantastic! Basically, it is clear that the cush was cushless, as I could roll the bike back and forth while in gear with the engine off, and all I would get is a solid "thunk!" at each limit of travel. Now, when the normal limit of travel is reached, I can continue pushing and there is an additional amount of soft, rubbery travel that brings the bike to a soft, nicely-damped stop. This just wasn't there before. The test drive was ever better than expected as the bike so much smoother in on/off throttle transitions. Very nice!
Thanks again for the help!
Shaun
I did mine a couple of weeks ago, I saw a post here recommending drilling holes in the rubbers to give more squishiness and leaving half out. I drilled a couple of 3/8 holes in mine but left them all in. It seems to improve the ride for sure.
Yes, I basically followed Greg Field's recommendations, including drilling the rubbers. Those instructions recommend that a hollow bit be used to core holes, but I used a standard drill bit and found that it worked just fine. Greg also recommends only putting three sets of wedges in, but I put them all back in there and was very happy with the result.
Thanks,
Shaun
-
Hi, folks.
I am happy to report that the cush drive service was conducted without issue, and that the result is... fantastic! Basically, it is clear that the cush was cushless, as I could roll the bike back and forth while in gear with the engine off, and all I would get is a solid "thunk!" at each limit of travel. Now, when the normal limit of travel is reached, I can continue pushing and there is an additional amount of soft, rubbery travel that brings the bike to a soft, nicely-damped stop. This just wasn't there before. The test drive was ever better than expected as the bike so much smoother in on/off throttle transitions. Very nice!
Thanks again for the help!
Shaun
-
Hi Shaun,
I used a cutting wheel on one side to slice through the bearing housing,and tapped out the other side with a wood dowel from the inside.5 minutes tops.Mine went at 16k and many report having them go under 20k so would be worth doing while you got the wheel off.Another Guzzi "good enough" engineering achievement was that the spacer between the bearings was believed to be the incorrect size,Doh !

Michael
Thanks, Michael. I do plan to replace the bearings, but need to order them in first. I noticed that you had McMaster Carr part numbers for both the bearings and the grease gun fitting in the first thread you listed. The numbers for the bearings still seem to be good, but the grease gun fitting is not found. Do you have any information from the one you bought that could assist me in finding the right item?
Thanks for any assistance.
Shaun
-
Thanks for the feedback. The plate came off quite easily using a couple of screwdrivers!
Shaun
-
Hi, folks.
I have removed my rear wheel in order to service the cush drive today, and even managed to get the button head fasteners out without stripping them. I am at the point of wanting to remove the plate, but wonder if it is necessary to remove the wheel bearing? The manual seems to indicate this, but I have seen some pictures in various posts that seem to show the plate removed with the bearing still in place. Bearings look good, and bike has about 10K miles.
If the bearing must be removed, does anyone have any suggestions as to the best methodology? Still learning...
Sorry I'd this is a duplicate question. I have been searching for some time and haven't found a clear answer yet.
Thanks,
Shaun
-
Hi, folks.
Sorry to post here -- I posted under Wanted, but I'm not sure how often people look there.
I'm looking for a seat if anyone has one. Cover condition not overly important.
Cheers,
Shaun
I'm pretty sure that Ed at Gutsibits has a used seat in stock.
Thanks -- you're likely correct. I might check with them, but will try to find something a little closer to home first. Much appreciated.
Shaun
-
Hi, folks.
Sorry to post here -- I posted under Wanted, but I'm not sure how often people look there.
I'm looking for a seat if anyone has one. Cover condition not overly important.
Cheers,
Shaun
-
-
Agreed. I installed the MPH risers on my '03 Le Mans a few weeks ago. Very happy with both the look and the comfort. The MotoBits footpeg relocation kit made things just perfect!
-
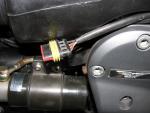
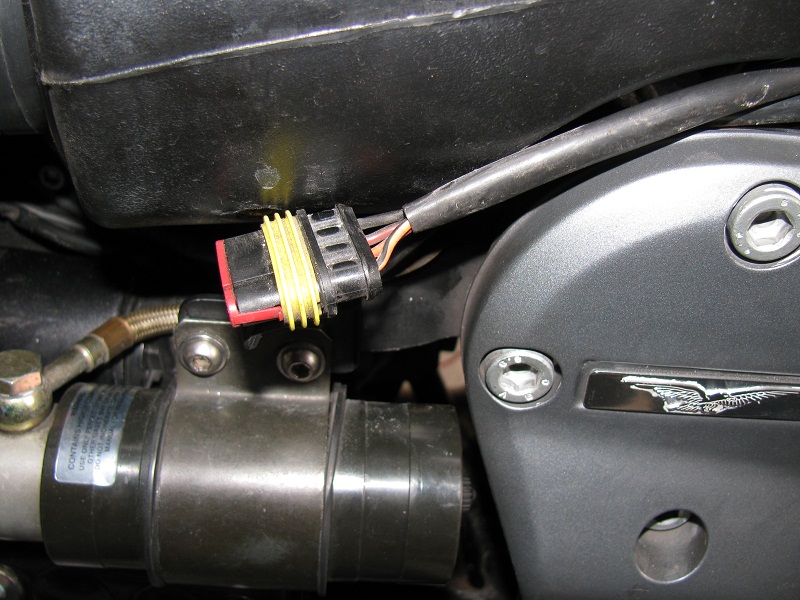
Shaun,
The ALDL connector is a 3 wire plug with blue,black & brown wires. Can you tug on the 4 wire connector to see where it goes in the wiring harness ? I have looked and cannot find a 4 wire connector with your combination of wires. If EVERYTHING works, ride it.
Thanks for looking -- I couldn't see it on the diagram either. When I tried to trace it, I couldn't localize it completely. It did seem to go back towards the ECU, though...
Cheers,
Shaun
-
I will look at a wiring diagram n see. what are the colors (red/blk stripe) n sequence on the connector?
Thanks for the response. Sorry for the late reply -- I have been in the garage all day.
I have the side cover back on now, but from what I recall, and can see in the picture, I believe it was:
Black
Red/Black
Red
White/Black
Everything seems to be working fine, which would seem to support my feeling that I had not disconnected this connection.
Thanks,
Shaun
-
Hi, folks.
I am starting to put my 2003 Le Mans back together after completing a lot of work, and have come across a connector that I am pretty sure I did not disconnect, and for which I can find nothing to connect to. Looking at the wiring diagram, I can see that there is supposed to be diagnostic connector somewhere, and thought that this might be it, but it appears that it is supposed to be a 3-wire conenctor, where this is 4-wire. The colors don't seem to match either. The connector sits under the left side-cover, just at the bottom of the airbox. I have attached a pic, and hope that someone can help me figure out where is goes.
Thanks!
Shaun
-
Wow, some fantastic ideas, here -- I never would have thought about adding a separate fuse block!

My sincere thanks to all. Once I get back out there and get it sorted, I will post an update.
Cheers,
Shaun
-
Thanks, gentlemen.
Sorry, I should have mentioned that the Zumo 665 uses a hardwired crade, not an lighter socket/power point. So, my intent was to wire it into an existing switched circuit. For the horn relay, I have wired fused power from the battery, and am using the stock horn circuit to switch it when the button is pressed, so that wouldn't work well for other things.
I am really against cutting into any existing wiring, so my thought was to create a split patch lead to insert in between an existing termination point, thereby powering two devices without disturbing any of the stock wiring at all. I would then be able to return it to stock very easily by removing GPS along with the intermediate wire. Does this sound like a reasonable approach?
Thanks,
Shaun
-
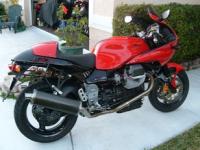
Hi, folks.
Lots of work to the 2003 Le Mans recently. I built a manometer and balanced the throttle bodies (runs beautifully now), installed some MPH risers, put on some Motobits foot pegs/controls, upgraded to Fiamm El Grande horns, and am now in the process of insalling a Zumo 665 GPS. I was really surprised when, working on power, I found that the bike had three major cable connections to the positive terminal of the battery! This doesn't even include the new one I just added for the horn relay, or the one that the previous owner added for the power point. Is this really normal? All previous bikes that I have owned have only had one positive cable (plus anything that has been added after manufacture). No matter, really, but there is not much room around the positive terminal as it is, and all those connections really make a mess of things.
Now to the issue at hand. I have figured out where I want the GPS mounted, and have started running the wiring, but am looking for suggestions for a good source of switched power. I definitely don't want to wire anything else directly to the battery, and I think it is better to go switched for the GPS anyway. So, any recommendations relating to successful options would be very much appreciated. I'm running the XM antenna into the tail section regardless, and have the bodywork completely stripped anyway, so there is really no dificulty in accessing any part of the bike.
Thanks for any input.
Shaun
-
PERFECT! That was exactly what I needed! For the record, ther is no way that I would have been able to get these off by hand.
Thanks, Skeeve!
Shaun
-
Thanks, gents.
No rubber pad on the tank, and I am pretty certain that it has an internal pump. I'm not sure it even has a petcock? Sorry, but I am relatively new to this bike!
Shaun
Well if it has the internal fuel pump you should take off the tank retaining bolt, lift the tank at the back and stick something to keep it up a couple of inches for easier access. You will have 2electric plugs to disconnect ( fiddly) then disconnect the QD,s on the fuel lines (even fiddlier) . The way i do it is keep your left hand on the red or white plastic connection coming out of the tank, then with your right hand push or pull collar on the fuel line til its loose, some petrol will leak out. When they are off lift the tank from the back and look underneath in the middle there should be a overfill hose to disconnect then lift it off. Just be careful with the connections. When you are putting it back on make sure the fuel lines are fully home.
Gary
Hi, all.
I'm hoping for a bit more information regarding the quick-disconnects (not) on the later bikes? I'm trying to, well, quickly disconnect them, but they don't seem to want to come loose. I'm pushing, pulling, etc., and concerned that I am going to break them if not careful. Does anyone know which way they should go? I'm trying follow the instructions that Gary was kind enough to provide, but am not sure if I should pull the collar towards the red/white connector or push it away. I am assuming that I shouldn't try to twist or squeeze the collar?
-
Thanks, gents.
No rubber pad on the tank, and I am pretty certain that it has an internal pump. I'm not sure it even has a petcock? Sorry, but I am relatively new to this bike!
Shaun
Well if it has the internal fuel pump you should take off the tank retaining bolt, lift the tank at the back and stick something to keep it up a couple of inches for easier access. You will have 2electric plugs to disconnect ( fiddly) then disconnect the QD,s on the fuel lines (even fiddlier) . The way i do it is keep your left hand on the red or white plastic connection coming out of the tank, then with your right hand push or pull collar on the fuel line til its loose, some petrol will leak out. When they are off lift the tank from the back and look underneath in the middle there should be a overfill hose to disconnect then lift it off. Just be careful with the connections. When you are putting it back on make sure the fuel lines are fully home.
Gary
Thanks, Gary -- that's a big help. I used to ride Hinckley Triumphs, and recall that there were a lot of failures of the plastic QD connectors as they were really fragile. Many people replaced them with metal equivalents to get past this. I hope that this isn't necessary with the Guzzi parts, but wonder if anyone has done something similar? I know that Jaap mentions something in this thread above, but that seems more like an in-line solution rather than a direct replacement.
Off to take things apart!
Cheers,
Shaun
All Guzzis go to heaven, right?
in 24/7 V11
Posted
Wow, that long to just find out what is wrong? Seems a bit of a stretch to me...
Best of luck -- hope they can get you fixed up soon!
Shaun