

RichMaund
-
Posts
390 -
Joined
-
Last visited
Content Type
Profiles
Forums
Events
Gallery
Community Map
Posts posted by RichMaund
-
-
Most of my bikes warts were fairly easy to remove. I have NO issues now with the FI. This bike runs great! Niggling problems seem to keep popping up. In Sept. it was worn out rear wheel bearings and brake pads at only 8K miles. Now it's a ripped intake boot. New ones are on the way. Easy stuff to fix and the bike has never let me down out on the road. It's a blast to ride and makes me grin every time I get on it. I love just looking at it. It's easy to work on. The grins waaaaaay outweigh the frowns, so I keep coming back to Guzzi. My last Honda (1983 Saber 750) would get fouling in the carbs. The clutch slave cyclinder would leak when I stored it during deployments and the bike bored me. My last Yamaha (1983 Vision 550 with full fairing.) had a self destructing starter. Got so I could pull it at night in a dark parking lot in ten minutes! It's kill switch shorted and caught fire. It used to eat speedo cables. All my Japanese bikes overcharged their batteries. I used to have to add distilled water regularly to them. My last BMW (1971 R75/5.) ate it's tach and had unsolvable electrical glitches. Weak ass charging system was useless in the Winter.......
When I look back like that over my 12 Guzzi's and 12 "other" bikes in almost 23 years, the Guzzi's are about as reliable, much more durable and are more fun and satisfying to ride.
I think I have this flu bug beat now. I'll go for a ride in the morning!

-
The manual calls for #2 Lithium grease.
Common stuff.
-
I agree with you SN. I fell in love with the looks of the bike in it's stock form. When I can afford it, I'll buy another seat and make a solo version and keep the tail piece attached. (The passenger backrest unbolts from the rack with four allen bolts.)
But I love having my wife and family ride with me more than I loved the solo style of the bike! The solo seat lost. I had to make it good for two up riding.
-
I just got off the phone with Joe Eish. He has the V11S intake boots in stock for $10 each. Not $78 like the parts guy at Winchester quoted me. He also had the V11S Parts Book in stock for $20. He's mailing me the boots and book Monday.
I'm not sure what's up with the Dealer's parts book that Winchester would quote me $78 on them. But something is wrong here, because Winchester runs an honest shop.
Thank God for Joe Eish!
Feeling a bit better today, but still dragging. A 20 minute ride on the V11S did help some!
-
That is a great site Jaap! Thanks for the update!
-
Remember I'm a ex-nuclear mechanic. We were trained to NEVER say something in a clear and consice sentence when a long-winded paragraph could be used!

-
Good tips Guys! Thanks!
I've been fighting a bad intestinal bug for a couple days now. It destroyed me yesterday afternoon and evening and then I felt better this morning. Worked a normal day today and it hit me again this evening. Thankfully, not as bad! This is really gonna cut into my riding this weekend. Bummer too.
 This Sunday is the Breakfast in Richmond Va. 200 mile round trip. I'm gonna hate to miss it, but I don't want to give this bug a leg up on me again! I WILL test ride the bike though tomorrow. I get this feeling the performance in the mid range will be better now!
 This posting WAS checked for virus's though, so don't worry. You won't catch what I have from it.
-
But the Lemans isn't three years old yet! MG won't publish a manual until they are that old!

I have a 'zox of the V11S maint. manual too. Pretty good manual!
-
Folks
It really bothered me that the bike gave such odd air fuel ratio readings on
the dyno. Off scale lean at midrange and wavy, but acceptable in the low and
hi range. Todd and I figured it was because the tail pipe sniffer only goes
about 12" into the muffler in this dyno. Reading upstream of the cross-over
would be better. But it seemed to read OK hi and low. What gives?
I believe I found it....
The right intake boot has a crack in it on the inboard side. Just a narrow
clean little crack that's almost hidden by the clamp. Where does the engine
vibrate the most? Midrange! What is the likely cause of the crack opening up
enough to lean out the AFR in the midrange? Engine vibration.
Just enough to throw the whole thing off w/o really affecting drivability
yet! Sheesh!
Had I done all this last month I bet the crack wouldn't have been bad enough
to affect it yet!
I removed the clamp and put some black RTV around the boot to seal the
crack. I'll re-clamp it tomorrow after it's cured. OK temporary fix. Left
boot is fine.
Did y'all know that new boots cost $78 each from Guzzi?
&%$#@(*&^~@!!!!!!!!!!!
Anyone know of a reasonably priced alternative that last more than 18 months
or 10K miles?
-
Adding the PCIII to my V11S has eliminated all the occassional coughs at idle. I even lowered my idle speed from 1200 (Where it would occassionally cough but not stall.) to 1100 rpm. It used to be, at 1100 rpm idle, it would idle OK at traffic lights for a minute then cough and die. Now it ticks over at 1100 rpm like it's happy doing it all day. It's a great bike in traffic with it's light handling and smooth throttle response.
Having the Dealer do a good service to it and tweak it in with factory software eliminated almost 90% of the driveability problems. And I was happy with that. But plugging in the PCII has made it rock solid 100%. That was the best thing about it.
Now I dream of Stuuchi cross-overs and a trip to FBF for "link" tuning. Ahhh! The possibilities with these bikes!

-
Here's a HP vs Speed graph from my dyno runs this morning. Unfortunately the equipment there is older. They have no way to kook up to the PCIII. But it gave me a good idea of what's going on. The dip in the 4's is still there , but narrower. Picked up about 2 Hp and 2 ftlbs torque almost everywhere except in the dreaded 4.5K rpm range. The air-fuel ratio readings were really screwed up though. Made me wonder if their sniffer was OK. Off the chart lean in the midrange! The headers should have been cherry red according to their sniffer, but the bike ran great and never overheated at all. We richen'd it, but the bike felt weaker afterwards in the 4's. I'll put that adjustment back to where it was.
My overall assessment? Worth the money. Driveability is much improved and the bike is stronger to boot. But I need to go somewhere like FBF to get it done properly on up to date equipment. Probably some more to be gained in efficiancy if I do that! So I am very happy with it so far.
My two hours on the dyno there weren't wasted, but I need to go to a better facility to do it right!

-
I considered that too Jim. But after trying it on my old Guzzi, the noise was overwhelming. So I plan to keep the stock box for now. Besides, I really like the stock side panels. ;-)
-
Thanks Russ! I appreciate your business!
This is where my job satisfaction kicks in!
-
One of the first really good accessories I made was also my first lathe project. I machined a lump of aluminum round stock into a billet gage holder for a VDO quart dash clock. I polished it and mounted it, with the VDO clock, onto the top of the dash of my '97 Cali 1100. That really worked well and looked like a factory accessory. At Winchester's Open House in '98 the owner was driven nuts by a number of folks asking him to get them the accessory clock for the dash of their Cali. He kept trying to explain to them that there was no such thing. And they'd argue that it was right out there on one of his bikes out front! (I parked at the end of his line of demo bikes in the front of the shop!
)He saw it, knew it was my bike and tracked me down to try to get me to build more. I told him great! $60 for the clock (retail $$) and eight hours of shop rate to machine the alloy plus the cost of the alloy itself and they'd be all his! His jaw just about hit the ground.
Some things are just not economical to build.
Of all the custom work I did to that bike and later the sidecar I added to it, that piece was my favorite.
Any time you can make something look like a factory accessory, you're going to be really proud of it!
-
Thanks Folks!
Actually, with practice and the right tools, rebuilding a seat like Russ's takes about one work day. Though due to delays that come up and folks dropping by it often stretches to two. Back in 1996 when I bought my first walking foot machine, a job like that took a few days. I have had LOTS of practice and greatly improved my tooling and technique over the years. That is one reason I haven't raised my prices in three years. I have found ways to improve efficiency and my suppliers have had only very modest increases in thier prices. So if I stick to jobs I know I can nail well, my hourly wage on jobs has actually increased modestly each year as well. Folks are welcome to come here and wait while I build it. Most seats can be done in one day. If it's a complicated seat like a EV, I will build the covers in advance and do the rest while you're here. On those days I work right thru the day and even ignore calls. But I can have you done by dinner time and ready to ride out. On those evenings, I usually take the family out to our favorite Mexican Restaurant since I am "finished" at the end of that day and need a break!
 I am pretty busted up physically and have much arthritis, so on days that I push it, I really pay for it by day's end!
So if anyone out there wants to see their seat get built, that's perfectly do-able!
I can sell gel, foam, glue or fabrics also.
-
Folks
No dyno runs today to report. Sorry. The Dealer had a tech call in sick
today leaving them strapped. I'll have to go back Thursday morning.
But after over 100 miles of use, here's what I can say. Try as I might, I
cannot make it ping anymore under acceleration. No matter how many times I
get off the freeway and do a sudden hard stop to see if I can make the
engine stall, it doesn't happen. Roll on power in the 4's is much better
now. I doubt I'll ever downshift to pass anymore.
I'll see Thursday what the dyno has to say. But for now, I can say that
drivability is 100%. No more occasional glitches. This bike just plain runs
great!
-
It's not rocket science. I'll try to keep it concise, but you know me.
You first have to have an idea of how you want it shaped to fit you better.
To reshape it, you must be able to add foam and then shape it smoothly the way you want it. I use 100# density urethane foam. firm, but not too firm. I buy it wholesale in 2' X 9' X 2" blocks. Retail on a piece of this is about $60. To glue it together you need good contact cement. The DAP junk they sell in hardware stores is like corn syrup. Never hardens and will slip and let go. Useless, as are all the spray can cements. You need to use the commercial grade DAP upholstery cement. It is a laquer/urethane cement that is pre thinned to 80% solids for spraying. You can brush it on, but you'll use more than you need to and it IS very expensive. It is only available wholesale and it runs $50 for a 5 gallon can. Your local auto upholstery shop may sell you some if you bring in a clean resealable metal can to fill. I use a Sears spray gun to shoot it. I typically use up to a quart to rebuild a complicated seat like a EV. Reshaping, installing gel and top foam all use up the glue. I seal the seams of the cover with it as well. 45 psi will shoot it very well.
That covers gluing. How about shaping? I use a long bi-metal fine tooth hacksaw blade for rough shaping. Allow for removing another 1/4" when you smooth sand it later. I hear electric carving knives work too. But I keep it simple. Smooth sanding involves a high speed pneumatic disk sander. I use a 8" 80 grit disk at 90 psi pressure. Let it spin fast and take light cuts. With some practice and a good eye for evenness, you can make it look molded. The high speed sander does impart a static charge to the foam though. Makes the dust cling to you. This work generates alot of dust. It's a bloody mess and should be done outdoors. I wear coveralls and a full face respirator. I don't like paper hoods as they always seem to be in my way as I work. So I use a old Soviet surplus M70 respirator made in Bulgaria. Any of the old Soviet "helmet" syle respirators will work well as dust masks and keep all the crap out of your scalp. But I like the M70 because the tissot tube design keeps it fog free w/o needing anti-fog treatments on the lens and the lens fit flat to your face like good goggles. Very good straight ahead vision. Periphrial vision isn't important in this work. Other common masks like the GP5 have angled lenses that leave a halo effect right in front of your face where you need to see best and the filter hangs down and can get in your way as you work. The M70 has a left side mount filter. Stays out of the way. Cheap too. About $20 for a new one on the surplus market. Just make sure you buy a large! (Size 4) Most of what's for sale are smalls. I don't like the masks with the large plastic face shields. They are usually badly molded and offer poor depth perception. As you lean over to work your sweat pools in the shield and annoys you badly. My old Gulf War issue MCU/2P was like this. Sweat gets blown out the bottoms of the Soviet masks. In this case, I think they had the better design. I can't stress keeping the foam dust out of your eyes and lungs enough! Get a snoot full of that stuff and you will be wretching!
 So just use the sander to smooth everything just so. You can use compressed air to clean yourself off afterwards. Cotton poly coveralls shed the dust pretty well afterwards too.
OK, now you've shaped it! Best thing to do now is go ride. Make sure it's what you want to ride on! Changing it at this stage is child's play.
Got it right? Good! Next problem.... the lines of glue where you joined the layers of foam will show through the cover eventually. What to do? Buy some automotive headliner material from your local auto upholstery shop. Spray a light coating of the cement on the seat and the fabric side of the headliner. Let it tack up and lay it atop the seat. Smooth it over the sides. Where it needs to fold up, like at corners, let it. Trim the folded areas off first and then the excess off the sides. Nice and clean looking now! That 3/16" foam layer will smooth over the glue lines and gives the seams in the cover a place to sink into for a better fit.
I have discussed my gel installions here elsewhere. I can't give away all my secrets.
 But if you use gel, blend it to the cushion. Isolate the gel from the foam with 1 mil. plastic sheeting. Foam and vinyl can leech silicones from the gel in time when they are in direct contact. It pooches out the foam and will puff up the vinyl. So use plastic sheet to keep the gel out of contact with the other seat materials. You can often buy preshaped vacuum wrapped gel pads. Many folks use these. Just route a hole in the foam and lay it in. But you prolly won't cover the whole area you need to. And the edge where foam meets gel can form a pressure point you'll feel later. This is why I like my technique better. I buy bulk orders of 18" X 16" X 1/2" gel sheets. I can sell you one if you want to play with it. They are pricey though. Most expensive material I use. You want to cover the gel with a soft layer of 1/2" thick 20# foam to act as a insulative layer. Slows down the rate of heat transfer between you and t he gel to keep from cooking or freezing your butt. I will soon have a sample of a new closed cell foam here to experiment with. It seems to have the same properties as the gell with easier installation and slightly less cost. If after I test it out and like it, I'll discuss it here.
Now you're ready to cover it! Congrats! Probably quite a project so far! Using a fine tip marker, run a centerline down the seat on the foam. Next mark where you want the seams to be. Keep them away from where your thighs go over the seat. They form a pressure point. Keep in mind the fabric has to be able to bend to where you place the seams. Now you have a pattern of where the parts of the cover need to be. Cut a pice of vinyl oversize and lay it atop the seat. Allow for a couple inches to go under for stapling. You'll trim the excess off after you're done. Use the marker to place dots every inch or so on the underside of the vinyl where you need to sew. Allow for where you may want it tighter/looser as you do this. (I can't tell you everything folks. Some stuff takes practice to get a feel for it.) Now you can connect the dots and you have your sew line. Trim it off allowing about 5/16" excess outside the sew line. Once you have the pieces the way you want them, I recommend holding them back up to the seat to see how they'll fit, you're ready to sew.
Sewing: You need a heavy duty walking foot machine to do it right. Many home machines will handle two layers of vinyl. I have a old Singer that will handle three layers if I slowly roll the machine through by hand. But a walking foot machine is best. Pfaff and Juki/Consew (Old Singer designs) are my fav's. I have a Juki with large bobbin and reverse. It'll sew thru 1/4" belt leather and not drop a stitch! I use heavy 32 oz. marine grade vinyls. They stay pretty supple at low temperatures and wear very well. Better than leather. Leather is overrated as upholstery. It stretches, sags and dries out quickly if not kept treated. And trying to sit on treated upholstery grade leather is like sitting on a teflon fry pan. You'll slide off as you hit the brakes! I use heavy 138# poly sail makers thread. But nylon auto thread is adequate. But the heavy poly is stronger, more fade resistant and lasts longer.
I like to join side pieces in the middle first. Then I sew the front piece (under your butt) to it's sides. Do the same for the rear portion. Sew the rear portion to the front and then the nose piece to the front to finish it. After you sew a seam you can fold the material under and double stitch it. You can trim excess material. But don't trim too closely as you can ruin the double stitching. You have to plan the seaming in advance. Being able to think upside down and backwards is very helpful to place it all the way you want it! Visualization is everything here!
Ready to fit the cover? First coat the backs of the seams with urethane cement. Seals them and glues the thread to the fabric to keep a broken stitch from spreading. Allow it to dry a half hour or so. If your seat has concave depressions and you need to glue the fabric to the foam in these areas, apply glue to the foam and cover there too.
Now you have a half hour to kill. Get a cuppa, get on the computer and check the forum for new postings! Is this a great job or what?
You can buy a horribly expensive upholstery steamer to heat the covers to make them more supple for fitting. I just use a big old kerocene blower heater. Start the heater up and warm the cover a few feet away from it. When it is warm to the touch and drapes nicely, it's ready to fit. Place it on the seat so the nose fits well and it's aligned down the center. I like to warm and pull the nose snug first, then the rear and the sides back and forth to keep it all even. You must keep warm it to get the proper tension. You don't want it to sag in the sun, but now so tight that it looks like a cheap face lift. I use a pneumatic staple gun. 1/2" crown 3/8" long staples. The air guns shoot the staple thru a extended nozzle. Very helpful to place staples into tight areas on seat pans. Hand held guns lack this and they are difficult to use to place staples accurately while you're trying to hold the cover where you need it.
When you're all done, inspect it. If good, trim off the excess vinyl underneath.
You folks are lucky I was up before dawn today to see the meteor shower! Or I never would have had time to do this. Hope you enjoyed it. I have to get some work done. Dyno reports on the PCIII Later!
-
Sorry folks. And my apologies to Admin! My long post is in another part of the forum, not here. It may be alzheimers!

That, or I am simply a drifty bastard.
The long post is here:
http://www.v11lemans.com/forums/index.php?...f=8&t=330&st=0&
-
Al
That looks stunning on the bike! I'm glad they nailed it for you!
Corbin actually helped give a start building my own seats years ago. I wanted a seat for my Mille' GT. But I couldn't get to either of their factorys to get it done. They refused to do it via mail order. That was back when they were quitting the custom business for mail order work. A local builder screwed the job up and took three months to do it. Then Sargents did the same to me, but faster. I was so angry I bought the tools and did it myself. That was how I got started!
I really admire Corbins designs from the early 90's back. Your seat is the reason why. Looks like a perfect blend of function and style!
-
I wrote a long post here earlier about my business. But it seems to have been deleted. Since admin didn't bother writing me to slap my wrist about it, here's the short version:
I have little backlog. I could build a seat next week for you. I spent most of the summer caring for my Mom while she was dying and it wiped out my business. Months later, it is just now picking back up to the old pace. So for now, I could set appointments as soon as next week.
Price for the solo or two up rebuild is $280 including overnight FedEx in the USA. That includes the custom cover just about any way you want it in my heavy marine vinyls and gel padding in the front. Out of the USA, you'll have to cover shipping costs. They can be high! The last 28 pound package I sent to the UK cost the customer about $100! (A rebuilt Lemans seat weighs about 20# packaged up.) And shipping things back out of the USA is more pricey than shipping them in. Turnaround time with an appointment is a couple days. That is why I work by appointment, so I can manage the turnaround times better. Too many of my own projects just sit around for months. I don't want customer stuff to do that!
So if you want a job scheduled, just contact me.
rmaund@pinn.net
-
I have one left. It is made from thick black leather vice red. No more material in the shop to make more. Sorry. Until demand warrants it, I can't just afford another hide. That's a big investment in materials!
-
Folks
For the first time in five years I have no real backlog. I could build a seat next week for you. For a number of years I stayed booked up 2-3 months in advance. But taking this summer off to care for my Mom while she died took me off the radar screen of the Guzzi crowd. With no one talking about the seat they just got from me on the MGCL this summer, folks stopped asking me for seat work. I usually build 2-3 seats a week. Mostly Guzzi's. That steady output and folks talking about them brought me a regular business for some years. I do no advertising and don't want to. I depend on word of mouth to bring me business. I have found that if you advertise, you get many low life customer wannabe's with stupid or unworkable projects they want built bothering you. And because they took the time to call you, they expect a free education on why their idea sucks or get mad at me because I can't turn a sow's ear into a silk purse. Good business begets more good business. If I stay slightly hard to reach and mostly deal with folks who heard about my seats from other customers, I find the quality of customer work increases. I get enthusiasts tracking me down with good ideas for workable projects. Much better business that way. I get a better clientele by staying low key. Business is picking up slowly. In Oct. I had only two jobs scheduled for Nov. But here I am working steadily and often on evenings and weekends because good projects keep falling into my lap just as I can do them. That has been a blessing for me as I really would rather not look for a "real" job this winter. I go back to college in Jan. and that would really hurt taking classes. (Right now I'm three classes shy of a AS degree in Eng. Supervision and certification as a CNC machine tool operator/programmer.) If business continues to pick up, I will will be booking work well in advance again.
But right now, just contact me if you need your Lemans seats done. I'll set up an appointment for you and it'll be rebuilt and FedEx'd back to you a couple days after I start it.
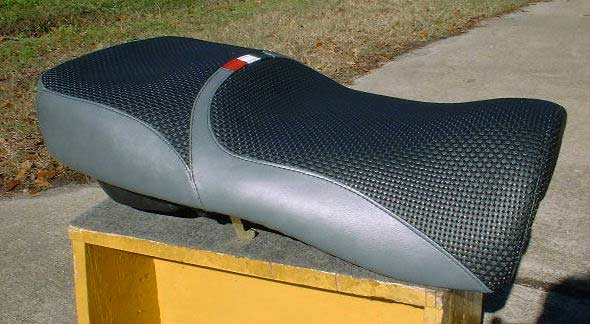
I can build them with a gel sheet to pad the front and the rear cowl will still drop right on. Or I can also reshape the rear for better passenger comfort, like the one I shipped today. The gel sheets are good stuff. They are solid, not liquid. And none have oozed since the bad old days when Sports Med was the manufacturer. That company used to take short cuts and not bake the two part silicone mix long enough to cure it properly. Some of their pads were known to ooze as they aged. For three years now, another company has manufactured them. That problem has never come up since they took it over. And I do glue 1 mil. plastic sheeting on the foam prior to laying the gel sheet on it. No raw gel comes into contact with foam or vinyl. Then I trim, blend and bevel the gel to match the shape of the cushion. I have built them this way for over five years. It's a proven technique. Everywhere you sit is covered with gel sheeting. No harsh edges where gel meets foam to form pressure points and bother you. I layer on another plastic sheet to lock it down to the seat and layer .5" of soft foam above that. Cushier and adds a thermal barrier to slow down the rate of heat trandsfer between you and the gel. Won't cook or freeze you that way. The seat pictured above has gel in the front. It does much to reduce pressure points and absorb shocks and vibes. Reduces the volume of the "monkey butt" you feel at the end of a long day.
I can do all black covers or with the dark gray like in the photo. No extra charge for colors, textures or Italian flag trim. All seams get double or triple stitched and sealed with urethane cement. All vinyls are heavy 32 oz. marine grade and the thread is heavy #138 poly sail making thread.
I'm an ex-Navy submariner and nuclear plant mechanic. I DO try to build them to last. Good form and function ARE style in my book.
Cost is pretty reasonable. $280 includes the seat rebuilt for solo (with cowl) or two up with gel in the front and overnight return FedEx shipping. Va. residents add 4.5% for the Guv'mint. If you wanna go crazy and gel the rear for best passenger comfort, add another $110 for the second gel sheet installation.
I've been building seats professionally for over seven years. Full time for over three of those years. I have owned a dozen Moto Guzzi's amongst my two dozen bikes over the years. I'm a life member of the MGNOC.
I doubt you'll find many seat builders with my qualifications!
OK. Infomercial mode off. Just contact me if you'd like to discuss a job.
rmaund@pinn.net
-
Dense closed cell foam tape works well to pad it there too. I think they all rub there.
Here's a picture of the two-up Lemans seat I shipped today. The new owner will have it tomorrow and we'll see how he likes it! Sorry. I just had to show it off. It was a great project!

-
Folks
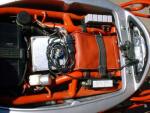
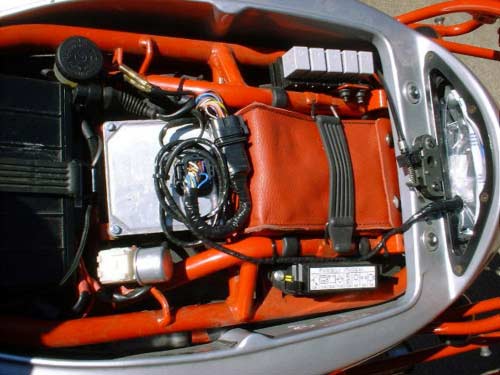
I installed the PC III this weekend. Easy job. About 20 minutes. Most of
that was spent finding a good way to place the plug for the wiring so it
didn't hit the pan. Placing it aft of the bikes computer next to the tool
pouch and coiling the extra cable in a circle atop the computer worked
really well and looks neat too. The PCIII itself resides in the tail piece. Plenty of room there. It
rained all weekend though, so today was the first ride.
I got a nice 20 mile ride in this morning with the new PCIII in my V11S.
Here's my seat of the pants impression:
First off I noticed it raised my idle speed when the engine warmed up. It
went up a full 100 rpm. So I lowered it back to 1200 rpm.
Riding around town. Drivability is a notch better. No more occasional cough
at long lights when idling. Ran well and felt good. Heavy traffic though. I
couldn't "play" too much. After I FedEx'd the seat I needed to ship I went
out on the freeway and went to my favorite cloverleaf ramps.
Impression. Noticeably stronger all the way up. No more "rush" as it hits 5K
rpm because it is pulling stronger in the 4's. Throttle response is more
linear. Now it's a nice even ride to yellow line vice the dip & rush that
used to be there. Feels stronger up top. I missed the rush at first, until I
realized that I was accelerating better w/o it due to the bike pulling
stronger across the whole powerband. I tried some roll on passing with the
engine at 4K rpm. It used to feel doggy there before and I would sometimes
have to downshift to pass someone quickly. Now it pulls stronger from 4k as
I roll on the throttle. No downshift needed. I can get really used to this!
The PCIII was set up for my bike running the stock airfilter & box but with
Mistral pipes and stock cross-over. But I have not had it dyno tuned to
personalize it optimally for my bike yet. But my seat of the pants
impression is that the bike runs much better. Right now my feeling is that
even if I don't get it dyno tuned to finish optimizing the mapping, I can be
very happy with the way it is presently!
I plan to do before & after dyno pulls tomorrow at the local Triumph shop.
One with the PCIII plugged in and one w/o it. We'll see if my "pants seat"
is accurate or if I'm full of it. Stay tuned! ;-)
Attached is a pic of the way I routed the cable and plug. You have to place the plug where it won't get crushed by the seat pan. On the aft end of the computer by the tool pouch worked well.

Factory Workstand
in Technical Topics
Posted
It comes with a spool shaped prop to place under the oil pan. That brings the front wheel up even with the rear. So it does hold both wheels up.