Mikuzzi
-
Posts
29 -
Joined
-
Last visited
Content Type
Profiles
Forums
Events
Gallery
Community Map
Everything posted by Mikuzzi
-
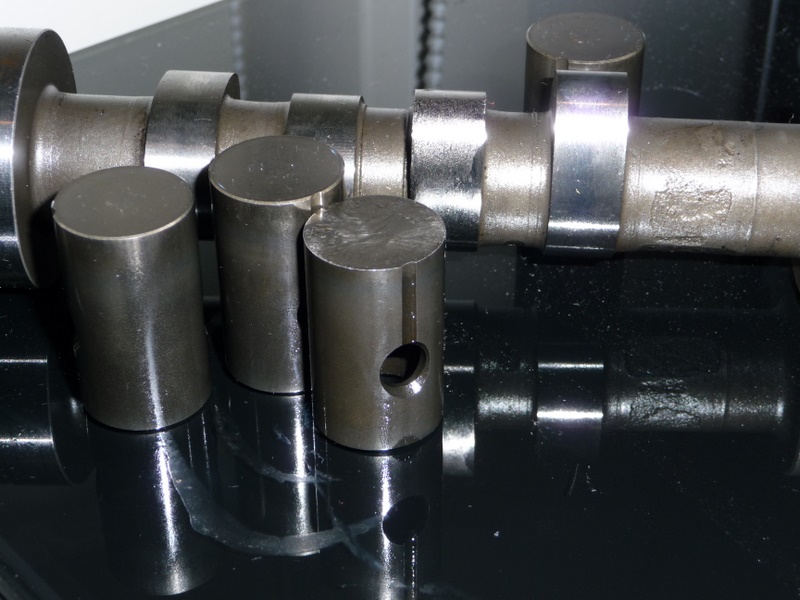
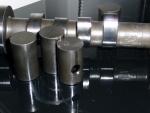
Got the bike back and is running well. I also got back the offending bits of innards so thought I'd post a pic for interest. If this was a bad batch, most would probably have failed by now. I was staggered at how much material had worn off both the cam lobe and the tappet (lifter? what's the right term?). There was some talk at the workshop that inadequate lubrication in the area may also be an issue, based on the fact that the replacement cam had much larger, repositioned oil galleys.
-
How great is that! Gave me a grin that hurt- thanks Gavo
-
Thanks Mike -The oil pump has been stripped and checked amongst other items. Just in limbo at present waiting for parts to arrive from Europe.....waiting....waiting....a long way away, Europe...
-
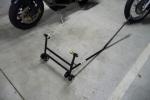
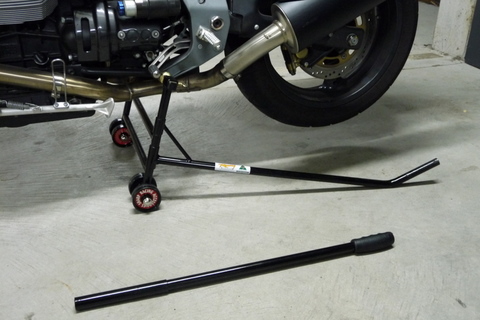
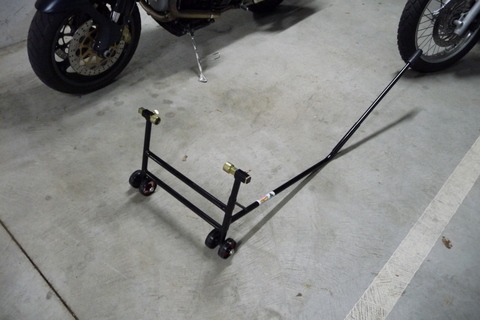
I took my bike to a local race stand fabricator. He ran a measuring tape over it and made a stand based on the OEM item but with removable lever arm and, the whole thing is able to fold flat for storage. Not overly cheap but it does what it says on the tin every time - very solid.
-
Tom M thanks for the link – must admit I got a bit depressed about halfway through the read when consensus seemed to be that the engine was now shot and should be sent back as a warranty claim – no option there for the V11. Interesting magnet idea. Is there a magnetic sump plug available (I think my wife's BM has one)?
-
My Ballabio is undergoing surgery at the local Guzzi workshop. Tappet noise started to get quite loud during a fairly gentle (honest!) morning ride and it turns out that the microns thick hardening on the timing lobes of the camshaft has worn away and the tappets are chewing well into the metallic cheese underneath. The tappets themselves have also worn. The mechanic told me today that there's around 70 thou. of material missing – well, not missing, just now mixed with the oil. The bike was made in 2003/2004 and a search here says that was when the factory was outsourcing component hardening duties. So, what do I need to look for/be mindful of after repair? I've asked that the oil pump be stripped and cleaned and the mechanic's going to pop the shell bearings in the bottom end to check condition, flush the oil system renew filter etc.. Any advice? Btw, the bike has done just 14,000Km – a bit disappointing that.
-
Direct Wire for GPS - Parasitic Current Draw?
Mikuzzi replied to sign216's topic in Technical Topics
I think the Voltage is stepped down to 5V, the adapters use a few mA even without the GPS plugged in but that's enough to drain the battery over 2 or 3 weeks, connect your multimeter in series you will see (provided that the meters fuse isn't blown of course, try it with the GPS installed to be sure) I'm getting 0.3 Amps with the Zumo in the mount and working, and 3.3mA with just the mount by itself (disclaimer - I'm using a multimeter that cost all of $9 so accuracy may not factor!) Even a $9 meter would be better than +/- 10% A 10 Amp hour battery would be at 1/2 charge 5/0.0033 = 1,500 hours (2 months) So...my Ballabio has a 13 AH sealed battery. The GPS mount will take this down to 80% charge in approx 4 1/2 weeks. Add the normal self discharge for these type batteries of around 2.5% per week and I'll get around, what, 2 1/2 to 3 weeks from full charge to 80% - I've got to ride more! -
Direct Wire for GPS - Parasitic Current Draw?
Mikuzzi replied to sign216's topic in Technical Topics
I think the Voltage is stepped down to 5V, the adapters use a few mA even without the GPS plugged in but that's enough to drain the battery over 2 or 3 weeks, connect your multimeter in series you will see (provided that the meters fuse isn't blown of course, try it with the GPS installed to be sure) I'm getting 0.3 Amps with the Zumo in the mount and working, and 3.3mA with just the mount by itself (disclaimer - I'm using a multimeter that cost all of $9 so accuracy may not factor!) -
Direct Wire for GPS - Parasitic Current Draw?
Mikuzzi replied to sign216's topic in Technical Topics
I needed the GPS in a hurry so wired up a Garmin Zumo mount directly to the battery - the supplied cables have an in-line fuse. Obviously the mount is live all the time so the GPS comes on as soon as it's fitted to the mount. I'm convinced that there is a small drain on the battery from the mount itself - at least the battery has started losing more charge between rides than before. Next job is to change the supply from the battery to a switched source. -
Nice. Thanks Roy
-
Replaced the Metzler Sportecs at 10500 Km (not all my K's - they were on the bike when I got it) with Angels and liked them straight away. Felt much better - possibly due to fresh unworn profile, but made a big difference.
-
If the plug is the sort thats installed from the outside of the tyre then they are for short term emergecy use only and the legal requirment in Oz is the plugs with the mushroom head that must be fitted from inside the tyre. How do I know this? 4weeks ago and a week before a trip i got a rear flat the bike shop that repaired it said this was the requirment. I rode 2 up fully loaded QLD to VIC, started to go flat at Reefton spur (slowly) tore the rear up a fair bit, bought new pilot2 road in Melbourne> with the mushroom type it's physicaly impossible for it to blow the plug out but can you ever be 100% on what the tyre case will do when dammaged. Gavo, thanks - I hadn't considered the legal aspect, although in VIC we don't have to go through a yearly check at rego time like NSW (and QLD?). I'm taking the wheel to a bike tyre specialist tomorrow to get it plugged properly with the tyre off or, changed for a new one if it looks too manky from the inside.
-
The tyre pressure hasn't budged in 3 days and I'm pretty comfortable running on it for a while (and monitoring as suggested). I suppose I was interested to hear if there had been any known catastophic failures of a plugged tyre as opposed to the repair failing and the tyre losing air the same way as, say, getting another puncture. Thanks for your input guys.
-
On the weekend I had my rear tyre punctured with a 40mm long wood screw. I plugged the tyre with a kit that uses shaped rubber plugs (not the cord type). The repair got me home without problems, so the kit did its job. Checking 24 hours later the tyre is not losing any air and the plug looks ok. My head is saying, ditch the tyre and replace it - it’s a Pirelli Angel ST with just 1000Km on it, my wallet, though, is complaining loudly at the prospect. I checked an old 2007 thread on here where opinion was pretty much divided down the line between replacement of a plugged tyre or running through full life as long as the plug was good. My question then is this: Is there anybody here that has had a plugged tyre fail during “normal” use?
-
My final drive splines were showing a light dusting of rust ( at around 10K Km) so I rubbed in a couple of finger smears of grease on re-assembly.

-
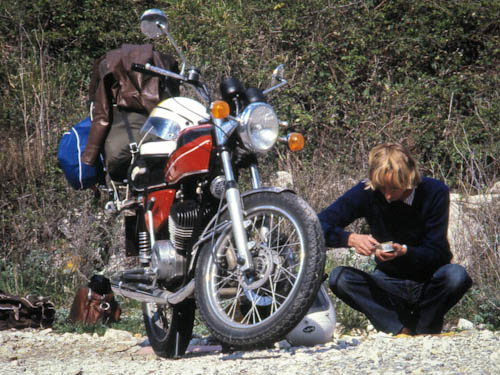
Hmmm.. This strikes a chord. In 1980 my wife and I bought one each of the Benelli variant (250 2C) in Milan and toured around Europe for many months. These are about as simple as bike can be, mechanically reliable and easy to work on with only basic tools. The electrics though were another story. It used a woeful 6 volt system and the headlight output was tied to engine revs - at brightest, it was the equivalent of about 3 candles so we didn't do a lot of night riding. We put about 20K Km on them before ending up in the UK. The pic was taken in Yugoslavia. - as it still was, just. Tito was on his deathbed and food was a bit elusive - all we could seem to get were cans of fish. I still have one of the bikes - in a sorry state at the back of the shed.

-
I'm measuring a variation on the rotor over the full revolution of 0.6mm (as a sanity check, I also measured the wheel rim with the same measuring setup and the side runout for the wheel was 0.15 over a full revolution - according to the manual the standard value for the wheel rim is 0.5mm). I'm not feeling a pulse through the pedal so I might just stare hard at it and monitor for a while. I did find the min. thickness stamped on the rotor, 4.5mm (right in front of my eyes once I knew to look!). Thanks for your insights with this
-
I'm trying to get a loan of a dial indicator for the test. Do you have a spec for the run-out tolerance? The only numbers I've found are the rear rotor thickness wear range (5.1 to 4.9 mm)
-
New pads are in and good to go - BUT, now I notice a slight rub/drag once per revolution of the wheel. I suppose the rotor might have a slight warp. It's not noticable on the road, but walking the bike in the garage I hear it. Raz, why did you have to change your rotor? Do they go pear shaped often (or at least bend a bit too much)?
-
I've done around 7000 of the nearly 10,000 Km on the bike. I don't think I use the rear brake abnormally and I don't suppose the PO changed the rear pads in the time he had it. So how long does the rear set normally last? silly question I suppose - you can tell me how long that piece of string is as well.
-
Got it! As per Raz's suggestion, used a tiny amount of WD40, knocked it from the other side a few times then back to the correct side and it gave after a few choice swearwords. Used brakecleen to clean up. The pads were completely shot. The front pads though, are fine - I was expecting the reverse wear pattern. Thanks for your help (The coffee was crucial)
-
Thanks for the responses guys, I'll resume battle with the thing after work today. I'm using a punch (with extension)the same diameter as the pin and knocking it away from the wheel. A few more strikes then if no go, I'll remove the caliper as suggested.
-
OK, What's the trick to getting out the pin in the rear brake caliper? I'm trying to pull the pads for a close check and possible change. The manual says: "Using a push rod and a hammer, beat the conical part of pin “B”, using small strikes, in order to remove it from its seat" I've beat the conical end until it's starting to become un-conical but so far, it's not shifting. Any clues as to what I'm doing wrong? BTW, I tried a search on this but the search facility is getting the better of me as well, lots of non relevant results to search terms like, brake pad, Brake pin removal etc etc, tried boolean, encasing search terms in quotes and so on but still get over 200 results to wade through. If someone has a few tuips on the site search, I'd appreciate that too Cheers
-
Had this stand made up locally - variation of the OEM stand. The arm swings through greater than 180 degrees so it will hang flat from a hook on the wall and can have the arm either side of the bike. The removable arm extension gives good extra mechanical advantage and makes life a bit easier on the now, er.. not so young, back and arms. Great quality job.