raz
-
Posts
1,561 -
Joined
-
Last visited
-
Days Won
2
Content Type
Profiles
Forums
Events
Gallery
Community Map
Everything posted by raz
-
Yet the potting is on the component side too, or isn't it? Maybe one could fix the components with hot glue and fabricate a water proof bottom lid instead. All hot components are screwed to the cover, right?
-
I wasn't certain it was not a fake but now I found it on ebay too, the typo made it easy. So, how many MGS-01's are there in Cuba?

-
This will be a fine job for next winter, and then I can sell my newer regulator as almost new. I guess my old one could be regarded more reliable than the new one, after I fix it and check all soldering.
-
You didn't refill it with some kind of goo like there was before? I imagine 100 VAC would love some moisture around those components. Maybe I should put some laquer where the leads come out of the rubber, as a preventive measure.
-

-
I've been thinking of doing an autopsy on my old one too. Probably the exact same problem as yours have. How did you get into it, heat gun?
-
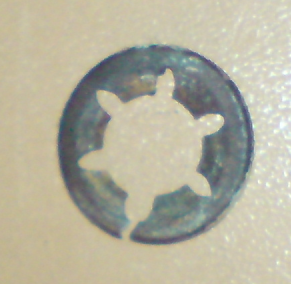
Apparently the lock ring is called a "push on fastener" and a common name is Starlock. Another name is Quicklock. http://www.springmasters.com/sp/starlock-push-on-fasteners-metric.html
-
Anyone using a MyP8 should read this: Chip fix to get rid of kickbacks Not applicable to 15M/16M
-
I assume you're right it's possible, I wasn't aware of that. But there's no reason to expect the worst: My hose made a complete mess on the outside but when I later replaced my clutch there was not a trace of oil inside. And like you say, it shouldn't cause much harm anyway. I did the opposite: My pre-historic V11 didn't have the switch from factory. As I was 100% sure it would bite me some day, I retrofitted one. But the kit did not include a neutral relay so I couldn't run the engine on side stand at all. This was more annoying than I thought it would be, so I just retrofitted the relay too (actually I did it yesterday!) using the V11 schematic.
-
It never got inside the bellhousing, it just poured down the sides. Cleaning it up should not cause any problems either. It's a tight job. I did it long ago so don't remember it all but I guess you have to remove all screws from that front subframe except the frontmost ones that you just loosen. Then you can pivot it down/forward. If you don't have the extra engine support right between engine and bellhousing, you need to support the engine underneath. I recall having no idea how I would get to it, but just patientally removed stuff until it was possible. It's at least a two beer job.
-
The controller needed is complicated, not something you would design yourself in an afternoon. But there are DIY kits available, like Megasquirt and I think there are others too. I use an Innovate LC-1.
-
Do the stock forks have clip-ons mounted above the triple clamps? If so, you could gain that length by using a conventional handlebar and mount the forks flush with the clamps. How much would you gain?
-
Here's a report from a former member who did it himself and later went to a dyno. He used a MyECU instead of a PCIII but that doesn't change much. Most dynos around here are the interia type like he used.
-
I guess this thread should be un-pinned as the resulting How-To is pinned in the FAQ section. Some people has ended up reading these literally hundreds of posts instead of finding that one!
-
It is that simple. But only you knows what is better. Doing it myself is better to me, but I like the endless tweaking. Many don't. If you want to immediately get a good map, a dyno run does that for you in an hour or two. What a dyno center will do, is go for that air-fuel ratio. So they do the same thing, except they have a rolling road and hopefully years of experience. And automated map changes. The major difference is how long it takes.
-
I don't think the stock one is as bad as some belives. My first one kept up in 75.000 kms or 11 years of weather. Not the world record, but fair enough given I don't know what abuse it went through. There is supposedly no overload protection in it, and my bike don't have the 30A fuse that V11's have... My new OEM one exceeds 13 volts even at cold idling just below 1000 rpm right after cranking (so probably delivering significant current to the battery). This despite an extra 5A load of a wideband sensor, and headlight turned on. Off idle it very soon reaches 14 volts. The regulator spec. is 14.2 volts. I played with the idea of adding a small signal diode in series with the sense wire to the regulator. I reckon that would make it want to put out 14.9 volts instead, just below the (AGM) battery spec. of 15 volts max charge. But I decided I have absolutely no need for that other than the tinkering itself. It would just make all bulbs last shorter. On my ol' bike, it's far easier setting valves and greasing all three nipples on the driveshaft than replacing the headlight bulb
-
When I was a kid we used to say the Norwegians put their windshield wipers on the inside. I'm sure they said the same about Swedes, that's how it goes. Seriously, the more I think of it, the more I recall actually seeing water drops 'popping up' from around the fuel cap, from the Bernoulli effect, when riding after a rain or wash or after some gas spill in the bowl. There is always some left that didn't go down the drain pipe.
-
I actually tried to convince my insurance company this is the case, but they didn't get it
-
Yes, and I think it will end up right on the plates, let's call it #6. Actually there is also a #7, the two lower bolts for the crankshaft bearing carrier. They are drilled through and should be taped with PTFE.
-
Is your fuel cap drain in order? I think I've had some water work its way up from the bowl after parking in rain. Maybe turbulence could spread it so it's not obvious. Oh, and have you tried riding with a full face helmet and see if the problem moves inside? Braaaampampampambraaaaampa
-
First, the ECU can not actually make the diagnose "petrol pump cutout" with any certainity, as it a) does not get any feedback on actual fuel pressure, and does not get any feedback on [electrical] pump current. It could theoretically sense that the current passing the power relay coil is too small, but that would be it. If that's the case, the correct error description should be power relay coil cutout, although the fuel pump (as well as the injectors and spark coils) will obviously lose power as a result. I have no idea what the code really means. It could even be just "deceleration when expecting acceleration" and in that case this error would also pop up if you run out of fuel or even outpower the engine with your rear brake. I would check the power relay and the ECU relay (and why not all relays) as well as the ground strap fitted to the ECU cover. Relays are said to be failure prone but I think the sockets are even worse. Clean them and grease with battery pole vaseline, and perhaps even use zip ties around the relays (I've had the power relay pop out of its socket twice in 150 kms!). In case a relay is actually bad, swapping them around should make the problem move or go away. When this appears, does turning off headlight make any difference? Ignoring the codes (sometimes they are just there to confuse you) I would replace the fuel filter.
-
Let's rephrase it to avoid confusion: does it leak gearbox oil (smells awful) or engine oil (smells, uh... engine?)
-
Fork top caps? Most engine leaks would not end up on top of the tank. Brake or clutch reservoir, or even hoses? Scary thought...
-
But then which side is the "Sealing portion", the open or the flat? These seals are so small, I'm not sure there are lips and stuff like on a larger seal. There is definitely no spring. It's pretty soft so maybe if the flat side is outwards, the seal will bulge when pulled in and seal better? The lock ring. The tabs grab the shaft so you can only push it further down, not back. I have no idea what it's called in Swedish, let alone English. But they are not too uncommon.
-
It seems I picked the wrong guy for regrinding my cam. It's 1-2 months overdue now so I'm fixing some other low prio stuff to remain sane. I've already missed two local bike events and several great days for riding. I bought the Yamaha seals (four of p/n 256-14997-00, about €15 total) that reportedly fits our TB shafts. I can confirm they do. They look just like larger seals but very small, 8 mm ID. I started with the LH throttle body, and on that side the seals were mounted with the open side inwards. I did the same without thinking. Then when I saw the RH side seals was mounted the other way, I realized this is probably the correct fitting - the pressure is always lower inside the TB, right? Unless anyone disagrees (and can explain it) I will dismount the left side again and flip them. Unfortunately a lock ring snapped from the RH shaft. It's under the TPS, the kind with inward tabs that is pushed onto the axle and can't be backed out. I'm puzzled why it broke when I was trying to pry off stuff in the other end of the shaft. Hopefully it will be easy finding a new one Maybe I should take some pics when I redo the left side, and post a how-to.