Craig
-
Posts
323 -
Joined
-
Last visited
-
Days Won
8
Content Type
Profiles
Forums
Events
Gallery
Community Map
Everything posted by Craig
-
Not that there is any controversy over this part, but I just wanted to add that it performs exactly as advertised. I was easily able to flash the oil pressure light while in first gear. After installing the plate, I CAN'T do it no matter how hard I try. Thanks!
-
Thanks, I'll look for those. I set my valves to the specs 0.10mm intake and 0.15mm exhaust. Sounds like the real world disagrees?
-
It's not the oil, it sticking my hands so near a hot exhaust to change the fluid...
-
I actually insist on doing my own work. I adjusted the valves yesterday, but aside from balancing the throttle bodies there doesn't appear to be much 'tuning' to do...its not like I need to set the timing and the dwell on an points distributor...
-
I have now had my Ballabio for about 2000 miles. It is mostly stock except for exhaust and a PCIII. This weekend I set about to do my annual maintenance. The plugs were very carbonized with a tighter gap than spec. Is this carbonization to be expected with a PC III? If not I guess I need to learn how to tune the thing, the carbon buildup seemed extreme, and I am no shrinking violet on the throttle... Then again, I have no idea how long they were in there. The bike does seem to run nicer with the newer proerly gapped plugs.
-
Good thing I love this bike! I will fab up a funnel for it...
-
I was planning on changing the fluid in my gearbox today. After I got back from the warmup ride I changed the final drive fluid then started for the gearbox. The only thing I can find that looks like a drain plug is directly above the catalytic converter. Please tell me I am wrong! (2004 US Ballabio)
-
He popped up on the Roper HOWTO in the DIY section a few weeks ago.
-
Two years since the last thank you. So I will thank you again, I just finished this morning. Pretty easy job, I just wish I knew how the PO got the oil filter on so tight. I did add the hoseclamp filter stopper.
-
Purchased from Vlad. Thanks Vlad!
-
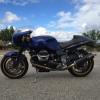
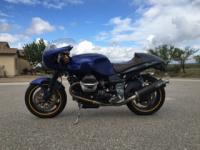
V11 Instrument plate. This is the aluminum plate that holds the speedo and the tach. Cosmetic condition is unimportant.
-
There you go!
-
True, true, but polished steel just doesn't hold up to well!
-
That looks like a nice piece of kit. Acewell is hard to get in the US so I didn't look into them much. You might want to ask this question in the Technical section. I doubt anyone who isn't interested in the VDO gauge set up will see it here
-
It's done. The install took a bit longer than it should have due to some learning experiences. First, the finished product: The gauges look OEM, and work better. The two buttons below the meters control the modes for the LCD displays. The speedo has ODO, Trip ODO, Voltage, and a Clock. The Tach has total hours, trip hours, voltage and clock. The only drawback is that the plastic housing will not fit over the rear of the gauges. I wasn't able to find adequate gauges in the diameter the originals came in. The metal plate that holds the instruments was exactly the correct size to hold the larger gauges without the rubber insulators use with the ITI meter. My next project will be to splash a fiberglass cover to hide the guts. If you go down this road, here is the first critical lesson. The GM sending unit has a small flange at the base of the input spindle. If you don't have adequate space it will seize and snap the input shaft: This took a while to figure out since I checked all the circuitry before I installed the sender unit on the trans. The ultimate solution involved machining a slightly different adapter that had adequate clearance at the top. The second lesson is that the sending units are fairly sensitive to solder heat. I tried to solder leads and destroyed one sender (that's my theory for now, I was a bit ham-handed when I solder the ground lead on). The accuracy is great and I have very good speed resolution at low speeds. The tach has a bit too much damping, but I can live with it. The proper calibration pulse count for the speedometer is 35449 counts per mile, which is very close to what I predicted based on measuring the turns of the speedo cable over 1/100 mile as recommended by Palo Alto Speedometer. 22.1 turns X 16 pulse/rev *100 = 35360 The GM sending unit easily drives the positive input to the speedo and the signal line to the ITI tach drives the VDO Tach set for 2 pulses per rev.
-
Looking for an ITI tach, working or not. I need to tear it apart to get the connector on the back.
-
Contact artist behind Ghezzi Brian, Bruno Saturno, through the Ghezzi Brian website (ghezzi-brian.com) and he will give you a list of kit pieces, prices, and optional performance parts to go with it. Thanks.
-
How does one obtain one of these kits in the U.S.? Directly from GB or is there a US dealer?
-
I am going with Bike EXIF. Beautiful and I don't have to explain anything to my wife (whom frankly, is WAY hotter than the women in this calendar...)
-
I am always amazed at what people are willing to live with instead of spending a few more dollars and doing it correctly...I mean really, even if this worked the instant after he 'finished' the job, it probably stopped working thirty seconds after the bike started rolling.
-
I test road a 2004 Monster S4R about two months ago. That was a very difficult bike to ride in parking lots/stop and go traffic. Throttle was very snatchy. I bought my Ballabio after testing riding the S4R. Much better behaved at maneuvering speeds. I am not sure how similar the S4R is to a multistrade engine other than 90 degree desmo twin.
-
I am back from vacation and started in yesterday. Right now I am on Plan A and a half. The right angle drive was about two millimeters two tall to clear the throttle connecting rod. And even if it cleared the sensor wouldn't clear the seat removal lock barrel. So I am modifying the top of the GM sensor to allow the electrical connections to bend over and clear the throttle connecting rod. After I cut the quick connector skirt off the sensor, I soldered wires to the terminals and covered them with heat shrink and liquid electrical insulation for added isolation. Once I have the sensor completely screwed down I will gently bend the terminals over toward the center of the bike (I am not sure how the sensor will be clocked once it is completely tightened). Here is the start of the wiring harness. I will be using the old speedo and tach illumination terminals to provide switched power, and run another line direct from the battery (fused of course) to provide hot power to the clocks in the new instruments. This is probably a good time to add headlight relays "while I'm here" (the four words that signal the initial descent into project hell)...
-
I am about halfway through converting to VDO speedo and tach. I should have the wiring harness finished tomorrow then I can run the speedo to verify. You can see where I am on this thread
-
I was going to make a batch when I got my repaired speedo back. Now I am replacing everything with VDO meters.
-
I am replacing the ITI tach with a VDO that matches the Speedo. I saw the Koso units too late, they seem like a reasonable alternative. I am detailing the conversion in this thread.