edge Posted August 1, 2004 Share Posted August 1, 2004 Instead of replacing a damaged OEM riders foot peg at the tune of $52.49 US, I decided to adapt a pair of rider pegs from a 04' Buell Lighting for about $40.00 US. What I liked about the pegs is they have about a 1" plus drop to them. Parts Needed from HD dealer: N0520.1AD, Foot peg Assembly, Rider LH, S, $12.80 US N0521.1AD, Foot peg Assembly, Rider RH, S, $12.80 US C0249.02A8, Spring Rider, Foot peg, RH, $1.95 US C0250.02A8, Spring Rider, Foot peg, LH, $1.95 US C0235.02A8, Pin, Foot peg, (2EA req.), $7.00 US (Optional) N0425.02A8, "E" Ring, Foot peg, (2EA req.), $4.20 US (Optional) Bushing material Tools Needed: Standard Guzzi stuff Caliper/micrometer Bench grinder Drill (Optional) I'm not sure I'll keep the OEM "Hero" spike but will make that determination once I get my bike back on the road. Projects took about 3 hours due to learning curve and head scratching but if your handy and have the tools, 1.5 hours tops. I kept stock peg mounting brackets and did not mod them in case I want to revert to stock (If you use the HD pins, you will have to drill the boss larger.). The biggest headache in this project is grinding/milling the Buell pegs to fit the stock width. Stock peg width is ~22.40mm and the Buell pegs are ~24.60mm so some cutting is necessary. I used a bench grinder to work both sides of the Buell peg (used the side of the wheel for large flat surface) to get it down to the ~22.40mm required to fit into the stock mount. I'm sure there are better tools to do this but the side of the grinder wheel worked fine (leather gloves required!) grinder worked fine... take your time, and keep surfaces flat and parallel. Once trimmed to fit (width only!), I chose to use the stock pins and "E" clip as not to drill out the stock mounts for the buell pins which are fat (optional). The inside pin diameter of the buell peg is much larger than the Guzzi, I used a small piece of lighting conduit, cut to ~22.40mm width and used the buell spring instead of the tiny MG spring. If you do not use a bushing, the peg will be loose around the pin. I've got more pictures but not sure how to post a couple at a time so if you have question let me know, remember I have not ridden it yet due to other work being done but I think it will be perfect, the pegs are tight (grind slowly), a little wider than OEM, down an inch or so and slightly Aft of original position. I know it will work for me, I've been sudying our erg options (Centauro, 15.00 relocation kit, etc) and think this will meet my needs. 1 Link to comment Share on other sites More sharing options...
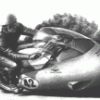
edge Posted August 1, 2004 Author Share Posted August 1, 2004 Top view with Buell spring (bushing not visible) Link to comment Share on other sites More sharing options...
edge Posted August 1, 2004 Author Share Posted August 1, 2004 measurements and shots Link to comment Share on other sites More sharing options...
TX REDNECK (R.I.P.) Posted August 1, 2004 Share Posted August 1, 2004 Most Excellent ! I wonder how this in relation with Ken's setup ? Do you have big feet ? Let us know what you think after a shake down run. Link to comment Share on other sites More sharing options...
edge Posted August 1, 2004 Author Share Posted August 1, 2004 TX, I wear a size 9 and the reach is no issue (in the garage!).. If there are any shift/break issues, I may adjust lever position(s) as needed. Not familiar with Kens setup.. Did he adapt Buell pegs too? Link to comment Share on other sites More sharing options...
TX REDNECK (R.I.P.) Posted August 1, 2004 Share Posted August 1, 2004 Not familiar with Kens setup.. Ken Zellar was the guy with $15 relocation kit. I used Ken's setup , but I wear a size 13 & this kit didn't work well for people with smaller feet. BTW I just looked at Ken's site & noticed he doesn't offer Guzzi stuff anymore http://www.evoluzione.net/ Link to comment Share on other sites More sharing options...
al_roethlisberger Posted August 1, 2004 Share Posted August 1, 2004 ...that's too bad with regard to Evoluzione. I haven't talked to Ken in ages, but even then he wasn't actually *selling* much Guzzi specific stuff So I guess the market just wasn't there for what he offered, plus he did get frustrated with MG's inconsistent QA and build, such that some products couldn't be easily standardized. But I really like this peg solution I have 9.5-10 shoe size, so I'll be very interested to hear how this modification works in practice for you as well. Please let us know as soon as you get some test riding in. Very exciting and clean solution al Link to comment Share on other sites More sharing options...
jrt Posted August 1, 2004 Share Posted August 1, 2004 Looks very similar to Ian's Centauro peg setup, which I've always lusted after. Nice job! Jason Link to comment Share on other sites More sharing options...
Guest friz Posted August 2, 2004 Share Posted August 2, 2004 EDGE THIS THE SAME THING THAT WE HAVE DONE TO MY DADS LEMANS IT WORKS VERY WILL I DID A POST ON TIS SOME TIME AGO!!!!! ENJOY Link to comment Share on other sites More sharing options...
al_roethlisberger Posted August 12, 2004 Share Posted August 12, 2004 Any long-term update on the peg/control ergos after the installation? al Link to comment Share on other sites More sharing options...
guzzi323 Posted August 13, 2004 Share Posted August 13, 2004 Any long-term update on the peg/control ergos after the installation? Well I've got the fixin's for this conversion on order and I've got a long weekend trip in a few planned in a few weeks. If you don't hear anything by then, I'll let you know what I think. I'm not thrilled with the looks, but I want my pegs lower and this is so damn cheap. Link to comment Share on other sites More sharing options...
Guest Neronut Posted August 13, 2004 Share Posted August 13, 2004 I also have the parts on order and hope to start the change over soon. Link to comment Share on other sites More sharing options...
edge Posted August 13, 2004 Author Share Posted August 13, 2004 Sorry I can't give an update as far as comfort goes with mike bike still down for maintenance (waiting on exhaust cans). I did refine the bushing I originally used. I found a couple bronze bushing that were 1" long, 3/8 outside diameter, with a 1/4" inside diameter. I had to shorten the lenght to a little less than 7/8" to get it to fit perfectly inside the peg and MG peg mount (used a bench grinder again). I found the bushing at a local hardware store. I had originally used a piece of threaded lamp conduit which has the 3/8 OD and 1/4"+ ID just to get it together. It worked fine, and wasn't visible but I knew it wasn't the right stuff and would eventually rust which made me keep looking. The following web site will give you a source and visuall of the bushing/bearing I'm talking about. McMaster-Carr deal in SAE/Metric and you might even find one with closer tolerances but the 3/8x1/4 worked for me (a kick ass site for sure). The trick with the whole project is grind slow on the peg & bushing to keep the tolerance close and square. If you take too much off, I imagine things will get a little sloppy/droopy. The Buell spring around the bushing works great. http://www.mcmaster.com/param/asp/PSearch2...cMMainWidth=570 the above link will take you to the bushing I'm refering to, or just go to www.mcmaster.com and surf the night away as you'll find all those do-dads you been looking for. Shipping is supper quick and reasonable. Link to comment Share on other sites More sharing options...
Guest Thundering Subash Posted August 13, 2004 Share Posted August 13, 2004 GREAT post Edge!!! I appreciate the detail, pictures, and follow-up info. I was considering doing the Centauro foot peg/controls conversion, but am now leaning toward this as a solution to lower my pegs. I currently have the Evoluzione kit on my bike, and it's not the best solution for me (I find the pegs too far back, and too far of a reach to the levers). The way this looks, it's a nice drop lower and forward from the original peg position, and the pegs look nicely made and a bit beefier than stock. So, here's my question. I'm sure you have good reason in not using the Buell peg brackets, but am curious as to whether or not they could have been used on our bikes along with all the other Buell components without having to shave them down to fit the v11 brackets. Having not examined the Buell's up close, I have no idea what the brackets look like and how they are mounted. Link to comment Share on other sites More sharing options...
twhitaker Posted August 13, 2004 Share Posted August 13, 2004 Those look great. Exactly what I was looking for. I may have to get 2 sets. I hope I can put them on opposite sides to move my wife's pegs forward and down. Link to comment Share on other sites More sharing options...
Recommended Posts
Create an account or sign in to comment
You need to be a member in order to leave a comment
Create an account
Sign up for a new account in our community. It's easy!
Register a new accountSign in
Already have an account? Sign in here.
Sign In Now