

MartyNZ
-
Posts
936 -
Joined
-
Last visited
-
Days Won
42
Content Type
Profiles
Forums
Events
Gallery
Community Map
Posts posted by MartyNZ
-
-
...flywheel, I will probably replace with a beautiful Ergal aluminum flywheel. Price about 500 euros...
That flywheel looks like a work of art alright, but I worry that you may be disappointed if you fit it.
Aluminum is not durable as a flywheel material. It would be great for racing, where frequent inspections and rebuilds occur, but it cannot last as long as a steel part.
There are some reasons why aluminum is not used in most flywheel designs.
Aluminium is weaker than steel and softer than cast iron. There are some very strong aluminum alloys, but these are susceptible to corrosion and stress corrosion cracking, so need surface protection and frequent inspection.
Alum does not have a fatigue limit like steel, so it will eventually crack from the constant load reversals from the engine compression/power strokes from those two cylinders.
The surface of alum can be made hard enough for wear resistance in the contact faces of the clutch rotor teeth by hard anodising, but still wear in those teeth will exceed that of the factory flywheel.
The inertia is important too. An alum flywheel has less rotational inertia, unless the manufacturer does something clever with a thicker rim. If there is less inertia, then the torsional vibrations through the drive train will be greater (worse for your gear backlash).
I don't want to be a downer, but you should be aware of these things before spending money on an aftermarket product.
The factory flywheel & clutch is a well optimised design, if you ride on the street, and value durability, tractability, and cost.
-
I have an FullRiver HC14B battery in my bike that just won't die. It has May 2012 written on it, so after 5 years, I expected it to fail soon. It looks like I might be too pessimistic, if a PC545 lasts 10-12 years.
I bought a Shorai LFX21L6-BS12 to replace it, but before I fitted it I found that the bike had wiring and grounding faults. Once I tidied the burned alternator connectors, bad regulator ground, and fitted a better 30 amp fuse holder, the old battery kept doing it's job.
I really want to try out that Shorai battery, as it claims to be "high zoot", prismatic cell, lithium iron phosphate, and is MUCH lighter than a lead acid battery, but that FullRiver still still cranks well and thrives on neglect. And I'm just too tight to throw away a battery that works well.
If someone has a good home for the HC14B, then I can report back on the Shorai LiFePO4.
[ Edit: O2V11 swooped in and claimed the FullRiver battery. By swooped, I mean he PM'd me. Now he just needs to arrange collection. I might go for a ride while he works that out.]
-
I removed and cleaned my injectors when I did some work on my fuel system at 80,000km.
When I fitted a new fuel filter and fuel hoses, I noticed some brown fuzz matted in the fuel pump intake screen. I found lots more on the tank shutoff inlet screen, and a little of the same stuff in the screen of the pressure regulator. Where did it come from? My guess was an old fuel filter deteriorating.I decided that there must be some of this fuzz in the injector inlets too, so I took them out and backflushed them, and washed out the fuel tank with hot water & detergent.
Afterwards the bike ran just the same as it did before : awesome!
So do you need to remove your injectors and back-flush? Probably not, but if you are like me, you want to.Scud posted a picture of the tools he and I used to flush throttle body cleaner through our injectors. Let one of us know if you want a loan.
http://www.v11lemans.com/forums/index.php?showtopic=18805&page=18&do=findComment&comment=215324
-
 1
1
-
-
-
I've seen oil inside the bellhousing caused by tiny cracks and splits in the crankcase ventilation hose which runs from the top of the bellhousing to the frame. A new hose fixed that leak.
I've had oil on my rear drive from a bad job I did replacing the valve cover gasket. Oil was also on the pork chop and my foot. I've not see a bevel box leak unless it is removed and laid on it's side.
I read somewhere on this forum of a crack in the gearbox housing causing an oil leak near the gearbox mount.
Have you tried sniffing the leaking oil at the three locations? Engine oil smells different from gbox & rear drive oil.
-
I've had a couple of broken springs examined....I had one tucked away deep in my tail storage and it sat for so long and through so many rains it actually rusted up pretty good.
Wondering if I should replace this talisman or just add another one coated in oil?
The experts tell me that in both cases the springs broke at a place where they were damaged before installation, probably at manufacture.
A tiny scratch or a corrosion pit in a stressed area causes a fatigue crack, which eventually breaks.
One spring had a scratch which I expect was made by the wire bending jig at manufacture, the other had a row of pits along its length, as though the spring wire lay on a wet area before it was bent.
If you have a rusty spring, then I expect that it will still work for an emergency repair, but have a shorter life when installed before it breaks than a shiny new one, depending on how deep the rust goes.
It is still good as a talisman though.

I'm thinking of finding some better spring wire, and making a jig to make a batch of longer life springs. It will probably not happen till this coming winter (July in southern hemisphere) . Anybody want one to try?
-
2
-
-
Well, it is pink . . .

WHAT you dont like pink bits???
I would have called the colour of that filter "Man Salmon".
It doesn't get more masculine than that.
It is just sitting there saying to the engine "Suck on this!"
-
Two thoughts on that leaky seal.
Is the gearbox vent blocked, forcing oil out the seal as it heats up?
Or was the gearbox overfull? I took out the gearbox sight glass and blasted it clean with brake cleaner so I could see the level clearly. After seeing the photo of Scudd's Champagne gearbox after he took off the selector plate, I don't think I will rely on draining and adding a quantity of oil. http://www.v11lemans.com/forums/index.php?showtopic=19680&page=5&do=findComment&comment=216567
-
The best examination of the benefits of silicon dielectric grease is here: https://www.google.co.nz/url?sa=t&source=web&rct=j&url=https://www.w8ji.com/dielectric_grease_vs_conductive_grease.htm&ved=0ahUKEwjWxZrynPfRAhXGo5QKHUD7Ac0QFggYMAA&usg=AFQjCNHwibqeA9xoggY2S8AvFyuRQxLNQQ This guy explains the relative merits of insulating grease, "conductive" grease, and vaseline in a better way than I could. Sure he has an electronics perspective, but connector corrosion is the same for them.
I'd like to read that, but the link gives me a "page not found" error.
Sorry, post edited with a link that works.
There is a lot to wade through in this post, and you will probably want to skip past the heat sink tests, but he offers a thorough analysis of his subject.
-
Don't count me as an expert. I merely try to "connect the dots" for a better understanding of these super-complex topics.
As I recall, Wayne's primary reference for his opinion was Ford Motor Company's research into wiring infiltration and switch/ relay failure from silicon dioxide. Again, *my recollection* from respecting Wayne's willingness to share hie vast knowledge and experience. I don't mean to speak for Wayne and hold a high respect for him.
Here is OMRON's precaution (perhaps it can be interpreted differently than my "take" on avoiding silicone "dielectric" grease in the proximity of switches and, especially. relays?)
https://www.omron.com/ecb/products/pdf/auto_precautions.pdf
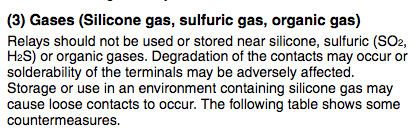
The service temperature for DC4 is -40 to 200 °C. I assume that there is little decomposition of the grease till greater than that temp. PVC wiring insulation starts to melt and burn above 80 °C, so I believe that we don't have this problem on motorcycles.
Conventional wisdom says dismount if your bike catches fire.
 By then relays will not be your biggest concern.
However, there was a problem of some types of silicon sleeving gassing off and ruining open relays in the 1970s. Perhaps this is where Ford's research was focused. I think things are better now, more stable silicone, PVC automotive wiring insulation , and some types of relays are sealed.
-
LubriPlate DS-ES ....I need to get some .
Uh $112.00 for 1 1/2 oz. tube on Amazon ? Mmmmmm . I will see about this .
US$5.18 + shipping direct from Lubriplate https://www.lubriplate.com/Online-Store/1-75-oz-tubes/DS-ES-1-75-oz-tube.html
-
A Distinguished Previous Owner of a non running Strada I bought thought it was a good idea to put dielectric grease in all electrical connections. Naturally, it never ran again. Dielectric means, "does not conduct electricity." Another guy bought it, couldn't get it running and sold it to me after buying a $$new$$ unneeded Digipex unit.
Wayne Orwig posted a long explanation of why not to use it. It included migration inside relays (!!) among other things.
He says the only place to use it is spark plug boots.
Sorry mate, but it is time to gently euthanize that story. I have the greatest respect for your expertise and achievements, but you have been misled.
Wayne Orwig needs to explain why he has the "facts", and aircraft, auto, and boat manufacturers have been fooled for the last 70 years.
Even those little squeeze together wire connectors for lawn irrigation valves use silicon dielectric grease to keep moisture out, and still allow a good electrical connection. .
The best examination of the benefits of silicon dielectric grease is here: (link edited)
There is a lot to wade through, but this guy explains the relative merits of insulating grease, "conductive" grease, and vaseline in a better way than I could. Sure he has an electronics perspective, but connector corrosion is the same for them.
My bike has Dow Corning DC-4 silicon dielectric grease in every electrical connection except switches since early 2015, and does not have any electrical faults.
I agree that DC4 would be bad for inside switches & relays where an electric arc can happen.
For the switches, I used Lubriplate DS-ES. It is a thin grease designed for electrical switches just like our ignition switches.
Relays I try to keep dry from both water and grease, except for DC4 on the terminals. I see that some relays have little vents near the bottom that I try to keep clear.
Sorry to be a grump, but it pains me to see people who live in wet/humid climates continue to have electrical problems due to corrosion in connectors, when the use of the right product would prevent these problems permanently.
-
2
-
-
On the topic of ignition switch faults, the soldered joints to the wiring can break, but still touch, making an intermittent connection. Vibrations could make or break the connection. See Walterg's experience with this here:
http://www.v11lemans.com/forums/index.php?showtopic=18953
See also Chuck's experience here:
http://www.v11lemans.com/forums/index.php?showtopic=18606&hl=%2Bbroken+%2Bignition+%2Bwire
The comments on wiring loom strain relief are valuable advice.
-
1
-
-
The ignition switch, feed to fuses F4 & F5, and battery terminal connections, & grounds, could be the source of both problems. After that, you may be chasing two separate faults.
I'd check your relay bases, if you haven't already done this, see Kiwi_Roy's helpful guide here:
http://www.v11lemans.com/forums/index.php?showtopic=15718&hl=%2Brelay+%2Bbase+%2Brepair
The safety switch (clutch) bullet connectors under the tank give trouble, so cleaning and gooing them may help if the start relay coil voltage is low from connector resistance.
Wriggling wires to make the headlight fail may lead you to the problem. Otherwise, when the headlight next fails, see if the horn and brake lights have failed at the same time. If yes, then check LH switch cluster, 10 wire plug to it, light relay (swap with another), and light fuse connections.
Good luck.

-
When I got my bike the Ti CO trim was set to +15. DD got a 2nd hand Ti ECU from Scud, and it was set at +48. So who knows what was standard.
Czakky's advice about finishing the basic tune-up first before adjusting CO trim is wise.
-
Im at +20 and no air temp at the mo... best its ever ran, tho with air temp censer in hanging loose as I have pods, the censer was 43* so the bike would lean out, gave me a massive power spike but I was worried it was to lean still.
Ill extend the air temp and hide it under the seat when I get a chance... and Marty SHIT sorry forgot I still have ya laptop, im away this weekend at a rally down south please rark me up to return it.
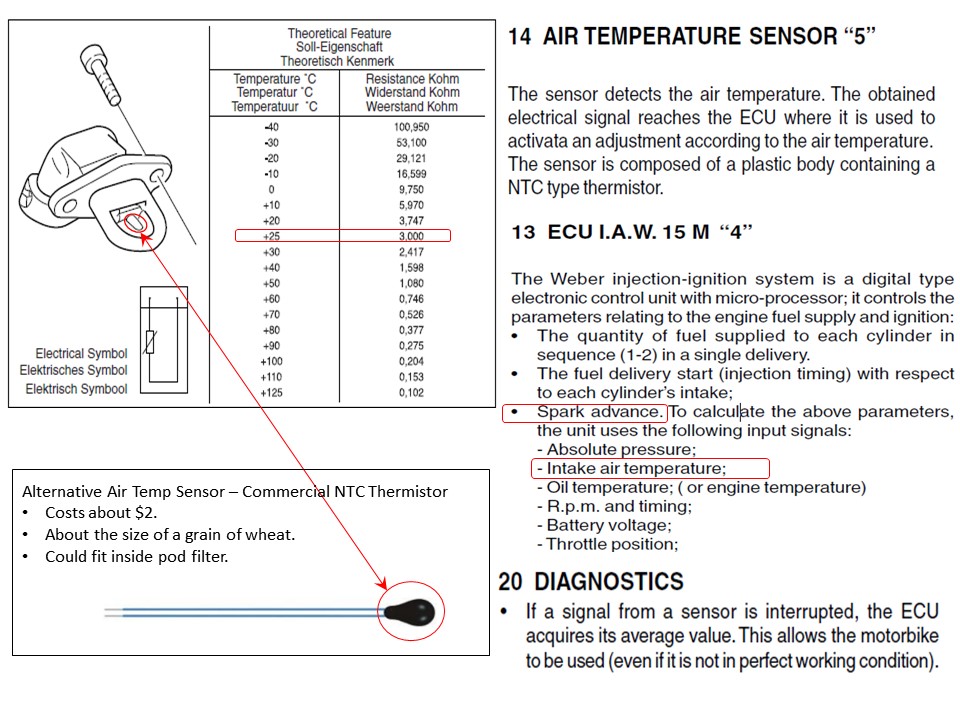
DD, Would you like me to make you a sensor that can slip into one of the pods?
It may run OK now with it unplugged, but that just means that the current ECU programming is not right. As the air temp changes, the ECU needs to know about it. Normally that air sensor affects the ECU output of both fuel and ignition advance.
It will cost about $2 for me to make a sensor to fit into your pod filter. Then maybe you can adjust the CO trim to suit, so I can get my laptop back.

BB, as for comparing fuel trim on your bike with a standard bike, keep in mind that DD's bike has Meinolf's #42 .BIN file loaded into the ECU, which is lots richer than the Ti ECU. And he has done things to improve airflow, meaning that more fuel was needed.
You can adjust fuel delivery with CO trim, or get serious with TunerPro and GuzziDiag.
Maybe Meinolf could have better advice if you ask him.
-
Scud, on 31 Jan 2017 - 07:15 AM, said:
...along with a giant seal for a front-load washing machine... apparently, if I can rebuild a motorcycle, I can rebuild a washing machine.

You know that after you powder-coat the washing machine black, you are going to have to do the dryer too.
I hope you will start a new thread on the whiteware project. I find your rebuild efforts inspiring.
-
3
-
-
Does anyone have a foot brake lever they want to sell? I'm looking for the standard MG part, cause I like the position and the look of it.
I'd consider any condition except bent or broken.
Don't ask why.[update: I bought a second hand one from Ebay UK]
-
I just finished doing this to my bike.
Thanks Scud for the tip, and your help getting the improved pin.
Instead of a hole, I made a slot to allow the block & pin to slide a little in the brake carrier slot.Then I coated the block with moly dry lube. I don't know if it was necessary, but anyway...
-
OEM Part
Name: Bevel Box Needle Roller Bearing (RH side)
Moto Guzzi Part Number: 92252225 Needle Bearing/Outer Race, & 92259025 Inner Race.
Replacement Part
Brand or Source: Any Bearing Retailer, but in NZ: SAECO Wilson were great.
Part number: HK2516.2RS Needle Bearing, LRTZ202518 Inner Race 20x25x18.
Differences from OEM: No hole in inner race. This is a good thing.
Comments: You can't knock the old outer race out from the other side of the bevel box. If heat, rapid freeze, and slide hammer don't get it, then thin-walling with a dremel is your only option.
When installing the outer race, the end with writing should face outwards, as it is usually designed to withstand installation press loads better than the unmarked end.
After installation, packing it with waterproof wheel bearing grease before fitting the axle should help it last, as rust seems to be the main reason for failure.
-
3
-
-
And the fork bottoms needed some love - courtesy of VHT Brake Caliper paint.
Did you cure that paint? I've used it, and think that it is great stuff, but the product use sheet says :
"Curing Caliper Paint - VHT Caliper Paint only attains its unique properties after correct curing. Bake at 200°F (93°C) for 1 hour. The inherent heat of braking operation will also accomplish curing". (for calipers)
It might stay soft if you don't heat it.
A portable heater aimed at the forks should do it, 93 deg C won't harm the dampers if you monitor temps with an IR heat sensing gun.
Plus it will warm the garage for you.
-
Sorry for using sloppy terminology. Guzzidiag refers to CO trim. This is what I meant to say.When say adjust fuel trim you don't mean adjust the CO.
-
Those are awesome pipes. They sound good, look good, and weigh a lot less than the stock pipes.
They do dent easily though, so be careful.
http://www.v11lemans.com/forums/index.php?showtopic=19286&page=2&do=findComment&comment=209717
If you do get a dent, & need to repair them, there is a really helpful guide here:
http://www.v11lemans.com/forums/index.php?showtopic=13524&do=findComment&comment=146073
As for writing a Ti map on your old ECU, or fitting the new ECU, there is actually less effort to fit the new ECU. Even though the Ti map is richer than standard, you still need GuzziDiag to check that the fuel trim is a least zero. For me, +15 was better.
Best of all for me is Meinolf's map #41. It is excellent! Load his map onto your old ECU, and the new Ti ECU will be left to gather dust.
http://www.v11lemans.com/forums/index.php?showtopic=17865&page=14&do=findComment&comment=213970
-
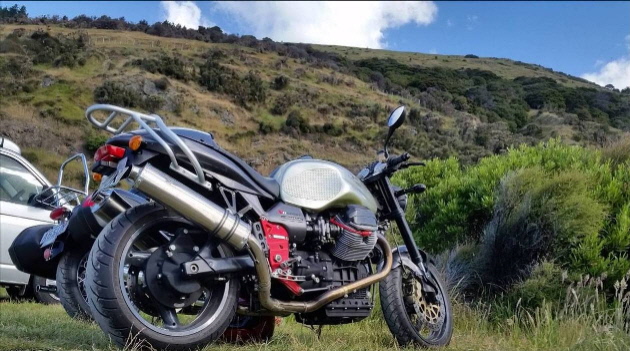
My Brother-in-law visited, so he rented a Triumph Bonneville for the day, and we went to Akaroa.
A four hour trip took us all day, as we stopped for lunch at the Hilltop Tavern, and visited little bays and coves on the way.
https://goo.gl/maps/ZvhR9uPrjUG2

-
3
-
Running trouble
in Technical Topics
Posted
You can prove that the pump is priming properly by releasing the fuel hose to the pressure regulator, and holding the hose over a can while you switch on the ignition. You should see a small amount come out each time you turn on the ignition. I recall about 50cc on my bike.
OSH Warning: this procedure could set fire to your bike if you do anything really dumb..