

MartyNZ
-
Posts
936 -
Joined
-
Last visited
-
Days Won
42
Content Type
Profiles
Forums
Events
Gallery
Community Map
Posts posted by MartyNZ
-
-
You are right, roller bearings do not like axial loads.roller bearings do not like axial load. Just remove ALL slack on these situations and then jam nut .
However the swing arm bearings are not rollers. Part number 92218418 bearings listed in the parts catalog are described as "bearing with two ball crown wheels" and in Guzziology as "double row sealed round-ball bearing".
I guess that roller bearings would be fine if thrust washers were fitted to take the swing arm side loads.
Regardless, we agree that all the slack needs to be removed.
Marty
-
I just installed my swing arm. I set the pivot bolts to the same measurement as when I removed them. The bolts don't feel very snug at those measurements, and I can tighten each side about another 1/16".
Do I tighten them down so that they're snug, or just leave them at the original measurement and call it a day?
Ken
The shop manual is a bit average on this subject. It says "assemble in the reverse order to disassembly".
Guzziology doesn't specify a torque that I can find.
So, if it was my bike, I would tighten the pivots up evenly until the swing arm binds, then just fractionally back off until the swing arm moves freely without binding through the full range, and without any sideways movement. Then align the front and rear wheels with string or straight edges, whichever is your preferred method, but keeping in the same clearance. Marty.
-
 1
1
-
-
Guzziology 4-17 says:do I need to re-torque the heads after a heat/cool cycle or a break-in period? I didn't see anything in the manual about it.
1 retorque after letting the gaskets settle overnight.
2 set the valve clearances .002" more than normal.
3 run bike through half a dozen heat/cool cycles (up to temp, then back to cold).
4 retorque heads.
5 reset valves to normal.
6 ride like the wind.
Actually item 6 wasn't from Guzziology, but it could have been.
-
2
-
-
I think you should fit the gaskets. It looks like there wasn't any fitted before, but as Footgoose said, two gaskets don't cause a problem.
Can you show us a picture of a gasket in place in the head, and against the header? Does it protrude into the gas path?
I'm now thinking that I should take my headers off to check what's in there.
-
Good question. The parts catalog shows gaskets should be fitted, but you are not the first to find that gaskets were not there.how the heck do you get the exhaust gaskets out?
I have new gaskets, but if there are gaskets in there now, they must have compressed a lot. I've tried a screwdriver and a pick - there is only a very small lip, which I think could be the gasket - but I am staring to wonder it there is any gasket in there currently.
There have been comments on this forum about exhaust leaks causing tuning problems (like Kiwi Roy's sneeze). Since you have the gaskets, I think you should fit them and tell us if it runs any differently.
There is a step in the exhaust port which is an important part of exhaust tuning, don't be tempted to grind it out, unless your name is Dr John.
-
If it was my bike, I'd clear that tight hole with a reamer or drill or a round file, so that it slid on with finger pressure. Then I'd very lightly countersink the top of the hole with a 90 deg or 100 deg countersink tool. No deeper than approx half a mm at 45 deg is necessary. Or scrape a chamfer with a Stanley knife. All that you are trying to do is transfer the tension loads on the studs (that you create by torquing the nuts) into compression loads on the fitting, head, gasket, barrel, & base gasket. A little rework of the hole in the fitting doesn't matter much....there is raised lip on the upper RH stud hole - it goes from about 10-o'clock to about 3 o'clock. I suppose I can grind that down. But I can get a replacement part from my spare engine if needed. Keep or replace?
...the problem was not the head gasket, but the 4 O-rings.
Does it look like I should do anything besides bolt it all back together with new O-rings and gaskets?
[/url]
I'd clean the gasket mating faces on the head and barrel with a hardwood or plastic scraper, while being super careful not to get anything down the oil passages in the barrel. The oil passages in the head you can blow out with air or degreaser before installing.
-
My guess would be that there is a little burr, sharp edge, or swaged edge of the hole hooking onto a thread of the stud. If I'm right, you have two choices.
1. Lever the rocker support fitting up with pry bars, trying not to damage the rocker cover gasket surfaces, which means you are dragging the burr all the way through the hole. The aluminum casting is much softer than the steel stud, so any damage will be limited to the inside of the hole in the fitting.
2. Tap the fitting back down, retighten the nuts on all but the stud which is binding, and hook out the burr with a small screwdriver.
I think 2 is better. Before refitting, deburr all the holes where they get mashed by the nuts during torquing, and clear the stud threads of any debris. And fit a washer if it was missing, as torquing a nut against the aluminum casting will smear the aluminum into the threads.
-
1
-
-
It looks very interesting. The claims made by the manufacturer ( http://www.stabilant.com/appnt20.php ) are so good that I wondered if it was another flavour of snake oil, but so far I can't find anything bad written about the stuff. One retailer claims that Hyundai and Volkswagen list it in service advice. It's claimed uses seem to be most effective on non sparking contacts so it may not offer any benefit on a V11 ignition switch. There is a similar product called DeoxIT.Anyone else used Stabilant 22a ? It is a connector conductivity enhancer . I use it on very low amperage connectors .
I have not tried either product, and always assemble electrical connectors using lots of dielectic grease. So much that it oozes out of the connector as it is coupled so oxygen and water are excluded. Dow Corning Compound 4 electrical insulating grease is good. Vaseline is probably just as good, but I think Italian electrics need all the help you can give.
I believe that good electrical connections are made when plugs/pins/spades/bullets and mating sockets do not have any tarnish or corrosion on the contact surfaces. Bad connections can be fixed by unplugging and replugging, which scrapes off some tarnish. It seems to me that chemically removing an insulating layer of oxide is like introducing corrosion.
Can you share more about your experience? Is it good for long term exposure to road grime and vibration?
-
So Guzzidiag sets the CO,
how does that work there is nothing in the ECU to measure O2 or CO
I thought you would need to be hooked up to a fancy analyzer.
You're right, to do things properly on an engine without a Lambda sensor (like yours and mine), you should know the CO level in the exhaust. You might guess on the CO using you nose, looking at plugs, or noticing uneven running, but regardless, GuzziDiag allows you to set the CO trim.
See the last few pages of http://www.thisoldtractor.com/moto_guzzi_quota_guzzidiag_howto_-_a_tutorial_for_beginners.html
Your question is answered here: http://wildguzzi.com/forum/index.php?topic=65527.0
Other good stuff is here: http://www.von-der-salierburg.de/download/GuzziDiag/
and here: http://www.tunerpro.net/downloadApp.htm
-
I will check the sensor gap ASAP, bit of a task as the timing cover will have to come. I might try to measure it first with the digital calipers.
I used a blob of blu-tac stuck to the sensor tip, then screwed it up tight. So long as the sensor is degreased and the wheel is oily, the blu-tac will squeeze to the actual gap, and still pull back out with the sensor. Then I cut away half the blob to measure the thinnest remaining blu-tac. I had to check using calipers as well, because I didn't believe the 1.5 mm gap I found.
BTW, how is your new accommodation working out for you?

-
The RPM sensor gap is supposed to be 0.7 to 0.9 mm. See attachment. GuzziDiag reported the RPM sensor as failed on my bike, but I fitted a correct thickness shim, which made GuzziDiag happy again. Be sure to fit a new o-ring as you refit the sensor or you get an annoying little oil weep.I will check the gap, what's it supposed to be?
The snort you describe was the same on my bike, and was fixed by either of two things:
1/ Setting the TPS to 150mV when the RH throttle butterfly is fully closed (lower than idle). My bike was set to a higher voltage, and the snort could almost pop the throttle bodies off. Do this as part of the full tuneup Docc mentioned.
2/ Renewing the rubber hoses from the throttle bodies to the intake manifold stubs.
Good luck, Marty
-
1
-
-
As I am new to the brand performance parts seem kinda hard to find for 2002 and up Lemans. I will be picking up a 03 in 2 weeks, and was wondering where to get exhaust and ecu. ect Thanks Rob
Hello Colorobo,
I can't help with a source of aftermarket exhaust, however there is lots of advice on this forum, and wildguzzi, to help you change the firmware on your bike's ECU (if you need to). The firmware BIN file holds ignition and fuel schedules, and it is possible to extract, edit, and reflash the BIN file. As Pete suggested, you need to have a reason to add fuel. There has to be an increase in airflow before an increase in fuel is worthwhile. The stock airbox and those awesome big velocity stacks hidden in there do a good job. Changing to Titanium kit exhausts would be a reason to add fuel, so you could then load the Titanium Kit BIN file to your ECU, or fit a Titanium ECU. Use caution though, as reflashing firmware is not for "clueless shitgibbons" as Pete has already said.
I haven't used Tunerpro, but GuzziDiag and associated programs developed by Paul Minnaert give you options. GuzziDiag information here:
http://www.v11lemans.com/forums/index.php?showtopic=17865&hl=guzzidiag&page=1
http://www.v11lemans.com/forums/index.php?showtopic=18052&hl=guzzidiag&do=findComment&comment=202816
http://wildguzzi.com/forum/index.php?topic=69168.0
I hope that helps.
Marty.
Note that I have only used GuzziDiag for detecting faulty sensors, and adjusting fuel trim. I have not felt the need for changing the ECU map. This bike was fitted with Titanium exhaust and ECU by a previous owner, and I'm really pleased with how it runs. Smooth, lusty, and willing.
-
1
-
-
The stock reservoir allows fluid to move down into the calipers as the pads wear and pistons extend to take up the wear. Surplus reservoir space allows for fluid thermal expansion as the caliper temperatures cycle. You also get more warning of a minor fluid leak. Jet's thin reservoir looks cool, but he will have to top up the level more often than the standard reservoir. Otherwise it has the appeal of looking simple and clean.I have wondered why we have so much fluid volume in the reservoir to sit and gather moisture.

-
1
-
-
I hope your knee, elbow, and shoulder heal soon Gio.
For bits that don't heal, Moto International Ltd in Seattle sold me Guzzi footrests for US$55 each, plus about US$7 for shipping to NZ. https://www.motointernational.com/store/footpegs-floorboards--parts/lh-footrest
I'd recommend them.
-
Wait, what?
 I thought that beer was for me.
 -
In this topic http://www.v11lemans.com/forums/index.php?showtopic=16675 Baldini says "When I fitted RAM unit I had a mismatch between dimensions of clutch pushrod & clutch centre button resolved by using OME button in RAM clutch."
-
As you say, the bike could still have the original charging problem.The question about what other electrical bit might have malfunctioned still remains though, so a new voltage regulator will be on order shortly.
The regulator may be OK.
The workshop manual says this:-
"THE REGULATOR IS CERTAINLY DEFECTIVE IF: After having isolated it from the rest of the system short circuits can be detected between the earth (aluminum casing) and any of the output cables".
See also extract from manual attached.
Perhaps you could check that the regulator and the battery are well grounded, and the 30 amp charging fuse has been replaced with a separate 30 fuse & fuse holder after the new alternator is fitted.
KiwiRoy has written a lot of helpful comment about this on this forum.
Marty.
BTW, the page from the workshop manual attached shows that 30V AC from the alternator could be OK, depending on engine RPM.
-
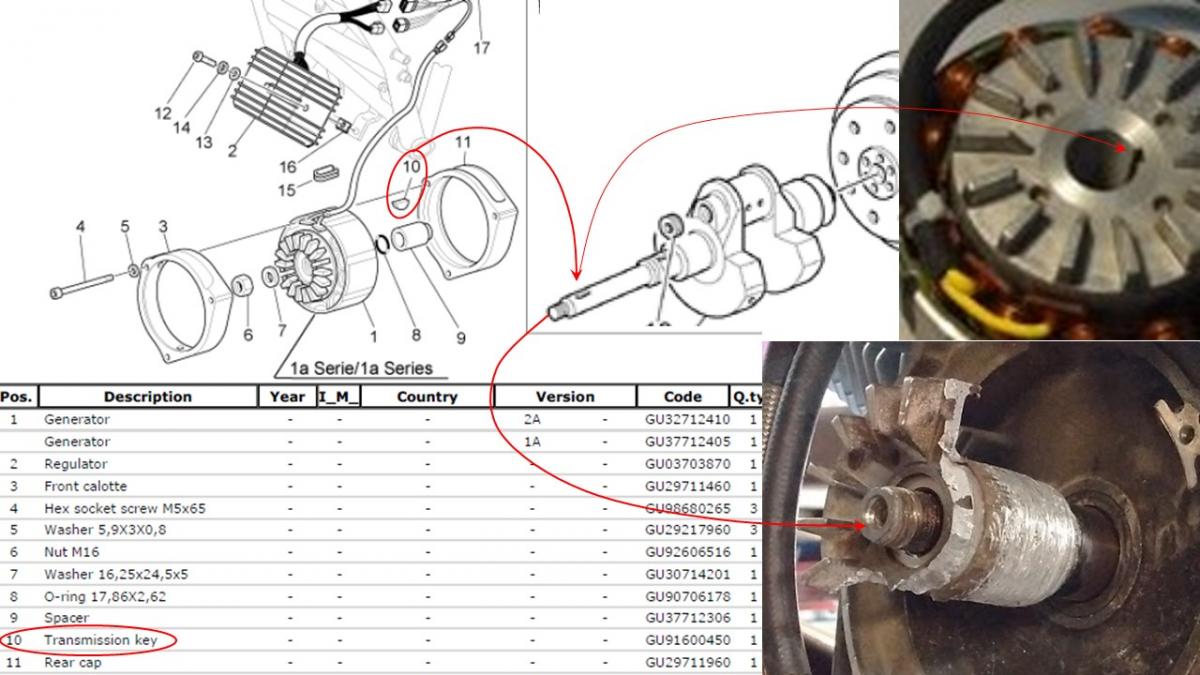
After several heating and pulling sessions the rotor slid out some 5-6 mm. Tomorrow the effort will continue.
If the rotor damage has swaged the rotor keyway tight behind the key, then it may never pull off. I suspect that you may still need to do some filing (or hacksawing) to allow the rotor keyway to open. See picture attached.

-
Hello Dimo,
If that was my bike, I'd do this to remove the damaged rotor:
1) Remove both exhaust headers.
2) Undo both oil hoses from crankcase, and tie them up out of the way. Tape some rag over the ends of the hoses, and cap the crankcase fittings, so debris can't get in.
3) Fit a puller, heat the remains of the rotor, and try pulling it off. Heat helps, as aluminum expands more than steel. Hotter is better, keeping in mind that the engine can easily get to 120 deg C, so heating that hot is ok.
4) If that doesn't work, file a flat in the rotor, two places on opposite sides. Take care not to let the file touch the crankshaft or the crankcase. The idea is to make the rotor boss walls thinner so clamping loads on the shaft are reduced. You will also be able to fit an adjustable wrench on the flats to assist breaking it loose. Try turning the rotor back and forward with the wrench. It may come loose. The woodruff key between the rotor and the crank will stop it from turning, but wriggling may loosen it. Heat and pull again.
5) If the rotor is still tight, now you need an alert and useful friend. Get a big lump of steel like a 5kg bench vise (without the bench), and have him hold it against one flat you filed on the rotor. Firmly. If he messes this up, you risk bending and buggering your crankshaft. You get a steel cold chisel and a BIG hammer, and hit the thinnest part of the flat you filed, opposite to the bench vise, or whatever you used as a reaction mass. You are trying to stretch the diameter of the rotor, so it will become looser on the shaft. You need to leave a chisel mark along the rotor flat, both sides, deep enough to stretch the rotor, but not deep enough to damage the shaft. Try pulling the rotor after every hit.
Hope this helps, Marty
-
Hello Rosso Mandello, can you share the reason that you need a transmission?Hello,I am seeking a used rear transmission to Rosso Mandello,or at least the gear set. Thanks
If you are building a special, then I hope that you can share some pictures.
If something has gone wrong with a six speed that you already have, is there any advice you can offer so we can avoid a repeat?
thanks, Marty.
-
Actually that LED I put in my bike does have a little driver box or ballast, which fits easily into the bucket behind my sport naked headlight.I'm going to try the LED headlight Marty recommends in the Scura - no extra plugs or ballast on that one.
For your more petite Scura headlight bucket, perhaps you could put the driver outside the bucket. The lead from the lamp to the box is long enough for this to be outside, but would need weather protection (unless you live in Southern California
 ).
). The reason I picked that lamp was that it didn't have a cooling fan, just big loops of copper braid, which press nicely onto the back of the steel sport naked bucket. You can feel the back get slightly warm if the headlight is on for a while. If the Scura bucket is plastic, this may not work so well, but I think it's worth a try.
Marty
-
Thanks GuzziMoto, I stand corrected. My comments are OK for rubber, but not for urethane.
However there are various opinions on the use and life expectancy of urethane in a joint designed for more resilient material like rubber.
http://www.netbug.net/blogmichael/?p=103
Nolothane is an Australian urethane bush manufacturer. They say use molybdenum disulfide lubricant on the inner bush diameter. http://www.nolathane.com.au/faq.php#q5
They claim good things about their bushes, but don't mention durability.
-
I believe that you should not lubricate these bushes.So, would one lubricate urethane bushings? And, if so, with what, silicone grease?
In car & truck suspension, rubber and urethane joints are not lubricated. Generally suspension joints are tightened once at the normal load position, then suspension movement is allowed by flex of the bushes. A temporary rubber assembly lubricant can help get things in place, if needed, which then quickly dries out. Any lubricant is bad for an elastomer joint, as it allows the elastomer to rub on the metal pin or housing, and believe it or not, the metal wears (very quickly), not the elastomer.
Greases attract road grit, and some dry lubes attract moisture, assisting with joint wear. The advantage of tight rubber joints is they are immune to water and dust damage. Oil, age and sunlight are their only enemies.
I personally would continue with an unlubricated rubber bush, tightened when the suspension is at ride height.
Just as good would be ball rod ends (heim joints) which would last a long time if you could keep them clean & greased.
-
Today I tested MartyNZ's new dipstick/thermometer (source MG-Cycle) on my LeMans before sending it on. Marty - you'll be glad to know that not only does it look cool and tell the temperature in degrees Celsius, it makes the bike faster, and improves handling, braking, and fuel economy. ...now I want one.
That's excellent! I was hoping that it would tell me about the oil; how much & how hot, so this is an unexpected benefit.

Have you had it fitted long enough to see if it makes you more attractive to the opposite sex?
new look for the nero corsa
in 24/7 V11
Posted
Nice bike!
If you want to try a naked bike, we could swap bikes for a day (or for a lot longer).
I have a Givi bikini fairing that is not on it at the moment, but bolts on in about 10 minutes.
I suspect that you would prefer that full fairing you have for going any distance or for going fast.