

MartyNZ
-
Posts
936 -
Joined
-
Last visited
-
Days Won
42
Content Type
Profiles
Forums
Events
Gallery
Community Map
Posts posted by MartyNZ
-
-
There are some good pics posted by BelfastGuzzi here http://www.v11lemans.com/forums/index.php?showtopic=16872&st=0bloody ell... hey cant remember how the spring closest to the gear shift input sits? photos anyone?
While you have the side plate off, why not look at Lucky Phil's improvements http://www.v11lemans.com/forums/index.php?showtopic=19547
This spring seems to have a short life. I see that you posted a question about this in 2014.
http://www.v11lemans.com/forums/index.php?showtopic=18737&hl=spring
Can I have your old broken spring?
I'm going to try to make a different spring arrangement that will last longer. Maybe a pair of lighter springs, or an extra turn on a spring made of similar wire, or use better material.
Marty
-
 1
1
-
-
I didn't know that there is 7 Guzzis in NZ, let alone with one guy in the South Island....ring a mate...need a loaner (well he has 7 Guzzi's)...
-
Good job. The Titanium cans are made the same way. How do they perform and sound compared to the standard cans?I rebuilt the inner part to absorption type damper, perforated tube D 50 mm, housing lenght 30 mm shorter,from the outside it looks as original, its good for our traffic police.
-
Nice!
A Sonerai with an air cooled VW engine.
It's got something in common with the V11.
And you have the aviation version of a personalized plate.
Cool.
-
We know that you got the idea, trialed it, and then told everyone. Well done you too!...That's quite a bit of work there, well done...
It wouldn't have happened without your efforts.
-
I know what you mean. Some metals are hard work. I just finished making attachment brackets for the new bike rack I should have fitted 6 months ago. I had a brainwave and pulled some titanium out of a scrap bin, thinking that it would match the titanium cans...actually, it was more work than I expected. I've never done a run of 4130 before. Normally, when building an airplane, I'll make one of a part, and don't give a thought to how tough it is on the cutter.
 I used up several end mills on this "production"run. In hindsight, I should have gone to a laser or water jet shop and had them make the blanks.
What a dumb idea!
I couldn't cut it, so made up a .dxf file and went to the closest laser cutter. They said "nope, 4mm thick is the limit for that stuff without argon, and we use nitrogen". Then the water cutter said "8mm? Sure, come back tomorrow with $90". That's when the fun started. I wrecked 4 drill bits and 2 taps, but at least it didn't catch fire.
Then I painted the brackets black, so the idea of matching the cans was wasted.
Next time I think that Ti6Al4V is a good idea for something, I'll have a beer until I calm down.
I believe that the Russians make a lot of titanium stuff, which helps explain why they drink a lot of vodka.
-
1
-
 1
1
-
-
I can download the BIN file from my Ti ECU this evening and send it to you if you PM me with an email address. Note that my ECU has 02 written on it. There is more than one version of the Ti ECU.Can anyone share a stock titanium ECU .bin file for a 15m with me? Much appreciated!
Sent from my iPhone using Tapatalk
You should consider Docc's advice though.
-
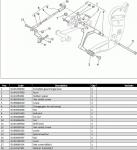
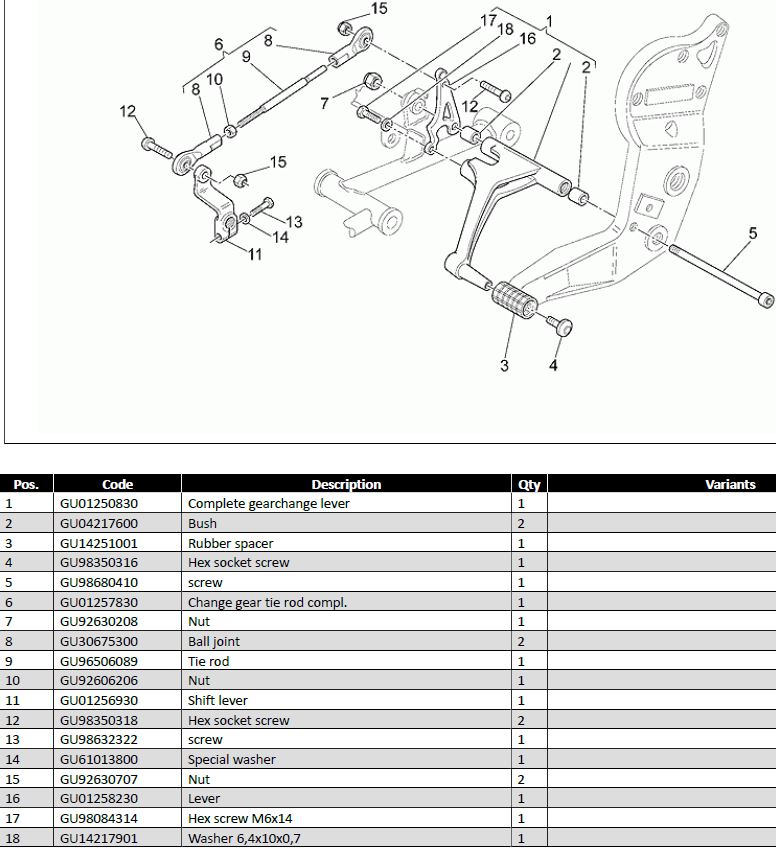
On my bike, the bush protrudes from the foot pedal lever (item 1), and just fits into the hole in the pushrod drive lever (16). That lever (16), that Chuck is making, has the rear lower hole the same size as the bush (2) OD, not the pivot bolt (5) OD. At least that's what I'm expecting when the slow boat from California arrives, and that's what Chuck's CAD drawing seems to show. And Chuck's picture in post #18 of this topic.That some of the foot levers have different appearances (protruding bushing) is no false alarm.
There are two lower-rear subframe versions (late model long-frame has braced subframes).
Do any of the late models index the protruding bushing into the subframe tab?
I made new bushes (2) for my Pedal Lever, and I expected to be able to drive them further in, as Docc suggested, and trim them off later, but no. The counterbore for the outboard bush was about 10mm for a 10mm long bush. At the inboard side, the counterbore was about 8mm for the 10mm bush. The bush on that side is designed to protrude, but not enough to touch the subframe tab.
-
Hmmm... I just looked up the gearshift lever for 1999, 2002, and 2003 on Harper's website. The part numbers are the same (01250830) for all three.
I agree Tim. On my shift lever, the bush (item 2 in the picture) protruded out of the inner face, but is flush on the outer face.

-
The previous owner of my bike added a grease nipple to the shift lever. I thought that this was a good idea for others to do at the same time as fitting the extended lever, so posted this picture....you can clean and lube the pivot at the same time...
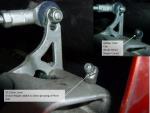
Also, I had slop on the inner bush of my shift lever, where I found that the pivot bolt was threaded too much, so the inner bush sat on threads instead of plain shank. The bush had grooves worn in it, and the threads were worn flat. I got a new bolt with less thread on it, and made new bushes. This improved shift lever action a little.
-
1
-
-
I'm keen to buy one too.
And if there is any other interest from NZ, I can act as your distributor if that suits you.
-
...the anti-wear ZDDP...[/url]
To add to Docc's wisdom, Penrite, my current favorite oil manufacturer, has this helpful writeup about zinc / ZDDP / dialkyldithiophosphate additive in oil. They begin by saying: "There is a lot of hysteria over zinc levels in oils, especially in the latest specification engine oils. Many of these myths and stories are unfounded. To understand more read the latest up to date information here:"
http://www.penriteoil.com.au/tech_pdfs/0Zinc%20Myths%20&%20Legends%20Nov%202014.pdf
I see that they talk about phosphorus at the same time as zinc. This comes from zinc-dialkyldithiophosphate burning when it gets past the rings or valves. Freed phosphorus can poison the catalytic converter if one is fitted.
-
1
-
-
The Lucas website does not say anything about their chemistry, which means to me that at best it is a group 3 oil. This is still a fine oil, but will suffer from additive degradation. Over extended time it will perform poorly compared to a group 4 oil. If you used it for long enough, you would observe a gradual hot engine oil pressure decrease as the viscosity index improver additives are destroyed. The normal oil change interval solves this problem.I looked, but could not find any specification of the base oil in the Lucas 20-50.
I can't find where Dave Richardson (Guzziology, Version 8.2)) discusses why Guzzi changed the viscosity spec for the later V11?
http://lucasoil.com/products/lucas-motor-oil
I see that Guzziology version 8.3 page 3-14 has 5 pages of advice on oil, filters, and oil change intervals. My take on his advice is there are many options available, and your previous advice is good: "use good oil, and change it often".
-
1
-
-
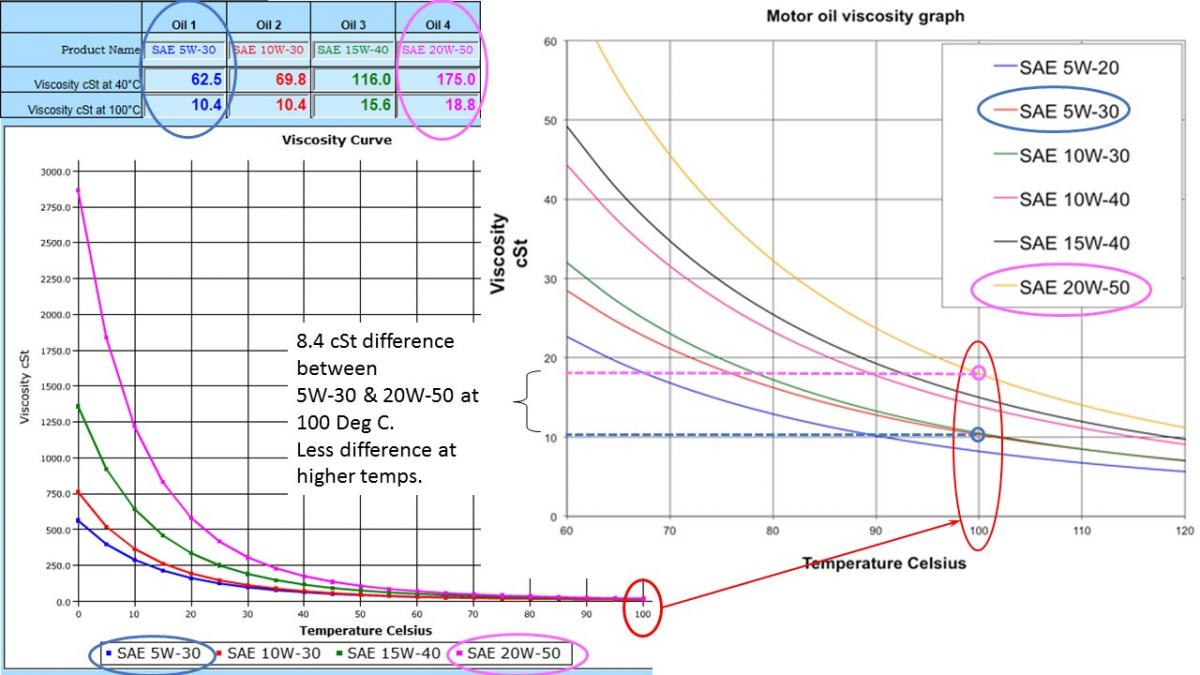
I had a wee rant about oil earlier, but didn't answer your question.What weight 5-40 or 20 50, ?
My 03 Owners Manual says use Agip 4t Super Racing SAE 20W50. But then the maintenance section says 20W-40, 20W-50, 15W-40, 10W-40, and 10W-30 can be used. Then experienced riders like Phil say that they use 0W-40.
So does it matter what viscosity you use?
The attached diagram shows that 5W-40 & 20W-50 have a big difference in viscosity when cold, when high viscosity is just a burden. But there is little difference between -40 and -50 oils when hot. We can see that the last two digits of 20W-50 are the target viscosity for the engine design clearances when it is hot. This is sometimes called the operating temperature viscosity. The first two digits are less important, except that lower is better. Hence Phil's 0W-40 is probably quite good.
If you are uncertain about using thin oil, you could check the oil pressure when running with it (if you have access to a gauge). Your low pressure switch turns on below .35 kg/cm2 (5psi), and your pressure relief valve opens above 3.8 kg/cm2 (55psi). Pressure below .35 is dangerous, and pressure above 3.8 is ported back to the sump, so that pump power is wasted.
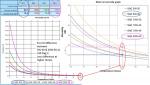
As an aside, MG twins have a dry clutch & separate gearbox oil, so this means that you don't need to buy motorcycle oil without friction modifiers. You will not get clutch slip from slippery oil. Air cooled engines can get hot compared to water cooled, so I don't think you should use cheap high zoot snake oil fortified lemming squeezings in your engine.
As Docc said: "...change your oil, be careful about the V11 oil filter..."
His bike is passing 100,000 miles, so he shows us that using any good oil is ok.
-
Hi Phil, I agree that Mobil 1 is good oil, but is it a "group 4" these days?I run mine ... on Mobil1 0W-40 full group 4 synthetic
I see ExxonMobil make this claim on their website about Mobil 1: "A synthetic lubricant contains more highly refined base oils than conventional mineral oils". This is very different to their claims years ago, when they were very specific about their chemistry being man made, not made from crude oil.
When Castrol reformulated (downgraded/cheapened) their group 4 Syntec to group 3 mineral oil in the mid 90s, and still called it synthetic, Mobil sued Castrol over misuse of the word synthetic, but lost. Now everyone sells synthetic oil which is actually Group 3 mineral oil, rather than Group 4 synthesised oil. The word synthetic now just means "premium" for lubricating oil.
I'd be really interested to know what Mobil states on your drum of Mobil 1. Does it say Group 4?
The only group 4 oil I can find in NZ is Penrite 10Tenths, a good Aussie product, which specifically says is made of 100% PAO (polyalphaolefin) & Ester chemicals. My next oil change for the upcoming summer here will be to Penrite, now that I know the temp of my oil, thanks to a dipstick thermometer Scud sent to me.
-
I bought one of these new from Harper's Moto Guzzi in Jan 2016 for US$119. Harper's item no 97326090004. They may have more in stock. http://www.harpermoto.com/
It is nicely made of aluminum, and looks good on a V11. It came with an instruction sheet written in Italian, and mine has the MG Eagle decal on top. It is only rated at 3kg so can't carry much more than a pizza.
This MG rack wouldn't fit until I removed the Ventura rear mount bracket I left on when I pulled the pack rack off the bike.
-
I got a set of NGK leads and caps from Moto International in Seattle. They look good after I wiped the pretentious "NGK Racing" white lettering off them using isopropyl alcohol. There is a nice anti abrasion sleeve over part of the lead so you can tie the lead to metal parts without a problem.I also notice my spark plug caps were torn. Does anyone know if the NGK caps on Harper's will work? I don't want to pay $50 for the OEM spark plug caps.
And of course everyone knows that Moto Guzzis run best with red ignition leads.
-
...If you want to check the timing of the camshaft, you ideally use two indicators fastened so that you can measure valve lift while turning the camshaft with 0mm valve play set.... If the measured value is off a new hole needs to be bored into the camshaft wheel...
This is new information to me. I thought that the only timing I had to get right involved the timing chain and sprockets. Have you found camshafts which have the dowel pin drilled in the wrong place, or are you modifying and optimising your engine?
-
You could make your own protractor and pointer, since if you are building your engine you have the skills. The crank sprocket is about 25 teeth, so your protractor only needs to be more accurate than 360/25 degrees for the crank, and 360/50 degrees for the cam. Your old high school protractor is more accurate than 7 degrees. You need to be sure that your camshaft is not a tooth out relative to the crank, or your engine will be VERY sad, especially if a piston touches a valve.Under the "Check of the Timing System Setting" in the manual it says to "fit a dial gauge support into the LH cylinder's spark plug hole. Then fit the gauge into the latter." This is to find TDC with valves closed. Then, one proceeds to turn the index plate attached to the crank to make sure the timing marks are aligned.
As for the dial gauge, you might consider a drinking straw poked down plug hole, and feel when the piston reaches the top. There is 2-3 degrees of crank rotation where the "lost motion" at TDC & BDC mean that the piston barely moves. This uncertainty is much less than one tooth of the sprocket, so you could try it.
Marty
-
1
-
-
Boo hoo hoo hooooo
Maybe you can cash settle with the insurance company, and repair this yourself.
Is it possible that the scratched side could be turned so it faces inwards?
See WASPP's repair of a Ti Can here: http://www.v11lemans.com/forums/index.php?showtopic=13524&hl=titanium&do=findComment&comment=190119
-
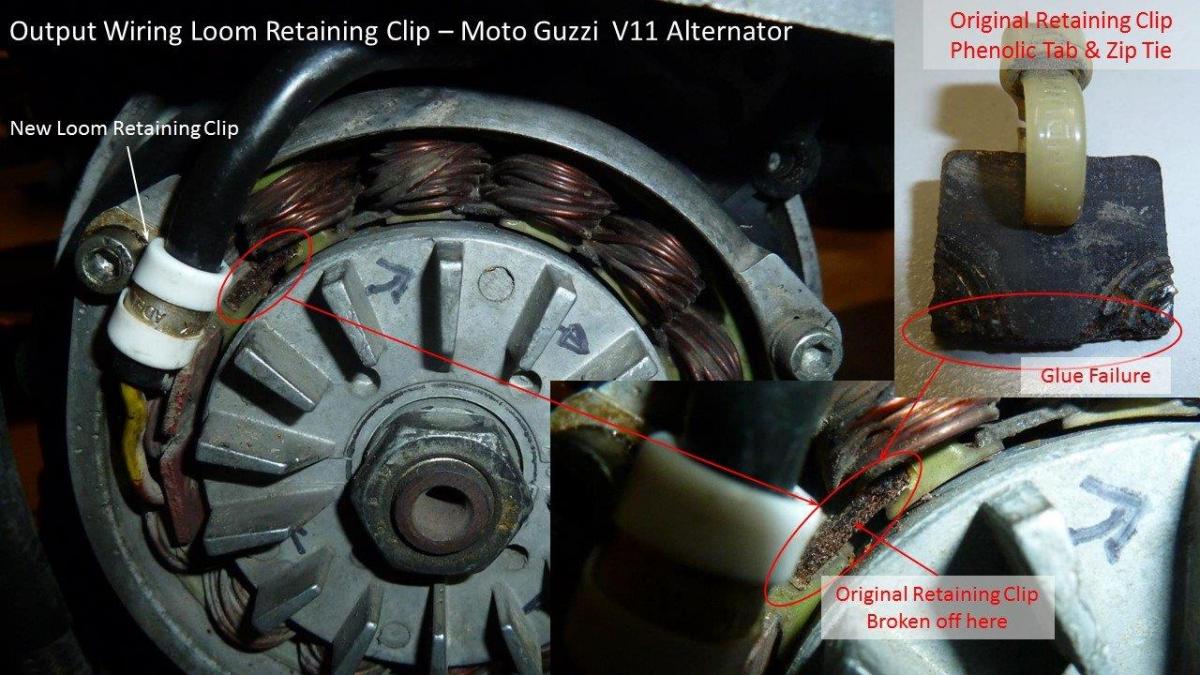
OK anyone no what the broken thing zip tied to that wire is, looks like its broken off from next to the other two things but they have a wire attached???
That broken thing you see is the tab used to secure the the yellow wires with a zip tie so they can't catch in the rotor.
My bike has this tab attached to the alternator stator under one coil, very close to the rotor.
If the tab breaks off, it could get between the rotor & stator, and damage both.
I think you could throw the broken piece away and secure the leads with a small p-clip or clamp under one of the screws which hold the stator down.
This might be the cause of Dimo's problem http://www.v11lemans.com/forums/index.php?showtopic=19415&hl=
Marty
And guess what? I touched that tab on my bike, and found it broken off too! I had to add a p-clip.
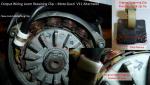
See picture of a P-Clip securing the wiring loom away from the rotor.
-
As KiwiRoy said, it is held in with screws.
See picture attached, which should answer your question "But how is such a stator fixed to the housing? Glue? How to you get it to come out? And more importantly even: how do you get a new one back in?".
My alternator problems were cured by repairing bad connections in the yellow wires from the stator to the regulator, fitting a better 30A fuseholder than the one under the seat, and properly grounding the regulator.
Marty
-
I had a "leaky rear main oil seal" when I bought my bike, and fixed it by replacing the Breather Hose part no GU30157400.Hmm... I may have disturbed things that were not previously leaking.
When you look for the breather hose, it is hard to see, let alone see why a leak from a breather hose finds it's way into the clutch housing. You usually can't see any cracks in the hose when it is installed either, and tightening the hose clamps can make the leak worse.
The rubber gets brittle with age, and gets tiny cracks just like the throttle body rubbers do.
I think that these parts should be replaced every ten years, or less, regardless of appearance.
-
Carl Allison said "The 2002 models had the black paint on the sealing surfaces and bolt holes, shaft seal surfaces etc. This led to a lot of sealing problems."A cracked engine casing can leak, and be difficult to spot.Belfast Guzzi mentions a leak caused by a cracked timing cover. http://www.v11lemans.com/forums/index.php?showtopic=11429&hl=%20casing%20%20crackA comment about kick stand attachments http://www.v11lemans.com/forums/index.php?showtopic=13357&hl=%20casing%20%20crack


clean electrical connections
in Technical Topics
Posted
I used Dow Corning Compound 4, as it is specifically designed for this application, so I thought it would be even better than vaseline.
Dow says this about DC4: "A moisture proof seal for aircraft, automotive and marine ignition systems and spark plug connections, disconnection junctions in electrical wiring systems also in electrical assemblies and terminals".
I cleaned all the connectors on my bike, then filled them so full of DC4 that it oozed out as the connectors were plugged. Same with relay bases & lamp sockets.
However, DC4 is a silicon based dielectic grease. It is also non-conductive, but squeezes out to allow metal to metal pin & socket contact.
Have I made a mistake?
If Gstallons, Wayne Orwig, and Kiwi_Roy think silicon is bad, should I clean it out of the connectors?
https://www.google.co.nz/url?sa=t&source=web&rct=j&url=http://www.farnell.com/datasheets/319850.pdf&ved=0ahUKEwjvgq3T1YXPAhXFKZQKHXU4DW4QFggfMAI&usg=AFQjCNHauFpF8tXzI_HDDEzfDusfYwoyug
https://www.amazon.com/gp/aw/d/B0195UWAHG/ref=mp_s_a_1_3?ie=UTF8&qid=1473581534&sr=8-3&pi=SX200_QL40&keywords=dc4&dpPl=1&dpID=4197U0ONekL&ref=plSrch