
bikelee
-
Posts
132 -
Joined
-
Last visited
-
Days Won
3
Content Type
Profiles
Forums
Events
Gallery
Community Map
Everything posted by bikelee
-
I am having my seat done by Rich now. He's a great guy and knows his stuff. I am very fussy about seat comfort. I'll report back and let you know how the seat works out. See ya on the road.
-
Looks like that fairing should have come stock. It is a knockout !! Simply beautiful.
-
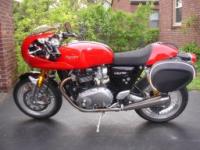
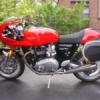
SO HOW MANY ROSSAS WERE PRODUCED ? Are they really that rare ? How many are still around ? Seems like a lot. I heard of about 3 in the Albany NY area alone but have only seen one, mine. Hal Wiley has one but he moved to Tennessee recently. Bought my Rossa in Jan 2013 on my birthday. Found it at a local BMW dealer. Here are some pics:
-
Found a seat. Thanks !
-
NOT MINE !!! http://cgi.ebay.com/ebaymotors/2003-V-11-Rosso-Corsa-/111089098482?pt=US_motorcycles&hash=item19dd6d1ef2
-
Just another start-up or will this happen ? http://www.cycleworld.com/2013/06/04/new-moto-guzzi-liquid-cooled-v-twin-engine-work-in-progress/?cmpid=enews060613&spPod
-
I agree. Keep looking. Looks like a money pit.
-
YES ! He is doing seats. I think he's gonna do mine.
-
Rich Maud still doing seats ? Thanks !
-
Doin' some maintenance on the Rossa and took a couple of pics of the NGK IRIDIUM BPR6EIX plugs: They look ok to me. No oil deposits. Nice light tan to slight darker tan. I have been using non-ethanol gas I concocted myself using the instructions in Motorcycle Consumer News. A valve clearance check is next.
-
Cool ! Thanks !!!
-
What clearances should be used ? I am gonna check mine too ! Thanks !!
-
I took the manhole cover off and there is an rtv like substance on the o-ring seal. What is that stuff ? Is that stuff on a new o-ring ? I'm gonna replace it. I think it is just good practice. Where can I get this o-ring ? Also, if you look at the second pic, to the right you see 2 sealing washers, where can I get those. They have a rubber inner seal. I need new ones. They are used on all the drain plugs of the rear drive and trans. As before, any help would be appreciated. Working on this Guzzi has been a real learning experience. Thanks, Leon.
-
About to change all the fluids but, which plug do I remove ? There are 2 on the rear of the engine sump. Which one do I remove, the small or the large one ? Thanks !!
-
FINALLY ! I took my first extended ride on my new to me Rossa. Holy mother of pearl ! This bike is all I hoped it would be. After about 30 hours of work replacing all the fluids, installing new steering bearings, getting rid of a mouse nest in the air cleaner assembly, adjusting the idle (po set it too high), replacing tach glass, cleaning and other assorted tasks, it starts, runs like a bear and sounds beautiful with those Ferrachi cf mufflers. Handles very well to boot. I am glad to be on a Guzzi again. I had a LeMans 1 back in the day. As for some accessories: I'm gonna put MPH bar risers on and try some Buell pegs I've had stashed away for such a situation to try and make the riding position a little more comfortable for my aging 63 year old body. Also installed a Guzzi rear rack to carry tools and other sundries. The bike came with a Tourmaster tank bag that fits like a glove. I am gonna try putting lead shot and silicone in the handlebars to try and quell some of the vibes in the bars. The vibes are not bad but maybe I can reduce them with the shot. I also sourced a new speedometer from MPH to have ready when the original one fails ( I guess they almost always do. ) Again thanks for all the help and advice in this endeavor. I hope to be an active participant in this forum.
-
I'm gonna go with the MPH handlebar risers and that requires clutch and brake line replacement. I have bled lines before but have not replaced any in a long time. Any tricks or techniques for doing this ? I have a Mity-vac but when I use it, air seems to get around the area where the clear tube attaches to the bleed nipple even though the tube seems to fit real tight. I put a little thick grease on the threads of the nipple and that seems to stop air from getting in that way. Also should I remove the rear wheel to gain better access to the clutch bleed nipple ? I have kinda big hands. Thanks for any help or suggestions !!
-
I think I'm gonna try the risers and do some crunches for the abs. Thanks for all the suggestions ! Leon
-
Do these riser work ? Will they help ease my 63 year old back ? http://mphcycles.com/handle-bar-risers/
-
STEERING HEAD BEARINGS ADJUSTMENT OR REPLACEMENT ?
bikelee replied to bikelee's topic in Technical Topics
I used a propane torch to slowly and evenly heat the area where the race fits. Between that and putting the races in the freezer, the races tapped in nice and easy. PATIENCE is a key here. i did the job slowly and carefully. -
STEERING HEAD BEARINGS ADJUSTMENT OR REPLACEMENT ?
bikelee replied to bikelee's topic in Technical Topics
I'm glad I took the front end apart. The lower bearing was notched and worn. Not enough grease from the factory. Just want to thank everybody for the help. I was able to replace the bearings and races without too much trouble. The old races popped right out with a little persuasion from a good drift. Put the new races in the freezer and heated the steering neck and the new races went in with just a little help from a light hammer hitting the old races and slowly bring the new race home. Greased the new bearings real good !! Knocked the old lower bearing off of the steering post with a good chisel and pushed the new bearing on with the old bearing with little effort. Put everything back together, adjusted the "tension" nut and now the steering is nice and firm and precise. I'll check it in about 500 miles and retighten if necessary. This video was a great help. http://www.garagenight.tv/ep-5-replacing-steering-head-bearings/ Again thanks for all the help !! -
I have my 03 V11 Lemans on the lift now ( just replaced the fork oil ) and have noticed some play in the steering bearings when I push and pull straight back and forth on the bottoms of the fork. If I pull "diagonally" there is no slop. The bike only has 5800 miles so I am thinking that I just need to tighten the bearings a little. Am I wrong or should I just replace the bearings ( i ordered new ones just in case ) ? I think I'm gonna start with just tightening the bearings and I need to get the top triple tree off. Do I have to take the whole front end apart (AGAIN ! ) to just to take the top triple tree off or can i just loosen the pinch bolts were they attach to the forks, loosen the bolt where it attaches to the post of the triple tree and remove the top bolt where it goes through the top triple tree and finally lift off the top triple tree ? I've never done this before. I am gonna take a lot of pictures and notes. Any help or advice would be greatly appreciated. I do have a shop manual but it is very sketchy and vague in many areas. Thanks !!
-
I am assuming you ran the big fat wire from the negative terminal on the battery to the starter motor bolt ? Thanks !!
-
Yes I did change the fluid in the rear brake and the clutch line after I removed the rear wheel. I inspected the rear bearings and the splines. When they put a new rear tire on they apparently greased the spines and the rear bearings. Everything looks good and fresh,ready for the new riding season.
-
I was wondering if someone could me out with some torque figures: These torgues are for a 2003 Lemans. 1.Bolts holding front u-joint (on the drive shaft) to trans output shaft 2.Front/ rear caliper mounting bolts 3 Rear shock to swing arm bolt and nut 4 Front fork upper and lower triple tree bolts that hold the forks. 5 Bolt on top of rear drive unit that attaches to the torque link. I have a shop manual but they do not list these bolts in there. Thanks for any help. Leon
-
Hooray !! Drive shaft is all greased up. It has been installed along with the swing arm. It appears shaft has been lubed well it's whole life. U-joints are ok !! Swing arm bearings are perfect. Everything turns smoothly. Should be ready to go as soon as I get my new air filter and rear brake caliper inspection cover installed. I took care of the tank suck thing also. I am pumped Bought 2 of these quick release fuel unions from BEEMERBONEYARD (Brand new 2 piece 5/16' CPC chrome plated brass quick disconnects for BMW R850/1100/1150 & R1200C and K1200RS/LT/GT fuel lines. These are made by the same company that supplies the OEM plastic units. Replaces BMW part #s 13317659120 and 13317659119. The difference is ours are the high grade chrome plated brass version with stainless internals and fuel resistant Viton O-rings. We also include 2 fuel injection rated hose clamps and a spare O-ring. These are the units BMW should have supplied in the first place. Don't be fooled by less expensive but cheaply made cast zinc parts that are being sold elsewhere. The set includes enough quick disconnects and clamps to change over one fuel line on your bike. A great upgrade for older Oilheads and K-bikes or any bike with 5/16" fuel lines! ) so I do not have to screw with the white and red gas tank fuel pump connectors. I am paranoid of breaking them. What do you think ? If we can get some decent weather I should be able to take the first ride on the Guzzi within the next week or so. Leon
