

Lucky Phil
-
Posts
4,541 -
Joined
-
Last visited
-
Days Won
234
Content Type
Profiles
Forums
Events
Gallery
Community Map
Posts posted by Lucky Phil
-
-
2 hours ago, gstallons said:
Hmmm , how did it get apart ?
I worked on mine with contact cleaner and working it about 15-30 mins.
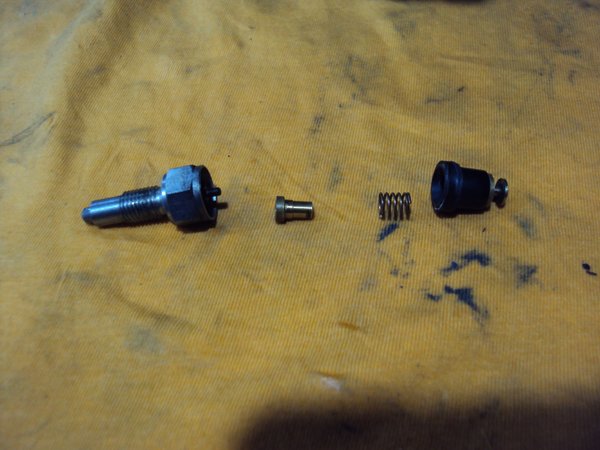
I machined off the crimp. I dont know how contact cleaner worked for you as I tried that as well. After I disassembled it I saw how that wouldn't work for mine as there's no way for the cleaner to get to the switch cavity. The contacts in mine were just tarnished and it needed cleaning up with wet and dry. There was no evidence of oil or contact cleaner in the switch cavity so I assume there is a seal in the plunger section.
Ciao
-
 2
2
-
-
Gearbox is done and now just trying to rectify the nil ops neutral switch. The switch is outrageously expensive and all it needs is the contacts cleaned up. Holding it all back together is the challenge. Loctite 635 will hopefully be the answer.
Ciao
-
1
-
-
42 minutes ago, footgoose said:
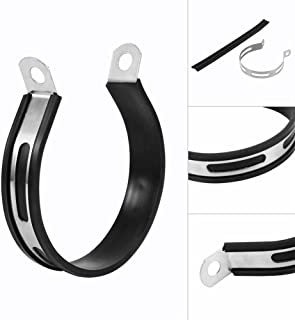 the plastic edge piece for the strap. 'plastic edge trim' search gets me one edge. I can't find it if I don't know what the hell it is.

What about this?
https://webshop.lineamotor.hu/en/spd/YYB950QT01007/Rubber-Cushion-Strip-Muffler-Fiing-Ring
ciao
-
On 10/11/2019 at 4:18 AM, czakky said:
I went with Fast by Ferracci valves. Looks like he’s liquidating ($22 US each).
The step is on the top side visible when valve springs/spacers are removed. It is the same color of the guide itself.
Bargain, not sure about the guides though. I'll take another look at my spare head.
Ciao
-
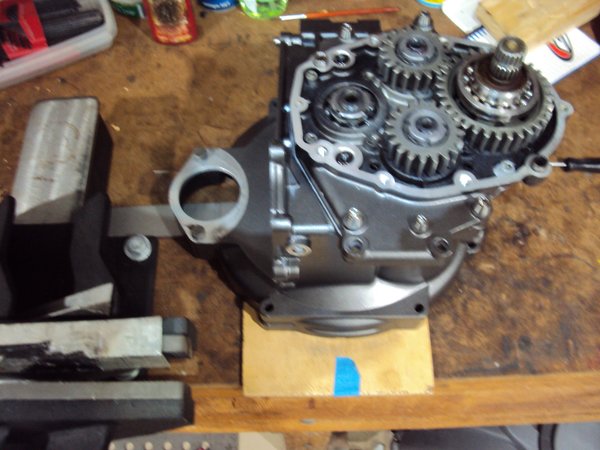
Well some things just seem to fight you all the way for some reason,maybe its just me. I've finally made some progress on the gearbox after a few issues along the way. I assembled the mid case with all the gear shafts onto the main housing and bolted it down all sealed and with me feeling rather good about things, that is until I tried to turn the upper secondary shaft (1st,3rd and 5th from memory) It would turn but you could feel the drag of no end clearance. With a ball bearing on the aft end and a roller on the front it was obvious there was something amiss on the roller. The thought of the 0.0035" I machined off the rear face after the weld repair to flatten out the case which was like this from the factory was on my mind as was the not correctly seated input shaft roller I found. So before the sealant had set I pulled it apart again looking for the problem. Nothing jumped out at me so I drifted the front roller bearing into its recess just to be sure. I suspected it moved a fraction because the baffle thingy behind it tightened a little but I wasn't confident. It was tight enough to warrant sorting but it would have got enough clearance when the gearbox warmed up. Anyway seating the fwd roller fixed the issue to my relief.
So with the mid case bolted down and sealed it was onto fitting the input shaft and secondary shaft ring nuts. These have a surprising amount of torque 90 n/m on the main and 80 n/m on the smaller secondary shafts. I managed to get the main nut torqued up which is hard when you're holding the gearbox shaft with the tool and applying the torque but when I went onto the secondary shafts I stripped the first ring nut. No idea why. I applied some lube to the lock washer face and some loctite to the threads and used my "good" torque wrench but there you go.
Anyway I gave Pete Roper a hoy as he had lent me his tooling and he kindly sent me a new nut and washers in the post.......stout chap Pete. After some research and thinking I decided to back the torque on these down a touch. 80 n/m just feels too much and considering that are the same 17x1mm thread as a Ducati 1098 cam pulley ring nut which uses 64-78 n/m I ended up going with 70 n/m and some loctite.
So that all worked out and the rear cover fitted up nicely with its new seal. I have of course fitted my Chuck shift return spring to the shifter mechanism and the shift assembly has previously felt the warmth of my fettling so it was just the spring upgrade to worry about.
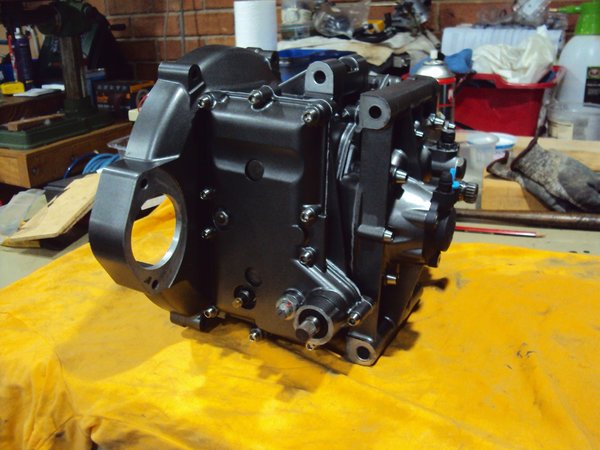
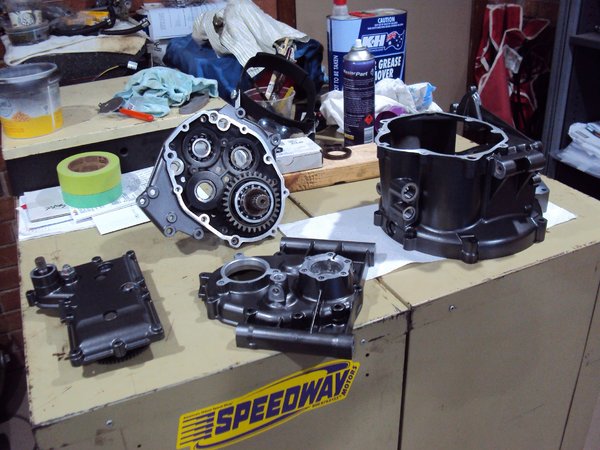
Once again thanks to Pete Roper for the tooling and spares, I owe him a few drinks obviously. All that's really left if to fit the clutch slave,torque up the front ring nut and install the shifter cover. Not sure if I'll bolt it up to the engine unit yet or wait until fitment to the bike.
So here it is at present, assembled for the most part with all titanium fasteners. Surprisingly there are a lot of fasteners that go into the wet area that aren't sealed in any way. The manual doesn't call for anything but I have applied sealant to all these fasteners.
This is what you need to do to torque up the secondary shafts when you dont have any friends.The secondaries impart a rotating torque to not only the input shaft but also the gearbox case and you cant hold both and apply 70nm hence you need friends to hold the casing. So I pinned it to the bench with the input shaft holding tool against the vice and 2 8mm bolts throught the starter mount holes into holes I drilled into my old much loved bench. Don't like drilling holes in the bench but it adds to the patina I guess.
 T
T
Time to start considering installation to the chassis I guess.
Ciao
-
3 hours ago, czakky said:
All is right with the world. She’s back together and probably running better than ever.
Left side valves seems to make more noise than before so I’ll be checking them soon. Hopefully that oil in the bell housing is from my recent breather hose leak.
Two things the machine shop asked me about.
One is, the original(?) guides look to have a step on the top side. Does this indicate a liner at some point?
The other question. The shop asked me who did my porting? Do all Guzzi’s have these shaping/grinding marks in the intake and exhaust ports?
What valves did you end up going with?
Do you mean this step? Image 2
http://www.mgcycle.com/index.php?main_page=product_info&cPath=68_127&products_id=423
My spare head just has a cast finish in the ports.
Ciao
-
1
-
-
6 hours ago, Chuck said:
I replaced a set of gears for a guy's Centauro. It wasn't *quite* that bad..

 but I could feel the particulates in the oil as soon as I opened the timing chest. If I would have kept mine, I was planning on a chain at the next belt service.
The gears in my Centauro engine were worn (mileage unknown, but lots I suspect) enough for me to not want to re use them. Surprisingly the oil pump was in fine shape. I went with the Caruso gears again same as my 2 valver.
Ciao
-
3 hours ago, po18guy said:
Well, I stand corrected! Thank you. As always seems to happen, I should have specified that my experience is limited to V8 car engines.
Although car/multi cylinder engines have more valve springs to drive the load on the gears is more evenly distributed and the gears generally have more real estate inside the engine which means they can also be wider. Car engines by and large also spend much of their working life at much lower rpm. My previous Chev gen111 engined car used to cruize at 1750 rpm at 110kph. The Guzzi is turning around twice those revs at the same speed.
There are of course many other factors but I agree with Pete in that aluminium isnt a great choice for cam gears. I wouldnt have changed the chain for alloy gears.
Ciao
-
29 minutes ago, po18guy said:
Way old thread, but back to timing setups. First cup of coffee musing here. HQ gears should last the life of the engine, but such gears - think transmission quality or above - would cost near the value of the bike. Straight cut gears are more efficient than helical (no thrust), but give you that "NASCAR" V8 sound. Lovely for around town, but tiring when droning along. Alloy gears? If we go back 60+ years to the Studebaker car V8s, we find a fiber cam gear! And I know of no failures driving 16 valves for 100K. Rather mild cam profiles I'll grant you, but their performance "Avanti" cam gear was helical alloy. The engineering on the Studes was such that there was crank gear directly meshing with cam gear - nothing in between and no tensioner needed.
Where does that leave us? I tend to think that racing engines (fairly frequent tear downs) need gears, while street engines need a good tensioner. Being an owner, have prowled the Kawasaki EX500 forum for many years and cam chain tensioners were a big issue on the gen1 ('87-'93) motors. Fortunatel, the bulletproof gen2 unit swapped right on. They have the silent hy-vo chains and many of them go 100K miles if properly maintained. Says something about the chains in what was essentially a commuter/throw away bike. And this is with the lumpy 180º/540º firing interval they have.
I am of the mind that a good aftermarket tensioner will serve me well.
 Timing setup that Andy Granatelli used to go 168 MPH in a 1963 Avanti. https://www.youtube.com/watch?v=YG8pdR6VAXw
No to the cost and no to the noise. My bike has Joe Caruso steel gears and neither of those comments apply.
Ciao
-
2
-
-
Just thinking, a "universal joint replacement" is a bong isn't it.
Ciao
-
2
-
 3
3
-
-
51 minutes ago, Kane said:
I have discovered that when the front fork is turned all the way to the left, as it is when the bike is parked to lock the fork, the fork tube is touching the end of the tank. It is not denting it but it’s enough to have worn off a spot of paint and left a mark on the fork tube. I guess I will put an adhesive pad there to protect the tank, unless there’s a better idea. Is this common? Can it be remedied?

Make sure the tank is venting correctly as this will also happen if its not. Mine is usually about 3mm clearance but recently I had the tank vent hose kinked after install and it interfered. You wont believe how much the tank expands when the vent is blocked.
Ciao
-
Yes the exposed shaft is standard, the alternator light should go out as soon as the engine starts, no idea what the three way toggle is as its not standard, the left front indicator mount looks damaged, the seat cowling needs some large headed chrome attachment screws and the canisters under the seat need to go.
A few little items to keep you amused. I'd look into the alternator light and the three way switch first. Check the battery and alternator connections as a start to basic troubleshooting.
To lock the steering on my bike you need to push on the key, release and then it will turn to the locked position while you hold the steering a little off the steering stop. If you push and hold the key down it wont turn to the lock position or if the steering is all the way on the stop it wont lock either. all my other bikes you pushed the key down and held it down to go to the locked position but not the Guzzi it appears.
Also check the toggle switch isnt wired into the regulator sensing system Some people replace the std reg with a unit that bypasses the ignition switch which works fine except it drains the battery after sitting for long periods. Maybe they wired a switch in the system or an anti theft device?
There's plenty of help here if you need it.
Ciao
-
23 minutes ago, Chuck said:
If a manufacturing process isn't carefully controlled (we *are* talking Guzzi, here)
 nobody knows until things start failing in the field. Remember, this is a very small company with very little money.. and no reliability lab. This is much of the allure to me. They were making a *very* good motorcycle on a shoestring, and doing a good job.. mostly.. at it.
I'm thinking in those 2 years they probably only made 2-3000 bikes worldwide. How many were affected I dont know but it seems not all of them.
Ciao
-
6 hours ago, docc said:
I am thinking the 2001 Rosso Mandello has different paint that preceded the problems with the '02/'03 ?
Or maybe a batch of cases with bad/incorrect preparation that caused the paint not to adhere.
Ciao
-
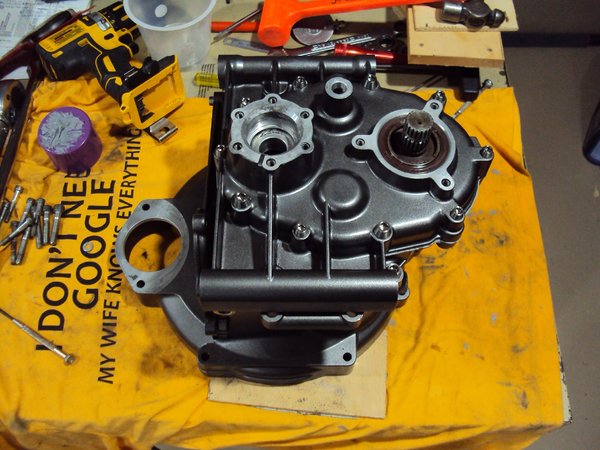
Gearbox painted at last just need to oven cure the paint then assembly.
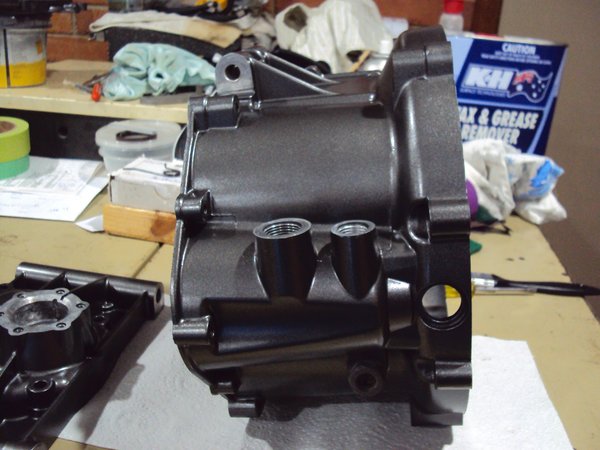
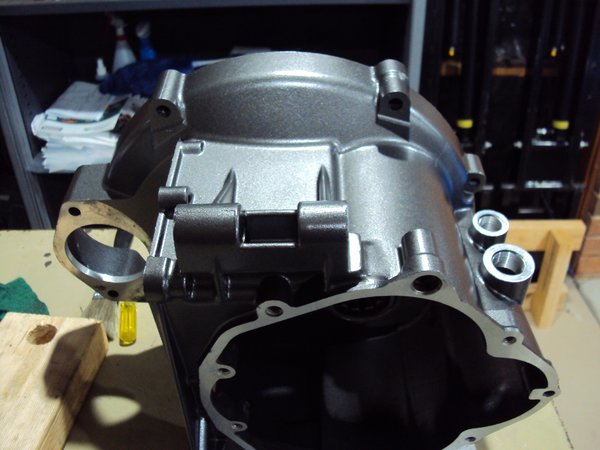
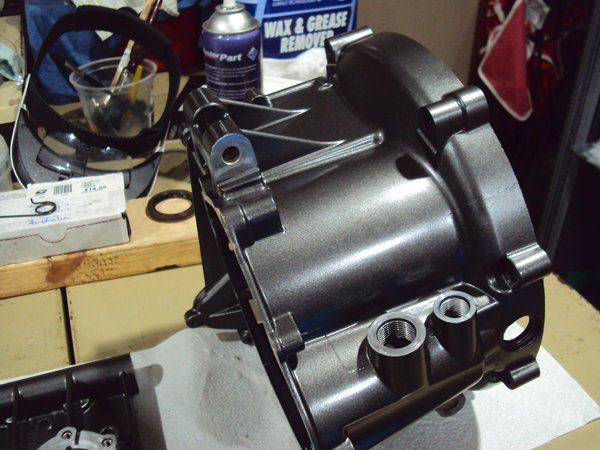
Ciao
-
2
-
-
6 minutes ago, luhbo said:
I had over 200.000 km on my first V11 and the U-joints didn't show any signs of wear. In fact they still were stiff in all directions. I greased them once a year or so, maybe once every two. It's in fact one of the more robust parts on a V11. Not that I haven't seen failed ones though ...
Sounds like how my body feel every morning.
Ciao
-
1
-
-
16 minutes ago, 68C said:
I have often wondered if linking the two manifolds would help low throttle balance. Many parallel twins do, perhaps the uneven firing order of our v- twins mean this would not be of any benefit.
All it does is introduce another variable you dont need. Ducati did it for a while in the 851 days along with a vacuum connection to the fuel pressure reg then wisely deleted it.
Ciao
-
1
-
-
2 hours ago, Bob Maynard said:
My new to me Sport has a piece of fuel line joining the left and right vacuum ports together. Any advantages to this setup? I’ll disconnect this to balance the tb’s, but wonder if it’s worth putting back on. The PO went to trouble of installing with a clamping tool instead of regular hose clamps, makes me wonder if he may have known what he was doing. TIA
Bob
Pointless, get rid of it and plug the holes. Its just a convenient way of isolating the holes without plugging.
Ciao
-
1
-
-
14 minutes ago, Twin AH said:
Holy crap Chuck..... you must have got a good one for sure.
Thx for that.
Ciao
I'm currently repainting a wrinkle finish gearbox and I can tell you if an engine was painted with this level of adhesion you would never have an issue. Looks like you either got a rock solid wrinkle paint job or a flaky one.
Ciao
-
59 minutes ago, Chuck said:
No, this was a Molex connector.. or used to be.
Oh ok my mistake.
Ciao
-
1 hour ago, nobleswood said:
Which connectors are these ? I can't visulise where they are.
As the owner of a 2004 with 18500miles I should have a look.
Most likely cable tied to the front engine subframe. Two bullet connectors on yellow wires from the alternator.
Ciao
-
3 hours ago, doslemans said:
2004 V11 Lemans 76K miles. Was headed to the Kentucky Guzzi rally last Thursday In Frankfort and voltmeter I added a couple years ago indicated the charging system was fading away. Was hoping to get to a town before it died altogether as I was out in the middle of nowhere. Voltmeter flashes when it drops to 11.8 volts and I was surprised how soon the bike quit after that. Luckily the cell phone got a signal and was able to contact guys at rally so they came the 80 miles to get me with a trailer. After removing fairing and troubleshooting in the campground, the connector that the 2 yellow wires are in had overheated and fused together. Took 2 pair of pliers to persuade it to separate. Cleaned best we could and removed burned plastic, tightened the terminals, and applied caig deoxit electrical magic. Made it the 300 miles home Sunday charging better than it has since I added the voltmeter. Need to cut out the connector and replace with individual disconnects for permanent fix. Any recommendations as to what type of disconnect terminals I should use?
A fix as old as time. Those connectors have always been an issue.
Ciao
-
10 minutes ago, Kane said:
Thanks for the offer! Seriously, you guys have been really helpful and forthcoming. I really appreciate it. I know that these are hands-on bikes. I am actually looking forward to having a bike like this that I need to become handy and familiar with. Years ago, wrenching on my 850T and later my Triumphs, a ‘61 pre-unit Bonnie and then a ‘68 Bonnie, was my passion. It’s been a while, but I am really glad to be back in the saddle with a Guzzi. Back then, the two bikes that I lusted over were a Norton Commando and a Guzzi LeMans. My impression is that the V11 Sport is dipping into LeMans territory. I’ll see my friend on Sunday and hopefully wrap everything up next week.
Thanks again for your welcome and help with this. This is a quality forum.
At the very least we've saved you from a Norton Commando,lol
Ciao
-
4 minutes ago, docc said:
How would that turn 90º off the gearbox output shaft? A chain drive Guzzi . . . .
Would require a whole new rear gearbox housing with an internal bevel drive. Better in there than dangling off the back wheel.
Ciao
V11 Daytona project
in Technical Topics
Posted
JB might be an overkill docc, even without bonding of any kind with the switch assy put back together it would operate without coming apart the spring pressures are so small. might need to be careful putting the connector on and off,time will tell I guess.
Ciao