mikethebike
-
Posts
24 -
Joined
-
Last visited
Recent Profile Visitors
267 profile views
mikethebike's Achievements
Guzzisti (2/5)
0
Reputation
-
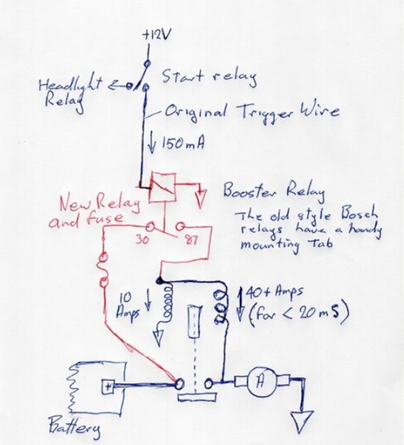
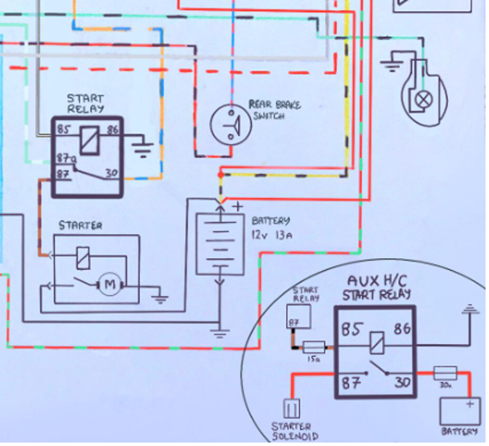
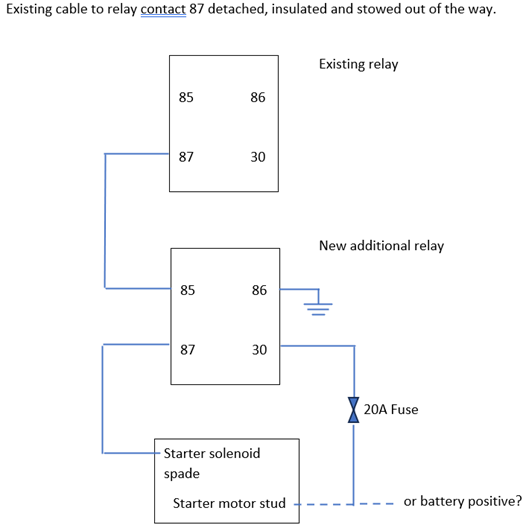
Hi, I’m not new to the forum but it has been many years since I have participated – I was pleased to find that my user name and password still worked. I have been suffering from “startus interruptus” for years now and I have finally got to the point where I have to fix it. Usual trouble – press the starter and the bike starts and other times just the familiar click sometimes several times in a row but it always eventually starts. There has never been any consistent pattern to the press-click problem. The bike can sit for a couple of months and fire up first press or after a 100 mile run and stop for petrol it can then click-click-click-fire. Worst occasion was getting off the ferry in Holland when it took about 10 presses of the start button and a squirt of WD40 into the starter switch and a serious talking to before it started and then it behaved for the rest of the tour. I have checked and cleaned terminals, earths etc and fitted new relays, starter solenoid, complete starter and new battery but still the problem returns. So now when I finally get round to looking to sort it out once and for all I consulted this forum and found recent threads which at last makes things clear. My bike is a V11 Sport which I bought new in 2002. The owner’s manual wiring diagram shows the "sensible" wiring for the starter circuit so I believed the problem did not lie here – or so I thought…. Finding Stewgnu’s colour wiring diagram has been a revelation – my bike is wired up exactly as this shows which is the “weak” circuitry. Kiwi_Roy’s voltage test confirms this – I get 12.2V at relay contact 30 with the ignition switched on. (and 0V with ignition off) So it looks like the additional relay in the starter circuit will be the answer but before I begin to do this work I need to clarify what I am going to do to make sure I get it right first time. From previous threads, Kiwi_Roy’s sketch above has been translated in Stewgnu’s colour wiring diagram. My interpretation is – Remove the cable from existing starter relay contact 87 and insulate the cable terminal and secure it out of the way. Make a new cable and connect existing relay contact 87 to additional relay contact 85. Make a new cable and connect additional relay contact 86 to earth. Make a new cable and connect additional relay contact 87 to the spade connection on the starter solenoid. Make a new cable including a 20A fuse and connect additional relay contact 30 to the battery positive terminal or the ring terminal stud on the starter motor. Which would be best? New cables will be heavier gauge than current wiring. Stewgnu’s diagram shows 15A and 30A fuses – I propose to use only one 20A fuse? New additional relay can be either 4 pin or 5 pin? Here is my plan in diagram form ---- Comments and advice would be gratefully received. Thanks
-
-
It's been a bit cool here in Scotland of late and starting the bike from cold has started to become a bit of a worry. Press the starter button and it grunts a couple of times and then bursts into life but doesn't spin freely the same way it does when the weather is warmer or after the bike is up to running temperature. I can start the bike after work - grunt, grunt, vroom and then ride to the local petrol station about 100 yards away, stop and gas up and then the bike fires up like it should - whirr, vroom. Bike is a V11 Sport 2002. Battery has 12.6V available (it's the original one - now 5 years old) after an all night rest or after a couple days inactivity so it seems to holding its charge OK. Electrical connections are good and tight. Could the battery be on the way out - despite regularly showing 12.6V or could there be a starter motor or relay problem developing or some other weakness in the system? Don't recall it being so sluggish in the even cooler Spring. Give me a nuts and bolts problem and I'll sort it but mention electrons and my eyes glaze over and I'll start to think of football, beer, sausages, naked ladies, bikes, anything other than electrons...... I'm starting to get a bit paranoid about it - anyone out there had any similar experiences or clues as to what is happening?
-
I was converted to Redline Shockproof Heavy some time ago and wondered how long it would last between oil changes. There was talk about it lasting 2-3 times longer than regular 80W/90 and even that it would never need changing. 10000 miles on however and being a stickler for regular maintenance I decided that I should change it. At £25 a US quart (direct from Redline UK inc carriage) it is around 3 times more expensive than Castrol. Anyway the oil was drained and what came out was a murky pink colour but it still felt like oil and had much the same sticky consistency as the new stuff. I reckon it would be OK for another couple of thousand miles so I'll set a limit of 12000 miles between changes from now on. I feel better for doing it. Just thought I'd share that with you.
-
thanks Edge, didn't so much get them as got them made (in the machine shop at work). I'll be in touch.
-
Forgot to mention last time - my neutral light has always been a bit hit or miss, sometimes it works sometimes not. But since using Heavy it comes on every time without fail and the light has never been brighter. So this amazing stuff cures electrical problems as well. Is there no end to its talents? I'm going to start carrying some in a wee bottle and next time I've got a problem I'll just rub the offending part with the elixer and the Redline genie will fix it.
-
I’ve got the “drawings” on my PC at work (they’re actually CAD files) so I’ll get the info converted into a word doc that I can email to you on Monday/Tuesday. The parts are made in aluminium alloy but they've survived around 7000 miles with Mrs mtb on the back and they’re still rock solid. You could hang the whole bike from them and they wouldn’t bend. I think the design is a wee bit utilitarian but they look OK in the flesh. I wouldn’t have left them on this long otherwise. The only reason I didn’t utilise the folding Guzzi pegs was simply time – I had to do a quick design that could be knocked up the next day at work and I didn’t have time for the added complexity needed to use the originals. It would be "fairly" straightforward to change the mounting blocks to take the folding pegs. The only reason I haven’t come up with the new improved design is laziness (and these ones work) ps 1 coincidently, we passed through Saverne during Eurotour 2004 so next year watch out… Col du Bonhomme - execellent ps 2 Mrs mtb really appreciated being referred to as a “young lady"........she’s certainly young at heart.
-
I’ve carried out several oil changes and I’ve never yet managed to remove the filter through the access hole. I’ve tried a variety of home-made tools and even bought a special tool just the right size for the filter but no luck. I always tighten the filter to the specified torque but once it’s been there for a while it seems to get a great grip and won’t budge. Each time I’ve had to remove the sump and use a strap wrench like you’d use on your car. But there has always been enough crud or sludge in the sump to warrant a good clean. There is also a mesh filter in there that needs a periodic clean. With care the old gasket comes away cleanly and can be re-used - the current gasket has survived the last three changes. You also have to disconnect an oil feed pipe at the rear of the sump - this gets tightened up again nice and tight by feel but not too tight! The job appears a bit daunting for the first timer but it's probably quicker to drop the sump than buggering about trying to get the filter out. Anyway I always feel better afterwards knowing that the innards of the sump are nice and clean. Make sure to tighten the sump screws progressively and evenly and apply the correct torque. Good luck.
-
I have fitted a forward-set rear footpeg mod to my V11. I bought a set of Hepco & Becker hard luggage (similar to the cases fitted to Calis) which is excellent kit but it severely restricted access to the pegs and Mrs mtb couldn’t tuck the heels of her boots behind the pegs which left her feeling a bit insecure. So I designed a new peg arrangement which moved the pegs forward by an inch and a half. Far enough forward for her to get her feet on comfortably but not so far forward for her toes to interfere with my heels. I have said before on these pages that Mrs mtb reckons this is our comfiest ever bike - due in part to the new peg position. Less bending of ze knees you see. This peg design was rustled up in an evening, parts were made at work the next day and fitted that night. We were heading off on our first Guzzi Eurotour a couple of days later – so the design had to be kept quick and simple. I had planned to make a more sophisticated set-up later using the folding Guzzi pegs but the “temporary” fixed position pegs have stayed on ever since. If you want a copy of the drawings get in touch. I could look into having a few sets made if there is any interest. It would probably cost a bit though. Don’t think I could swing a batch being made at work. I might even be encouraged to design the new improved model at last.
-
I've done 700 plus miles in the past couple of weeks since changing to Heavy, including a couple of early morning starts when the temp has been 5 or 6 C. Haven't noticed any negative effects at these lower temps. Still enjoying the slicker shifting. I'm a believer.
-
On the subject of workshop manuals, there’s a guy in the UK who can supply CDs of the V11 manual (’99 – ’03) and also the Guzzi training CD which has film clips of engine and transmission stripdowns complete with narrative. They are excellent and if I remember right only cost about £4 for the shop manual and £6 for the training CD plus p&p. You can also listen to the training CD in several languages so you can learn Guzzi in Italian or whatever. Very educational. Contact
-
When I read the good words about SPH I immediately ordered some from Redline UK which for £24.76 inc carriage for 946cc must be brilliant stuff. (This was cheaper than Demon Tweeks). The package came two days later and went in the g'box yesterday. Now, my real interest in this oil is as a result of a whirr from the gearbox which is evident at all speeds in all gears and developed about 200 miles after I bought the bike. It’s a bit like an electric milk-float noise and has bugged me for a long time. On a trip to Italy I asked Agostini’s for their opinion but they thought it sounded OK. The noise is definitely there though. I’ve experimented with other oils with no improvement but the SPH claims it has much thicker oil-film properties and is like a 250 grade oil at working temperature, with noise reduction properties. So, sounds like this has to be the stuff I’ve been looking for to get rid of the dreaded whirr. Well, a test run today showed that the noise has been reduced (some) and I definitely have a slicker shift. So thumbs up for Redline. I don’t plan to leave it in there forever but I should get 2 or 3 times the life of dinograde which will reduce the effect on my wallet. The oil itself is red and thick – like a raspberry milkshake. There was about 100cc left in the bottle. I couldn’t resist it – a good dollop of whipped cream on top – mmm, deelishus.
-
Set to work with a Dremel and small grinder and cut a slot in the outer race which then lifted out easily – excellent. New bearing was obviously going to be a tight fit so I heated the bevel box bearing bore with a blow torch and the new race drifted in – again easily. There is no shoulder in this bore to set the position of the bearing so I used the large outer washer to set the bearing flush with the recessed face the washer sits in. So far so good. Next came the matter of the oil seal. This is fitted below the large expensive looking needle roller. Much examination and measuring of the parts showed that the old seal sealing diameter was 36.9mm. New seal is 36.4mm. Shaft is 38.0mm. The old seal surface looked OK – no nicks or rough areas so I concluded that the old seal is a wee bit worn but should still seal. But since I had the whole thing apart (and there was a leak after all ) I decided to attempt removal of needle roller. There is a small land of the outer race accessible between bearing and seal to get a puller onto to haul it out. Heated the casing, but not too much for fear of melting the seal and leaving me totally stuck if I couldn’t shift the bearing which in the end proved to be way too tight for my home-made puller. More heat and a much more sturdy puller is required. Having measured all the parts I know what is needed and have a good design in mind to make one if I can’t locate a suitable ready-made puller. Needing the bike back on the road I decided to put it all back together and leave the seal for another day – next new rear tyre fitting time. The seal should hold out til then. The oil level plug hole is about level with the lowest point of the seal sealing diameter so if I don’t overfill the box that should help. (Confession time – I think I did overfill it last oil change) A good dod of grease was applied all around the washer/spacer/bearing/inner race/swing arm to try to keep water out. This will be regular maintenance task from now on. Anyway – new needle roller fitted, bevelbox wobble cured. Old bearing part number – Torrington HK 2516 2RS New bearing part number – NTN (japan) HK 2516 LL If there’s a next time I’ll check out if a bearing factor can supply it cheaper than the £34 I paid. 25 mile test run – no leak. (so far, fingers crossed, touch wood, etc) Celebratory beer called for. Thanks again chaps for the help and support. It’s good to know you’re not alone.
-
Yep, I had cracks in all four boots. replaced them at about 20000 miles. Simple enough job and able to be done without separating throttle body linkage.
-
Received new outboard needle roller bearing and spacer (inner race) – next day delivery from the good folk at Motomecca – at a cost of £34. Note these are sold as two separate parts. Also got an oil seal (only £2) and a cover o-ring seal (£1). Stripped off bevel box and yes the needle roller was well and truly goosed. Needle bearing is a very tight fit in casing (fitted from the outside) and will need some fancy extractor tool to remove it…..unless of course I try my usual cunning and a bit of brute force to drift it out. So off with the cover/crown wheel assembly to get better access – this came off relatively easily – remove the 8 very tight loctited (why???) bolts and apply a little leverage with a couple of tyre levers. The bearing outer race has folded over ends which retain sealing rubbers and which would provide an edge for a small diameter drift. Prised out the cage and seals to get at the flange and gave it a good whack – only to knock off a piece of aforementioned flange. Had a fag and considered the options – special puller – obvious choice but don’t have one heat up casing in oven – fill kitchen with delightful aroma of hot gear oil, possibly wreck seals, spoil cakes and pies for weeks to come heat casing with blow torch – burn off casing paint and possibly damage oil seal attack bearing with small grinding tool and collapse it inwards – successfully did this before on a car gearbox take bevel box to nearest dealer - 80 miles away but I'm not beaten yet have some beer and go to bed and sleep on it – sounds like best idea The next problem is the swing arm side oil seal which is located below the large needle roller bearing which I would not attempt to shift without a special extractor which of course I don’t have. Tomorrow’s another day. More beer please.