

leroysch
-
Posts
203 -
Joined
-
Last visited
-
Days Won
5
Content Type
Profiles
Forums
Events
Gallery
Community Map
Posts posted by leroysch
-
-
19 hours ago, Lucky Phil said:
Yep thats it the shock full travel bumper. Horrible to replace. The spring needs to come off the shock and the eye end removed. I've had to get this done before, quite tricky.
Ciao
Thank you Gentlemen.
I'll go out to the shop in the AM to see where on the shock this thing goes....it's not jumping out at me looking at the online PL drawing

-
I was getting ready to flush the clutch fluid and as I finished putting the bike up on the OEM stand I found this..thing...under the bike on the ground. I don't recognize it....don't "think" it was on the ground before I moved the bike into position...and can't find anything amiss on the bike..so is this just FOD or part of the machine's life blood?
(Crap...I better check the Ducati since I was working on it where the V11 is now....)


-
No issues getting my '04's tank off/on and aligned independent of fuel level....
-
Swift driver?
-
Had to get back into the bullet connectors under the LH side of the fuel tank. Typical symptoms (fuel pump would prime, all lights functional, no starting current draw when hitting the start button anywhere except full LH steering lock). Seems this happen every 2-3 years or so. To my eye, there's plenty of strain relief present (refuted by the steering lock symptom though), the connectors are locked to each other upon disassembly, and no other visible signs of distress. It's puzzling. Might try a Posi-Seal product next time and get rid of the bullets, Second Amendment concerns be damned.....
And many thanks to this forum for the discussions on this topic!
-
 2
2
-
-
Thanks for asking docc.
Going to wait till the dust settles on all of....this. Not exactly what I was hoping for in my first year of retirement. Heck, if I do any road trips at all this year it will be using the John Hopkins per capita map along with Basecamp as route planning tools!
 (Love the emoji...!!!!)
-
2
-
-
The organ-piped Agusta's are a thing of beauty. While not in a living room, this ticks the same boxes for me:

Although the Italians can be pesky at times....

-
4
-
-
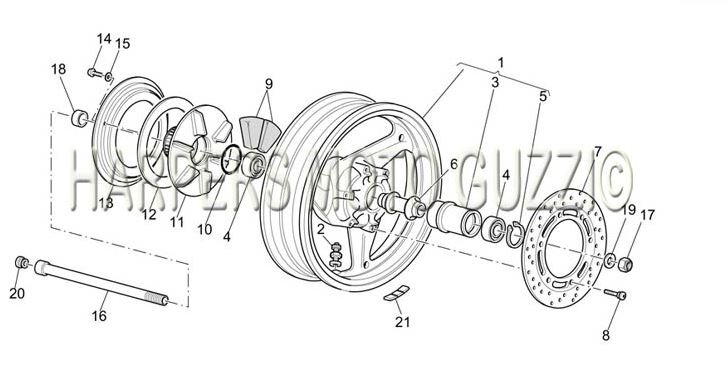
I was studying the exploded parts view for the rear wheel (Pg. 35 of the V11 parts manual, 2003-2004 flavor) while waiting for a rear tire delivery and noticed the item 10 O-ring, PN 90706490. If I'm reading this correctly, it resides about the outboard face of the RH wheel bearing and, if present, should be visible once the wheel is off. I've never seen it. Do I have this right, or is it embedded in the Item 11 (flexible coupling disc), 12 (Ring), and 13 (Flange) assembly?
-
....while waiting for a tow other than to take a pic (and find some shade!). Interesting experience as all these unplanned events result in (usually). Two passing bikers stopped as well as a couple in a pickup which was a nice reaffirmation of the inherent kindness of folks, a pleasant break from our current craziness. The brother of the guy who owned the towing outfit that was called lived a 1/2 mile down the road from where I broke down. He showed up on his bike. Apparently, a fuel tanker which services a number of the gas stations in the area delivered a incombustible gas/water mixture and the owner was stacked up with vehicle recoveries for the rest of the day. Well, the guy took the time to swing by his house, load up his pickup and attached a motorcycle trailer to his flatbed recovery vehicle, and dropped off said equipment where I broke down. The three of us had everything loaded up in short order. Have to give a shout-out to AMA roadside assistance who found somebody with the right equipment. I've not been as lucky in the past....

-
1
-
-
...a "lone wolf" year at best.
-
1
-
-
It's a beauty!
-
2
-
-
Hand wax....new addition to the shop's fluids shelves.

-
 2
2
-
-
Shop operates under VFR...

-
2
-
-
-
Doing fine, but there appear to be unreported symptoms with widespread community transmission.
To wit....what I see in my efforts to promote social distancing.....
.JPG)
What everyone else sees....

-
2
-
-
Station wagons....the minivans of my youth. They have a funky appeal to my eye.....
-
1
-
-
8 hours ago, gstallons said:
Your angle drive has been removed ? I didn't see that !
Yup, this '04 has black faced ITI's and no angle drive. The "interesting" part of all of this is the broken cable (broke up around the speedo) didn't have the bent tube feature.
-
Thanks gentlemen....increasing the bend (duh!) makes a lot more sense.
Appreciate the idea about adding the angle drive Phil, but as Docc pointed out going back to the earlier "sketchy" configuration (and spending the $)...well...I'd go the Speedhut route and be done with it instead.
-
Recent decent weather allowed me to take the V11 out to check whether my recent replacement of the speedo cable brought the speedometer back to life. At startup it seemed to be idling slightly high, and a subsequent brief ride confirmed the throttle wasn't closing completely (throttle off RPM's on the order of 3K). The speedo cable's metal strain relief is contributing the cable's interference with the connecting rod.

The throttle cable has plenty of slack in the "off" condition, and when high I can manually close the linkage (below the TPS) to lower the RPM's (surprised at how little movement was involved).
I'm not prepared to go the Speedhut route yet, and I can only think of two solutions: 1. Remove part/all of the metal strain relief or 2. Use the old cable with new innards.
Any other ideas would be welcome!
-
 1
1
-
-
Had success reaching the fowardest most driveshaft zerk with a 1/8" 45 degree coupler. Rear wheel on.

-
7
-
-
1 minute ago, Scud said:
I've used the Pit Posse Wheel Bearing Remover. You insert a split cylinder, then drive in a wedge to grip the inside of the bearing. Then you just pop it out with a hammer. Very efficient. Fun, even.
 on the Pit Posse. https://www.amazon.com/Pit-Posse-Motorcycle-Separator-Extractor/dp/B004MAPN42
-
On 1/11/2020 at 2:15 PM, pete roper said:
I thought they'd done away with TDC markings by the time the V11 came out? I mean what would be the point of any sort of timing marks? The spark, along with the injection pulse signal, is governed by the phase sensor and phonic wheel and its input is non adjustable although how it is interpreted and how the ECU processes the information is adjustable in the map.
For setting the valve lash just turn the motor by hand until you see the inlet valve close and then pull it round until the piston is very close to TDC. This can be established by the drinking straw method or simply by feel once you have the hang of it.
The piston doesn't need to be *Exactly* at top dead to set the valves. As long as the tappets are on the base circle of the cam lobes that's all you need. Clearances are 4 & 6 thou.
Thank you Pete for clarifying the clearances. Searching the forum led to a number of different values..I was having some problem sorting them out and didn't write down what I used previously. (Oh..and now I remember why I have what looks like shish-ka-bob sticks in my toolbox....)
On 1/11/2020 at 3:34 PM, docc said:My March 2000 build Sport has the "D" and "S". Perhaps later V11, like leroysch's '04 do not?

All this time I thought 4 and 6 thou (0.004" intake/ 0.006" exhaust) were US specs more for noise and emissions and "world clearances" were 6 and 8 thou? "Raceco" lash: 8 and 10 ?
Now that I can (barely) make out that arrow, let me try to be more meticulous in my letter search. If unsuccessful, I'll live with the pain of the extra mg's.
-
I've never been able to see the "D" or "S" on the flywheel of my 2004 V11, but have instead relied on the ability to spin both pushrods on the cylinder I'm working on to establish TDC before checking clearances. Well, today I got to the point where both pushrods rotated freely and I decided to have a look for these elusive letters. Didn't find them, but I did discover a faint but well formed engraved arrow on the flywheel pointing in the forward direction when I had the RH cylinder at TDC (pushrods easily spun about). I'm curious if anyone else has seen this, or is this some other artifact defining a different relationship unrelated to adjusting the valves?
-
I've had good luck with these https://realgaskets.com/product-category/motorcycle/moto-guzzi/ thru original installation and one reuse. No leaks, seeps, etc.


Reviving an Old Garage
in Special place for banter and conversation
Posted
I expanded an existing shop space using white peg board compared with the old space which used dry wall and brown pegboard. I was pleasantly surprised by how bright the new space turned out!.
Old
New