andy york
-
Posts
601 -
Joined
-
Last visited
-
Days Won
15
Content Type
Profiles
Forums
Events
Gallery
Community Map
Everything posted by andy york
-
Greased my $%#&*^$ U joints - now what about the rust?
andy york replied to Jacob Ezzell's topic in Technical Topics
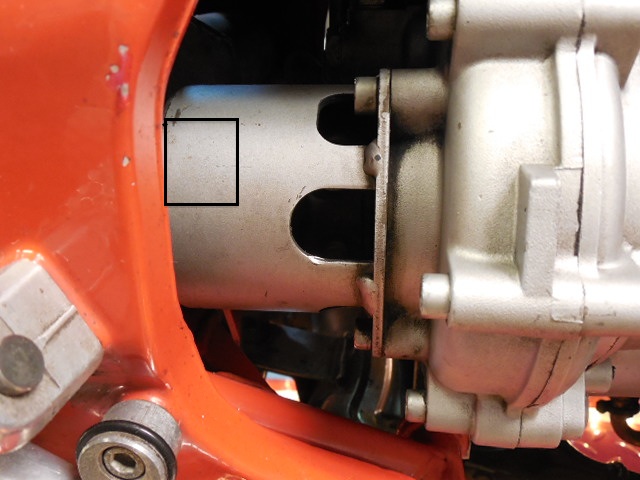
Ok ...memory going bad....trying to post pic Here is Docc's with an outline on it.
-
Greased my $%#&*^$ U joints - now what about the rust?
andy york replied to Jacob Ezzell's topic in Technical Topics
THATS IT !!! Like I have said ,this was a long time ago. I either enlarged on of the existing "access points" or I created another just a little further towards the rear. Huge would be ok in my book also. All it is going to do is contain the driveshaft till you get to the side of the road if the shaft/u-joint fails.(and maybe keep some grease off your boot !) -
Greased my $%#&*^$ U joints - now what about the rust?
andy york replied to Jacob Ezzell's topic in Technical Topics
Be home Sat. Unfortunatley i'm not "on "the bike. -
Greased my $%#&*^$ U joints - now what about the rust?
andy york replied to Jacob Ezzell's topic in Technical Topics
More power to anyone who has accoplished this task without taking anything apart. You haven't gone through the headaches that many of us have. I don't know the details on how many different ways that this can be done. But....... years ago,with my swingarm out for some reason, I removed the three 5 or 6 mm bolts that hold the cover in place, enlarged the hole/window that faces the outside of the bike. Once this was done, I can access the grease nipple from the right side of the bike... in front of the "pork chop" as we call it....roll the bike till the driveshaft grease nipple is facing the right side,fit the grease gun, couple of pumps, and i'm done. easy peasy. Anywhere ,anytime, no tools required.(except the grease gun) -
Greased my $%#&*^$ U joints - now what about the rust?
andy york replied to Jacob Ezzell's topic in Technical Topics
give me a couple more days to get home and i will take and post some pics.....Sat morn Hey Docc ....does yours have the little "factory windows " made in the drive shaft cover...if so maybe you could put up a couple of pics in the mean time... -
Greased my $%#&*^$ U joints - now what about the rust?
andy york replied to Jacob Ezzell's topic in Technical Topics
Yes ...I suppose it is possible to modify it without removing. If my swingarm were still mounted and all I needed to to do was grease the driveshaft, I would do everything I could not to have to disassemble. Years ago I was to the point that Jacob is now and I said to myself.... I'm gonna fix that problem now. -
Greased my $%#&*^$ U joints - now what about the rust?
andy york replied to Jacob Ezzell's topic in Technical Topics
another also....remove your gear shift lever main bolt and gat some good yak fat in there. much easier to do now. you can get a wrench right on that 10mm nut. PIA if it's all assembled. -
Greased my $%#&*^$ U joints - now what about the rust?
andy york replied to Jacob Ezzell's topic in Technical Topics
also....now is the time to bleed your clutch and put new fluid in. PIA if you do fully assembled -
Greased my $%#&*^$ U joints - now what about the rust?
andy york replied to Jacob Ezzell's topic in Technical Topics
unfortunatley I will be away from the bike for 10 days or I would send you a pic of mine. maybe someone else can chime in here. It appears that there are no " holes " in yours at all. Mine is an 02 model and somewhat different. Look at the bike from the right side ....turn the driveshaft so that the zerk is facing you/ to the right ....figure out where and how big ....dremel,die grinder, .... make a access point. It is reasonably thick steel....so it can contain the driveshaft in the event of u-joint failure.... message me and I can send you the one picture I have that might allow you to see what I'm talking about. three 5or6mm bolts hold it on... the only way to remove it is where your at right now.swingarm on no remove. be sure and align the swingarm dots when you reassemble. andy andy -
Greased my $%#&*^$ U joints - now what about the rust?
andy york replied to Jacob Ezzell's topic in Technical Topics
Hey Jacob, Since you have gone this far you should go ahead and take the front u-joint shield off so you can open up the hole on the right side so next time you can just grease the u-joint and not disassemble. As far as pivot points go, I like to use Bel-Ray waterproof grease. I know, nothing is waterproof. It's good yak fat ...last longer than regular yak fat. I'm not the brightest bulb in the pack but I do have 105,000 miles on my 02 lemans andy -
I don't know about that ............hehehehehehe !!!
-
Hi Ray I'm not known for sugar coating things to much so I'll cut to the chase. if you want to ride a sewing machine, go for the BMW. if you want a roarty torty, grab her by the neck and ride me bike ...get the V11 cheers andy
-
-
I now have the ignition switch contacts nice and clean, lubed with vaseline, back together. we will have to await the outcome of a nice little test ride. This is to me the nice and wonderful thing about this board. I consider myself a pretty good mechanic, but once you have done all the logical things to solve a problem and nothing works, you can come here and read up on things and find out about the flukes that happen. anyway ....good on everybody and their associated wisdom. thanks Andy
-
headed up to Indy this morning. Need to survey a job so I thought I would ride up. Was almost to Bowling Green and she coughed twice. Felt like I had hit the kill switch for 1/2 sec ...did thet about three times. Filled up with fuel ( 4 gal ) and turned back to home. did not miss a beat on the way home and I was running even harder coming back. I hate not having confidence in my gal. Fuse was not hot ....regulator was not hot ...battery was not hot ... oh well back to the drawing board as they say andy
-
I agree with Bob. All sorts of meters I could mount but in the end all I was after was ... no red light =good red light =bad Andy Here are wiring schemes for Electrex 451 Reg/Recs as used on V11 Guzzis, et al. The white wire is used for the charging light. On my bevel Ducatis I've wired Electrex R/R's to have the red generator light act as original (on=charging/off=uh oh) and the reverse - as found on Guzzis. And I think the key to motorcycle electrics is keeping the grey smoke inside the wires. If one really wants to monitor the last 100th of a volt there are plenty of inexpensive meters out there - and I've tried one on a pesky 1978 Ducati - but in the end a simple red light does the job.
-
I also have the electrosport set up on mine. many years back I had replaced the voltage regulator with the Ducati . At the time it seemed to be common knowledge that you would lose the charge light. Hook everything up and sure enough...no charge light. I don't know why it doesn't work. I realize that everything plugs up the same.It just doesn't work. I don't know if it is wired just a tad bit different or what. This is why I posed the question so that maybe someone smarter than I could come up with the answer. Will see what happens Andy
-
I like the looks of that. I wonder if we have the equivalent on this side of the pond? andy
-
I misstated the stock wire size in my first post.The stock wire appears to be 16 gauge...whatever the metric equivalent is. So ...coming out of the voltage regulator there are 2 red wires tied together that look to be 16g.this paired wired plugs into a single green/red stripe that travels to the fuse block at the 30 amp fuse. The other side of the 30amp fuse is a red wire that goes to the battery. My problem is wire gauge. Where I come from if you pull 30amps through a piece of 16g....it will work for bit but will get hot and melt and start a fire or blow a fuse. maybe i'm mixing up my AC and DC power flows...i dont know. My alternator and voltage regulator are only 2 -3 years old. the fuse was deformed a bit ....it had been hot but did not blow...and the fuse block and wires appear to be OK. Reguardless...My solution is to Run 12G wire from the battery to a inline fuse holder at the front of the bike and then connect to the double red leads out of the voltage regulator. So far the bike runs ok on the stand...just need to get all back together and go for a ride. I will agree that a lot of times there are bad connections and loose wires. I don't believe that is my problem. We shall see.
-
After 94,000 miles , I use the 60, 40, 20 option 60 for the spindle (I have Ohlins forks) 40 for the calipers 20 for the pinch bolts all of the above are Nm If memory serves me tonight the pinch bolts on the triples are 20 Nm also If you had them stem off, there is a specific spanner and a procedure to reinstall....it escapes me tonight Andy
-
having read all the posts on melting the 30 amp fuse...I guess I am still confused as to what the actual problem really is. I know Docc wired in a 30amp fuse separate from the fuse block. I have an extra 30 amp in line fuse but I am not crazy about the idea. The aftermarket 30 has #10 wire and the Italians put # 10 or # 12 wire on the bike. In my mind you are just moving the area that might melt and cause problems further into the wiring harness. I have a fairly new alternator,voltage regulator,extra grounds for lots of things.....so now at 94,000m why am I now having problems with the 30amp fuse? bike is apart so it's easy to check things...so give me you best insight Andy
-
I'll be the first to admit my dislike for failed electrics . It seems that when most of us replace the stock alternator we go with the cheaper Ducati unit. In doing so we lose the charging light warning capability which leads to the question... Do any of our resident electronic gurus have any ideas on how this idiot light could work with the Ducati alternator? Andy
-
Thanks to Docc for another great Spine Raid Five star lodging,Feasting on the finest southern cuisine, and a personally guided tour of some of the best roads east of the rockies. it was a pleasure to ride with everyone....Rick C, Rick M,Josh,Jake,Docc,and the fellow on the Ambassador andy

-
Your welcome....but what the audience really wants to know is .... Does the damn thing leak or not? Andy