

Lucky Phil
-
Posts
5,449 -
Joined
-
Last visited
-
Days Won
276
Content Type
Profiles
Forums
Events
Gallery
Community Map
Everything posted by Lucky Phil
-
Yes the later one is longer by 20mm as mentioned. Fwd of the fwd mount. I would have thought that the bike with the extra gearbox support struts would be the longer frame with the in tank pump. Does this bike have the later front engine support frame with the aft mounted tube pair running straight down to the front engine mount? Like your other V11 does.The earlier front frame supports had these struts running more horizontal and intersecting the fwd tubes running to the front engine mounts around the mid point. Ciao
-
The link shows an external pump and my bikes external pump plastic outlets are white so I assumed its external however the 02 parts manual shows internal pump. Internal aftermarket pump kits are as cheap as chips so that also made me think external. The issue with the in tank pump is the tank is longer from the fwd mounts to the tune of around 20mm due to the longer frame. I just tried one of my spare internal pump tanks on my bike and it limits the steering lock too much to use but mines reduced as it is with the tank lifted 40 mm at the front anyway. I dont know about the pump mounting plate. I have one that I could take an image of an give you the dimensions if that helps. Ciao
-
Lucky it didnt break when you were riding. Imagine fuel pumping out at 3 bar all over a hot engine. Ciao
-
It looks nice but when you look at the grief the original one cops from road debris I wonder about the logic of replacing it with something more fragile. Its pretty now for sure but it wont last. Carbon Fibre.......21st century chrome:) I just repainted my oil cooler guard the std black because the powder coat was flaking off in big chunks on the mounts. Black is best as it blends in better. Ciao
-
Yes, if you've been on a racetrack you will know that brakes are more important than horsepower. Far and away the best thing about riding a modern bike is the fact you use zero mental capacity compensating for the poor performance of machine dynamics compared to even 1980's bikes. Forget worrying about fading brakes,gearbox shifting woes, ground clearance,poor suspension, brakes that dont work in the wet, etc etc. Get on it and focus 100% on the riding. The bike is way better than you are. Ciao
-
Interesting.In 35 years of mounting carbon guards to Ohlins forks I've never seen this and have never even heard of it. My bikes all have carbon parts mounted to ally everywhere, to swingarms petrol tanks exhaust systems. never had an issue. Same working on commercial jets, aluminium fitting brackets washers etc mounting carbon flight control panes etc, never had an issue. I've even had race bikes with carbon tanks with embedded aluminium fuel fittings etc without issue. Ciao
-
Pretty much. All the V11's used the same style guard but with double mount points on the front and 1 behind the forks so 3 per leg except on the Ohlins bikes. Ohlins equipped models had the same general design but with different mounts like your bike 1 mount point front and rear. My 1198 ohlins equipped bike has 2 mounts/side front only as does my 1000ss. The Guzzi style guard is unique and a PITA for removal and install as you need to pull the front wheel and calipers. Ducati you can remove and install easily, 4 bolts and a brake line grommet and its off. Race bred engineering. Ciao
-
This has to be the shittiest looking race track surface I've ever seen. Ciao
-
2 pack paint, base and a hardener and a little thinner. Dries chemically not due to flashing off solvents. Tough, hard great depth but hard to apply without a booth to keep the dust and contaminants off. Takes about 30min to touch dry. I did mine outside and then put the stuff in the spare room with the door shut to let them cure in a dust free environment. Ciao
-
I believe it is docc. Its often hard to tell. Some use a wipe test with solvent which isn't totally reliable but powder is generally thicker and if you look at a flake its devoid of any primer. It also seems reluctant to respond to cutting and polishing and lacks depth. I have stripped a swing arm once that had been powdered and it came off in long plastic like strips when you tried peeling it like a piece of fruit instead a chipping off. The Guzzi parts didnt seem like this but I'm still inclined to believe they are powder. Not 100% sure but pretty confident. If you had a decent painted surface even if it is 20 years old you should be able to cut and buff it to pretty much the same finish as new paint as long as its not been sun affected. You just cant get the V11 frame like this. I also read it was while doing research which isn't of course definitive but made me test and evaluate. Ciao
-
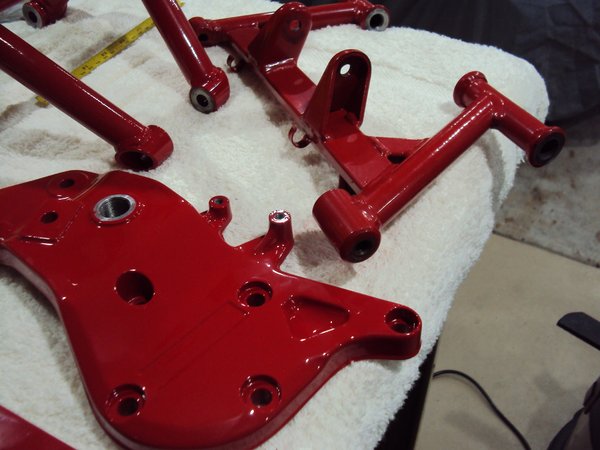
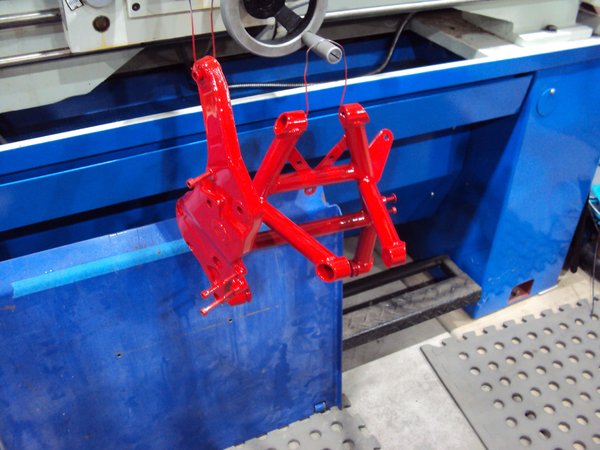
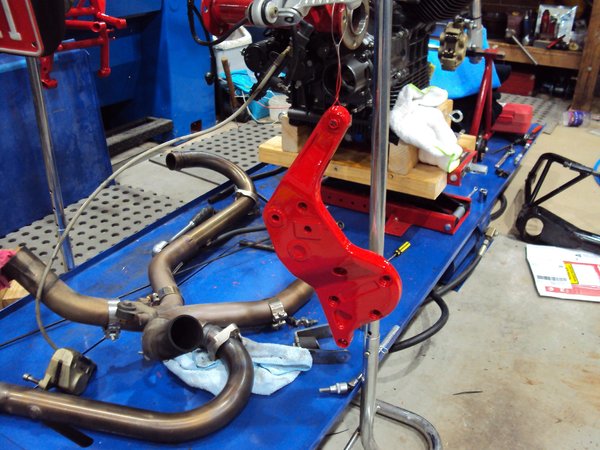
Pulled the tape off the painted parts today. I'd rate the finish quality as an 8.5 out of 10 which is about all you can expect from an amateur that hasn't sprayed 2K paint for 35 years so I'll call it done. For anyone thats contemplating whether to powder coat or paint 2K here is the difference. I realise this is straight off the gun compared to 20 year old powder but I've cleaned and polished the powder part and the protected parts of the frame aren't really much better. If you want a tough and glossy finish with real depth you can't beat 2K, the powder just doesnt compare and thats the reason I repainted the side plates and front support. I just got tired of the lack of depth and richness to the finish. The battery tray and rear swingarm are next in satin black. My original arm has quite a bit of weld spatter on it from the factory which is pretty pathetic really and the finish is quite poor now esp on the round tubes where the original rear hugger rubbed the surface. 2K V powder Ciao
-
From the album: V10 Engine
-
Got the 2K painting done today, its decent. I'm no painter. Ciao
-
From the album: V10 Engine
-
From the album: V10 Engine
-
To me it looks like something that is on a petrol driven cement mixer. Mufflers are such a style cue on a motorcycle,they can completely change the whole style of a bike. While I'm having a soap box sermon I also hate with a passion wrapped headers on just about any bike. Ugly as sin and totally pointless. Ciao
-
Yes personally I think the quad d look effing horrible, but to each his own. Ciao
-
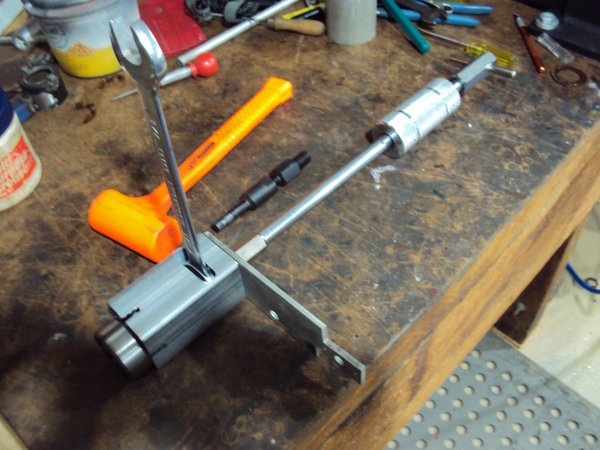
After years of reading about the difficulty of this task I though i'd attack my first one by engineering the issue. The tool shown can be made by anyone with a hacksaw,drill and file and 100 mm of 50x2mm wall square. Something with a little bigger ID would be better but I used what was on hand and thats the reason for the end slots to allow for the fact that the tube id was 46 and the bearing OD was 47mm. The radial slot is for the 3/4 spanner to hold the bearing puller as you crank up the slide hammer nut. When you have moved the bearing 10mm or so you can slide hammer it out easily or just keep cranking the wrenches. The steel plate was just scrap I had laying around and when I have the time I'll make a decent looking dedicated one. On the bench is one of the other size bearing puller adaptors for reference to style of puller and a hammer for docc. The key is to apply a decent load to the bearing puller and slider hammer combo via the wrenches and then give the swingarm boss a few light taps just in one area is good enough and the bearing then releases. I used my copper hammer for the task.This is an important technique which I learned removing Ducati Crank gears. Load up the puller then a "tap" with the hammer and drift and they pop free. Exactly the same here. Time to remove? as the header says 30 seconds. Ciao
-
From the album: lucky phils V11
-
The images I've seen the quad D uses it own headers. It may have OEM headers option,not sure but it would be worthwhile to check. Ciao
-
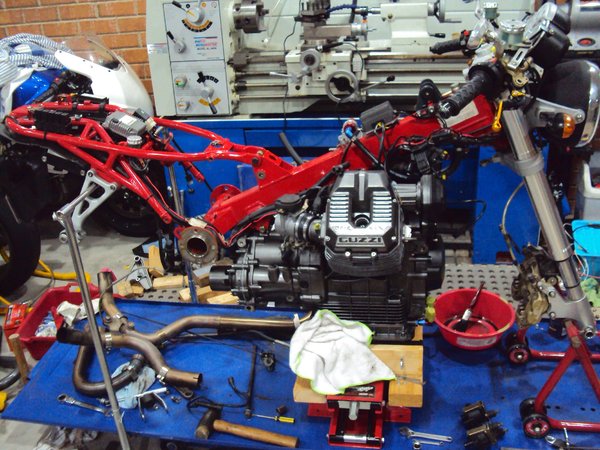
Yes docc its always a wrench to disassemble again to do the painting and finishing. My main issue at the moment is waiting for parts and materials to arrive in the post. Silly stuff like fuel hose etc. Slows the process down a lot and you tend to need everything on hand with a project like this because you're making it up as you go. So to run fuel and breather hoses you need to have things like the throttle cable routed etc because everything is so tight and messy under the tank you need to consider everything before you can finalise things. The next major hurdle is adjustable steering stops which is going to mean fabricating a pair of stops and then machining off the old ones and bolting on the new. Cant see any other elegant way around it. My friend that usually does my machining for me is currently quite unwell and the last thing he needs is to be doing me machining favours so I'll need to work around that. Ciao
-
Italian bikes dont leak they perspire a little is all. Ciao
-
Hmmmm, just sayin. Always good to recheck when you have an issue. Crank sensor that uses the cam drive as its reference. It MAY need adjustment depending on the difference between the exact dimensions of the original and the new but its always good to check the gap when replacing anyway. Ciao
-
Looks like a step backwards. Side plates and front support removed for painting and finish removal of the remains of the old horn/regulator bracket. I have also machined the threaded section of the regulator housing back 5mm and relieved the body to give me some comfort factor clearance wise to the TPS. The Centauro throttle cable arrived and am glad to say it fitted perfectly. Ciao
-
From the album: V10 Engine


