Lucky Phil
-
Posts
4,551 -
Joined
-
Last visited
-
Days Won
235
Content Type
Profiles
Forums
Events
Gallery
Community Map
Everything posted by Lucky Phil
-
All true. Didn't actually mean to sound like I have the definitive answer here it's a considered opinion only. Interestingly a lot of Einstein's theories were the result of what he called "thought experiments" as mankind didn't have the technology to prove his theories at that time. It's amazing how many are being proved correct now we have the technology to be able to run a physical experiment and measure the outcomes. The 2800-3200 rpm hiccup is the LP "thought experiment" Can't give an Einstein guarantee though. Ciao
-
Never cool, too much "look at me" going on there. Better the warm inner knowledge you are a man of quality, distinction and elegance and have no need to descend into tawdry displays of engineering opulence. The nod and a wink is all thats required. Ciao
-
Well docc you can deduct the cost of a new cam chain, sprockets and tensioner from the cost of the gears because it's probably about due for those. I learned about 25 years ago that values are relative after one of the guys at worked scoffed at the cost of my new motorcycle when he heard what I'd paid for it, around $16,000 from memory. I remember thinking at the time, this guys passion was his 60' motor cruiser that cost about $150000 at the time to buy and $1000 to fill with fuel another $5000 a year for mooring fees and it got used about a dozen hours a year. Go figure values out. I sometimes look at my bikes and wonder what people in maybe 50 years time when I'm long gone think about the owner that made all these modifications? I always liked reading about old bikes from the early part of the last century that were uncovered with loads of enhancements from some long dead previous owner that loved the thing. A lasting legacy for others to wonder about one day maybe. Ciao
-
The stability is controlled by the shop stand and the front lift support by the scissor lifter. It's stable. You can of course have a simple small wooden frame to locate on the sump when you use the scissor lift if your worried. My large holder was made for an engine change where I lifted the chassis over the engine on the lift bench and for engine storage. An overkill in all other situations. Ciao
-
It doesn't quite work like that docc if I get your meaning here. Basically the tension on the cam chain doesn't vary between on and off throttle, the forces on it don't reverse. It's not in tension when on the gas and slack when off the gas. It's more a case of in tension on the gas and off the gas and more tension or load when accelerating due to increased valve train loads and friction. You're never in a situation where the cam chain loads are reversing, it's more or less load situation but always in the same direction under normal running conditions. In some ways the tensioners job is easier at higher rpm than at idle depending on the engine configuration. The reason for the throttle hick at steady state only is the same as the reason you don't always feel the dip in an engines torque curve you see on a dyno because you accelerate through the area fairly quickly. Same as areas where the jetting/mapping is slightly off, if it's in an area you accelerate through briefly then it doesn't get noticed or is of no operational consequence. So the reason for the 2800-3200 rpm hick up I think is in this area there is a combination of related factors that come together under certain circumstances with regards to mapping and environment and if you ask the engine to operate in that area in a steady state under the right conditions you will get the effects. Even under the right conditions if you dont hang around in that rpm/load area but just ride through it same as the torque curve dip it in effect becomes a quickly transitioned area as the engine accelerates that isn't felt. Combined that with the fact that when you accelerate through the area you are probably using a throttle opening that doesn't equate with the problem anyway. If I still had the 2 valver fitted I'd change the ignition advance in the area I pointed out earlier and then see the effect which might take a while for all the environmental stars to align. Ciao
-
Well I have the ability to learn but it's like playing a guitar like an expert it takes many many hours before it's like an extension of your body. I used to set up the Mill to do work I wanted and anything remotely involved I would get him to do as I didn't want to wreck an expensive part due to a lack of skills. it never helped my confidence when I watched a master like him work the X/Y manual feeds together smoothly and with finesse. I knew then that I probably don't have enough years left to ever become that good and it be second nature. Ciao
-
If you look at my how to post on installing the gears I used the metal gasket and did the front seal while I was there as you suggested. The most noticeable thing initially after installing the gears was the need to reduce the idle by 200 rpm as after the gear install it was idling high. Less friction and drag? maybe. Ciao
-
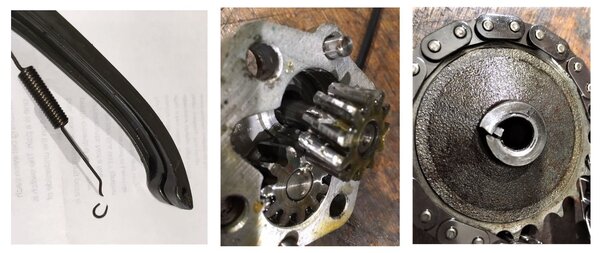
It didn't. I'd say the failed tensioner resulted in total loss of cam chain control which then caused the oil pump and drive gear failure. Ciao
-
Here's an interesting image of a 1 year old blade style tensioner failure. Nasty collateral. Ciao
-
From the album: lucky phils V11
-
 Yep and they still leaked. Ciao
 -
This, race stands at the back and a scissor jack. The wooden part is a dedicated engine holder which isn't totally necessary. Ciao
-
Well I have a decent sized metal lathe and various other stuff but I dont have a Mill. My closest friend who passes away recently had a full engineering workshop and more importantly the skills on the machines to go with them so I was spoiled for that really. I've just spent the last little while hand digging and jack hammering 18 tons of dirt and rock from under my house which adjoins my garage so when that's concreted and I can move the bikes in there along with storage stuff that takes up room at present and I'll buy myself a Mill and a workshop press and metal bandsaw. Learning how to properly use the mill will be my next mission after that. I've got crankcases and cylinders to bore out:) Ciao
-
I have one of these. Only hassle on the V11 is I need to disconnect the shift lever to use it. Other than that it's perfect. I ordered mine direct from Germany. Make sure you order the sockets with it unless you have a few old ones lying around. Ciao
-
I spent 42 years working in aviation inflating tyres on heavy jets as well as things like hydraulic reservoirs with Nitrogen. The benefits are a clean, consistent quality, dry source of inert pressure. That's about it really. Ciao
-
And that's Precisely how the universe and life operates. Einstein's theory of relativity or as he himself explained it for mere mortals " “Put your hand on a hot stove for a minute, and it seems like an hour. Sit with a pretty girl for an hour, and it seems like a minute. That's relativity.” OR, at 67, 10 minutes cleaning header pipes seems to take a day but at 37 it's done in the blink of an eye. That my friends is relativity. Ciao
-
I've run Mobil1 0W-40 full synth group4 oil since day 1 on the original engine and it's never put any oil at all in the airbox. Ciao
-
Haven't you just had the engine rebuilt docc? No need for this if the rings seal well. where did the original hose vent to in the airbox? surely on the engine side of the filter. Did it have a reed valve in the original vent line? Ciao
-
Venting the crankcases into the airbox is perfectly rational. It's been done on WSB engines for at least 35 years. Generally only an issue if your engines got ring seal problems or the original design was really bad or you've taken a pedestrian grocery getter engine and tried to make it a race engine. Ciao
-
In practice it's not generally as bad as you think. A vent to atmosphere has been illegal for probably 40 years or more due to emission regs so it feeds to the airbox to be burned. Ciao
-
So from the Video the light seems to show the alternator not putting out above battery voltage? is that right? Doesn't the V11 alternator normally put out better than battery voltage at idle? I can't remember. Ciao
-
Interesting. Go to 6:45 for stainless exhausts. Ciao
-
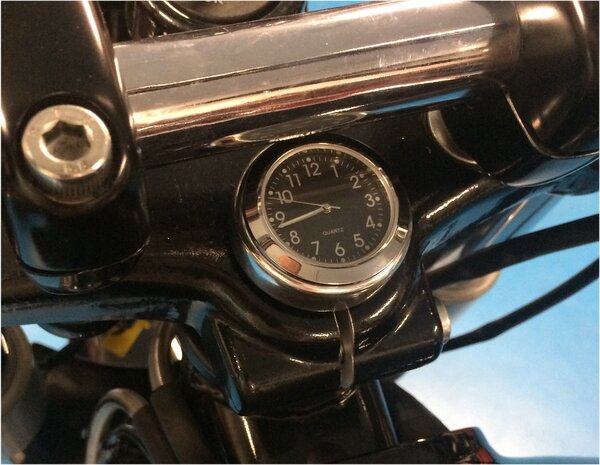
I think that there's not that many options on the V11 to mount that particular clock size in a position that looks neat and tidy. The spot I chose was a bit of a last resort. You can of course just use double sided 1mm thick tape but the domed top on the triple clamp even makes that a little difficult without turning it flat. On my Interceptor I just used the tape mount system although the top nut is pretty flat on that. Ciao
-
From the album: lucky phils V11
-
I was worried someone might ask this. I wanted the clock mounted some other way than a Velcro sticky pad or a double sided pad so I made up the following. This aluminium plug is a slight interference fit in the steering stem tube and is tapped in with some locktite on it to the required depth. The cap screw in the ctr is held in place by a rubber oring so it doesn't fall out when the clock isn't installed. So the cap screw head faces downwards and can be accessed from the bottom of the lower triple clamp up the hollow centre with quarter drive extensions and a 3mm allen head bit. So because you cant get a single long extension up the steering stem tube with the front wheel on you feed 4 short extensions up there as you go. The bit holder on the end has a collar I made to centralise the holder in the centre of the tube so its a simple task of feeding the extensions up the tube and connecting them 1 at a time and when the 3mm bit arrives at the allen head screw just twist it until it drops into the head. Simple and easy as the tool is centred and all you need to do is apply upward pressure and rotate until it engages. With the triple crown nut I machined it down until it was 1mm above flush with the top of the clamp and drilled out the std hex hole round to locate the spigot on the back face of the clock. With the hex drilled out you need a way to install and tighten the top nut now so I drilled 2x 3mm holes which you use a pin wrench on. The pin wrench is the small brass tool in the image above. The object was to have the clock as close to the top surface of the triple clamp as possible but the holding force of the fixing screw was taken by the spigot on the back of the clock so the fixing screw wasn't trying the pull the spigot out the back of the clock rear cover. So here it is ready to slip the clock into the locating hole with one hand and with the other on the ratchet and extensions tighten it down. Easier to do than it sounds. If you had the front wheel and fender off it would just need 1, 12" 1/4 drive extension and the ratchet. Yes I know, sanity is in short supply here. Ciao