Lucky Phil
-
Posts
5,449 -
Joined
-
Last visited
-
Days Won
276
Content Type
Profiles
Forums
Events
Gallery
Community Map
Everything posted by Lucky Phil
-
You can get powder coating that mimics anodising these days. here's an example. The gassing off thing sound like rubbish to me. Ciao
-
The top mount in the image has been elongated quite a lot to relieve the cover of stress when affixed. Hard to understand how they got the placement so wrong. My bike has my own design and manufactured mount screws as well so the elongation isn't quite as obvious. You can but button head allow 5mm screws and do something similar. It's not noticeable when fitted if done accurately. Ciao
-
From the album: lucky phils V11
-
I think it's a good idea to spacer up the rear tank mount to stop the tank rubbing the paint off the side covers. The covers are very prone to cracking around the mount holes and it's a material thats very hard to repair even with plastic welding. The solution is to elongate the holes nicely esp the top one which allows the cover to fit without stressing the thing. I can supply an image if you want to do it. Ciao
-
I've been pointing this out for years to people. A fancy solid colour/carbon look tank scratch pad saves the scratches but then you have an issue with paint fade. So you need to buy a spare to replace it in time AND replace it perfectly aligned with the old one. Good luck with that. The best option? A clear scratch pad like I've always used. May look less sexy/trendy but a much smarter option. Make yourself a new solid pad thats slightly larger than the removed one that compensates for the off centre issue. Then you can have a centred pad that covers the fading paint. Ciao
-
So here's my calculation docc. A std 1100ie Sport 26deg/45mm offset combination has approx trail of 96mm. If someone has the guaranteed actual figure let me know. Working on the same assumptions for fork length and front tyre OD a std V11 Sport with a 25deg/40mm offset triple also has 96mm trail. Now if you use a set of 1100ie Sport triples with 45mm offset on the V11 Sport so you get a 25deg/45mm offset combo you end up with 90mm of trail. A significant difference towards the "sharper steering" end of the spectrum. My 1198 has 30mm offset aftermarket triple clamps down from the std 36mm offset so it steers better on the track and doesn't push the front on corner exit on the throttle. That 6mm on the Ducati makes a lot of difference to the steering so 5mm offset and 6mm trail on the Guzzi V11 is a significant change to the steering and stability. I think this is probably whats happened back on the early bikes. We'll know for certain when I pull the triples on my bike after I get the replacement forks sorted and I can measure the supposed "cant" on my bikes original triples. If you had a std V11 Sport 25/40 set up and canted the triples 1/2 deg you'd go from 96mm to 103mm trail. If you instead opened the head angle to 25.5 you'd go from 96mm to 99mm trail. If you had 1100ie 45mm triples on a V11 sport and you "canted" the triples 1/2 degree you'd end up with 97.5mm trail from 90mm. Seems to me the most likely scenario is they started with 1100ie Sport triples at 45mm offset and then due to customer/journalist feedback increased the trail from 90mm to 96mm by virtue of 40mm offset triple clamps to bring the figures back to the same as a std 1100ie Sport. Ciao
-
Can confirm the V11's have 40mm offset docc. If you look at an image of an 1100ie Sport the triples look identical but do in fact measure 45mm offset. Ciao
-
Sport 1100's had 45mm offset triple clamps on a 26deg head angle from what I can see. The V11 Sport has a 25 deg head angle and 40mm offset clamps. If you had 45mm offset triples on a 25 deg frame it would be intrinsically less stable compared to the 45X26 due to the greatly reduced trail not only from the steeper head angle but also the extra offset. If Guzzi originally fitted Sport 1100ie triple clamps at 45mm off set on the 25 deg V11 frame maybe they were a little too twitchy so they went for 40mm offset forks to increase the trail and get some stability back on the later bikes. Ciao
-
Hold on here, 250F is 121C and some BB engines can see 140 deg C bulk oil temp under some conditions and 100 deg C is common. Nitrile is good to around 100 deg C which is ok for an easy to replace oring like this or on the filter where it's going to be replaced regularly but just about everywhere on an engine a Nitrile oring is at it's limit. This is why Guzzi have been slowly phasing them out for FKM seals which Ducati did years ago as well. Ciao
-
Viton and FKM orings have there place, so are excellent in gasoline and withstand high temps up to 200 dec C fine however they have inferior cold weather performance compared to Nitrile. Nitrile are fine for most things not engine related. Be also aware that components designed for nitrile orings can't always accept FKM due to slight sizing differences between the 2. A small dimensional difference on the oring groove makes can make the difference between fitting and not useable. The manual fuel tap issue is a case in point, there was no FKM size that would translate to the standard fuel tap piston nitrile oring grooves and the grooves needed to be modified a little to take the FKM seals. Ciao
-
No, going to use aftermarket cartridges with rebound in one leg and comp in the other. These later forks are rebound only adjustment. Ciao
-
The area and amount of loctite here is too great for a soldering iron. It's a 43mm dia tube and the threads are about 15mm deep plus another 20mm of plain sleeve that the loctite also affects and a sizeable alloy fitting. Yes it's hard chromes and needs to be sized and ground and checked for straightness. I checked and mine are perfectly straight so thats fine. Ciao
-
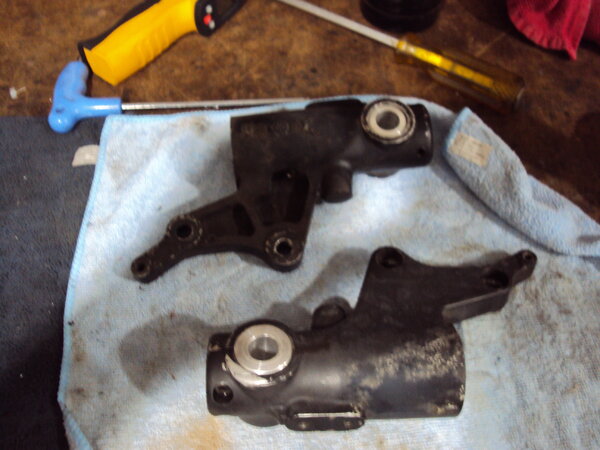
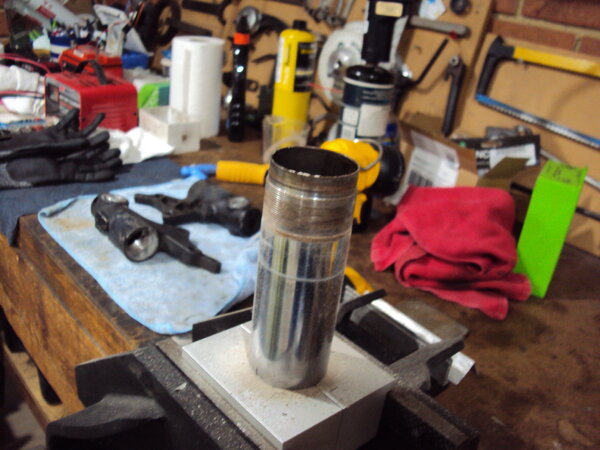
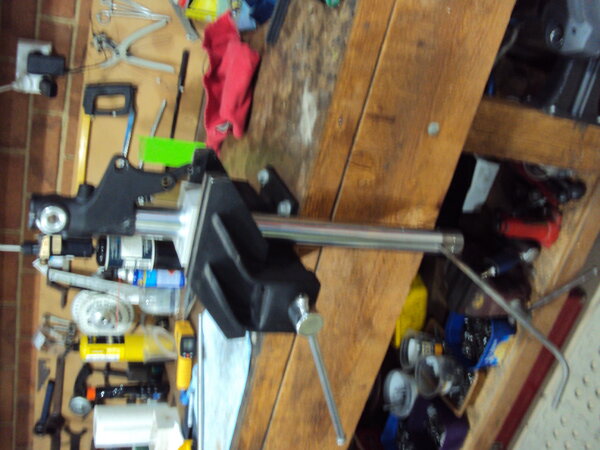
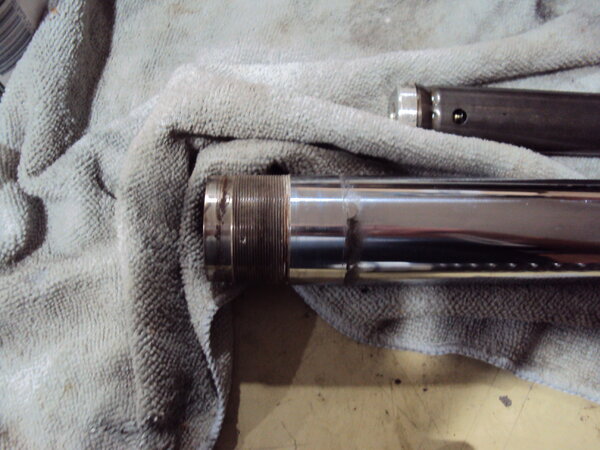
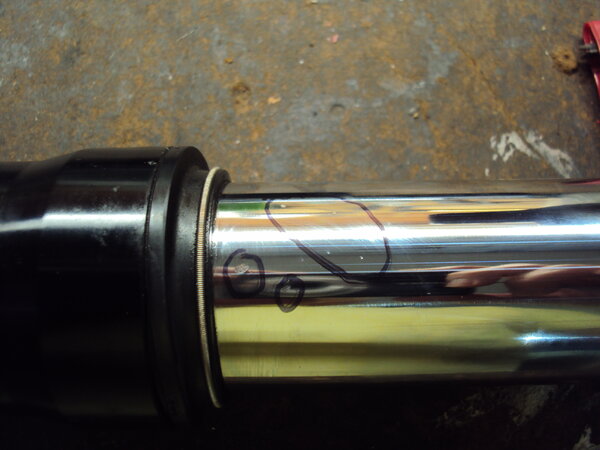
So I sourced a used pair of late model 43mm fork assemblies for the V10 Sport. Naturally when they arrived they were not quite what I expected condition wise probably due to the less than ideal packaging. Both legs were leaking with one side disguised by a piece of absorbent material under the dust seal and the other not. There was obvious damage to the other chrome slider as shown below. Both are dead straight and the stanchions are in good condition considering their age with minimal wear. The bushes were also fine for wear but they'll get replaced anyway. The real issue is removing the brake and axle brackets to get the sliders re chromes and ground. There is a small grub screw in the brake bracket which comes out with some heat to release the Loctite but the damage to the slider threads it causes needs to be addressed before the joyous job of trying to remove the sliders themselves. I drilled a small 5mm screw ( locking grub screw size) down the centre screwed it back into the bracket then took a 3mm drill ground flat on the end with some cutting clearance ground on the tip and used that to remove the damage caused by the pointed grub screw. Worked well. A 3mm end mill would work better if you have one. Next issue is the bracket removal itself which needless to say is held on with loctite on the very fine threads used on the chrome sliders. These are notoriously hard to remove and need quite a bit of heat application to break the locking compound. I bought a 43mm clamp and also drilled a hole in the bench for an 8mm steel rod to fit through the holes at the top of the slider to provide even more resistance to turning. You have to love the flexibility of a wooden bench for things like this. I also machined up a pair of bushes that I could clamp into the forks that fitted a piece of steel rod I had on hand. I wanted to provide as much support to the axle lug as I could. I don't have an axle at present but I thought I'd need a bit more leverage anyway. So gas burner and temp gun in hand I heated up the bracket and they finally released from the thread locker. There's a bit of loosen and tighten work involved initially but eventually taking it steadily off they came without damage to the threads. As you can see there's a lot of thread locker on there. Most people leave this sort of thing to the fork re chroming/refurbishing guys but I like a difficult life and it saves $50/leg in costs. So next job is off to get the sliders re chromed and ground. I have a seal and bush kit on the way and I need to refinish the brackets and repair a slight graze mark from an obvious trip down the road. The objective is to replace the std cartridges with aftermarket jobs and machine up a Titanium axle. Packaging! Damage. To the sellers credit he refunded me the cost of repair to this leg. The bench setup Brackets and axle bobbins I made up. The graze on the lower bracket looks worse than it really is. I'll just use some Devcon F to fix it and shape it back before re painting in 2 pack. Thread damage from locking screw that requires addressing before bracket removal Ciao
-

From the album: lucky phils V11
-
From the album: lucky phils V11
-
From the album: lucky phils V11
-
From the album: lucky phils V11
-
From the album: lucky phils V11
-
From the album: lucky phils V11
-
Pauldaytona supplied the answer to this. The RC, Rosso Corse has 2 types of Ohlins forks fitted a larger and small dia axle type, so T5/6 refers to that plus some other small changes. If you want details about stuff like this Paul is the man to ask. Ciao
-
Griso 1100 will fit. Ciao
-
I'd check that myself, 1.8mm of shims seems too much to me. Ciao
-
http://www.mgcycle.com/index.php?main_page=product_info&products_id=1226 Ciao
-
Before you do be aware that the clip ons are a "lot" lower than the std ones in the image in the OP. It's going to be a very aggressive riding position to allow fitment of this fairing. Ciao