edge
-
Posts
250 -
Joined
-
Last visited
-
Days Won
1
Content Type
Profiles
Forums
Events
Gallery
Community Map
Everything posted by edge
-
Don't feel bad, Fiats are known for swallowing valves and other parts when timing is lost. Great design huh? The 15k belt change interval on 124 series was the best insurance you could buy for that ride. $15 belt vs. pistons, valves and head
-
Try a search for Quad-D, Quat-D or GB. There is lots written about it, performance, sound clips, etc..
-
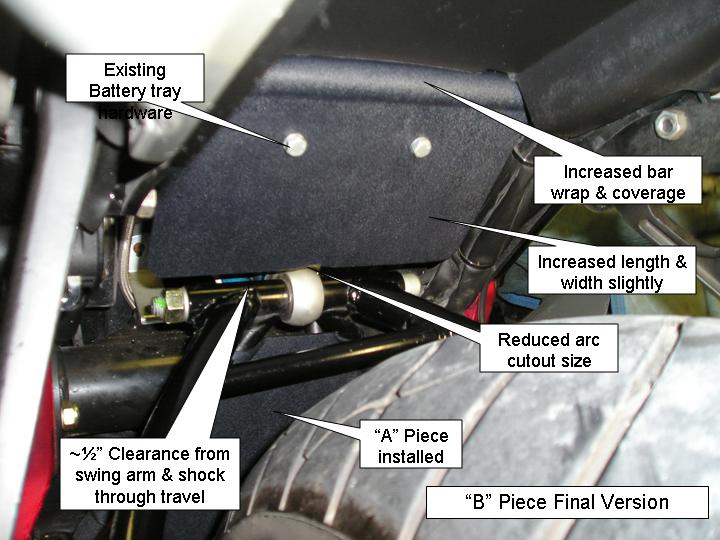
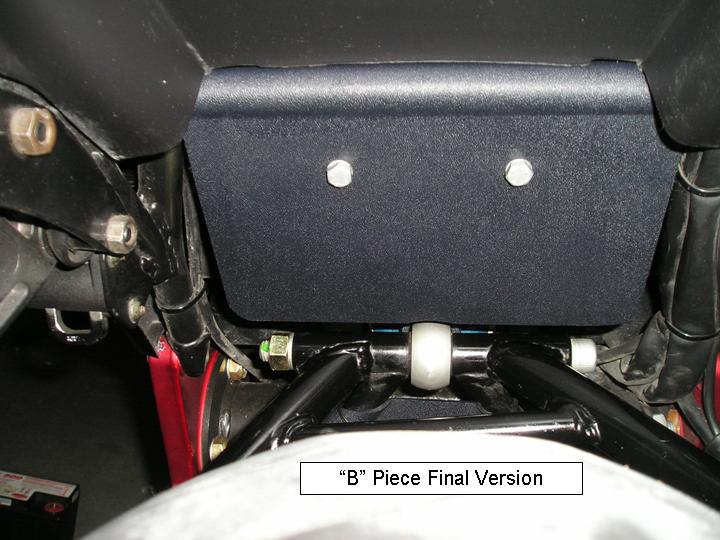
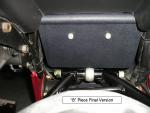
Ok, played in the garage today instead of riding due to weather, father’s day and other reasons... This is what I have settled on for the final "B" piece fender liner for myself and those interested to go OEM hugger-less and keep fender coverage and finish off the underside protecting battery tray and electronics. Like the Edge-Guard "A" piece, it is hand fitted on my 02 Lemans and they should fit the V-11 series bikes. As always, the Luigi caveat always applies If interested shoot me an email through the board, and I'll figure out how cheap I can get these done for you, depending on where you live and how I mail them. It is a smaller and a simpler piece than the first one I did so they are cheaper and easier for me for me to make. I can also bundle it with the other piece.
-
Got to ride a very well sorted out Centaro last year. A buddy and I put a day into into Northern New York Adirondak region. He spent alot of time sorting his Centaro out with EFI mods, chip tuning, pods, cans, x-over, etc... We swapped bikes in between a stop and it was quite a contrast from the V-11. I had a blast on the bike and he felt the lemans was very slugish. I felt the Centaro turned-in and, spun-up quicker and with the CF cans had quite the bark. Took a while for me to get used to the position but I found it more comfortable and quickly became one with the bike. A pic of our bikes someplace along the way.. .
-
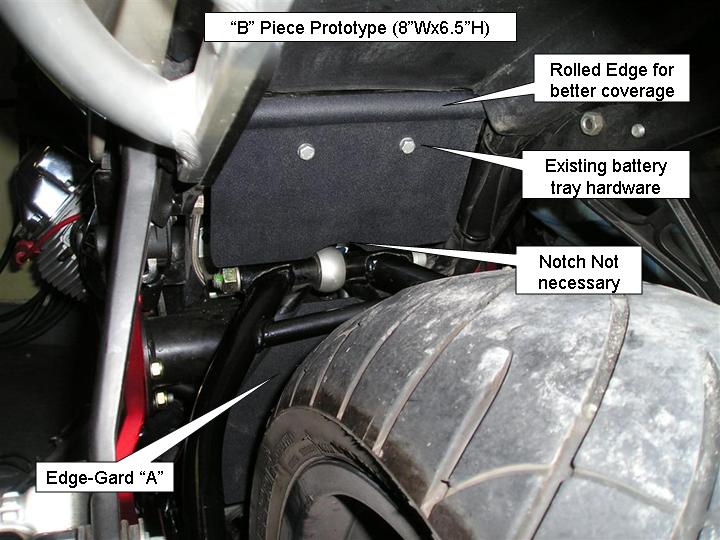
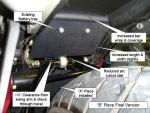
"A" Piece: A little progress tonight, still strugling with the upper "tab" on the on the guard due to the plastic forming, and so far, nothing that truly protects the shock mounting lug. I havent given up yet, just having problems getting the piece to consistantly set properly (jig problem). I think the easy fix for the shock lug coverage would be a rod-end boot. If a boot is used, it needs to be properly fitted to ensure it does not hold moisture around the lug and steel bolt. Just an idea... "B" Piece: I played with Al's design and ended up doing something a little different. Again trying to get things to lay correctly. I basically ended up cutting Al's in half and put a rolled edge it to wrap around a frame cross member. I used the existing battery tray hardware and reversed the insert direction and swapped nut plates. Cleans it all up and holds the piece in place. Basically working with a 8"Wx6"H piece. Might be able to get a little bigger but the 8x6 works consistantly and is not wasteful. A problem with too much wider is there are wire bundles that run down the sides of the frame in that area and are not very consistent in placement or width. Apparently Luigi has reserved the right place things as needed Of course the "B" piece does away with the OEM hugger. I did put the hugger on with it installed, they both fit but with the hugger installed it offers no additional coverage. and looks pretty stupid I'll tweak the B piece this weekend make a new template(s) and jig so I can consistantly make more. I'll also start looking for rod-end boots that might cover the shock lug to see what that might look like.
-
I stumbled upon this classified and was surprised; Ian is selling his Lemans http://www.v11lemans.com/forums/index.php?showtopic=5373 A major contributor on the board and to the V-11. Great blogger too, with threads of details and trips. He is not giving the bike away but with the mods and set up it's worth a look. It is set up pretty nice, and he certainly has taken care of... Let’s hope he has a change of heart and re considers... As he said himself, he really doesn’t want to sell it...
-
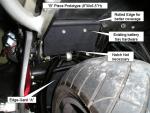
I just re-worked one of the templates to give me an extra inch "tab" to cover the shock attaching point better. I am limited in a way due to the forming process and the width of stock I am using. If I go much more than an inch vertically, I will start loosing bottom edge or become very wastful of material. As soon as I can get one with the tab formed I will post a picture. It is not that much different from what I am already doing. I also started another template using Al R's design of a coulpe of years ago. I have yet to get it to plastic but between the two pieces, it should be about as good as coverage as you can get w/o using a flxible material due to fixed and moving components. I like what Al did, and will let you (and Al) know how it comes out with a little forming. I am also playing with a third component that covers the whole battery tray. That one is a little more complex then the others due to size and forming... again not sure how that will come out but I should be playing with the protypes by this weekend to see what is doable. We have had 3 days of rain here, so puttering in the garage is ok
-
Too funny... Thanks!!!
-
Valve adjustment might be another varible I might have in gertting rid of ping. The intake changes didn't make sense to me but I did euro spec the valves clearance while I was playing with the intake... Makes more sense now
-
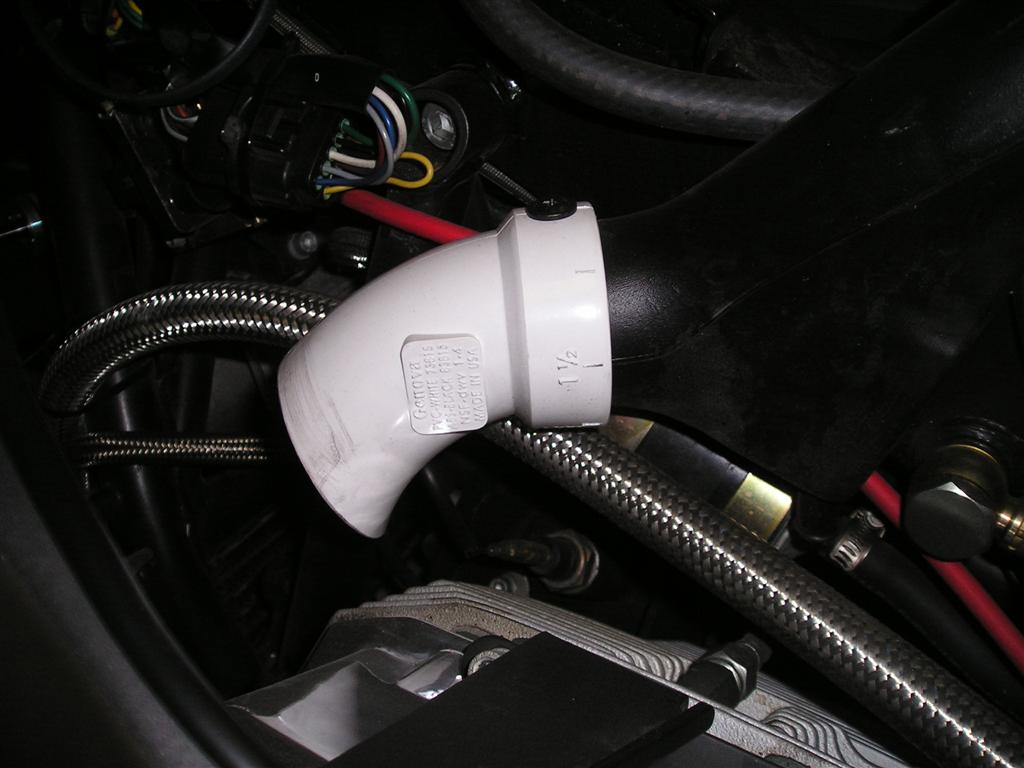
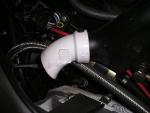
The opening of the snorkles I was refering to was removing the stock boots and adding the modified PVC fittings to, pull air from the forward area and not the cylinder head, open the diameter and to perform a ram air type induction. It does not make sense to me to have more air stop the pinging but mine was imediatly gone. I am not sure who posted this mod first but it was easy and it worked for me What further confuses me over the more air thing and pinging is this year I picked up another lid and punched 10 holes in the lid for more air flow, added the PVC snorkles (In my mind the holes in the lid would negate any benifit of ram air but the ping still has not returned). So, I'm not sure if it was the induction mod, exhaust, gas change or just breaking in but no pinging.
-
I think pinging (pre-detonation) is pretty common here with V-11 series, 6th gear with a load, and lots of throttle... Much dicussion if you do a search. Everything from bad combustion chamber design to low octane fuel. Mine cleared up with premium fuel, opening up the intake snorkles, and changing cans. I do not have a PC-III (it's coming) but it seems that a PC-III with the proper map, and dialed in, fuel managment is where it should be. I'm sure there will be lots of pile-on re. pre-det. I am glad mine is gone and I am not sure what actually cured it. It can be pretty hard on the motor to be running it in a pinging state good luck
-
I test drove a Buel last year too. I got a free Buel Sling Bag and shot of back road fun. Yes it was a hoot, albeit supervised but I found it lacking the stability of the lemans and I found the breaks to be lacking too. Not to mention feeling like my head was infront of the headlight! Roll-ons were comperable but thought he V-11 had longer stronger legs. For me it was a step in the wrong direction but fun just the same being a shot of "strange"! I missed out on the Buel purchase when they stoped making the Cyclone in favor of the current lineup which is Eric's most refined to date. Instead of tyring to find a used one or left-over, I went in quest of a goose. The S-3 was interesting to me too. Not sure of what the long term engine wear issues will be with the new lineup when you have to put a fan on the rear jug to cool it and keep it comperable in temp to the front jug.
-
My front OEM Briodgestone wore very badly with asymetrical wear and cupping. Barely made it to 4K during annual MVA inspection. It was run under pressure the prior season due to improper servicing. I had a sticking pressure gauge, I found the one I used to check it with was showing 10-15 psi more than actual.
-
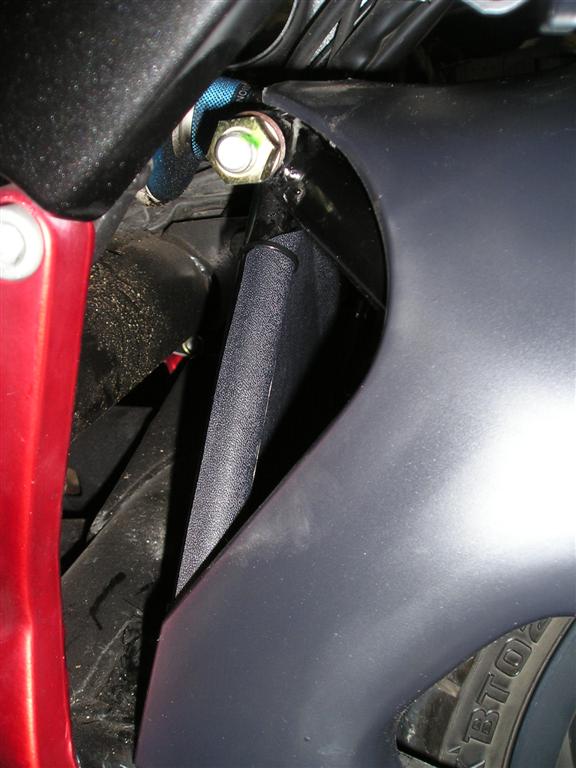
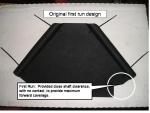
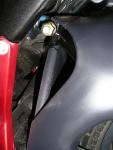
This link will take you to the calssifieds; http://www.v11lemans.com/forums/index.php?showtopic=5297 This will take you to the top of the thread in fabricated fenders; http://www.v11lemans.com/forums/index.php?showtopic=4893 And this is the picture off the bike. Fits under rear shock to stop tire sling forward onto engine/tranny.
-
I went with the Chong-Chong solution of using an Aprilia moped top box box (about 65) with the the OEM rear rack (about 235). Chong-Chong used the Stucchi rack. It might not be the most visually apealing solution but it works very well for me. Holds full size helmet easily and other "stuff". I do not know what interference there will be (if any) there will be witht he side bags. I think Chong-Chongs post shows with side bags. http://www.v11lemans.com/forums/index.php?...679entry16679
-
Yes I was using the Guzzi stand. The best I can remember I was pulling on the axel and gently applying force laterally trying to get the wheel off. When the wheel became free, the bike twisted off the Prok Chop bolts that are used for the stand. I figured the lateral force and CG shift caused things to get crossed up. Once was enough for me. I just loop a cargo strap under the seat pan, protecting the fairing, and apply a little tension to ensure it does not go far if things were to slip again by me or the
-
Be careful when removing the wheel. I had mine up on the padock stand and had things get a little too tippy when I droped the rear wheel. Not sure what I did but it was on it's way over and fortunatly I had a helping hand to catch things before they got expensive I now always support it from above with a strap to a beam in the garage just in case things get loose it wont fall. I think I picked that tip up from Rich Maud or another member. It's good insurance
-
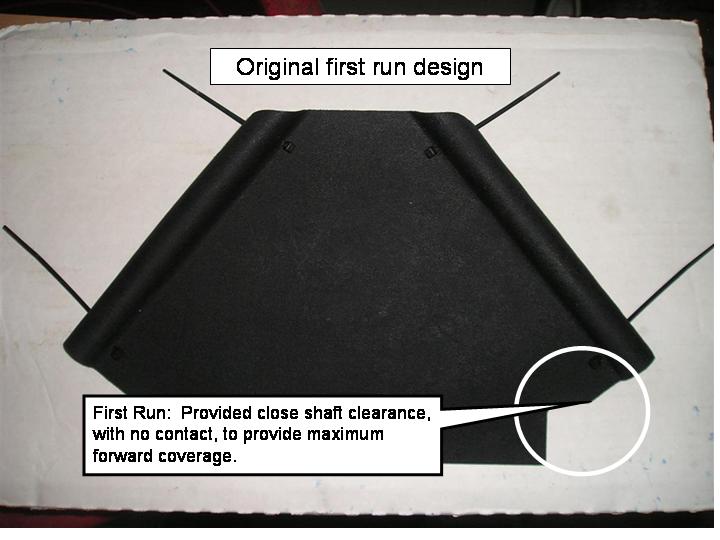
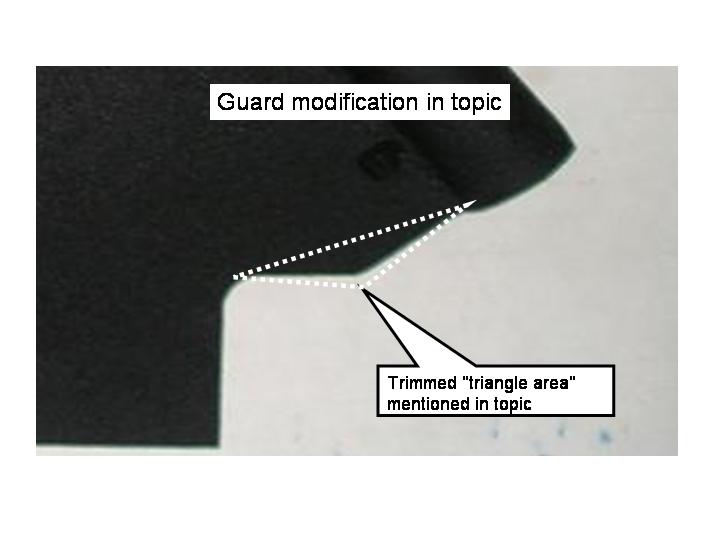
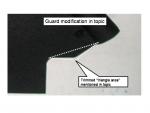
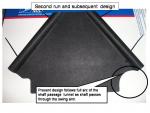
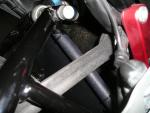
Thanks for the feedback, I had already addressed the drive shaft passage clearance on the second and subsequent runs. The drive shaft area cut-out now allows for maximum possible mechanical shaft deflection as limited by the shaft passage tunnel in the swing arm. A little overkill but seemed like the right thing to do. I attached a couple photos because a picture is usually worth a thousand words
-
Thanks guys... I'll keep all posted as this evolves. I have gotten some positive offline feedback too and will start work on a "B" piece that should be a nice addition to what you may already have or with what I did. Nothing fancy but simple and functional. My only problem now is, do I toil away in the garage or go for ride But seriously, this piece will be available as long as there is a want from the members As far as the fantastic claims others make... , I think it comes from getting something that works, is easy to install, and is reasonable but I am a little biased ...and no you wont loose those 40 pounds with 10 minutes of work but to the contrary..., you are likely to put on just a few ounces if you install the liner with a beer as recommended ride safe,
-
Gio, O/T: I tried responding to your board email but it was kicked back as a bad email address. Can you update or check your member data or contact me with another email accont so I can respond to your questions,
-
Unfortunately I didn't get his number and it is just as well. I was pretty spiked over the whole event and the stupidity of guy. My experience with taking off in that state of mind generally does not yield good results with the law or my own safety . The good news is, I did notice the startled look on the little lady’s face that was sitting right next to him (yes we were that close) so I hope he has the wrath of a woman to ensure he never lives it down and better yet, looks twice for motorcycles I think I am going to do one of those headlight modulators that several have done (I do that thread tonight). I have already gone to a brighter Silver Star bulb but I guess that is not enough for some in the day light break; Søren, no problem.. We live in fast times and I have learned to be patient. It's good for the stress
-
I took a planned croos country trip to one of our local Guzzi dealers today. It was about a 200 miler though upstate NY. On my way home, after stopping at the dealer, and at the half way point. I was driving through a town on a 4 lane, when some Azzhole in a pickup, was waiting for traffic, getting ready to pull out of a parking lot. He looked right at me, and then across the highway, while pulling right out in front of me to cross two lanes of traffic I was doing the posted 40mph speed limit, and was left with two options; Option A: T-Bone this MF'r in the drivers door with hopes of teaching him a lesson while breaking a few of my own bones or option B: Do an evasive in front of him and swerve into the opposite direction traffic lanes. (no drop slide option available, he would have run me over!). Since they put steel beams in the doors on just about all US trucks these days, the physics did not support option A: angry: Fortunately, I chose option B and was blesed with no oncoming traffic I ended missing this guy (read azzhole) by an RCH and found my self cussing him out during the whole episode For me this was bad Deja vu.. Last year, almost to the day... I had another azzwipe pop me at an intersection. That one cost me a broken fibula and a couple months down time (I wrote that one off to the jinx of buying a new bike ) The moral of today's story is: HE or SHE is out there!!! Just when you think you got the day by the balls and life can not get much better while riding your goose... your right! Somebody is out here and they are going to make sure you have to use those hidden self preservation skills! There were three cars traveling my lane and saw the whole thing. As I re-composed my self, they slowly came up on side of me gesturing support and disbelief of what almost just happened... Your safety tip of the day... Ride safe my brothers, he is out there...
-
You have probably already seen this in a thread for "Fabricated Mud Guard". I felt it was time to move it to the classifieds since I am making these "EDGE-GARDS" to meet demand What it does: This fender liner is a simple solution to help correct what MG didn't design so well in the rear fender department. The stock "hugger" type fender does not prevent road spray and sand-dirt from being slung forward onto the transmission area and rear shock on late model V11 series bikes. This type of item is not new, and has been done several times by other forum members with great ideas and solutions. I borrowed a couple of these concepts and put my own twist on it for a new solution. What I am offering, for those that want one, is a molded plastic insert that will cover the area directly below the rear shock. I was able to take an existing design and modify it by design using thermal plastic (Kydex .8) and cut and mold it to fit the rear subframe. Kydex plastic is tough as woodpecker lips (it's the stuff they make holsters and knife sheaths out of). It easily does the job of controlling all that funk from getting onto your engine, transmission and shock area How to install: When I designed this thing, I wanted to keep it simple and to allow it to fit into the "triangle" area just below the rear shock attaching point. The left and right sides are molded to fit the vertical members of the rear suspension making a perfect "insert" type fit. It extends below the lower cross member and is notched for the driveshaft passage. I provide four small plastic tie wraps to secure everything into place. When installed, it is barely visible due to forward location and covering of the stock hugger fender. What I suggest you do to install is; remove the rear hugger fender (4 screws) and inset the mud guard from underneath in front of the rear tire (It slides up easily). Once it's in place, secure the tie wraps and trim and rotate the ends. Replace the stock hugger and you’re done. 10-20 minute job with a beer Bottom Line: I am working on my 3rd generation of this mud guard and I continue to tweak the template and forming process based on user feedback and my lessons learned in making these puppies. I only make a few a time so I don't get left with a stack of these things. They are all hand formed and individually fitted on my Lemans to make sure I did my part right. I even include a set of instructions, as if they were needed I generally ship these things for $20.00US and have sent several international already. They are 100% satisfaction guaranteed. So far I have been able to meet the low demand and ship within a couple days. I am not making a killing on these things but I have to keep the wife off my back by not giving both my time and money away (read her time and money)! I accept Paypal, check, money order, beer, food, gas, etc.. You can drop me a email through the board if you want one or have questions. All I really need from you is your shipping address and the year and model and I'll have one on the way as soon as I can git'r done
-
Just had mine off this weekend and my re-learned tips are; Make sure you have a jar or bottle to catch fuel as you remove the main fuel line on the left side and the fuel return line on the right side. You'll need to hold the tank up while you slip off the two small lines at the saddle point of the tank (overfill collector and the breather line) also the electrical connector on left side. My biggest lesson re-learned is; do not turn the ignition on while the fuel return line is off unless your ready to catch what the electric fuel pump has to offer!
-
Mike, No, it works.. You'll have to "un-thread" the seat release spring at the latch since the end is permantently crimped on. I used a knief to separate the first coil and start it moving off the cable. It will just slip on the throttle advance cable once you release the cable via set screw. The one off the throttle advance, just gets threaded back on to the seat release. 10-15 minutes and all is done..