sp838
-
Posts
852 -
Joined
-
Last visited
-
Days Won
17
Content Type
Profiles
Forums
Events
Gallery
Community Map
Everything posted by sp838
-
Right, it's the oil return for the crank breather. So the question is, how much oil comes back down from there? If it's negligible, it could be capped off. Just top oil off every so often, and then drain it when doing oil changes, could be possible. If it doesn't affect the breathing of the engine, and if lots and lots of oil doesn't get spat up in there, shouldn't be an issue deleting it right?
-
I know these questions can get people riled up, but I'm curious to know if anyone has a good explanation for what the small sump breather hose does and if it is really all that necessary. Not talking about the big crank case breather, but rather the smaller hose on the back of the sump, that connects to the left of the drain plug. Seems like the crank breather should be enough to handle breathing duties, no? I would really love to get rid of it, if it's not really contributing much to the overall effort.

-
"The replacements that I got from mcmaster-carr have held up well so far." Those are nice thanks for posting! Mine are toast too, on ECU and coils. Held in place with zip ties, gonna get me some of those.
-
have you given any more thought to using the M-Unit?
-
I have one, send me a PM with your info. Happy to help you out.
-
I have some viton washers of various ID/OD, could work too.
-
I like the o-ring idea.
-
"sidestand bolts wont have anywhere to bolt to." still figuring this one out, seems like the bracket for 90s Sport 1100/Daytona works. Paul Minnaert has one of these sumps and uses our bracket and only the big top bolt and has apparently had no issues. "The other is if you still want to run the oil cooler" I want to ditch the oil cooler "running a lower chin spoiler" I do love chin spoilers but that's not a dealbreaker for me.
-
Great... Looking at the diagrams, it appears as though a lot of junk gets removed if you install this sump. The oil cooler is gone, but also looks like the "oil filter support" on the inside would have to go too. Part number 01003801, which the filter threads on to, and it looks like it also sends oil out and then back in to/from the oil cooler. Is that correct? I'm guessing this results in quite a few pounds of metal that would be excised from the machine... More oil capacity, better cooling, simpler innards, an oil-level sight glass, and a net weight loss. What's not to like?
-
Reviving this old thread, I just "discovered" the beautiful "Deep V Sump" and I am curious: would it work in tandem with the Roper Plate? Any reason why it shouldn't?
-
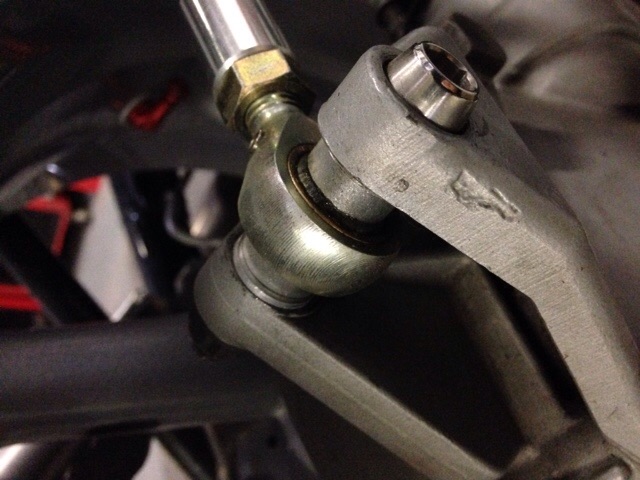
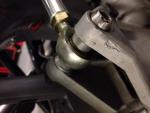
fwiw, this is what the Ghezzi rod end setup looks like. The rods have plenty of ability to wiggle in a very controlled manner thanks to those spherical bushings. The spacers are just wide enough to hold the inner spherical bushings in place, the outer parts move pretty freely. (for some reason the site likes to rotate images counter clockwise )
-
How much current do the stock horns draw?
-
VERY excited to watch this thread develop by the way. I posted a while back about re-wiring the V11 "from scratch", possibly to include an M-Unit, but I was discouraged and didn't pursue it.
-
I am going to throw this in, partly out of self interest: how about deleting the sidestand switch and relay? Seems like it would be a good thing to do while the harness is off. I'm thinking of doing it myself. Already removed the switch and twisted the wires to it together. But that relay takes up room and the wiring to it is unnecessary complication. I want it gone!
-
If I was to do it over, I'd make my own. I've got the Ghezzi Brian one, it's very nice, but I think I could have made my own for less, using tricker parts and materials. Some 7068 round bar and a couple chromoly+PTFE rod ends, and done.
-
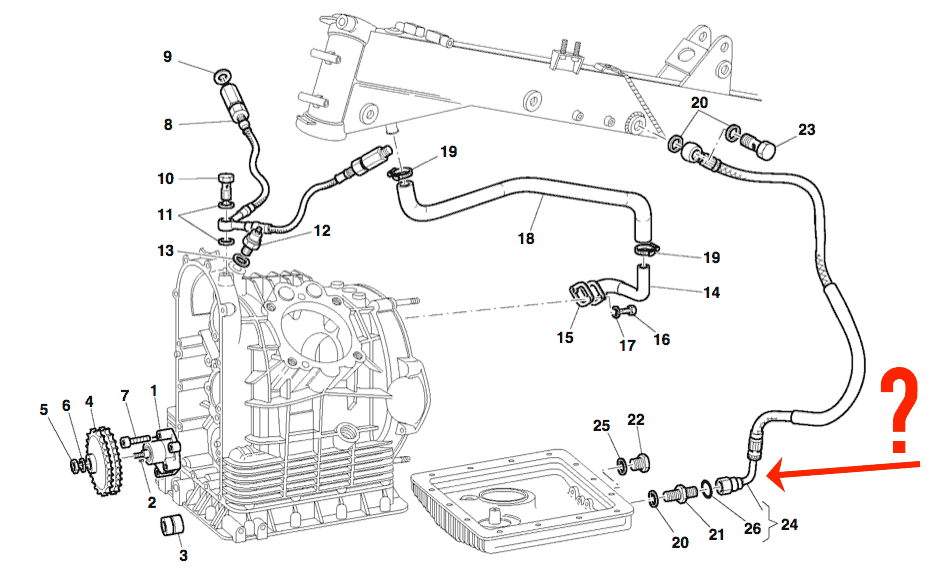
So anyway, sorry for the thread digressions. Getting the clutch line out is a pain in the butt, it's do-able though. Stubby wrenches, patience, maybe beer, and lots of cursing. All those and a lift to get the bike up off the ground help a lot. I found that it's a lot easier to get in there if you remove the air box. When I installed my new line, I used an M10 x 1.0 fluid bolt, with a 45º banjo fitting with -3AN threads. This allowed to more easily route the hose out to the front of the bike. It's a tight space vertically between hole in the slave cylinder and the spine frame. Hoses that thread directly into the slave cylinder are a real pain in the behind to get threaded in there.
-
So I got my new relays, they look and feel pretty solid. Made in the USA is nice too. The blades on the switch contacts (85 and 86, aka 5 and 4) are skinnier than the others... This is what yours are like? I doubt it's an issue but thought I'd ask/mention it. I am going to use these on relay pos. 1 and 5 and use my GEI units on the other that don't require as much beefiness.
-
All that was just to say that I don't think an offset of ~1.5 - 2mm is going to change the world, but if you can measure and setup within that level of precision then by all means go for it.
-
So did anyone ever figure out if there's a Hall Effect TPS out there that will witk for us? I like the idea of a solid state unit. Good to know about this one though.
-
Butler/Smith BMW race bikes for example had offset wheels, they won some superbike championships.
-
There are some examples of bikes that run dog legged...
-
lol I can't tell if this is sarcastic or sincere... but you don't need to disassemble the entire rear end of the bike to replace the clutch line. Get yourself an M10 fluid bolt and a 45° 10mm (3/8") banjo with -3AN threads for the slave cylinder. Then get a 48" -3AN hose. Another M10 fluid bolt and 45° 10mm banjo for the master cylinder on the handle bars. Accessing the slave cylinder is a pain in the a$$ but nowhere near as much as taking off the swing arm etc. That's totally unnecessary unless your fittings are completely corroded. Which is possible I guess... That said, I am about to do a swing arm swap. Mine is rusty, paint peeling off. I have a freshly blasted swing arm at the body shop getting painted, new hardware on the way. Gonna do it all as soon as I have all the parts ready. And I just replaced the clutch line hahaha.
-

How much power can be safely drawn on the headlight circuit?
sp838 replied to sp838's topic in Technical Topics
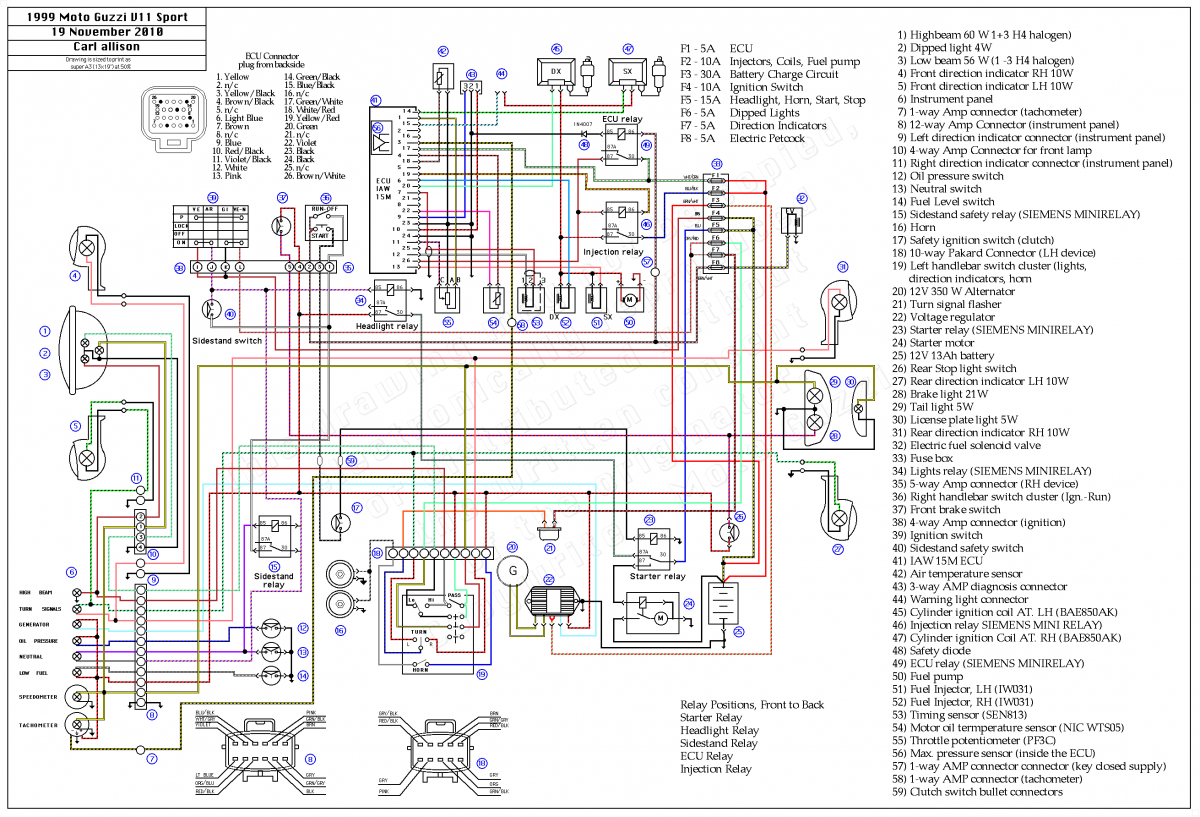
The blue wire out of the r/r connects to the very same red/black headlight circuit power via a dash light bulb, which is supposed to indicate poor charging. The plot thickens... Wiring diagram for early V11s attached.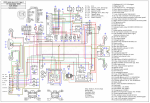
-
How much power can be safely drawn on the headlight circuit?
sp838 replied to sp838's topic in Technical Topics
The r/r I have installed from Rick's Motorsport does not have the signal input circuit. Just two yellow leads from the alternator, red wire to the battery, black wire to ground, and blue wire to the dash. So I don't think the voltage drop business from the headlight circuit should affect it. -
How much power can be safely drawn on the headlight circuit?
sp838 replied to sp838's topic in Technical Topics
What would the solution be to someone who isn't as well versed as you? Looking at the wiring diagram, I can see where there is power coming into the r/r from the headlight relay, the same power line that gets split up to various things including headlights, brake lights, horn, dash lights and low fuel/oil pressure sensors... I have an aftermarket r/r made by Rick's Motorsports. It doesn't use standard diodes, it is "mosfet" transistor based. I have it wired directly to the battery positive, bypassing the stock wiring and fuse. So I don't know if it behave the same way as the stock ones do as far as sensing voltage etc.