sp838
-
Posts
852 -
Joined
-
Last visited
-
Days Won
17
Content Type
Profiles
Forums
Events
Gallery
Community Map
Everything posted by sp838
-
If I was to do it, I would lace them up to some excel rims. Our stock rear wheel is a boat anchor.
-
No idea...
-
no, -560: http://www.mgcycle.com/index.php?main_page=product_info&cPath=135_137&products_id=46 Harpers has it for cheaper: http://www.harpermoto.com/?subcats=Y&status=A&pshort=N&pfull=N&pname=Y&pkeywords=Y&search_performed=Y&q=01117560&dispatch=products.search The one in your photo with the right angle tube seems to be -580 or -880
-
worn out, chipped, or new and never installed... looking for a timing gear set, preferably straight cut but will take spur cut as well. Let me know if you have them and want to get rid of them. Thanks!
-
I just called them up and asked for that part number. Got two of them.
-
Very interesting, 98 EV actually shares some common parts... I wonder how the widths of the hubs compare.
-
For a while I had a fantasy of running spoked alloy wheels. Now I fantasize about running Marvic wheels, but after having this idea, I thought I'd at least research it. Looking at the part numbers didn't make me overly optimistic though, as many of the cush drive part numbers appear to be different, for starters. Wheel bearings are the same though... Inconclusive at this point. http://www.harpermoto.com/parts-by-motorcycle/2000-up-moto-guzzi-motorcycles/california-ev-pi-cat-1100-2003-2005/rear-wheel-en-ev-pi-cat-1100-2003-2005.html http://www.harpermoto.com/parts-by-motorcycle/2000-up-moto-guzzi-motorcycles/v-11-cafe-ballabio-1100-2003-2005/rear-wheel-en-v11-cafe-ballabio-1100-2003-2005.html
-
Harper's has the correct cables.
-
Sorry if this has been asked before, but an idea popped into my head and I was wondering if anyone knew the answer off hand: would the rear hub from a California V11 of the same vintage be compatible with the rear drives on our V11 LeMans? (don't have it handy right now but I'm gonna look this up in Guzziology, might be some clues there.)
-
I am honestly kind of looking forward to this. I know wiring scares a lot of people, or they find it tedious. To me it feels like a ticking time bomb, not to mention how ugly it looks, and big bundles of wires all over make it hard to clean and maintain the machine. Getting it all not just sorted out but re-designed to be simpler will be like flushing the toilet. Leaving the ECU and everything relating to the FI and ignition alone, there should be plenty of opportunity to improve and simplify the bike's wiring, also important is to design it in such a way as to make -future- additions cleaner and better integrated into the system.
-
 thanks Docc!
 -
Thanks everyone. Yes, I have a proper crimping tool, that's how I got myself into this mess! Adding and removing stuff willy nilly! I've added relays to the system, so had to learn to make my own bases, with the tank swap I've had to make new sealable OEM style connectors, keyless ignition switch, little vintage japanese style bullet connectors all over the place. etc etc... Definitely intend to leave as much of the ECU wiring stock, as well as all the related sensors, and ignition wires. I am keeping the Power Commander, because it is so easy to use, the interface is fast, it just works (for fueling) and mainly because the guy I use for dyno-tuning uses Dynojet products. It just makes things easy. He builds AMA and MotoAmerica race bikes, so I have faith in his abilities and recommendations. I want to clean up everything else, and like you say Roy, the weird routing of power from the starter relay to the headlight relay to the charging system etc., too complicated. Also removing the sidestand switch circuit and relay, I've already jumpered it off on the harness. It would be a big undertaking, but I think it would be worth it in the end. That's what winters are for, Scud
-
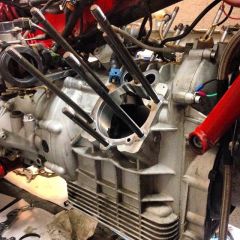
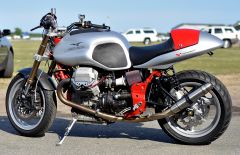
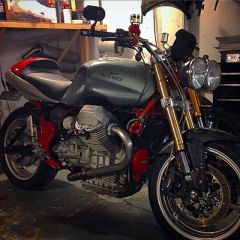
From the album: 2001 v11 SP
...... again! Please ignore the wiring... -
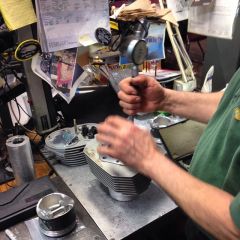
From the album: 2001 v11 SP
mocked up -
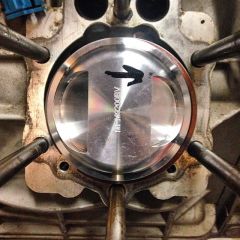
From the album: 2001 v11 SP
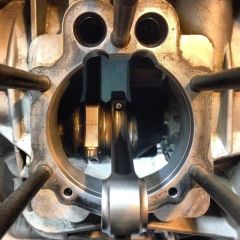
matching pistons to cylinders, and flex-honing. R25 head lurking in the background, hehe... -
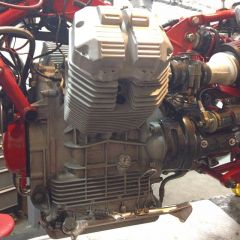
From the album: 2001 v11 SP
mocking up the Griso rocker covers -
From the album: 2001 v11 SP
-
I am contemplating this undertaking, to clean up and simplify the loom, which I've modified quite a bit by adding a power commander, dual headlights, gps instrument cluster, updated tank, keyless ignition etc., and has become a bit of a crazy thing to manage. I've found a used harness from an '03 as a backup to harvest wires and connectors from. Thinking this would be a good winter project once the roads become un-rideable. Curious to know what anyone's experience with a re-wire might be. Things to streamline, things to keep as stock. Down the rabbit hole!
-
Boy am I glad I updated my tank, that enormous fuel hose gives me nightmares.
-
My bike, running a GPR 2-1 exhaust and my own 3D printed intakes fitted with 70mm k&n pods, gets +5 peak hp (83 max) on the dyno. Curious to know what it will make now, with all the work I did over the last year...
-
GTL Advantage in LA: http://www.gastanklining.com
-
Ethanol gas bloats these plastic tanks, in some cases causes blistering which can lead to leaks, ruining the tank. It's a slow process, but my 01 tank is definitely bloated, I had to press it hard into place on the frame whenever I was putting it back on. So I decided to pre-emptively line the 03 replacement tank myself with Caswell Plating tank liner which is supposed to be the best at-home solution. However, I searched this site and found a thread about someone trying and failing, despite following all the proper procedures and precautions. Not wanting to take any chances I found a company in CA that specializes in tank restoration, including epoxy lining, and had them do it. Viola. No more ethanol bloat worries for this tank. I do still need to have it painted.
-
Yes, sorry. New tank is from an '03. It's really very easy, only somewhat tricky thing was that the AMP style connectors (male/female) on the fuel pump are reversed on the later model version so I just put new connectors on the harness and pump. Fuel level sensor connectors are the same, and you gain the extra wires from the petcock. One thing I recommend if you do it, is to have your replacement tank professionally epoxy lined. Heard too many horror stories about liners delaminating, or melting, so I had mine done by GTL Advantage in California. No more ethanol worries, either! I also recommend getting some QD fuel fittings for the fuel lines. The stock ones that connect the lines to the tank seem to be begging to snap or break in some ghastly way. I got two sets of 5/16" Goodridge QDs (along with some high quality Racetronix FI hose) to make taking the tank on and off that much easier.
-
"I am on my second manual petcock." I have an '01, updated my tank to a 2002 model with the internal pump and filter. Getting rid of the electric petcock on the left side and dingleberry valve on the right side being a couple of the gained benefits. Also un-clutters the area around the spine, under the tank and between the cylinders. Having the extra outlet freed up for a USB power port (or another key-on powered accessory) is graaaaavy.