Tinus89
-
Posts
354 -
Joined
-
Last visited
-
Days Won
7
Content Type
Profiles
Forums
Events
Gallery
Community Map
Everything posted by Tinus89
-
Thanks for all the responses! I've given it a whack yesterday with some paint stripper and a wire brush on a drill, which went remarkably well. Everything closed up/taped off obviously. Only need to go and find a smaller bit for the corrosion in the small holes, but should be fine. Plan is indeed to (quality) rattle can it, as the curing of the powdercoat will hurt any seals etc.
-
It is early '90s. Hmmm. So no need to set preload/backlash if I dont change anything, but also not too straight forward. Since it is not leaking, I am leaning towards leaving it intact an painting as is...
-
Hi all, I have a smallblock rear drive/bevel box which I want to repaint, as oxidation has caused the paint to flake. I can of course get a wire brush out on a drill and manually remove all old paint & oxidation prior to repainting it, but the best option really would be to have it sandblasted. Question: I have never disassembled a bevel box (I have with entire engines). Is disassembly and reassembly of one of these easy, or should I spend extensive time & effort in setting gear preload/interference?
-
Are you 100% confident the sidestand switch and related wiring is good? Because when I put out the sidestand whilst in gear, she dies, however when I quickly enough flip the sidestand back (or the clutch), I can actually prevent her from dieing and it sounds like a misfire or ignition problem.
-
So nothing happens when you press the starter switch? Not even a faint click of the starter relay? First things to check: - Dead man switch on? - Does the fuel pump prime? - Are you using the clutch lever whilst starting? - Check the main ground on the back of the gearbox is tight. - Push the starter button and then turn the handlebars from full left lock to right and back. Does she start now?
-
The distance covered was over 2.5m, so that would class it as a pressure spray right?
-
Lovely story. Can we ask for pictures?
-
I have, on mine. After changing the fuel filter, wanted to remove the tank again (after priming the setup a bit) for some other work. The fountain of fuel (probably aided by an air pocket in the fuel filter) was quite considerable, and unexpected after sitting for about 60min between priming and tank removal.
-
Soooo, my spacers are 60mm. Always found them long but never considered shortening them, but I have also only used the bag once in a weekend.
-
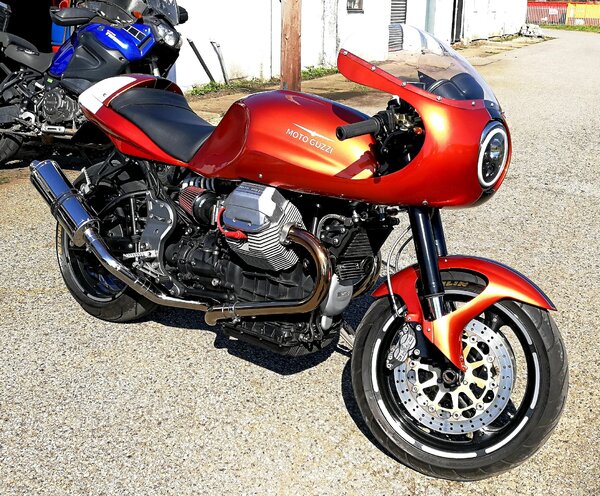 Yeah well thanks for this. Now I don't like my own Rosso Mandello anymore This to me is almost perfection. Remove the white ribbons on the front wheel and it is perfect.
 -
Anyone who can confirm this? I have a set of re-made racks. The PO of these racks had them on for years so they corroded and he had them re-made by a local shop in stainless steel. However, I am fairly confident my top spacer is even longer, like 60 or 80mm. I'll measure tonight.
-
Love all the responses! We indeed do drive on the right hand side and because of that, possibly left hand corners are longer, more visible and therefore faster/more throttle causing more tire wear. Thinking of it now, I think my dual compound front tire also wore unevenly, with the pointy "egg" shape not being in the middle but a bit more on the right (so more wear left). Wheel alignment can't be it on a V11 I would have thought, but I will check whether they are in a straight line behind eachother. The inner fender also looking crooked is visual by the way, but the uneven wear definately is not camera angle but real. I can also admit to being somewhat of an ape on the clutch/throttle sometimes, causing a bit of sidestep on the rear end...
-
Did not get the multimeter out as I did not intend to remove these connectors, but I did follow them. The small one indeed goes to the unused button on my steering damper bracket, of which I took a picture for your entertainment: The other one goes into the loom as well as to either relay one or two. So it is fairly clear to me this indeed was a connection for an alarm, which has been disconnected. I suspect the two yellow wire bridges are the actual connections the alarm electronics would make when deactivated. I think I will leave it as is, since my bike is running fine. Or do you guys disagree? To entertain you guys again, I have a small riddle for you. What is strange on my rear tire, except for the fact it is almost worn?
-
Yeah these were in the back of the "pocket". Good to know maybe is that when I bought the bike, the actual pocket liner was missing. I installed that myself. So maybe something has been inside that tail. Nothing plugged into either connector. The yellow wire loops were indeed. Your questions are already telling me this is fairly special, so I may actually have to go and trace the wiring after all. Nope, I never got the owners manual with the bike, so no clue on the wiring harness. I don't know exactly how similar they are. My bike is a '01 with a short frame (red frame length) but with a black colored frame. There is a small button on my steering damper mount which obviously is not original, but does not do anything either. Possibly the bike has been fitted with an alarm system in the past, or PC? I will go and investigate in the coming days and report back here.
-
Literally indeed. Because I removed the rear cover behind the gauges to solder diodes into my indicator idiot light for LED conversion.
-
Today I started working in removing the Tupperware party Guzzi calls a rear fender. Without starting a discussion on whether this is the way to go or not, I am doing it in such a way it can always be restored to stock. Question: In my tail, I found these two. Out of curiosity and without extracting the entire wire loom to find out where they go, Anyone knows what these are?
-
On my white face Veglia's on a 2001 Mandello Rosso (black frame, short frame) it spins cw to release. It is left-hand thread. I know this because I actually had to remove it yesterday
-
Rear drive needle bearing and swing arm restoration
Tinus89 replied to Bjorn's topic in Technical Topics
Normally I'm like that as well, however that meant ordering parts in Netherlands, which was in a snowstorm and therefore would take at least a week, keeping me from rebuilding her and therefore working on my other bikes due to lack of space... As this bearing only sees minor movement, I'm fairly confident it will last another year or two (which usually is less than 5000km). If you are referring to the rose/heim joints, I'm less confident but they are easily checked once in a while as they are out in the open. -
Rear drive needle bearing and swing arm restoration
Tinus89 replied to Bjorn's topic in Technical Topics
Soooo, pushing some life back in this topic. Did my 2-yearly big maintenance including greasing of the driveshaft and checking the small needle bearing was on the list too. Findings: Bearing pre-cleaning Bearing inner race post-cleaning Bearing post-cleaning (flush with degrease & rag) I've considered cleaning up the inner race even more using scotchbrite/sandpaper, but voted against it for materials loss reasons. I've regreased and remounted the bearing for hopefully another 2years of service. Question: should I expect to change this bearing in two years time? Or should I not expect it to last this long? Also in the same subject/region: I've discovered I have some feeling play in the rose joints of the reaction rod on my bike (the lightened "sport" version of aluminium). I'll most likely have to replace that next year as well... -
My V11 had a Yuasa YTX14-BS in it when I bought her (2nd hand). This worked perfectly for 4 years (plus the time it was in there before I bought the bike) and then died. No leaks, nothing.... My bike is stored in a no-heated-non-insulated garage.... On the Ctek trickle charger once a month.
-
Have you read my edited post two posts up? My explanation was fairly complete, right?:)
-
So the front fender is brushed aluminium, which I like. The rear one is rolled aluminium. Any idea how I can get the surface finish on the rear fender close to the front one?
-
Already have a new one installed. The old one was damaged beyond the outer races of the bearings and I did not want to try and resque it with the risk of hairline cracks or anything like that...
-
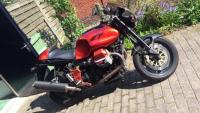
Yes indeed, the tank is big. I don't mind. Keep in mind the goal is a scrambler (less need to look fast compared to a cafe racer), it does not yet have shocks installed (yes to fotoguzzi, I will add shocks) and no fenders & exhausts yet. Also no carbs & filters. Adding all those will add to the body of the total bike and make the tank look smaller again. I'll update once I have those installed with another picture:). Thanks for the tip on ACF-50, I'll buy that. Also maybe nice to share: rate my u-joint. Discovered upon removal of the rear swingarm, did not notice anything during driving....
-
Hi all! I have been FAR too quiet here, apologies for this! I'm checking in with an update on the build, which I should have done more. Apologies. On the carbs, I will have them ultrasonic cleaned in the near future and have bought new choke plungers and a seal kit. I know some people may very much dislike what I have done to her so far, which is OK, but do remind yourself that this started life as a hideous white Florida, so anything is an improvement.... I also have a question. I was thinking about keeping both mudguards in bare/brushed aluminium. How do you keep that looking nice? This is the front mudguard: [