
Tinus89
-
Posts
354 -
Joined
-
Last visited
-
Days Won
7
Content Type
Profiles
Forums
Events
Gallery
Community Map
Everything posted by Tinus89
-
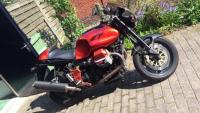
"Sold the V11, bought a different bike". Really? Well sort off... I have always admired the look of the V11 with the higher mounted Titanium exhausts, and once came very close to buying a pair, however they were damaged and I liked the look of the original carbon-fiber ones on my Mandello Rosso better. So when a member on here offered a set of carbon high-mount Gianelli's for sale, I went for it. He also threw a Stucchi crossover into the deal (thanks Crazyhorse!). Mounted them last Tuesday. Oh my, what a sound! Not much louder, but a whole lot deeper. But, did I imagine it revving much quicker between 3000 and 5000 rpm? Went for a ride. I'm not sure how much is to contribute to the Gianelli cans or to the Stucchi crossover, but WHAT a difference in mid-range pull! From 3000rpms onwards she just goes and goes. Like I bought a different bike.
-
Phil is correct, and I also noticed this. So I took a seal driver and drove the seal 3mm deeper into the gearbox case, causing the dust lip to now also remain on the sealbore on the shaft. I did order a replacement seal, but will keep this on stock for now as it was more of a wheep than a leak. Thanks for all the comments!
-
What I meant by that picture is explaining how I learned which direction is axial and lateral/radial
-
Thanks for the comments and comforting! Just for the record, I have always learned it like this (at Mech. Engineering uni):
-
Hi all, During maintenance (greasing the driveshaft), I discovered the driveshaft was pushed over the normal mounting position on the gearbox output splines. Most likely hydraulic lock or sticking (due to barely no driving in the last two years, house renovation) has pushed the driveshaft further onto the splines. I also noticed my output shaft seal to be leaking a little (but it can also not have been installed deep enough, but I did not have a tool at hand to drive it any deeper), but also discovered my output shaft to have approx 2-3mm axial play. There is no lateral/radial play and also no notchyness in the bearing. Here is a video: https://www.youtube.com/shorts/74sLrz0mv6A Anyone who can tell me whether this is too much play? And if it is, can I replace that bearing with the gearbox on the bike or will it have to come off?
-
This very much sounds like it has been tampered with...
-
If the lights dim and you do hear a "click", then there could also be a loose magnet in the starter motor. I had that, and all symtoms showed a poor battery (voltage went down significantly when I pushed the button, as low as 6v). After replacing the battery, the problem persisted. I fixed it by changing out the starter motor & disassembled the old one, found a loose magnet inside.
-
Thanks docc, that explains why I could not get my head around that!
-
Do you have a picture of the CBR600RR mirrors on a sporty? Which model year CBR are they from? I am very unsatisfied with the original mirrors, and even less satisfied with the current aftermarket replacement I have.
-
I have not heard of any RM's (or anything else than a Scura, to be honest) suffering from the spontanious decomposing flywheels...
-
Right. Spending about 70EUR for a small peace of steel is a bit steep. Spending about 70EUR for a shifting improvement of my V11 isn't. Sign me up please:)
-
What would be the price including postage to The Netherlands?
-
The timing chest gasket is a known weakpoint in the V11. Does your V11 have a support bracket/plate between the gearbox and the engine, connected to the frame? Should be between the throttle bodies. I can see she does have two connecting arms running from the sideplates/porkchops to the lower back of the engine (photo 3), so the other bracket should also be there. These remove some of the stress on the timing chest (thus gasket), but a leak can still occur there.
-
I have fitted an SW-Motech one to my V11 with chinpad. https://www.v11lemans.com/forums/index.php?/topic/22036-anyone-successfully-use-one-of-those-quick-release-tank-bag-adapter-rings/&do=findComment&comment=253658
-
They are, I have the same on my 2001 RM.
-
Yes these are perfect! But a word of warning as I notice you have placed it onto cartboard. The stability relies on the rubber grips gripping the floor. If someone were to bump into the handlebars, the chock may turn easily as the cartboard slides over the floor underneath it, causing the bike to lean and fall over. How I know this? I was just in time to catch mine...
-
That "Viton" addition is very important in my experience. A PO of my bike installed a non-oil-compatible o-ring there, which had swollen so much it pushed the sensor far enough off the phonic wheel to not make the engine run properly >3k rpm anymore. Took me ages to find the cause...
-
I have ordered the white plastic lamp holder for the cluster from https://www.cmsnl.com/, it was also NLA at most stores. Not cheap, but I was very happy they had it available. Maybe they have this as well. It is listed on their site as PGGU02781101.
-
I had the exact same. Sometimes a slow start, sometimes fine, sometimes click-no start (and battery voltage WITH a road-side assistance car battery hooked up) dropped to 7V when pushing the starter button.... 2 loose magnets in the can.
-
I have experienced my return line banjo, which is made of a different material compared to the steel of the frame tube, to be partially filled with corrosion product & debris. I cleaned it out when I found it. I can't confirm this would cause the leakage as described as I do run pods (came without air filter box when I bought it) and my breather line runs to the ground.
-
@Rox Lemans, which exhausts are those?
-
ANSWERED Emergency on long trip: any advice on bike randomly shutting down?
Tinus89 replied to jetboy's topic in Technical Topics
This behaviour sounds exactly like mine did. Only happened when the bike was hot, eventually traced back the problem to the phase sensor. A non-oil compatible o-ring underneath it had swollen, causing the mounting plate to bend and the phase sensor move away from the phonic wheel causing these issues. A new o-ring did the trick in my case. Not saying in your case it is the o-ring, but the phase sensor explains the behaviour very well. -
That is one way to look at it, however I personally quite like the swept back look. You could also have whoever translates the scan into a CNC program, ensure there is a fairly large radius in the back of the cutouts, e.g. 1/3 of the ID. That way the shape you take out on the front is about the same as the shape you will fill in on the back, where the cutouts are present in the original cast item. When you also use a metal which is at least as strong as the cast item you will be fine.
-
If you intent to remove the recesses on the back of the plate and move them to the front for cosmetical reasons, please also consider the fairly large radiusses used on this fairly stressed part. If you design the recess on the front side just to be milled out with an e.g. 10mm mill on a CNC lathe, the very small internal radius in the recess may still cause cracking, even though the design is strong enough for the general loads. Short version: when reproducing a casted part by CNC process, seriously consider the radiusses.
-
I have a spare, grey, non-cracked gearbox with 57000km on it, but I'm located in the Netherlands so postage may be an issue...


