

Lucky Phil
-
Posts
4,541 -
Joined
-
Last visited
-
Days Won
234
Content Type
Profiles
Forums
Events
Gallery
Community Map
Posts posted by Lucky Phil
-
-
1 hour ago, footgoose said:
Looks great! wth is 2k paint?
2 pack paint, base and a hardener and a little thinner. Dries chemically not due to flashing off solvents. Tough, hard great depth but hard to apply without a booth to keep the dust and contaminants off. Takes about 30min to touch dry. I did mine outside and then put the stuff in the spare room with the door shut to let them cure in a dust free environment.
Ciao
-
 1
1
-
-
2 hours ago, docc said:
Your saying all the red is powder coat? I didn't realize this. How can the difference be known?
I believe it is docc. Its often hard to tell. Some use a wipe test with solvent which isn't totally reliable but powder is generally thicker and if you look at a flake its devoid of any primer. It also seems reluctant to respond to cutting and polishing and lacks depth. I have stripped a swing arm once that had been powdered and it came off in long plastic like strips when you tried peeling it like a piece of fruit instead a chipping off. The Guzzi parts didnt seem like this but I'm still inclined to believe they are powder. Not 100% sure but pretty confident.
If you had a decent painted surface even if it is 20 years old you should be able to cut and buff it to pretty much the same finish as new paint as long as its not been sun affected. You just cant get the V11 frame like this.
I also read it was while doing research which isn't of course definitive but made me test and evaluate.
Ciao
-
1
-
-
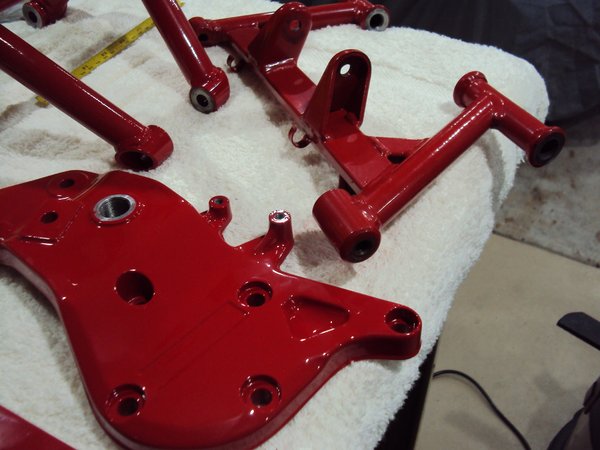
Pulled the tape off the painted parts today. I'd rate the finish quality as an 8.5 out of 10 which is about all you can expect from an amateur that hasn't sprayed 2K paint for 35 years so I'll call it done. For anyone thats contemplating whether to powder coat or paint 2K here is the difference. I realise this is straight off the gun compared to 20 year old powder but I've cleaned and polished the powder part and the protected parts of the frame aren't really much better. If you want a tough and glossy finish with real depth you can't beat 2K, the powder just doesnt compare and thats the reason I repainted the side plates and front support. I just got tired of the lack of depth and richness to the finish.
The battery tray and rear swingarm are next in satin black. My original arm has quite a bit of weld spatter on it from the factory which is pretty pathetic really and the finish is quite poor now esp on the round tubes where the original rear hugger rubbed the surface.
2K V powder
Ciao
-
 3
3
-
-
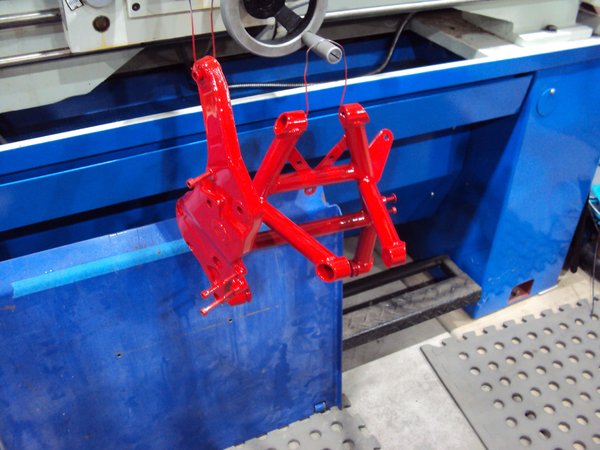
Got the 2K painting done today, its decent. I'm no painter.
Ciao
-
40 minutes ago, po18guy said:
It looks like something that was intended to be covered by a lower fairing.
To me it looks like something that is on a petrol driven cement mixer. Mufflers are such a style cue on a motorcycle,they can completely change the whole style of a bike. While I'm having a soap box sermon I also hate with a passion wrapped headers on just about any bike. Ugly as sin and totally pointless.
Ciao
-
1
-
-
19 minutes ago, footgoose said:
Price out the exhaust system you'd rather have and sell the D for that price. As was said, someone who want's it will buy it... they are rare.
For myself, the visual charm of the Spine frame is preserved and enhanced by the use of a high quality dual exhaust system.
Congrat's on the new bike! show her off when you get 5 minutes!
")
Yes personally I think the quad d look effing horrible, but to each his own.
Ciao
-
3
-
-
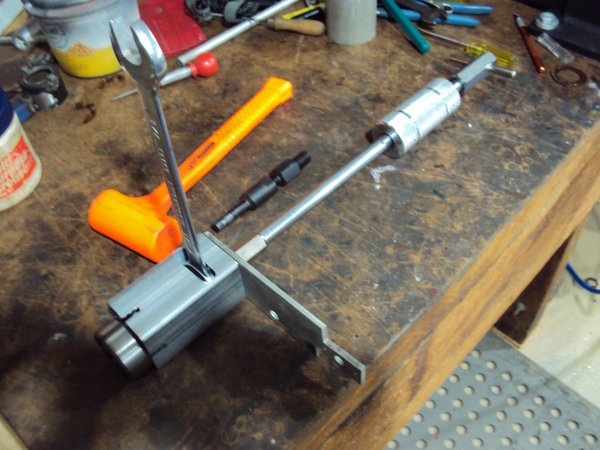
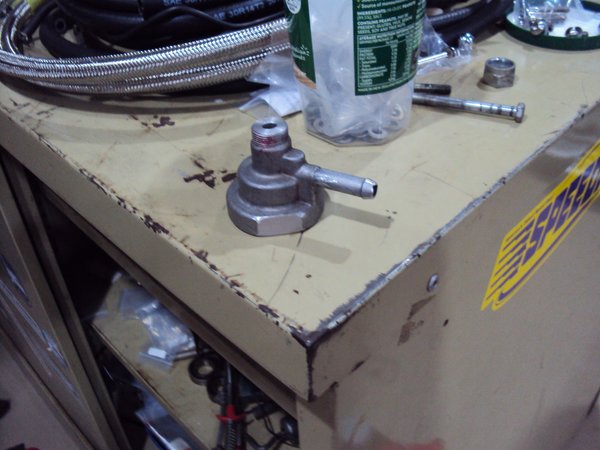
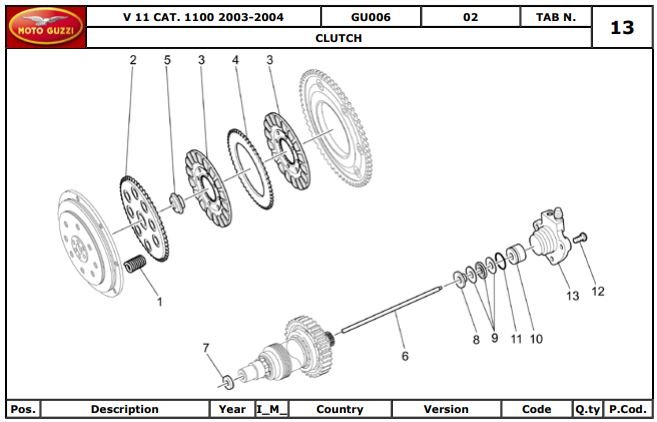
After years of reading about the difficulty of this task I though i'd attack my first one by engineering the issue. The tool shown can be made by anyone with a hacksaw,drill and file and 100 mm of 50x2mm wall square. Something with a little bigger ID would be better but I used what was on hand and thats the reason for the end slots to allow for the fact that the tube id was 46 and the bearing OD was 47mm.
The radial slot is for the 3/4 spanner to hold the bearing puller as you crank up the slide hammer nut. When you have moved the bearing 10mm or so you can slide hammer it out easily or just keep cranking the wrenches. The steel plate was just scrap I had laying around and when I have the time I'll make a decent looking dedicated one. On the bench is one of the other size bearing puller adaptors for reference to style of puller and a hammer for docc. The key is to apply a decent load to the bearing puller and slider hammer combo via the wrenches and then give the swingarm boss a few light taps just in one area is good enough and the bearing then releases. I used my copper hammer for the task.This is an important technique which I learned removing Ducati Crank gears. Load up the puller then a "tap" with the hammer and drift and they pop free. Exactly the same here. Time to remove? as the header says 30 seconds.
Ciao
-
6
-
2
-
 1
1
-
-
5 hours ago, griswoia said:
I've got a set of chrome or aluminum or satin black cans. Yeah I've gone through a few exhausts. Would swap with you and throw in a new mistral crossover. That would be everything you'd need. Let me know if you are interested I'll send pix of the options.
I've never had the quat d but like the idea.
The images I've seen the quad D uses it own headers. It may have OEM headers option,not sure but it would be worthwhile to check.
Ciao
-
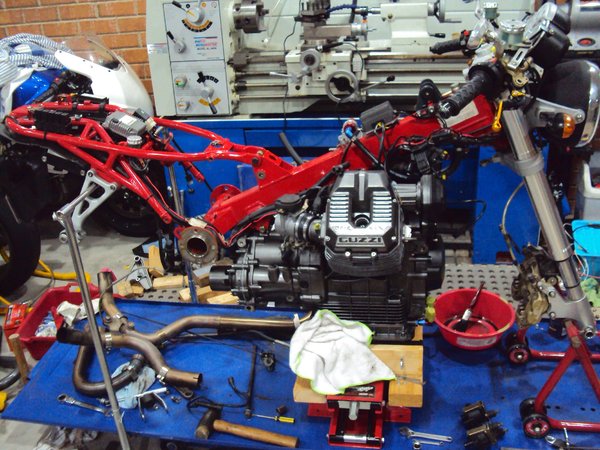
18 minutes ago, docc said:
So, this step has always destroyed my ability to perform the kind of amazing project this is. At some point, the progression has to be completely disassembled and refitted.
That, IMHO, is one of the hallmarks of true Professionalism.
One that will always reveal me as a mere hobbiest.
Well
 done, LuckyPhil.
(And once again, thanks for the generous sharing of the methods, process, and progress . . . )
Yes docc its always a wrench to disassemble again to do the painting and finishing. My main issue at the moment is waiting for parts and materials to arrive in the post. Silly stuff like fuel hose etc. Slows the process down a lot and you tend to need everything on hand with a project like this because you're making it up as you go. So to run fuel and breather hoses you need to have things like the throttle cable routed etc because everything is so tight and messy under the tank you need to consider everything before you can finalise things.
The next major hurdle is adjustable steering stops which is going to mean fabricating a pair of stops and then machining off the old ones and bolting on the new. Cant see any other elegant way around it. My friend that usually does my machining for me is currently quite unwell and the last thing he needs is to be doing me machining favours so I'll need to work around that.
Ciao
-
1
-
-
4 hours ago, Nihontochicken said:
Replaced the valve cover gasket yesterday with a cheap and simple greenie item available off eBay. Test ride today indicates the oil boundary is holding. Will see what a few more miles and heat cycles do. As mentioned in another thread, most time was taken by cleaning off remnants of the old gasket. Didn't the Japanese solve the problem of engine oil leaks about fifty years ago?
")
Italian bikes dont leak they perspire a little is all.
Ciao
-
1
-
2
-
-
30 minutes ago, Purloined said:
I had previously determined that the plugs were firing. I adjusted the valves a few hundred miles before this problem had begun.
The fuel pump comes on as it should when I switch on the ignition.
To be clear, the pic is the sensor in question? Fotoguzzi says it is a camshaft sensor, not a crank (assume 'crank' refers to crankshaft) sensor, which would make sense given its location. Testing for signal would involve removing it from the engine and accessing electrical signal from where it fastens to the block? Or the signal would be tested upstream?
In the case of this sensor: 'air gap'? Does it need adjustment when installed as opposed to being fastened in its socket?
I may have to defer to someone more versed in this diagnosis. It is a 550 pound dead weight at this point and will be difficult to transport the hour and a half to Hamlin's in Bethel. It would be cool if I could blunder onto the source of the problem without resorting to the age-old trick of tossing a bowl of pesto&pasta into the back of the van for a trip to the doctor's office and hoping if falls for it
Thanks all. .
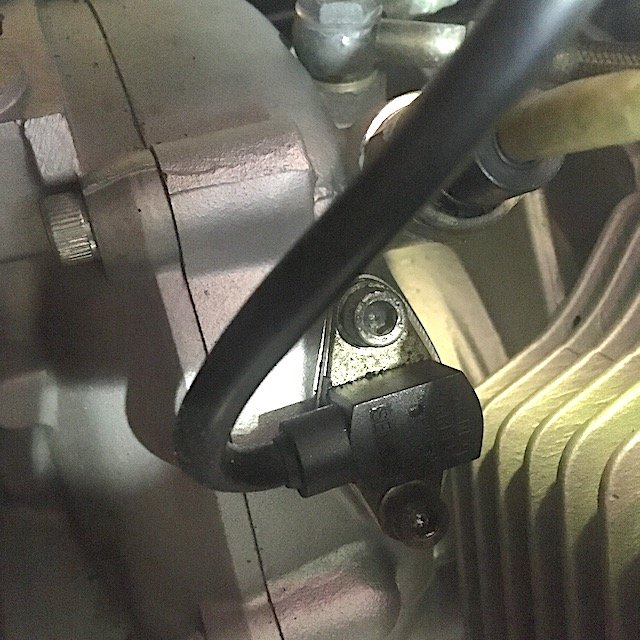
Hmmmm, just sayin. Always good to recheck when you have an issue.
Crank sensor that uses the cam drive as its reference. It MAY need adjustment depending on the difference between the exact dimensions of the original and the new but its always good to check the gap when replacing anyway.
Ciao
-
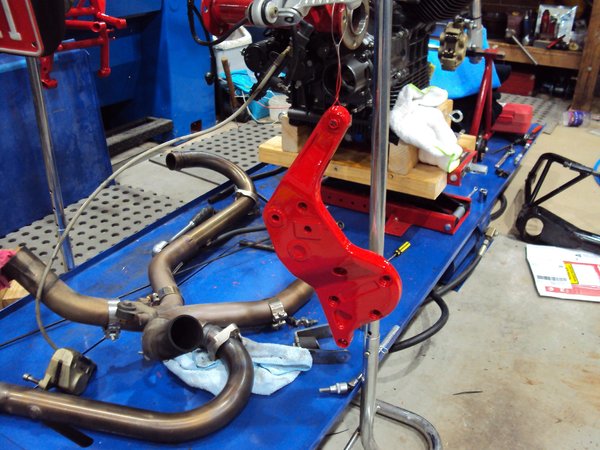
Looks like a step backwards. Side plates and front support removed for painting and finish removal of the remains of the old horn/regulator bracket.
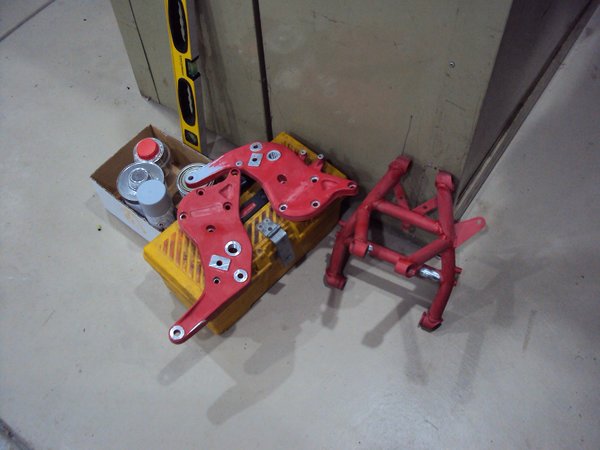
I have also machined the threaded section of the regulator housing back 5mm and relieved the body to give me some comfort factor clearance wise to the TPS. The Centauro throttle cable arrived and am glad to say it fitted perfectly.
Ciao
-
3
-
-
Was reading one of Brad Blacks reports yesterday and came across something I didnt know.
One very important thing to know about the 1.5M ECU is that it runs rich for the first 3,000 rotations every time you start the engine after turning the key or kill switch off and then on. I just thought (while typing this) that I don’t know what happens if the engine stalls and you restart it – I’ve never tested that. So best to assume it does it every time.
And this is not just when it’s cold. Every time! Even when it’s hot. If you start it up and check the idle mixture quickly and it’s 5% CO after idling for 3 or so minutes (3,000 rotations at 1,100 RPM idle is about 3 minutes) the mixture will drop to maybe 1% CO or so and it’ll idle like crap. I usually allow at least 4 to 5 minutes for the mixture to settle after starting the engine. It’s very annoying when you’re in a hurry, as you have to turn the engine off then back on to initiate the setting procedure with the diagnostic tools, but that’s how it is.
For the full report and hours of interesting reading...... http://www.bikeboy.org/ducati2vthrottleb.html
Ciao
-
1
-
1
-
-
25 minutes ago, Nihontochicken said:
Replaced the leaking left valve cover gasket today. Will smoke test it tomorrow. Just used a readily available green gasket, perhaps will invest in the high zoot metal item if this current entry fails. Of course, most of the time was spent scraping the old gasket remains off the mating surfaces. Noted that the cover mating surface does not seem to be very flat, may have to try the glass plate grind trick if it piddles again. Also temporarily replaced the aluminum front brake reservoir cap with a plastic one that will serve while I get the original recoated due to the brake fluid corrosion of the paint. Maybe do it in Italian fire engine red?
")
No that would look horrid.
Ciao
-
44 minutes ago, Chuck said:
For whatever reason, our beloved V11s seem to be abnormally susceptible to corrosion on the relay bases/relays. I'm clueless (my normal condition)
 as to why.
You cant get them wet Chuck, they dont like the rain. I never ride mine in the rain. If I get caught out I just go to the nearest hotel, book in and come out when it's fine:)
Ciao
-
1
-
2
-
-
30 minutes ago, Chuck said:
My guess, and it is only a guess, is the crankshaft sensor. Maybe gapped a little too wide? In that scenario, it will run at idle, but won't take throttle.

Yes chuck or its just failing period. Buy yourself a cheap Chinese copy one for like $15US and try that. If its not you havent spent the $170US they seem to want for the OEM. OEM ones are a little hard to come by these days and you see a lot of aftermarked retailers selling the Chinese ones so they cant be all that bad as they are used on a lot of older automotive stuff. Thats my theory anyway having bought one to use in the Daytona engine. Havent got it running yet so I cant comment on the performance.
Ciao
-
58 minutes ago, JKV11 said:
Thank you very much! So the best way is to instal the clutch, take out the rear wheel, take of the slave clutch cilinder and machine the rod until there’s a little slack.
Kind reagards, Jorrit
Your rod should be the correct overall length give or take. It looks like what you need to do is machine the clutch end dia down and along the length enough until its a slug fit in the pressure plate button and bottomed out. Then check the protrusion as i outlined. It should be close to these figures give or take a little. And then you can do what I did with the Daytona engine and 6 speed with the RAM clutch which is to fit the slave and slide half the drive shaft onto the gearbox output shaft,put it in gear and see if when you pull the clutch it disengages and at what point from the bar and that you have a little freeplay before it loads the pressure plate spring. If it disengages a long way from the bar then the rod is too long and the converse would be too short.
Ciao
-
20 minutes ago, docc said:
Here I thought the tapered, thin, machined end went into the clutch push button (forward)?
I had to think for a second as well docc but if you look at your images in the link when your input nut backed off you can see the non reduced end there. I also went and checked my old engine and the reduced end is definitely at the slave end. God I only assembled the Daytona engine a few months ago and I'd forgotten already.
Ciao
-
1
-
-
12 hours ago, JKV11 said:
Some extra info;
If i look closely it seems like it was properly installed.
but if i look a the clutch, it looks like it should be turned around
I have another picture, where you can see the pushrod fits exactly in the spring, but i'm only aloud to upload 200mb
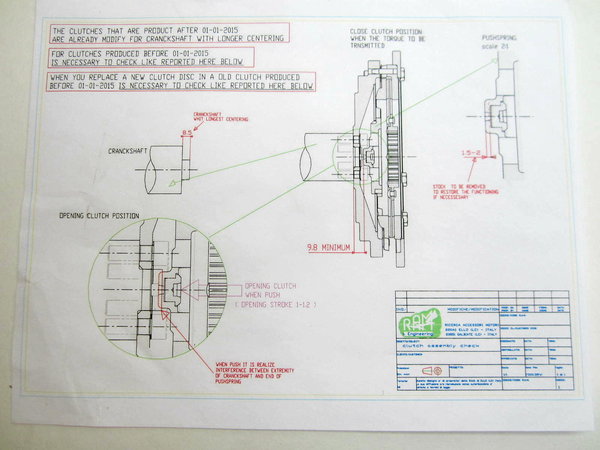
Your rod has been installed the correct way around but at the clutch end the rod doesnt appear to have engaged the pressure plate button correctly which would mean the rod is in effect too long and possibly holding the pressure plate partially disengaged. This would cause slipping issues.This is one of the issues using a 5 speed RAM clutch with the six speed gearbox. You need to machine down the dia of the clutch end of the pushrod.
To check the correct length of the pushrod once machined,install the gearbox and clutch with the pushrod and the pushrod bearing assembly and the piston and push it as far forward as possible then measure from the piston end to the gearbox face that the slave cylinder bolts to. With the single plate clutch with the original plate( same as I have fitted ) the measuremnt should be approx 18.5 mm. It about 19.5 with a partially worn twin plater. If you assemble yours as before and the measurement is say 14 or 15mm then thats almost certainly what been causing the slip due to the pushrod not seating in the pressure plate button and holding the pressure plate partially disengaged. Look for damage to the gearbox pushrod bearing and piston as well.
If you use the later thicker friction plate you may need to modify the length of the pushrod and also the pressure plate button on pre 2015 RAM clutch assemblies.
Ciao
EDIT.....here's your answer.......3rd last post by footgoose
-
9 minutes ago, docc said:
This is a well framed question. In clinical practice, I find the vast majority of conditions are "multicausal." This has been my experience with most issues with the Sport, as well. So, it is easy to say, "all of the above."
(These charging parameters apply to the OEM "Spark500" which is the OdysseyPC545 AGM) . . .
A simple series of voltage tests, with a quality DVOM, can be revealing.
> Check the "float" voltage of your "trickle" charger. If it is not within the specified range (especially if it is the commonly low 13.16-13.2v), Odyssey states the battery will be damaged.
> Check running charge voltage at "some rpm". If it is over 15volts, the regulator is cooking the battery. Ideally, the charge voltage should be 13.8-14.2v (above idle).
> (Even newly purchased) batteries below 12.65volts@25ºC/77ºF should be "conditioned" (discharged and charged through several cycles at the correct AGM voltages and with over 6 amps until the voltage remains stable [12.65 - 12.84v full charge] over days to weeks.) Expecting our V11 charging system to bring a new, but rather dead, battery up to full state of charge is like asking your girlfriend in a G-string to scrape the ice off your windshield. She might do it once, but there is gonna be a price to pay . . .

> Lots of the early V11 let the seat down onto the battery. In our local vernacular, that would squoze-out the insides. Usually this is visible inspecting the underside of the seat pan and the topside of the battery/battery strap. Solutions? Relieve the sharp and offending edges of the seat pan with a Dremel® or such and/or lower the battery basket under the subframe instead of on top.
Thanks docc I'll check my charger when I get the bike back together. It's possible to that the old reg might have been charging ok when cold but not when hot maybe. I'll check the seat base as well,good tip.
Ciao
-
1
-
-
36 minutes ago, docc said:
Learning, and practicing, correct AGM conditioning works wonders. Lots of folks don't and get along "just fine", but why ignore the manufacturers recommendations?
Biggest two faux pas are using a low amperage "trickle" charger at a voltage below the AGM threshold, 13.5-13.8v (Odyssey states this is damaging), and letting the battery drop below 12.65 volts (85%) before charging it with a minimum of 6 amps to the 15 volt termination threshold.
(voltages are at 25ºC/77ºF. Temperature correction charts for AGM are available and also displayed in that lengthy "conditioning" thread.)
Docc for the second time my battery has leaked. After the original one leaked I wired the headlight direct with some mini relays to bring the reference voltage into line fitted a new battery and checked the charging rate and it was fine. When I pulled the battery to fit the new engine I noticed it had started to leak again( luckily I had placed some absorbent material into the battery rubber tray) I have now fitted a new regulator I had laying around as the old one did show some signs of heat damage to the epoxy back around the wiring area. Do you think my keeping the bike on a trickle charger has caused this or my not conditioning the new battery or a faulty reg or all of the above?
Ciao
-
1 minute ago, gstallons said:
Not as much as you think .
I've removed seals from quite a few double sealed bearings to use in engines when I didn't have the non sealed types and always found them to be adequately greased. I mean it cant hurt to do as you suggested I suppose.
Ciao
-
1 minute ago, gstallons said:
When you install the new bearings , remove the dust seal . Pack the bearing completely with wheel bearing grease ,install the dust seal . Install the bearing with the disturbed dust seal inside of the swingarm . This bearing will not move 5 -10 degrees so the grease will only help .
A new double sealed bearing will already be greased.
Ciao
-
13 minutes ago, Twin AH said:
No.... I need the earlier one then.
Ciao
They come up for sale regularly.
Ciao
iSLE OF mAN.
in Older models
Posted
This has to be the shittiest looking race track surface I've ever seen.
Ciao