

Lucky Phil
-
Posts
4,541 -
Joined
-
Last visited
-
Days Won
234
Content Type
Profiles
Forums
Events
Gallery
Community Map
Posts posted by Lucky Phil
-
-
At that mileage the whole clutch will almost certainly need to be replaced, basket, hub and plates. Pretty easy job
Ciao
-
 1
1
-
-
Interesting video's. I'm always amazed that people will go to the trouble and expense of investing in something like a K-line kit and then not spend the $25 on a cheap air driven impact gun to drive the liners and the sizing arbours. Hammering them in and the arbours through with a lump hammer is silly. All that stuff bouncing around on the bench etc and the fact that one of the reasons you use a 4000 bpm driver is so the sizing process is fast and fluid and produces a uniform ID not a stop start irregular interior. Its way easier with the impact driver believe me.
Also why dont people spend a little time making a simple jig or cradle from wood to hold the component, head in this case to the bench so when you're doing this sort of work you're not chasing it all over the place and watching it wobble around while finish reaming.
I made up my own simple cutter to trim the liner which worked fine. I'm not actually convinced that the K-line reamer is compatible with the guide material Guzzi use as I see he has the same trouble with the process as I did. Surprisingly hard to ream the guides. I have since found out that Kibblewhite have 2 types of reams for the different types of guide material they sell and the reamers shouldnt be used on the wrong type.
Ciao
-
 2
2
-
-
40 minutes ago, 80CX100 said:
Some good mcgyver tips here,
SCUD, I've never heard of using the towel on the slide hammer, that sounds like a good one to save on the wear and tear on the old body.
Phil, if I understand correctly, I gather you mean placing a piece of large diameter tube/pipe 2"-3" and slipping the puller jaws inside and using the tube against the frame or hub to anchor the pressure on the outside instead of the inside like a regular 3 way puller set up?
I'm not recommending it and it sounds rough, but when I took a quick look on google, a lot of people without pullers or able to get access with a punch; have used concrete bolt anchors carefully secured and tightened tight against the wheel bearings then drifted out carefully from the other side, throwing the info out there in case someone ever gets stuck without the right tools as an fyi.
Kelly
I was thinking of this system for the swingarm bearings. As I said slide hammer pullers aren't usually much good unless the item has a lot of mass. Of course the disassemble the bearing and use the stick welder on the outer race always works just takes a while to do.
Ciao
-
47 minutes ago, Scud said:
The Pit Posse Wheel Bearing puller is not a traditional blind puller. It requires access through the wheel to drive it out. I've done several bearings with no problems.
I also have the "silver slapper" slide hammer, with which I recently removed the original wheel spindles from rusty steering knuckles on a 1997 F250. If the blind bearing tool is strong enough the slide hammer will get it out. I destroyed a Harbor Freight slide hammer and bearing pulller when I did some V11 swingarm bearings. But it did get them out... and HF gave me a full refund. FYI on slide hammers... you can wrap a towel around the slide and swing it like a baseball bat. The slide goes faster and it doesn't hurt your wrist or elbow.
Ok thanks Scud. Looks like a decent investment then. I have a theory on getting out the s/arm bearings. Use an internal puller but instead of using a slide hammer directly on the puller use a metal tube and bolt arrangement to apply constant pulling force on the bearing then impact the arm around the bearing with a copper hammer and or use the slide hammer in conjunction with the static pulling force. The piece you are using the slide hammer on has to be very heavy or very well anchored for them to be effective. Pit bull make a harley wheel bearing puller with the thinking I'm thinking somewhat
Ciao
-
On 1/11/2020 at 3:34 PM, docc said:
My March 2000 build Sport has the "D" and "S". Perhaps later V11, like leroysch's '04 do not?

All this time I thought 4 and 6 thou (0.004" intake/ 0.006" exhaust) were US specs more for noise and emissions and "world clearances" were 6 and 8 thou? "Raceco" lash: 8 and 10 ?
I'm with you docc,I thought the tight clearances were .004/.006 and the loose were .006/.008. Oh well, I do know that it makes a difference to the starting and idle running though, which surprised me.Such sensitivity to valve clearances. Dont know about running them wider than that though,you would get to the point where the opening/closing ramps became ineffective and valve seat wear became an issue. It would be interesting to see what effect valve clearance had on actual dyno numbers though so we could see the differences between starting,idling,valve noise and outright running performance then choose the compromise we wanted to make. I'd chip in for the extra hour of dyno time after someone does a dyno tune to find that out.
Ciao
-
2
-
-
2 hours ago, Scud said:
I've used the Pit Posse Wheel Bearing Remover. You insert a split cylinder, then drive in a wedge to grip the inside of the bearing. Then you just pop it out with a hammer. Very efficient. Fun, even.
I watched a youtube video and it looked to good to be true. Reminded me of those manufacturers instructional videos where the component literally just about falls apart in your hand but the reality is a whole lot different. Any more details on this tool scud. I mean did you give it a real testing bearing to pull? say like on the difficulty scale of a Guzzi v11 swingarm pivot bearing.
Ciao
-
2 hours ago, LangleyMalc said:
I just took a look and there does not seem to be a relief notch! The Spacer is very close to the diameter of the inside of the inner race and is very slightly lose and can be turned slightly: as a consequence it is very difficult to get decent purchase on the inner race with the drift. It just slides off and I cannot see how to get a regular-puller anywhere near it.
I popped off a dust cover and the bearing was full of red brown crap so they have to come out.
the next attempt will be with a little heat, but for that I will have to take of the discs.
Is it possible to drive one bearing down to get the other side started?Sometimes a large flat blade driver with the shaft through the handle can work as you lever the spacer aside as much as possible and drift it. Heat doesnt hurt but its not super effective as the heat transfers just as fast to the outer bearing race and it expands as well and the heat you're putting into the hub with a heat gun and not burning the wheel paint etc is not so large to make the differential expansion that big.
A 15mm steel drift with a sharp end edge and levered hard across usually works but its no walk in the park sometimes. Of course when you get it out the other end is easy and then you grind/file a notch in one end of the spacer for next time. Even if you can get the bearing to move 1mm it opens up the ease of removal.
The next step is to break apart the bearing cage and load all the balls to one side and see if the inner will come out and then pull the spacer and drift out the other side. Then you run a single bead of stick weld around the inner dia of the outer race and when it cools the outer race will fall out.
The other method is to spot weld a bolt to the inner race with a stick welder then drift it out from the other side using the bolt to hit against
Ciao
-
14 minutes ago, LangleyMalc said:
I have just pulled the front forks on my 04 Ballabio and on checking the front wheel bearings found one was sticky and the other distinctly lumpy so they need to be replaced. Marked up as NSK 6205 DU. Is there an approved method or tool for removing them or do I simply beat them out? (The BFI METHOD). I presume the bearing is readily available, but would also appreciate sources or alternative numbers.
Before I go to knock out the inner race etc, how do you get these things ou as the lip in the wheel is tiny?Drift them out. One end of the bearing spacer usually has a relief/notch in it so you can get the edge of a drift onto the inner race edge on one side. Once you get the bearing to move a little then the spacer loosens up a little and you can get more purchase on the inner race with the drift and keep it going. Support the wheel on the hub not the rim or tyre to get maximum impact force into the bearing.
Sometimes the spacer is a little short and you can lever it sideways to gain purchase on the inner race. These are generally the wheels that have short bearing life.
Ciao
-
1
-
1
-
-
1 hour ago, pete roper said:
Any model from the T3 through to the T5, all the Tonti framed LeMans and the Cali II all used the 7/33 ratio final drive.
If going down the route of seeking a complete bevelbox be aware the the earlier drum rear brake 850T not only uses a different ratio, (8/35 from memory?) but also has a thinner flange on the pinion carrier and uses different pinion bearings meaning if it is going to be used with a later swingarm it will need a spacer making up to fit it. Also fitting any of these bevelboxes to the EV will require the swapping of the axle spacer in the box, (From memory.).
It is nowadays getting hard to find a decent 7/33 from an earlier bike. Most of them the pinion splines are munted through age and abuse and often the pinion teeth will be pitted. Caveat emptor.
The alternative is to purchase a new 7/33 gear set and build a new box.€416 from TLM but you'll need shims, bearings etc.
Glad you chimed in Pete, I was out of my depth here.
Ciao
-
6 minutes ago, fotoguzzi said:
I dig that front brake.
Yes they were so good everyone's using them now, like swinging fork front suspension.
Ciao
-
19 minutes ago, vtwins4life said:
Help a brotha out with a year make and model of a T5 (latest possible please) that would use the 7/33 gearing :-)
VT4L
No idea, Guzziology doesn't mention year models. They probably only built the T5 for a few years. Is your bike possibly one of the effected wrong speedo bikes? because if it is Guzziology says once you change it to the correct speedo ration it doesn't feel overgeared at all.
Ciao
-
29 minutes ago, vtwins4life said:
So...my shop has agreed in theory to take this on over the winter. Now, I just need part #'s (or the make/model and year of the bike it came on) for the 7 and 8 tooth pinions. Can anyone assist with that ?
Many thanks !
VT4L
I'm not that familiar with the EV model just what I can see in internet images,but Guzziology recommends to use a T5 7/33 ring and pinion set for 5 speed 1100's with the 8/33 ratio. It also says that that early California 1100's had the wrong speedo gearing fitted from the factory and they overed so the bike wasn't going near as fast as riders thought when they were waiting to shift into 5th.
Ciao
-
1
-
-
1 hour ago, 68C said:
Really impressed. I have always done minor mods to my bikes, surprising how long it takes to just alter a mounting bracket or move a component. The standing and thinking always takes much longer than the actual doing. You can forgive designers making apparently odd decisions when they have a whole bike to figure out.
Your'e exactly right, its the working stuff out that takes the time plus I'm slow at that. I can come up with solutions but i'm not fast at it. I have a good mate that arrives at the same solutions as me usually but he figures out in 5 min what it takes me a week to work out. He has a really strong ability to visualise things and it's a fantastic gift. Interestingly after he had a course of chemotherapy he lost the ability but after a year or two he gradually regained it. I often need to see stuff in the flesh and then modify and refine it.
Ciao
-
19 hours ago, knumbnutz said:
Its an interesting exercise. You see race bikes often quote 53/47~ but I always wonder if this is with the rider.
In fact, anytime I see these stats I think its irrelevant without an average sized rider on board.
No those stats are always without the rider. Too many variations in riders. If you are too far outside the box these days with regard to your physique then you can pretty much forget getting a proper cutting edge sports bike to handle to its full potential. The bike and suspension and the tires are all designed these days for a rider between 5'4" and 5'8" 125 to 145 lbs.
As you move outside that box your ability to be competitive diminishes exponentially. You may think that that's only for road racers but if your 6'2" and 190 lbs nothing on a a modern hyper sports bike is designed for that kind of creature. Not suspension, ergonomics or tires. Doesnt mean its unridable on the road but your on a hiding to nothing getting it set up to be really good. Modern sports bikes are designed around modern racers,ie Jockey sized people.
Ciao
-
3
-
-
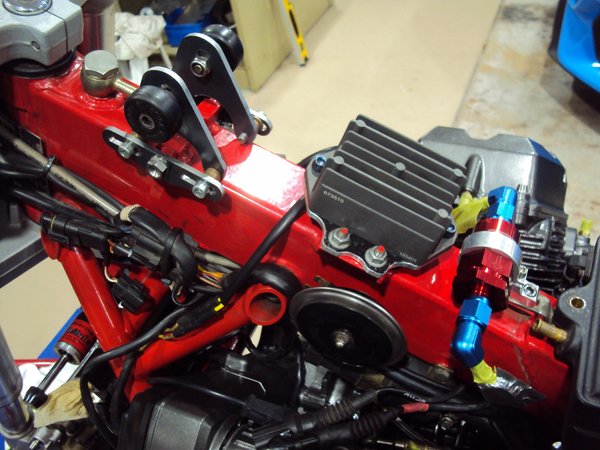
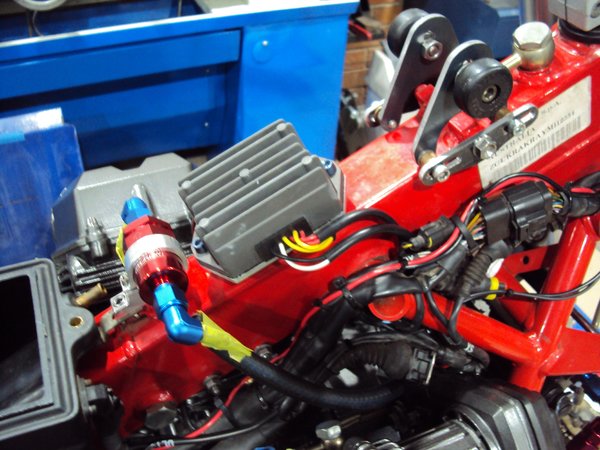
So I managed to make a mount for the regulator from 4 mm aluminium plate just need to pretty it up a little. I also found a new place for the stupid horn. I totally dont need a horn fitted to a bike but its a legal requirement here so its fitted. Getting rid of the 2nd one though. There's plenty of space under the tank now but real estate between the V is tight.
I had to re think the swapping of the reg and feed tap as there's no real room on the rhs of the frame to mount the pump as the main wiring loom runs there. The only issue is the reg body is close to the TPS connector but it should be ok. The benefit is it simplifies the fuel hose routing.
The fuel will come from the pump on the rhs to the filter then over to the throttle body on the lhs then cross over to the rhs tb then from there to the reg and back into the tank.
Found out I need a Centy throttle cable as well.
Ciao
-
1
-
1
-
-
This looks very nice. I have one of these single seat units in red brand new ( the original dual seat is still used)and a CF front cowl unpainted new as well plus a spare tank and second hand fairings in various colours. The plan was to have a spare set of bodywork in red as that was my favourite colour for them when I bought it in 2012 but as time has passes I actually like my yellow better. Too may red ones around I guess.

Ciao
-
1 hour ago, LangleyMalc said:
Hi Phil,
thanks for the suggestion.
The bolt in question is the one that stops the brake Caliper carrier rotating ny fixing the carrier to the frame. Assuming I drill off the head, will the rear wheel come out it the rest of the bolt is still in the frame, so the carrier won’t rotate?i will also probably have to remove the Caliper from the carrier to get some wiggle room before removing the axle bolt and thus getting out the rear wheel!
Sorry about that mine doesn't have the pin so I ignored that bit:)
Ciao
-
12 minutes ago, LangleyMalc said:
I have a 2004 Balabio with the Allen headed bolt on the rear brake Caliper carrier rounded out. (The one with the R pin in the end that anchos it to the side frame). I therefore need to get the bolt out and my immediate thoughts are:
1. Drill out the head and then pull off with rear wheel and then remove body of bolt and replace.
2. drill a hole into the bolt head down the Allen hole and try to use an “easy out”. I have used them before, but think the probability of success is low.
3. weld a nut to the top of the bolt and then turn out the resulting mess.
I could use some advice here, as I can’t be the first person with this problem, so what is the preferred method and finally where do as I get a replacement bolt or is there an alternative?thanks.
LangleyMalc
2004 Balabio and 2014 Cali 1400
Carefully drill the head off the cap screw,loosen and remove the other caliper mount bolt. Remove the rear wheel, pull the caliper off and use multi grips to extract the bolt with the head drilled off. Apply some heat and or penetrating oil if necessary.
Ciao
-
16 minutes ago, 80CX100 said:
To the OP, "you're in trouble now" LoL
Scud; What a man mission finding beautiful bikes,,,, Chuck called it right, sit down tightly on your wallets boys!
I know the under seat pipe routing is over done, but omg, that red MV Augusta is one sexy looking bike.
If it was my decision, that red Ducati would be in my garage already,js.
I only rode one Ducati 860GT, 40 yrs ago, I wasn't overly impressed, but I was young and stupid at the time.
The Ducatis have a great rep around the track, people in the know seem to love them, and I think that 1000DS model is one of the lower state of tune bikes, that's supposed to be very easy to live with, compared to some of the higher state of tune bikes.
It looks sexy as hell, sounds "mint", has a good title so it's safe money, and it sounds like it's been well taken care of.
I love the 70 yr old owner describing doing power wheelies with it.
In the used bike world, it sounds like it has been very well owned.
Good luck keeping that thing out of your garage,lol.
Kelly
Young and smart I'd say, 860 GT's weren't very impressive even in their day.
Ciao
-
4 minutes ago, leroysch said:
I've had good luck with these https://realgaskets.com/product-category/motorcycle/moto-guzzi/ thru original installation and one reuse. No leaks, seeps, etc.
Nice, I went straight to the aviation section and looked up PW 1830 and Wright R-3350 gaskets. R-3350, now there's and engine for you.
Ciao
-
 1
1
-
-
7 hours ago, Scud said:
I believe I have mentioned my nephew on occasion. He's a good dirt rider and has a Husqvarna TE250 (the older Italian street legal, 4-stroke made in the MV years - not the new Austrian TE250 2-stroke). Dammit Husky... the model numbers are so inconsistent over the years. Anyway, he's the one I tried to convince to buy my BMW K75s when he wanted his first street bike, but he just had to have this new MV F4. Emotions won over practical - he got the F4 and I sold my BMW to a neighbor boy as his first street bike.
So... he lives in Orange County but recently got a good job in San Diego so he's been living with us for a while. I, of course, said that I had room for his motorcycles in my garage (see Phil's insightful devil comment above). I commuted on it yesterday, which is a very bad idea. There are a few curves on the way to work that beg to be taken quickly. But the MV never lets you know that you are going fast. It just begs you to give it more gas... and how can you deny it? That fast and that red... I think I would lose my license if that was my daily ride.
It's a lovely machine in every way. I've ridden it a few times, but It's not something I'd want to stay on for 200 miles at a time - unless those 200 miles could be covered in about 90 minutes. Then I'd be happy to do it, and the bike would be in it's happy place too.
Did I mention how great it sounds? Glorious.
Agreed on everything here. My 1000 used to live in my lounge room. I never tired of looking at it,it was just the most beautifully designed and executed motorcycle I've ever seen. Fairings off was even better. Every part was perfectly designed and a thing of beauty no exceptions. I only sold my last one because I missed riding a twin. No matter how beautiful the MV was I couldn't deny the pleasure of a big high output twin, hence the purchase of the 1198. The 1198 isnt half the looker of the MV but it has the feel and sound over it. You cant have it all.
One of my most vivid memories was as a mechanic at the WSB round years ago at Phillip Island working for a friend running a 996 Corse. Starting that thing was a sensory overload. I'd be at the back with our starter, a Honda stationary engine with a go cart wheel and tire mounted on the crank fitted to a wheeled frame with handles and a twist grip throttle. The 996 was on its stand and my mate stood next the the bike chest on the tank and holding the bars. My job was to hold the Honda engine flat out with the go cart tire hard against the back wheel of the 996 spinning the wheel up to god knows what speed but fast. You could hear the wizz of the chain over the Protesting little Honda engine. My mate would be looking at me and I'd give him the nod when I thought we were at maximum wheel speed and he'd pop the clutch on that big angry racing twin and it would start instantly. Both Termi outlets pointing straight at my chest 1/2 meter away. The sound was overwhelming as was the experience. We'd then hand it over to our rider and he would take that frightening, brutal thing out and do battle with it.
There's not many things in this world as visceral and emotive as a big racing twin at full noise. An inline 4 doesn't even come close. Not even the beautiful and magnificent MV.
Ciao
-
3
-
-
On 12/23/2019 at 7:26 AM, knumbnutz said:
Two scales and add together.
I haven't weighed it and last bike I did weigh I used industrial scales at the tip.
Sent from my ELE-L29 using Tapatalk
Or a scale at one end and a levelling block at the other end and then repeat the other way around and add together.
Ciao
-
3 hours ago, 80CX100 said:
To the OP, in all seriousness, from my files,7 ft/lbs or 1 Kg/M, be very careful in all the conversions that can take place from manuals/internet to the tool in your hand.
Do yourself a favor and don't just use any big old torque wrench, that you happen to have lying around, especially the new modern click styles.
I've got 3 old fashioned beam style torque wrenches, 1/2", 3/8" & a tiny 1/4" drive, I would only use the tiny 1/4" drive on those little screws.
I used to make the mistake of over tightening those rocker valve cover screws to solve perpetual leaking issues,,, it was the wrong method,,, let the gasket do it's job, don't over tighten and compress it.
You can always go back and tighten up a little if need be , but once the OEM threads are stripped they're gone forever, yes they can be repaired, but it's an unnecessary pita.
Good luck
Kelly
I wouldnt use the old style gaskets anymore either. Pete Roper sent me a couple of the metal type and they dont leak, dont tear and dont compress over time. Technology moves forward.
Ciao
-
1
-
-
8-12 nm
Ciao
Ducati Clutch Repair Question
in Technical Topics
Posted
I must update that profile,I sold the ST 3 years ago. I think you'll find the electrics to be fine on the ST although they may have gone to a 3 phase alternator at some point, not sure. The only negative with the ST2 was getting the fairings on and off,a total PITA and the battery resided under them.The ST2 is a better bet than the ST4 for most people though as the maintenance is far easier.
The Ducati dry clutch I've been working on for 35 years. The good thing about them is they are simple and easy to access, parts are relatively cheap and the tooling pretty basic ( there is a nylon clutch holding tool you can buy on ebay cheap from memory. I have one and it holds the basket and the hub). You will need a new basket (get an aftermarket alloy one) and the outer part of the hub where the steel plates ride on the splines and a set of steel and friction plates. The hub nut is fairly tight so you need 1/2 inch drive and a rattle gun comes in handy for the basket bolts.
Look at the main seal for leakage ( they are pretty good) and you need to use thread sealer on the basket bolts so they dont leak oil. Look at the bearing in the pressure plate as well
Ciao