Scud
-
Posts
4,123 -
Joined
-
Last visited
-
Days Won
253
Content Type
Profiles
Forums
Events
Gallery
Community Map
Everything posted by Scud
-
Welcome to the club of darkness - which is how another forum member greeted me, so I guess that's the "secret Scura handshake." You can update the Scura Register. My bike is still 11,000 miles behind yours - which coincidentally is about one round trip between our homes. Maybe some Scura owners tucked the bikes away for fear of the magic exploding flywheel - or they just became art - or maybe they were afraid of the dark. Low mileage, affordable, used bikes for us. You know you're going to sneak it out before spring. I am having a blast with mine (took a completely unnecessary 40-mile detour to work this morning). If you do nothing else, get the suspension dialed in correctly. You have direct access to the "suspension gods" on this site (baldini, camn, docc, guzzimoto, luhbo). Your prayers will be answered. Some of their collective wisdom is earlier in this topic.
-

Anyone know what kind of bike this is?
Scud replied to mznyc's topic in Special place for banter and conversation
It's a UM. I don't know the model/year, but here's a link to their website. http://www.umglobal.com/en/ -
The shop (North County Powder Coating in San Marcos, CA) took great care of me and included a little bag of bolts in another run of flat black. All back together now.
-
Thanks guys for the paint and metallurgy briefing. Looks like science trumps wishful thinking yet again. If Einstein really said "Imagination is more important than knowledge", he must not have had a Moto Guzzi. I ordered the other paint too. FAIL (and not just on the seal joke) -- The Seal All didn't hold, which stopped me from going for an evening ride. My "new glue" is Griplock - the stuff that sticks your grips to the bars so hard that you have to cut them off later. We'll see if that stuff holds. @Docc: I was kind of surprised that you asked about the adhesive for that. Is sidestand bumper separation a common problem?
-
Thanks. I am currently sitting in a county courthouse waiting room, hoping not to be selected for jury duty today. Idle hands being the devil's workshop... I just ordered a little bottle of that Gun Blue. I'll give it a try and maybe black out all the oil filler caps and final drive bolt heads (where I thought paint would not hold up). If, hypothetically, in the not too distant future, someone's paint bubbled off and they also needed to replace their flywheel, could Gun Blue be used to do the complete engine, transmission, and driveshaft output cases? I read that manufacturers use it to protect molds - so it seems pretty tough. How cool would a gun-metal-black lump of Guzzi motor look? Seems it would be easier maintenance than paint too - just rub some more on whenever it gets scratched or pitted. Have this been done before?
-
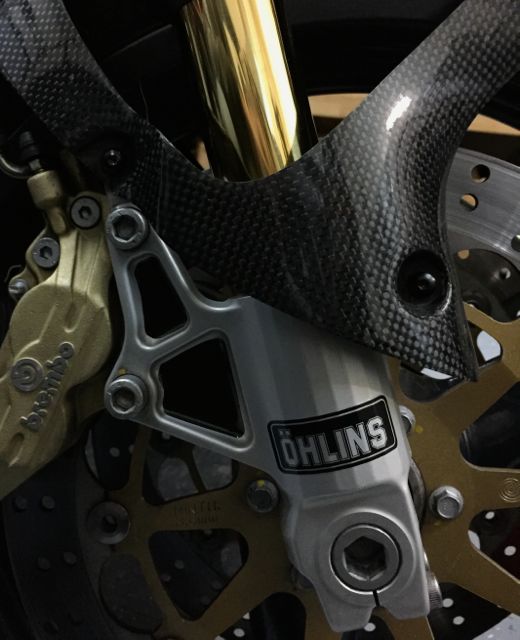
That's funny. They should have used the bubbling paint on the engine instead of the seat. That would have made it hilarious. I was playing with stickers (not markers) tonight. Since I couldn't powder coat the fork bottoms, I got some black Öhlins stickers from eBay and a roll of black reflector tape. I'm going to find a few more discreet locations for this reflector tape - invisibility by day, visibility and safety by night.

-
That is a cool bike - just read up on it here. (link shows picture of complete bike). 4 crankshafts... amazing.
-
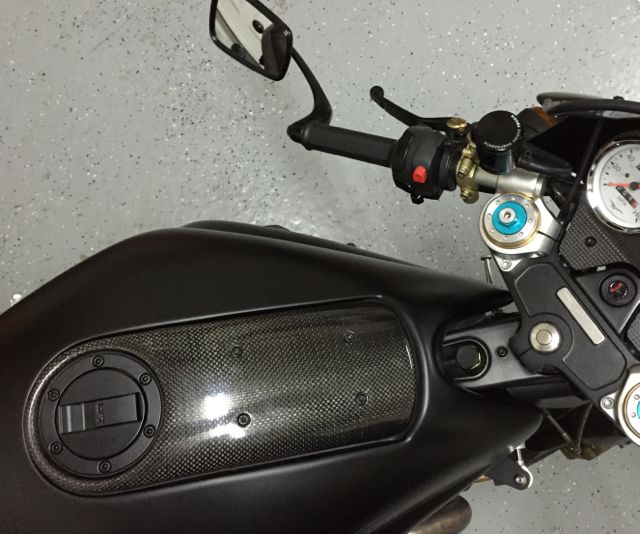
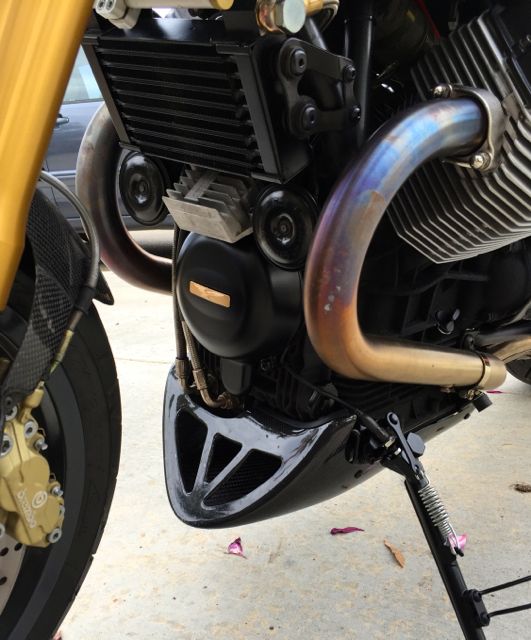
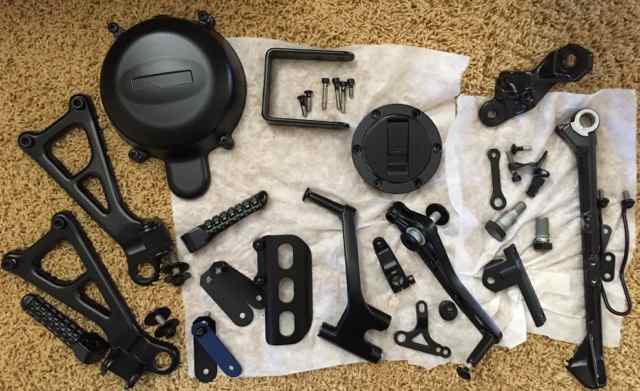
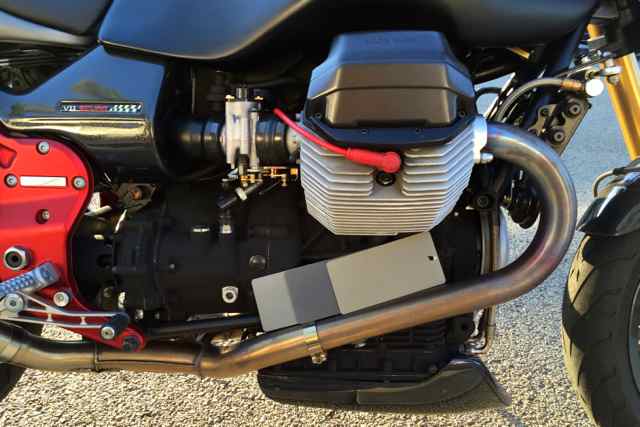
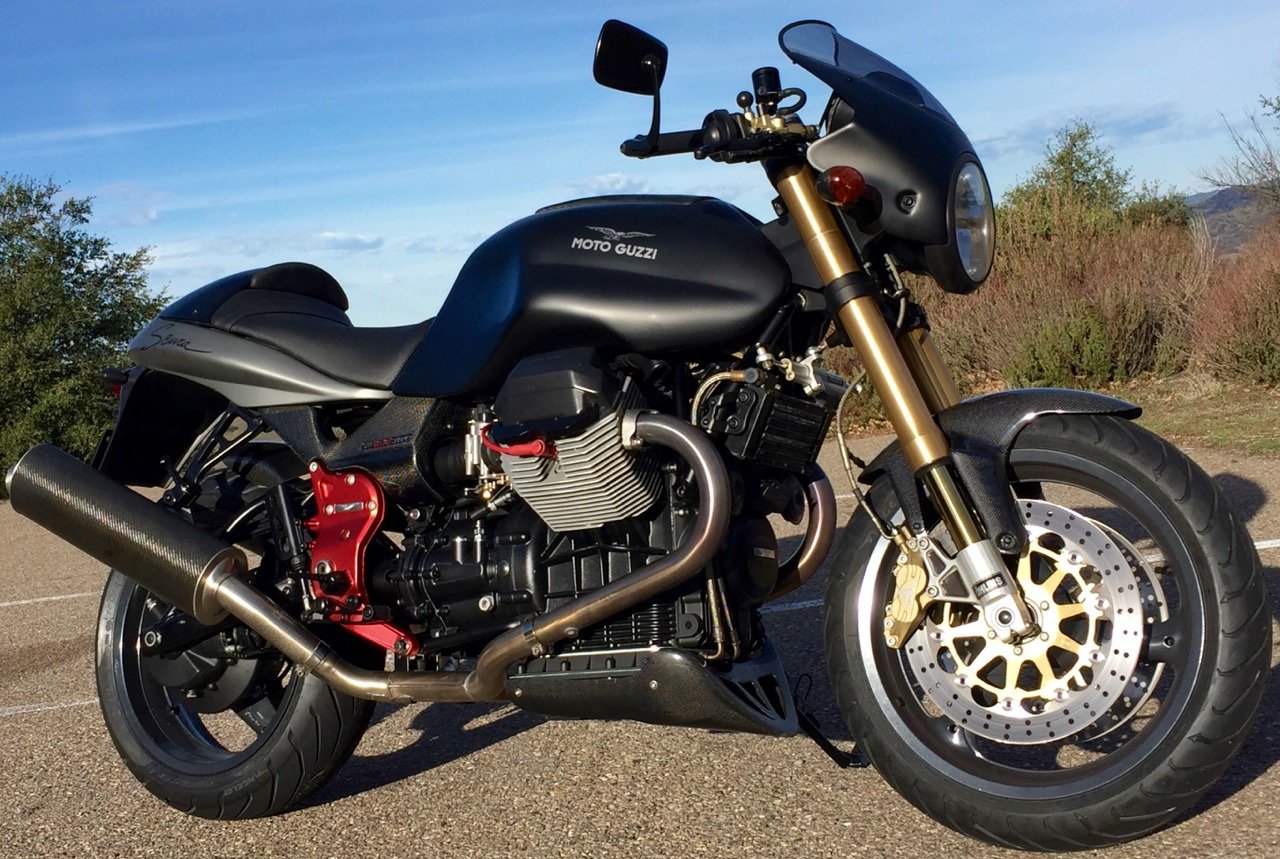
At first, I was not sure about the red pork chops. But I really like them now that some of the stuff around them is less noticeable. I've made a lot of parts and fasteners just disappear into the darkness. My family is pretending to be amused when I say "look what else you can't see." I was laughing about Chamberlin's earlier comment that the bike is becoming a black hole - because I actually had to use a flashlight in the middle of the day to see what I was doing when putting the horns and voltage regulator back on. In the "chest" picture, you can't see: horn rims, horn brackets, side-stand mounting brackets and bits, side-stand bumper bracket, and fasteners on: alternator cover, oil cooler, horn brackets, starter, valve cover, belly pan, and front fender. I'm super-pleased with the powder-coated alternator cover. It was far more affordable than a new carbon fiber part and it should be much more durable too.
-
I'm not trying to be a spoil-sport, and I apparently cannot refrain from looking. I click the thumbnail pictures to expand them and get a better view - can't help but notice the title of the image. Anyway - I am way over my head in this quiz, you guys are at whole 'nother level. Maybe you should call it the "dissertation" instead of the "quiz." Good fun!
-
Thanks Docc. Adhesives: Aguila=Eagle in Italian... had to look that up. I used 3M Permanent Mounting Tape, which is a double-sided adhesive foam. I cut a piece off the roll that's a bit smaller than the badge. BTW - I brush-painted the badge with Testors gold enamel (model paint). That way, when it gets FUBAR by tire spray, I can just retouch it with a brush. Side-stand bumper - I used Seal All, which is an oil-resistant contact cement. I also used that for the heat shield under the tank, which has held. The bumber has held for about 18 hours so far; let the long-term test begin. BTW - the bumper's retaining nut touches the pipe, which doesn't seem like a good idea. I didn't notice that before, but I'm going to take that off and elongate the hole in the bracket to lower the bumper. Grounding: Since I had the horn brackets off to the get powder coated (to get rid of that nasty, shiny, chrome...) I attached the ground wire to the upper horn bracket mount, which is the frame. I agree that the lower part (at the horn itself) would not be a good place for grounding. I'll look at that again, but I assumed that since the regulator is mounted to the frame that the least vibration would be another point on the frame. (I have not forgotten your advice re additional 30-amp fuse, just didn't get there yet.) Leak-Sleuthing: Thanks for the tip. Can I use baby powder for my baby? Scura-er vs. Scura-est: I'm not going for a total blackout. I think Tikkanen's is darker than I will go. He darkened big pieces - brake rotor hubs, porkchops, added LeMans-style fairing (which hides some of the forks and that "ugly" silver damper that you so graciously offered to trade with me). I really like his modified Scura/LeMans, but I took a different approach and have been darkening the little pieces - which, IMO, lets the larger parts show more boldly and highlights the original design.
-
Electrical update: Ran battery tender plug behind headlight so I can also use a USB adapter up there. Installed second ground wire (12 gauge) from voltage regulator LH mounting bolt to horn bracket. Installed all new Omron 5-pin relays, which are noticeably heavier than the stock (Tyco brand) 5-pin relay. I assume heavier (at least for relays) is evidence of better-built and more reliable. Also stashed some extras in case of emergency. Replaced battery bolts with longer screws: better grip that should not work itself loose, and I can never again accidentally arc a wrench to the ECU. I never want to see a spark there again. Now I will be forced to use a phillips screwdriver. 12-year old new-bike issues: It had developed a little hiccup, I put electrical tape over the small crack in the rubber fitting between throttle body and cylinder. It seems to run better - but I only rode it 5 miles since I put the tape on. It looks like I will be replacing those fittings sooner than anticipated. The factory paint is not very durable (this is probably a blinding flash of the obvious to you seasoned V11 veterans). I used blue painters tape (the stuff that's supposed to come off really easy) when I was measuring my suspension settings - it took a lot of paint off the lower triple clamp. I have a small amount of oil weeping from the RH side of what I think is the timing chain cover (in front of the piston). Not sure what, if anything, to do about that right now. Many of you warned regarding lack of grease. This is true and good advice. There was little or no grease on: side-stand pivot, brake pedal pivot, gear-shift bolt (the one that goes through the porkchop and is the pivot for the lever), passenger peg pivots, etc. Connections between hard rubber and metal fasteners didn't hold. I re-glued the side-stand bumper and got a new exhaust vibration damper, because the metal was spinning in the rubber. Darkening: I still have a few more little things planned, but here are a couple close-up shots with the powder-coated parts installed. Along with prior darkening, this one shows the alternator cover and all 288 parts of the side-stand. I decided not to paint the voltage regulator because: 1) the wires go into a huge ball of stuff that is all taped together, 2) I didn't want to do anything that might interfere with the function, since I learned how important it is for this part to be appropriately grounded, 3) I really just wanted to put it all back together so I could go riding. This one shows the shift lever and slave arm, passenger peg, and bracket with all fasteners.


-
I think if you click the "edit" button on the message you posted that you can delete the photo. Then just rename it on your desktop (or wherever you have it saved) and upload it again. I know what the bike is - but I'm not sayin'
-
@ velofish - maybe you can edit your post and change the filename of the image so it doesn't show up when you click it. I was all ready to play and then you gave me the answer. Cool bike too.
-
I can't advise you regarding the mechanics with the mechanics, but I do recall seeing some detailed topics about the engine swap, as Guzzirider mentioned. FWIW, I read this regarding the 1200 Sport when they changed from 2V to 4V engines: "Both engine and gearbox are very smooth, but it doesn’t have the grunt of the older 95bhp two-valve motor, which used to be in this bike. It does have more top-end power if you’re prepared to rev it, though. For a machine like this, which despite its ‘Sport’ tag prefers to cruise rather than scratch, we think Guzzi should have left the old engine in." Full review: http://www.motorcyclenews.com/bike-reviews/moto-guzzi/1200-sport/2008/ I don't know if the 1200 Sport has the same engine as the Daytona - so hopefully this is not off-topic for you. However, it has a 4V engine and a 6-speed, which sounds like what you are looking for.
-
I got all these parts done for $75, which is the shop's minimum charge.

-
The pipes were a cool gold when I got it and they have been developing a great blue-ish patina. I didn't think any of the color samples I got looked better than the metal - so I chose "none of the above" - at least for now. I got home from business travel today and got to open a box full of flat black powder coated parts and started putting some of them on. I should have had them mask a few more areas. I ended up filing or drilling out a few areas that should not have been coated. Passenger footpegs and brackets were my biggest miss; I didn't mask anywhere on those parts. The springs and balls wouldn't go back in, the pin didn't fit anymore, and the thickness of the powder coating made it impossible to get the spacers/ball-lock plates into the footpeg brackets. I got everything thing to fit correctly, but it took a while. I thought "I'll start with an easy part." Wrong. So if you're taking anything for powder coating, learn from my mistake and take some time to think through what needs to get masked or plugged - beyond the obvious threads, splines, machined surfaces, etc.

-
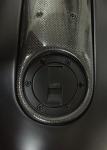
Here's the finished product. It's missing two bolts, which the powder-coater must have misplaced. I didn't know they could do the bolt heads and was planning to replace them anyway. The ones they lost are cosmetic, it's only held on with four bolts (one of which is inside) - so no big loss. At least they did not lose any important parts from the rest of my order. If I had it to over again I would have masked the bottom surfaces (I removed the coating to get a good fit) and the area that the lock cylinder goes through (it fit fine, but was a little snug). A billet one may still be in my future, but I do like the look of the flat black powder coat.
-
It looks like you're about to take us through a step-by-step restoration. I'll be watching this topic with great interest. How long did the whole project take?
-
Thanks. The Pirelli Angel GTs are holding up well. I got them because a lot of other people on this forum said they like them. Re pipes: I've got three color samples at home from Jet-Hot right now. I was going to send the pipes in for coating this week, but I wasn't thrilled with any of the colors I chose. I thought that black might be too dark, so I got samples in titanium, graphite, and champagne gold (in that order left to right in the picture). ...so maybe a black-bronze, or maybe satin black is the ticket, or maybe leave it alone for a while...

-
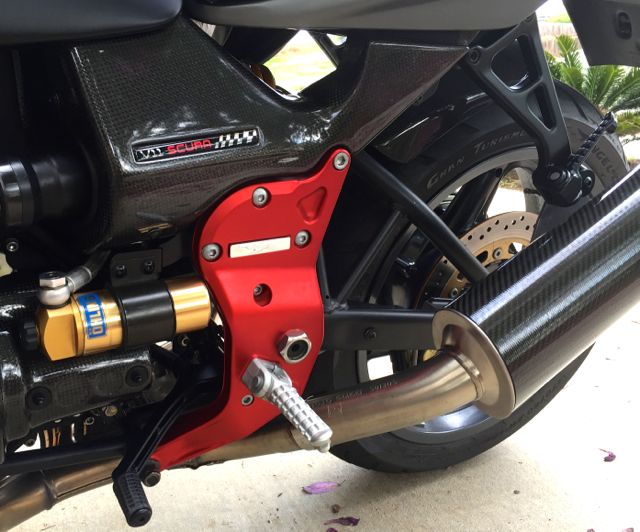
That looks great. What's better than a black and tan? (rhetorical question) That's dangerous thinking... pretty soon you'll notice all kind of other things that could be a bit darker... I like the red porkchops for contrast. I think they're distinctive. I'm eager to see how they look when I put my next batch of darker parts on.
-
Thanks. Good tip. I'll be watching the oil cooler to see if it's getting beat up. It looks like that guard uses the existing mounting screws. While I did replace a lot of bolts with black Zinc ones from my local hardware store, I painted the oil cooler bolts on my bike, because they're a specialty size and shape (and the black satin paint was a good match for the oil cooler bracket). You could just pop the four bolts in a piece of cardboard and spray the bolt heads with a can of rubber truck bed liner - or ask your Line-X shop to spray the bolt heads next time they do somebody else's truck. My wife picked up my parts from the powder-coater yesterday (I'm away on business). She sent me a text: "I love the red you chose." She's so funny...
-
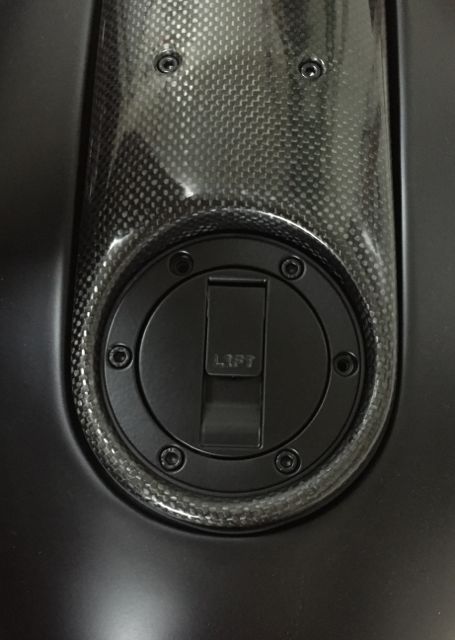
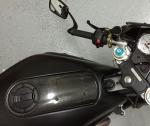
I was guessing at one of those too - or an MV. I got started on this recently by trying to get one by Driven Racing from this website: http://stores.sportbiketrackgear.com/Categories.bok But neither they, nor the manufacturer could say what was cross-compatible. The manufacturer did say that if I drove up there they'd be willing to take mine off and compare it to several likely candidates for compatibility. Driven's offices are a bit over 100 miles from me (in the Los Angeles area) - which I would gladly do, but scheduling is a bit tricky right now. My fuel door is currently at the powder-coater, so I'll take a bunch of pictures and measurements this weekend before I reinstall it. Maybe that's enough for them to find a compatible part. If we can figure out cross-compatibility, then we will have lots of options. FYI - the fuel door is not shown as a part in the part list nor the workshop manual that I have.
-
aww... spoiler alert. The answer was in the filename when I clicked the picture. EMW R35 - not much info on that and I had never heard of it before. So that's a Russian-produced, post WWII bike. Is this sort of like the Ural - in that the Russians took all the BMW tooling and technology back to Russia?
-
Black for Scura please. I assume that could be your preference on that lovely Nero Corsa as well. I don't know about everywhere else, but the gas (petrol) pumps here have huge vacuum venting hoses, which have to be pulled back to see the fuel level in the tank - all while making sure the fuel door doesn't flop closed. They work fine for cars, but they are not bike-friendly. A removable cap would be so convenient.
-
no,no Mr McQ on a CR250M... Really close. Husqvarna 400 Cross, Steve McQueen, on the beach at US Marine Base Camp Pendleton (in San Diego County, California). It's from the closing scene of On Any Sunday.