

Lucky Phil
-
Posts
4,632 -
Joined
-
Last visited
-
Days Won
240
Content Type
Profiles
Forums
Events
Gallery
Community Map
Posts posted by Lucky Phil
-
-
Phill,
Why do you think the petcock is stupid?
I have had 3, they always worked.
Granted they don't need to turn off
I have heard the wires snap off but that's easily avoidable with a ty-wrap
I guess I have no good reason for retaining the petcock but it's a nice bit of bling.
It's electric, I like all things electric LOL
Perhaps we can brainstorm up a good way to modify the plumbing, the RH side could act like a reserve
Only because Roy, its a little bulky and also just one more thing that can fail and if it does its a show stopper.
I spent quite a bit of time looking at the old style tank ( I have a couple of spares) and trying to dream up a solution to the hiding fuel in the r/h side but the tank fittings are so compact and the area around them so tight that I put it in the too hard basket. Maybe you could run a syphon hose over the tank hump internally but you would need to locate it and prime it initially and if you ever ran out of fuel.
I like the internal pump system because it keeps the external plumbing way tidier and neater.
Ciao
-
Whats the history of this engine? It looks like its run a big end at some point and been rebuilt with new shells and no work on the crank pin. I know the images alway look worse than real but the shells look semi ok, I mean I've seen far worse, down to the copper etc. ( I wouldnt re use them) but there is interesting marks on the pin which dont seem like normal wear. Is the pin round? any ovality?
The pump I'd say is toast, I just measured up my Daytona pump ( which I would be happy to reuse even though they have a bad rep) and it has a shaft to body clearance of 0.003" and a wobble at the end of about 0.004". Bearing in mind the V11 pump has a rolling element bearing it seems too much in your case.
New pumps aren't super expensive, better to be safe.
Ciao
-
External pump VIIs
I have often though it would be a good idea to somehow pipe the return line over to the left hand side, it's kind of silly to have a reserve of gas on the right and not be able to use it. You can stop and lean the bike over to transfer it to the left but the pump will immediately throw it back again at 26 gallons per hour.
Has anyone come up with a solution for this?
Perhaps swap the fuel return nozzle with the fuel level one.?
Return it to the pump suction?
Small pump tank with a gravity feed from the main tank?
BTW, I think the electric petcock is the greatest thing since sliced bread LOL
Yes thought of this a few years ago after running out of petrol a few times but its just to hard with the current plumbing set up and the external pump engines have far to much fuel plumbing externally as it is.
The electric petcock is a stupid idea and only there for US regulations that insist that the fuel system has an automatic shutoff of some sort in case the tank is torn off the bike in an accident you wont have fuel spilling everywhere.
I have fitted a manual petcock ( as many of you law breakers have) an it stays in the open position at all times, never touch it, why would you bother.
Ciao
-
Phil - if bearings are driven home in the housing by pressing on outer race only, then if spacer is too long, inner races would be misaligned, same as if spacer were too short?
True, and thats why I tap the last bearing in the last 1/2mm with a hammer and small drift carefully until the spacer clearance is nil. It doesnt matter if the bearing outer race is a few thou off the shoulder in the bore as there is very little actual pure side thrust on the bearings.
Ciao
Thanks for this, guys. It explains a problem I had recently on my BMW's front wheel. There must have been too much pressure on the inner races and the wheel wouldn't spin freely. I used a socket for that. Since then I bought some bearing drivers that apply pressure across the whole bearing - inner and outer races.
Or yes Scud, you could do it the easy way:) I was just saying to my wife yesterday that if there's 2 ways to do something I'll naturally opt for the harder way,sigh. My only defence is that most of the time it's also the better way.
The aim of course is to make sure the axial or thrust load between the inner and outer race is minimal and the amount of axial/thrust load you can generate with 60 or so foot/lbs of torque on an axle nut is considerable if the spacer is too short.
Ciao
-
Phil - if bearings are driven home in the housing by pressing on outer race only, then if spacer is too long, inner races would be misaligned, same as if spacer were too short?
True, and thats why I tap the last bearing in the last 1/2mm with a hammer and small drift carefully until the spacer clearance is nil. It doesnt matter if the bearing outer race is a few thou off the shoulder in the bore as there is very little actual pure side thrust on the bearings.
Ciao
-
Hey,
Thanks for responding! On the backlash/axial play in the camshaft: there seems to be a different opinion two pages back... Also, the manual states maximum backlash is 0,025÷0,066mm, which I'm over by about 1mm

The manual does not give any tolerances for rocker support (rockers are held in place by springs anyway) and rocker arm wear... So how do I know what's acceptable? I'll probably have to go and ask a specialist, won't I?
The bearings on the oil pump I'll have to replace (if you can?), that's clear. Radial play is somewhere between 0.5 and 1mm.
What do you mean with rod and main bearings? Big-end bearings? If so, no, not yet.
The axial play in the camshaft will be a worn bronze retainer plate. The axial play is controlled by the gap between the back of the drive gear face and the front face of the retainer plate. If the front face of the retainer plate has any sort of small edge to it its worn. Get the updated version with the oil slots.
Oil pump radial play? radial play as measured by moving the shaft radially while holding it perpendicular to the housing or radial play by moving the end of the shaft up/down side to side etc? I would call the latter shaft wobble and if measured at the end of the shaft will be many times greater than the actual radial play in the bearing. You can measure big end clearance by the wobble method and a formular as well.
Ciao
-
I flushed about 3 tanks of fresh fluid through the clutch. Went for a little ride - no difference. Next step, remove engine and pull the clutch plates out.
Bummer:(
Ciao
-
...and my Scura (with the RAM single-plate clutch) shifts flawlessly and is quite happy with clutchless upshifts.
My current problem is on the twin-plate LeMans.
Phil - does your bike still have the twin-plate? I think I recall that you were going to install a RAM.
Yes still a twin plater, I'm saving the RAM for the Daytona/V11 engine project.
Ciao
-
A few things Scud, thicker clutch plates will slightly increase the lever pull effort. The springs are now .6mm more compressed so the lever load will be a fraction higher. It shouldn't however effect the amount of lever travel required to get the plates to release once you have shimmed the pushrod as you have done. Some thoughts on that, Firstly if the clutch friction compound is a little more aggresive than the std type or if the new plates aren't nice and flat as they should be then you will need a little more lever travel to create more friction plate clearance than you're used to.
I know its obvious but is the clutch bled properly? If the new plates are as mentioned then there will be less tollerance for air in the system than the std plates and you may figure it was ok before so it should be now, understandably.
All this will effect neutral finding and general clutch take up from a standstill but it wont have any real effect on shifting. A little bit of clutch drag doesnt really effect shifting much as the gearbox likes to spin to change nicely, its about real load when it comes to clean shifting not full and total release.
I'm very used to clutchless upshifting on the track and so also use it a lot on the road even with the Guzzi. So unless I'm tootling around town or bumbling along in the country with my wife on the back i never use the clutch from second through to 5th gear. I'll use it into 6th only because by that time I've hit cruize mode and it's like relax time:) I've never, repeat never missed a clutchless upshift on the Guzzi, or my track bike so as I said full and complete release isnt that important for shifting as long as the load is reduced its fine.
I really don't know why these aftermarket companies dont take the extra effort to just make the plates to the std dimensions, I mean the difference in thickness between a new clutch plate and a worn out one isnt that much and .3mm doesnt sound like a lot but is quite significant in the scheme of things when you consider it has to be multiplied by a factor of 2 in the case of the Guzzi. That .6mm may be just whats needed to allow for less than perfectly flat friction and drive plates.
Ciao
-
From my Scura records..
For future reference on brake howl, rear brake side bearing problems, the rear spacer is 113.2mm. Some were short by 1mm.
Yes Chuck, my rear spacer was around 1/2 mm too short but I had a kind of off beat clattering feeling in the left footpeg on floating throttle.
Ciao
-
Not all berings are created equal. What brand / part #s are you getting ?
All major bearing brands no matter where they are made should be very very close dimensionally, within a couple of tenths of a thou. You wont find the kind of variation that will cause the spacer to be too short.
Ciao
-
After ordering my third set of bearings for my front wheel I'm thinking I've got a short spacer.
I've been looking for shims for the bearings, no luck...
Where does a guy get bearing shims? Particularly the 20/25mm I.d. Type
I agree with your feeling on the short spacer. I have a box of Ducati crank and gearbox shims and I used one of them so I cant tell you which one it was exactly. All you need to do is figure how much too short you are by measuring the distance between bottom faces of the the bearing cavities with a machining block or striaght edge and a 6'' caliper and add 0.005 to 0.010" depending on how confident you are on your measurement and you can make one out of sheet metal. It will probably be around 0.020" too short from my experience. A little bit longer is better than shorter hence the extra 0.005" to 0.010" . Make it out of steel not aluminium. Aluminium that thin will crush and deform. Loctite the shim to the spacer and Bobs you mothers brother.
Ciao
-
Excellent, lets all launch ourselves to the absolute worst case senario first and forget about that messy basic, simple, methodical, troubleshooting

Ciao
-
 1
1
-
-
Try the shift shaft seal
Ciao
-
I *think* it would be possible, but it's been years since I've been in one. You'd still have to get the bezel off to freshen up the needles, though.
Oh Ok, I thought that the whole internal mechanism would be attatched to the back of the instrument.
Ciao
-
Well done to those that have done the de/re crimp. I always thought it may be possible to machine up an aluminium end cap that sleeved into the body and was held in place by a couple of 4mm button head screws.Carefully cut the old one off and rob any necessary bits like bulb holders etc and use on the new end cap. Then you could access the instruments any time you needed to. From those that have had them apart would this be viable?
Ciao
-
No, sorry - my order hasn't arrived yet. And I'm going to be away early next week.
Thats cool, whenever you get a chance.
Ciao
Chance.
My Harpers order arrived today, so I tapped the seal in. It is the same as the one I removed.
Thanks man, I have a couple on order at $35 each...gulp. The std plain 42x56x7 are $5. Hopefully worth it:)
Ciao
-
I hate to be the bearer of bad tidings, but this looks to me like the transmission case is completely cracked through. In *my* opinion, the only way to fix this is to take a die grinder and rotary burr, grind most of the area out, and TIG weld it. The problem is this: The welder will more than likely want to put the case in an oven to preheat it. That, of course, means a complete tear down. The secondary problem is... warpage. Once repaired, will the bearing bores, etc. still be in alignment? That is a definite *maybe.. Maybe not.*
I think you are looking at a new case.
 Of course you should get a second opinion..
I agree with the chase out the crack and TIG it option and also the heat it up to reduce the distortion which I believe wont be a major issue ( the selector cover face may need some "fettling" with a flat file though). Dont even consider the epoxy/JB weld option. I would also fit the optional extra gearbox mount as mentioned here a few months ago just for insurance.
Ciao
-
So, Lucky Phil. 996 Corse eh? WSB? Are you like Troy Bayliss' mechanic? Had to ask. Feel free to ignore. Ha!
No, local wild card rider that year, Mal Campbell, ex Aussie Superbike champion, ex WSB rider and gentlman.
Ciao
-
1
-
-
Here's another basic one, I dont know how far you had this thing apart but you havent put a rag or something in the inlet whilst in bits?
Ciao
OMG, I once left paper towels in the intake manifold of an old Cadillac V-8. It started and died, started and died. Then it shot the whole wad out the tail pipe and ran perfectly.
Had a Ducati 996 Corse on the dyno after a rebuild for the upcoming Phillip Island round of WSB one year and it seemed to be running a little raggard on the first start then it shot something out the exhaust and cleared itself and was all good. Went looking and found a piece of chewed up smoldering rag outside. Like the one you use in the inlets to stop FOD with the airbox lid off.Oh dear.....
Ciao
-
Here's another basic one, I dont know how far you had this thing apart but you havent put a rag or something in the inlet whilst in bits?
Ciao
-
The chicken enjoying a little acrobatic flight..
 2017-02-16_11-53-37 by Charles Stottlemyer, on Flickr
I can tell you a little about tapered bearings. Aircraft use them, and at every annual inspection, one of the requirements is to remove, inspect, and repack the wheel bearings.
So. Wipe up what's left of Luigi's packing job, and give it a good cleaning in the solvent tank. Blow it off. Yes, you can make the bearing spin with air pressure. Avoid that temptation.
 I've been told that you can get it spinning fast enough for centrifugal force to blow it up in your hand. I don't know that, but I've never tempted fate.
 Now that is cleaned, you can inspect it with your 10x glass.
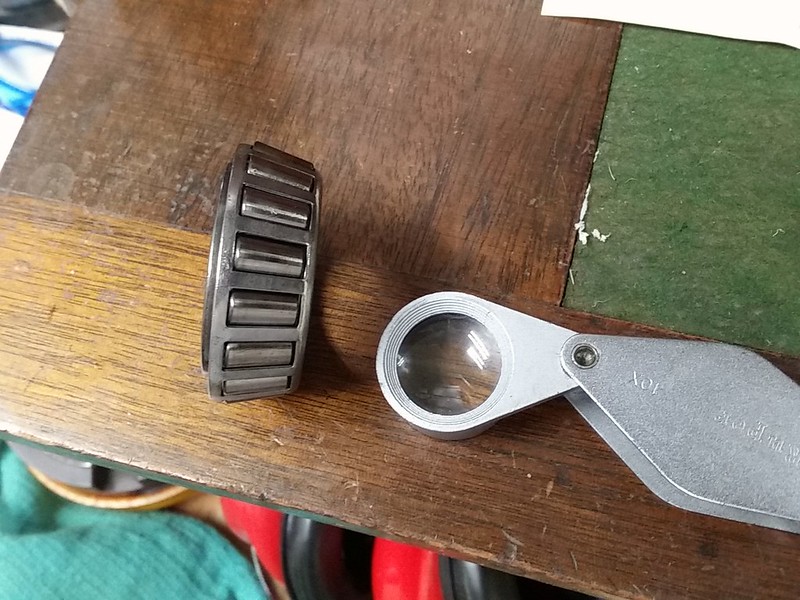 2017-02-16_11-52-16 by Charles Stottlemyer, on Flickr
What you are looking for are very small flats on the rollers called brinelling. See any? It's toast..
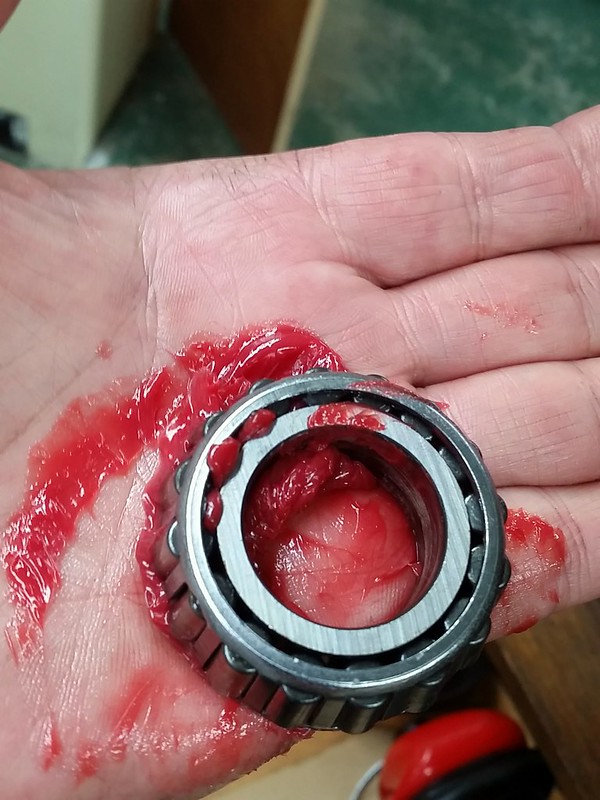
Ok, the bearing has been inspected.. no need for a new one. Time to pack it. Put a gob in your hand, take the bearing in your other, and repeatedly smack the bearing into the grease. It will take a *lot* more than you think.
 Some mechanics push and slide the bearing against their hand. Both methods work.
Just smearing grease on the outside is useless.
 2017-02-16_11-52-35 by Charles Stottlemyer, on Flickr
You'll see hydraulic pressure force the grease into the bearing, and it will come out the top. Continued whatever method you are doing, while rotating the bearing around until every time you smack it into your hand, grease will come out the top. Wipe off the excess, and you are done.
Yes, there are commercial bearing packers, but there is a certain satisfaction in doing it the old fashioned way.

For the bottom triple, just do the best you can. I put a bead of grease all around the bearing, and tappety tap/smear, trying to push grease through the bearing.
 2017-02-16_11-53-07 by Charles Stottlemyer, on Flickr
Patience is it's own reward, they tell me. At any rate, you'll eventually get it done.
Hmmm, I wonder if I could invent a Guzzi lower triple bearing packer? I think they all use the same bearing...
You took me back 40 years Chuck to my time as a second year apprentice doing my 3 month stint in "wheels and brakes" working in the bearing shop, washing, inspecting and relubing 747 mainwheel bearings. They were somewhat larger Timken tapered rollers though:)
Ciao
-
Are you aware that every time you cycle the ignition and the pump runs to prime the system it also squirts a shot of fuel down the inlets? If you're cycling the ignition to prime the system you will almost certainy flood it. If you have flooded it you may well have ruined the Platinum plugs if thats what you are using.
Ciao
-
Update.
I think I've found the cause, from where the noise comes. There is backlash between the gears of first gear. There is also a small backlash between the gears of the second gear. https://drive.google.com/open?id=0B1cTu58Dx28vTmFlY2lkVEl0aFE
This, I think, may be due to worn gear and/or worn needle bearings. There is no visible wear on the gears, but tolerance is perhaps small. I suppose it's difficult to measure the wear on the gears. I don't think the gears should be worn after just 34000 kilometers (21250 miles). The gearbox oil has been changed regularly every year. If I want to replace gears and needle bearings, it will be costly. Around 1200 euros. If I'm right, you can't buy gear for the first gear on the input shaft itself, so you have to buy a complete primary gear shaft assembly. This shaft will cost 680 euros. But I might take a chance on, only replace needle bearings.
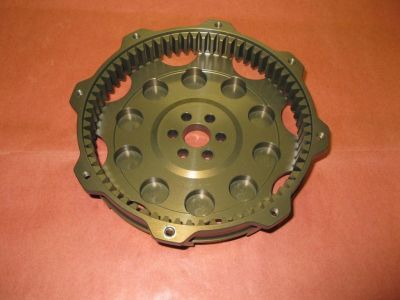
The flywheel, I will probably replace with a beautiful Ergal aluminum flywheel. Price about 500 euros.
Of course I will also replace the clutch gear, although it is not particularly worn.
I must admit that I'm little about to lose hope of this bike/make. Bad quality of parts and/or poor construction? Having to dismantle half the bike just to get access to the clutch or gear box is not fun... Don't try to come up with "there's no need to do that often."
 But yes, I also love the bike
  !!
!!Ciao
I just re listened to your video and your bike sounds just like mine, flick the clutch quickly and it stops clattering for a bit when the plates realign and then after you cycle the clutch it starts up again. Meh, mines been doing it since day 1. I'd forget the gearbox and go with the Aluminium flywheel. MartyNZ made some valid technical points about aluminium as a material but its mostly irrelevent in the grand scheme of things with regard to the flywheel. A bit like the argument about how bad telescopic front forks are, technically valid but more honoured in the breach than the observance, so to speak. Ducatis have used aluminium baskets as have Japanese bikes for many years and fatigue failure is not a realistic worry. Neither is wear really with the exception of the dry clutch Ducatis and even then they last for 30,000 or so Klms before replacement. The Guzzi however has far more toothed surface area so its life would be many times greater. Besides unless you spend all your time commuting or towing a sidecar around then the std flywheel assy is a massivly heavy joke and needs to be ditched for something lighter. Even the lightest V11 flywheel is in my opinion way too heavy.
Ciao


Fuel starvation at speed
in Technical Topics
Posted
It woudnt solve the issue Roy as when you filled the tank you would still have unuseable fel in the right side.
Ciao