

Lucky Phil
-
Posts
4,630 -
Joined
-
Last visited
-
Days Won
240
Content Type
Profiles
Forums
Events
Gallery
Community Map
Posts posted by Lucky Phil
-
-
Comes time to have a look at the rear brake, well known on the V11 to eat pads, stick pistons, and hydrate its own fluid.
Normally, I don't expect rear pads to last beyond 10,000 miles, and these EBC HH (left) are at 11,000.
While the pad material is not *gone* (let's realize these pads don't have much material to begin with), the surface looks to have turned to metal.
The cheap Chinese pad is pictured on the right with only 3,700 miles, but are actually fine (thickness and appearance).
I'd really like to go back to Brembo rear pads, but where to find them in the USA?
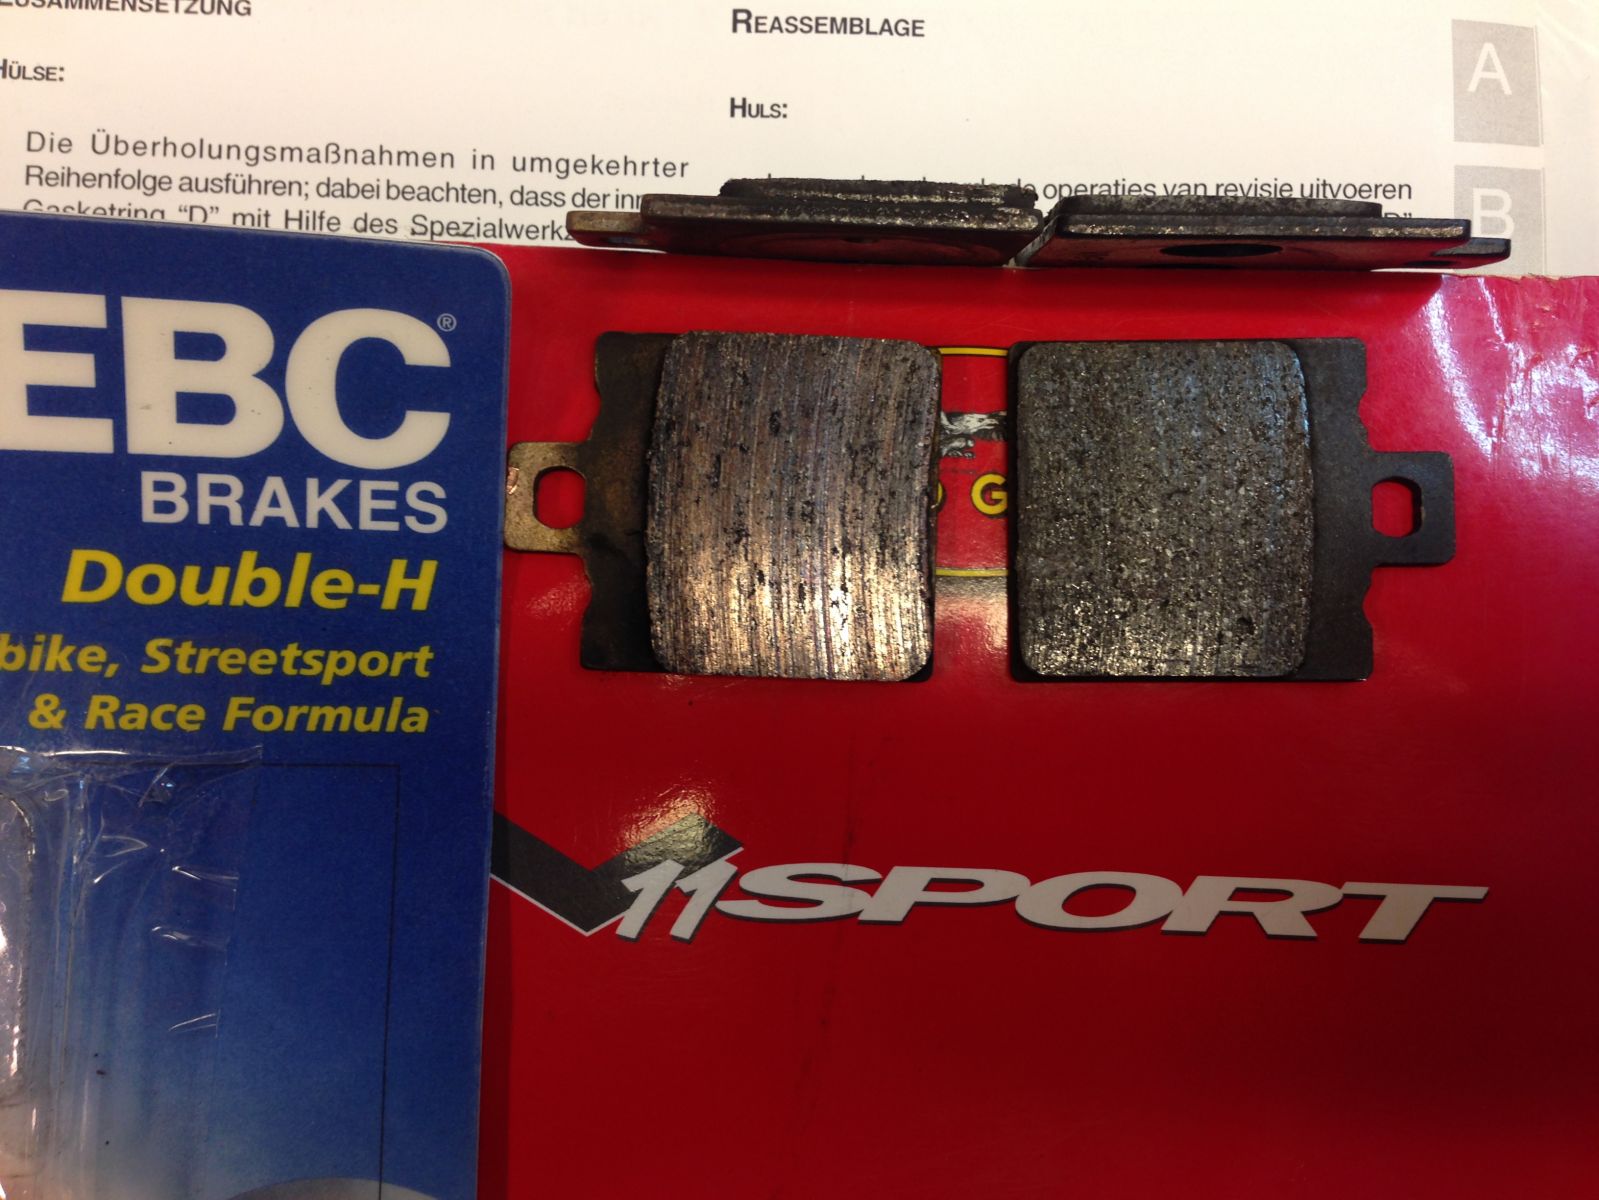
Docc the surface has turned to metal because they are sintered metal pads, thats how they look. Put them on a flat surface with some 180 wet and dry and give them a dry rub.
Although they do look like they need replacing.
Ciao
-
Chuck - as a pilot, perhaps you have heard of the chain of events, not the search for the single-cause, that are common in human-factor errors in flight safety. I think that's what we have here (and we've probably all done it at some level, I know I have).
Chain of events:
- Normal routine disrupted: hose clamp left off. And filter probably not on tight enough because hose clamp is normally relied on to provide security
- Hose clamp noticed after assembly - and decision not to re-install till next oil change
- Oil pressure light not working (the only mechanical, non-human, event in this chain)
- Failure to notice that oil pressure light did not illuminate with key-on
- Enough riding/vibration to loosen oil filter
- Result: engine damage
It took all 5 events to get to number 6 - and therefore the end result could have been prevented if any of those 5 events did not occur. For others, a bad O-ring (or two O-rings where there should be one) becomes a significant event in the chain (but not this time).
@Craig - I'm not trying to criticize you. I appreciate your honesty about the situation (and I am 100% sympathetic). I hope we all (self-included) learn something from it. I often get interrupted (dinner, kids, phone calls, etc.) during my projects. That's when I am most likely to make a mistake - I forget where I was in the process when I restart.
What you are refering to is the "Swiss Cheese" model of accident causation, well known in the aviation industry. For those interested in such things check the link
(https://en.wikipedia.org/wiki/Swiss_cheese_model)
I've seen many filter related issues over the years and generally over torquing can be as bad as under torquing filters.Under torquing them sees too little compression of the seal and they will come loose, over torquing them sees seal distortion and the seal can leak or under some conditions be displaced and leak catastrophically (cold oil and high pressure)
I've seen them come loose and throw the rider off in an Australian Superbike round, I've had them pop the filter seal off on a cold morning in the pits warming up the engine before practice (refit the seal and re-torque the filter and its all good??) etc, etc.
I also had an MV 750 for a while there ( modern one) and one model came out with incorrectly machined oil filter mount fitting threads and the filter would come loose after a while. A friend of mine experienced this at Easter Creek on the front straight at a track day. People wildly waving their arms at him as he was tucked in down the chute heading for turn 1 at 250KPH with the bike smoking madly. Didn't see them of course and tipped in with oil all over the rear tire. It didn't end well.
For what its worth I just torque it to the manufacturers specs use no hose clamp and check the oil pressure light is on before start up.
A filter fitted right shouldn't come loose, it doesn't on any other engine (apart from a specific technical issue as with the MV) and a Guzzi twin is nothing special in that regard. I think the main issue is that the old Guzzi is probably worked on by more backyard mechanics than most and not enough regard is given to proper fitment.
Ciao
-
 2
2
-
True concerns about the UFI filters, and any filter with round section gasket (rather than flat).
Craig, what kind of filter fell off?
It was a Wix 51215 with a square rubber O-ring.
I have a new pump waiting to go in. The old one was scored up a bit. There are 2-3 tiny (~0.5mm) pits on the crankcase surface of the pump as well. I don't think they will hurt.
I am completely tearing down the engine. At this point the only thing left together is the oil regulator and I have yet to get the studs out of the crank case.
Why do you need to remove the crankcase studs?
Ciao
-
I ''think" only stock size bearings are available from the factory. Anyone want to chime in ?
You can use the undersize bearings from the earlier models I here, like the old Ambassadors etc
Was you oil pressure warning light working in the end?
Ciao
-
If I could buy a grp 4 or 5, -10W/40 then I would.
Ciao
-
Hi Phil, I agree that Mobil 1 is good oil, but is it a "group 4" these days?I run mine ... on Mobil1 0W-40 full group 4 synthetic
I see ExxonMobil make this claim on their website about Mobil 1: "A synthetic lubricant contains more highly refined base oils than conventional mineral oils". This is very different to their claims years ago, when they were very specific about their chemistry being man made, not made from crude oil.
When Castrol reformulated (downgraded/cheapened) their group 4 Syntec to group 3 mineral oil in the mid 90s, and still called it synthetic, Mobil sued Castrol over misuse of the word synthetic, but lost. Now everyone sells synthetic oil which is actually Group 3 mineral oil, rather than Group 4 synthesised oil. The word synthetic now just means "premium" for lubricating oil.
I'd be really interested to know what Mobil states on your drum of Mobil 1. Does it say Group 4?
The only group 4 oil I can find in NZ is Penrite 10Tenths, a good Aussie product, which specifically says is made of 100% PAO (polyalphaolefin) & Ester chemicals. My next oil change for the upcoming summer here will be to Penrite, now that I know the temp of my oil, thanks to a dipstick thermometer Scud sent to me.
Well it depends on who you talk to and many believe its irrelevant anyway. I'm aware of the 90's Mobil/Castrol legal squabble and the outcome decided by a Judge (oil expert apparently)
I suggest you consult the excellent "bobistheoilguy" site and while away the hours reading all the points and counterpoints on this. Its a great site.
My 20l drum is hemmed in by the lathe and parts washer so I cant see whats written on it but I doubt it will have that info anyway.
I've never seen an oil container with any genuinely detailed info on it.
Ciao
-
This morning, I took the front nut off, loosened the rear nut but didn't let it come off, took some big hunker channel locks and moved that sucker that 1/8". Now, I have about a quarter inch clearance between the balance knob and the power lead to the starter. Perfect.
 Luigi still sucks, though..
It's been raining off and on today..still.. but I just had to try it out. I'm fully aware that the natural tendency when you've done some wrenching or spent some money is to say it's better.
It is.

I'm *really* familiar with how this bike shifts. After all, I've ridden it 14000 miles, mostly in the California canyons, shifting pretty constantly. It has never been this good. Period. Props to Lucky Phil.
I set my riding gear out to dry and called it done.
Excellent work Chuck. Try the shift lever arm extension mod ( I mean its an hours work to a bloke with your skills and equipment) and it will be another giant leap in performance.
Ciao
Thanks Phil, maybe this Winter. I'm perfectly happy with the way it shifts now.
I've been thinking about this. My CNC mill is tied up for the foreseeable future with a production job, but if there's enough interest, I could knock some out.
 We could call it the "Lucky Phil Extension mod.."
 Great Chuck, my future fame is in your hands
-
Oh good an oil thread. I run mine and just about every vehicle I own on Mobil1 0W-40 full group 4 synthetic (ZDDP levels are adequate for a flat tappet engine with this oil) Although admittedly the old runaround car that leaks like the Exon Valdese gets the drainage from the others. The guzzi seems to like it with no usage or oil into the airbox at all.
Buy in bulk like i do and its cheaper.
Ciao
-
-
That looks very nicely made. Is it steel of aluminum?
They are aluminum, and *are* nicely made.

Yes they are Chuck, and hard to get these days. I was lucky enough to get a great second hand one a few years back
Ciao
-
This morning, I took the front nut off, loosened the rear nut but didn't let it come off, took some big hunker channel locks and moved that sucker that 1/8". Now, I have about a quarter inch clearance between the balance knob and the power lead to the starter. Perfect.
Luigi still sucks, though..It's been raining off and on today..still.. but I just had to try it out. I'm fully aware that the natural tendency when you've done some wrenching or spent some money is to say it's better.
It is.
I'm *really* familiar with how this bike shifts. After all, I've ridden it 14000 miles, mostly in the California canyons, shifting pretty constantly. It has never been this good. Period. Props to Lucky Phil.
I set my riding gear out to dry and called it done.
Excellent work Chuck. Try the shift lever arm extension mod ( I mean its an hours work to a bloke with your skills and equipment) and it will be another giant leap in performance.
Ciao
-
Was it the plastic bearing cage?
Sent from my shoe phone!
The photo shows the destroyed bearing with a metal cage.
Ciao
-
There are angles I look at this Marabese designed V11 tank and find it so stunning and compelling. It is certainly like no other, totally unique.

Other times, it looks bulbous and odd and oversized.

I've often found myself thinking the very same thing docc. couldn't describe it better. I'm thinking that the hangy down bits at the rear that resembles two, too big ear lobes, is the culprit. I wouldn't give up the extra fuel residing there for looks though. I've wondered, does the 1100 Spoti tank fit? Is it nylon too?
PreV11 Sports have metal tanks.
I can see that the "skirts" or "panniers" of the tank shape contribute to its visual mass. Taking the V11 as a whole, especially with monochromatic body parts, I think the design looks like a giant, molten flame being blown by an intense wind from the front. Makes me wanna wrap myself around it and feed it high octane fuel!

There are angles I look at this Marabese designed V11 tank and find it so stunning and compelling. It is certainly like no other, totally unique.
Other times, it looks bulbous and odd and oversized.
Yet, we are probably entering an era of "preservation" as well as sourcing handcrafted replacements.
There are two distinct V11 fuel / gas tanks and they are not simply interchangeable even while they have the same shape/appearance.
Why aren't the 2 tank types interchangeable docc? I have 2 of the new type ( 1 second hand and 1 brand new) and a brand new version of the old type, plus the original on my V11 greenie. The new version will fit very easily requiring a small modification to the sub frame mount. I've tried both my new versions on my bike and will use one of these when I fit the Daytona motor. Although I like the old one the new version has much superior and simplified injector plumbing.
Speaking of the Daytona engine project, just got my Carrillo rods back from Carrillo after a factory referb, new little end bushes, closed and honed big ends, checked for twist, bend and crack tested for $240us. Good deal for anyone considering.
Ciao
My over-simplification.
 They are, indeed, interchangeable, but will require adapting the fuel pump, fuel filter, regulator, and plumbing between the two versions (internal and external pump/etc). What had to be modified on the rear subframe mount to fit the later (internal) tank to the earlier frame?
Oh OK, yes can't wait to junk all that external stuff and neaten up the area around the engine. The subframe mount needs to be slotted ( fwd from memory) a little as the tank isn't exactly the same length due to a slight variation in the later frames being longer. No biggie though.
Ciao
-
1
-
-
Guzzi sell a mod kit for the earlier bikes.Hi, Phil.. do you have a part number for the kit?
Yes Chuck, p/n 01 20 16 41. About $120US from memory around 18 month ago
Ciao
Harpers wants a mere $344.37 Gulp. I'll make do with what I have.
Chuck I bought pretty much all my stuff from Pro Italia ( now re-branded AMS Ducati ) and some from MG cycles.
Yes at $344 its not worth the expense.Having said that I think Guzzi in the US have had a rethink of their parts pricing for older bikes. Around 18months ago I was buying stuff so cheap out of the states it was awesome. Awesome like 1/4 of the price for the same stuff from Europe. Seems its stopped now.
Ciao
-
Hi, I will adjust like you said, but I think 0.030" (inch?) is too little... It's 0,7 mm... Is correct?
Best regards,
Nicolas.-
Move the shift mechanism through its travel and adjust to the gap at its closest point. I rechecked my notes and I adjusted mine to 0.035" or 0.9mm its not too critical unless its too tight which will be obvious when you run it through the positions on the bench. 1mm or 0.040" would be acceptable I should think.
Ciao
Ciao
I wish I understood better where this gap is set?
If you look at the photos docc and see the small adjustable eccentric pin that the later versions have ( as opposed to the earlier fixed roll pin) you adjust the eccentric so that at any point during the entire shift movement between gear selections the gap is 0.035-0.040. To do this you have the mechanism on the bench and operate the shift lever shaft to select a gear position while providing some resistance to the shift wheels so that it moves slowly and doesn't snap into the next gear position and also observe the selector fork as it moves back to the return position after the mechanism movement. Find its closest point in that process and adjust the eccentric to give clearance at that point.
On the earlier selectors you dont have the facility to adjust as its a fixed roll pin.
Ciao
-
There are angles I look at this Marabese designed V11 tank and find it so stunning and compelling. It is certainly like no other, totally unique.
Other times, it looks bulbous and odd and oversized.
Yet, we are probably entering an era of "preservation" as well as sourcing handcrafted replacements.
There are two distinct V11 fuel / gas tanks and they are not simply interchangeable even while they have the same shape/appearance.
Why aren't the 2 tank types interchangeable docc? I have 2 of the new type ( 1 second hand and 1 brand new) and a brand new version of the old type, plus the original on my V11 greenie. The new version will fit very easily requiring a small modification to the sub frame mount. I've tried both my new versions on my bike and will use one of these when I fit the Daytona motor. Although I like the old one the new version has much superior and simplified injector plumbing.
Speaking of the Daytona engine project, just got my Carrillo rods back from Carrillo after a factory referb, new little end bushes, closed and honed big ends, checked for twist, bend and crack tested for $240us. Good deal for anyone considering.
Ciao
-
The jury is in. I dropped the sump this morning and the oil filter was sitting free in the sump. Last time I changed the oil I didn't put the hose clamp on the filter. Pure laziness on my part. The are plenty of metal flakes in the bottom of the sump to tell me the several bearings are toast. I will need to completely tear it down to see how bad it is. If my luck changes none of the journals will be damaged.
Condolences on the engine damage, but lets turn to the lessons learned particularly with regard to oil pressure gauges. With the oil filter lying free in the sump you have been riding around with no oil pressure for quite some time. The filter doesn't' unscrew and drop off in the 30 seconds you rode since you filled up. So either you missed the oil pressure warning light that was on for some time or it wasn't working. I think you mentioned when you tried to restart the LOP light wasn't on when you turned on the ignition'? ( bulb out?)
If your going to miss an LOP light then you'll probably miss the gauge that's reading zero as well. As for the information a gauge gives you well I think there's more people worrying about oil pressure readings than anything else on the board. The truth is if the LOP light comes on you will have just as much time to react as a gauge reading zero all of a sudden as would have been the case here. It wouldn't have shown LOP for a while and given you any warning and even if it did for 20 or 30 seconds you probably wouldn't have seen it anyway while concentrating on the road.
There's a reason NO mass produced motorcycles are fitted with LOP gauges and thats because they are basically a waste of time and create more concerns than they are worth.
Despite what people think an engine wont immediately run it its bearings when the LOP light comes on, it has a lot to do with how the engines is operating at the time, but lets be honest, how much time do you spend or want to spend looking at a gauge or light.
Check before every start that the LOP light is on, put a hose clamp on your filter and make sure there isn't 2 gaskets fitted, keep the LOP wiring connectors in good condition, replace the LOP switch when it shows signs of leaking and all will be fine without silly gauges.
Ciao
-
1
-
-
Hi, I will adjust like you said, but I think 0.030" (inch?) is too little... It's 0,7 mm... Is correct?
Best regards,
Nicolas.-
Move the shift mechanism through its travel and adjust to the gap at its closest point. I rechecked my notes and I adjusted mine to 0.035" or 0.9mm its not too critical unless its too tight which will be obvious when you run it through the positions on the bench. 1mm or 0.040" would be acceptable I should think.
Ciao
Ciao
-
1
-
-
Is the 2000 V11 sport susceptible to the shift spring problems?
As far as I know, all V11S are susceptible..
True that, although the 2002 seem over-represented.
Maybe we need a poll?
Remember around that time there was an issue with pawl arm bosses being incorrectly machined over size and causing the spring to bind.
Earlier and later didnt suffer from memory, just a batch. They got around it by making the spring ID larger or you could remove .5mm off the boss.
Ciao
-
1
-
-
Hi to all! I have the kit with the update gearbox cover. Shifting is ok, but normally I have a neutral between 3 and 4 gear.... Before I install the kit I didn't have that problem... Anyone have an idea how to solve it? Thx!
Fettling and adjustment as per my post. Pull the cover off and make sure the large and small eccentrics are adjusted correctly, esp the large, its quite sensitive to adjustment.
Ciao
-
1
-
-
Guzzi sell a mod kit for the earlier bikes.Hi, Phil.. do you have a part number for the kit?
Yes Chuck, p/n 01 20 16 41. About $120US from memory around 18 month ago
Ciao
-
Nice work Chuck. When you reassemble adjust on the bench the eccentric stop. You will probably find that the trans will under shift in one direction and over shift slightly in the other. Use your hand to keep some load on the selector gears to as you shift and you'll feel it. I adjusted the eccentric until It was a good as it could be and then added a spot of weld to the stop faces and dressed back until there was little or no over shift. I tiny bit of over shift wont hurt but if the adjuster is a long way off in one direction you will get a fair amount of over and under. You'll see it. I still think the stop lever return/centering spring could be a little stiffer and I was contemplating a 1mm wall thickness sleeve locktited over the stop pin to give it a bit more preload.
Ciao
-
On the subject of the original question....
I am probably the wrong guy to listen to, but I would put a Centaro motor in it.
That would be fun.
The new CARC motors, both 2 valve and 8 valve, don't fit as easy.
Or I would build up a Big Bore motor.
As to the actual issue, take your time and tear it down. Don't jump to conclusions.
If you have ever had a Centauro/Daytona motor apart you wouldn't.
Ciao
-
The bike has 32K miles. Should I put a new pawl spring in it while it's apart, or go with what's been working?
Yes Chuck, replace both springs. The detent arm spring doesn't usually give much trouble but while you're in there and ordering stuff.
Glad it was something so simple. You have the earlier shift plate assy so check the dia of the boss on the shift pawl arm and compare to the ID of the pawl spring and make sure there wont be any binding.
I suspect it would have broken by now if its the too big 16mm dia boss, so it should be fine.
Ciao
PS make sure you get the centering/return spring installed the right way up Chuck, if you dont one of the arms rubs on that crescent shaped land just behind the stop pin in the photo.
Thanks, Phil. I have a spare pawl spring in my tool kit, so I'll just install it and keep the other for a spare. Maybe I should paint it red?

A tasteful red Chuck
Ciao

Lucky Phil extender mod
in Technical Topics
Posted
You're the man Chuck
I'll take one for the cause. I looked at making a complete one as well but I'd have to do it by hand which I would have if it was a flat piece, so I just went the weld on option. I did do a validation trial with a bolted on piece just to test though.
I'll have a "Gator red" one Chuck
Ciao