Scud
-
Posts
4,123 -
Joined
-
Last visited
-
Days Won
253
Content Type
Profiles
Forums
Events
Gallery
Community Map
Everything posted by Scud
-
yeah a bloody Harley, you yanks should know that, rebadged Aermacchi I've seen several of those little Harleys, but I didn't know that Harley didn't manufacture them. Those filthy re-badgers. Obama to Harley: "You didn't build that." So it's a METRIC Harley? That's funny. Any more guesses on the beach scene?
-
Thanks - I ordered 7 Omrons. 5 as replacements and 2 spares. I'll keep the current 5-pin relay as a 3rd under-seat backup, and ditch the quad-pins. It's not the small expense (heck, I spent more than that changing silver bolts to black ones on my bike for no functional reason whatsoever) - just really trying to understand anything that I change. I like the simplicity of all five relays being the same part number. Knowing that two of these are likely to fail - and now having a plan to have extras on the bike puts me in a better position to "fix it on the road." What was that saying I saw somewhere? "Moto Guzzi - making motorcyclists into electricians for over 50 years."- or something like that. I guess it's better than "Lucas Electric, the prince of darkness." It would be cool to "spine-raid" with you all - but that's a long way from here... We need a "surf'n spine raid."
-
Hint - it's from a movie.
-
Iconic image, three part question: What's the bike? Who's riding? Where was photo taken?

-
That's cool. A BMW Military R4.
-
The little red one is a HARLEY DAVIDSON, which is just shocking to a lot of people, like - "Hey, why did you put a Harley logo on that toy-bike, what is it really?" So sad that they gave up on the entry level bikes. But there's hope, they did just introduce some pretty cool little 500 and 750 cc commuter-twins. The V7 "won" a comparison against the Harley 750 that also includes a couple Hondas. Also Interesting that the comparison was conducted by motorcycle.com - the company that has made an inquiry to Jaap for this site.
-
Oh - I want a 1936 BMW Schneekrad. FYI - the title was revealed when I opened the thumbnail. However, the engine and frame are clearly BMW, so I did at least figure that out before seeing the caption. That is just soooo cool.
-
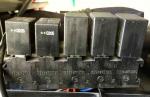
OK Docc - I am going to see if I "know my relays" please correct or complete my understanding. Loving them seems a bit premature; we just got introduced a few hours ago... I see five sockets that appear to be the same. They all have the same part number 3334458045, but each one has another number at the bottom - from left to right (which is back to front on the bike), they are: 4, 4, 2, 6, 7. The two left-hand, smaller relays are the same and their sockets both have 4s, so they are interchangeable for sure. The next two are the same (but different than the first two). The fifth one is unique - the little wiring diagram on it shows 5 connections, so this must be a 5-pin. You are saying that: One type of 5-pin connector can be used in all 5 sockets: the Omron part #G8HN-1C2T-R DC12 that comes up when I follow your link. Do not replace the sockets (the jigsaw-blocks that the relays plug into). This is Zooter's question. Replace all my stock relays with the Omron units or voracious vultures will circle ominously overhead while I ride through the desert. Carry a full set of 5 more. (Are they so prone to failure that I need to have so many on hand?) I should find some more V11 owners to go riding with. BTW - I disconnected the battery before pulling them out to get a closer look (and then plugging them all the way in - they were pretty loose as shown in the pic). Is it safe to swap them with the ignition off and the battery still connected? Your picture in post 22 of this thread does appear to have all 5 relays the same. They are labeled S, I, N, ECU, and FI. Can we cheat off your homework or do we have to do our own? I think I can guess what what 3, (maybe 4) of the labels mean, but do you mind explaining all 5 just for certainty? Can we assume ours are in the same order? Dang, that's a lot of questions...
-
My Husqvarna is a wiring nightmare, trying to learn from my mistakes. While I was in there, I also put in longer battery terminal screws. The stockers were probably only grabbing a couple threads as-is. BTW - if you prop the battery up at an angle you will have a direct line for your screw or nut-driver. Easy-peasy. On the relays, brand probably doesn't matter, IDK. I just copied everything printed on them. They are literally and figuratively "black boxes" to me. I figure an extra one of each type under the seat is cheap insurance. Tyco could be the same company. Ker-plunk is just like wiring. It's very hard to see how everything is connected... and if you pull the wrong one you lose.
-
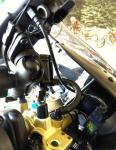
That was well-timed advice for me. I was just about to wire in a Battery Tender connector and a specialty Garmin wire for my GPS (which also has a USB port). Then I liked your USB idea and... we have a wiring challenge... (at least for me). The good gnus: I rigged one wire that does it all. I got the standard Battery Tender quick-connect for the battery, then I cut then the plug off, connected it to a Battery Tender extension cable that had a plug and cap on the other end and ran it up the spine to behind the headlight. Battery Tender makes a USB adapter that plugs in where you'd otherwise plug the charger - I can remove it when not in use or use it on other bikes. So maybe it's a little thing - but I am stoked (especially that I now have USB port to use on all three bikes if I want it - without any extra wiring on the other two bikes). With the RAM mount on the handle bar, I can have power to my GPS (or my phone with a different RAM cradle). Perhaps a bit off-topic, but a GPS is a good "make-it-home" device for me. It's almost essential on the dirt bike (which is where I learned to appreciate it). On the street, if gives me the freedom to explore new roads (and leave a trail of electronic "bread crumbs" so I can backtrack if needed) - and a way to find out where the closest gas station is (and get directions), even without phone service. Given that my bike was in a "time-capsule" for 12 years, I thought I'd share a list of fuses and relays used on mine (2002). Fuses: 5A - three 10A - one 15A - three 30A - one Of the five relays, it looks like there are three different types: Two of these: Tyco, V23073-B1005-A302, 12V Two of these: 161, 12V, Siemens A-1001-A402 One of these: ++01722A, 12V, Tyco, A1001-A403
-
Is it Kermit the Frog?
-
Great - so that might be the Oberon part number. I'll take a look at those and maybe give Driven another try to see what fits Aprilia and Triumph. Once we know what's cross-compatible, there should be a lot of options.
-
Touring Europe by V11 sounds great. Will you work in a few laps of the Nurburgring? I've got the spring, fuses, light-sticks, and a few other goodies from this thread on the way, will get a taillight bulb too (safety first) - and some more stuff to figure out (like relays). I like Docc's idea of labeling the relays - so if something is not working, you could easily check and/or replace the related bits. Of course, a well maintained bike is the first line of defense, but a few common failures - and related roadside remedies - might make a nice new topic, or an extension of this one. Now that we know what to bring, do we know when and how to use it? Like the punch-line in the old mechanics joke - he doesn't get paid to turn the screw, he gets paid to know which screw to turn.
-
I did a quick search and didn't see anything about Moto Guzzi. I'd appreciate a part number too - maybe even a pic on the bike... Perhaps you could add it to a different thread I started about replacing the fuel door. For now, the powder-coating is basically free, because I took in a bunch of small parts that, together, still only reach the minimum charge for the shop.
-
Update - Driven racing could not tell me what would fit the V11.
-
Valve stems on Amazon.com for US$25: Here's the item description: 83deg Aluminum 8.3mm Racing Angled Valve Stem - Black - 2 Pack. I hope you can get them in NZ. I put some on recently and am pleased with the function and the look. There's a picture in post #35 of the thread Brand New Scura.
-
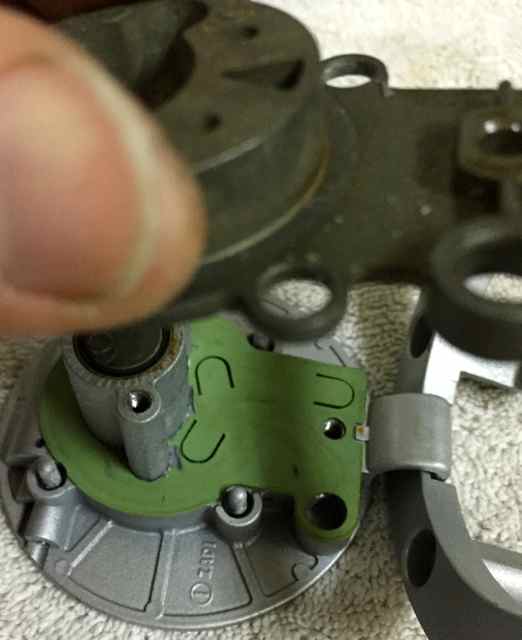
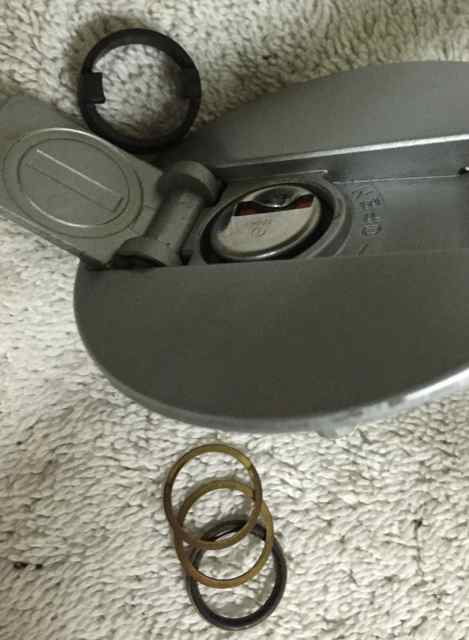
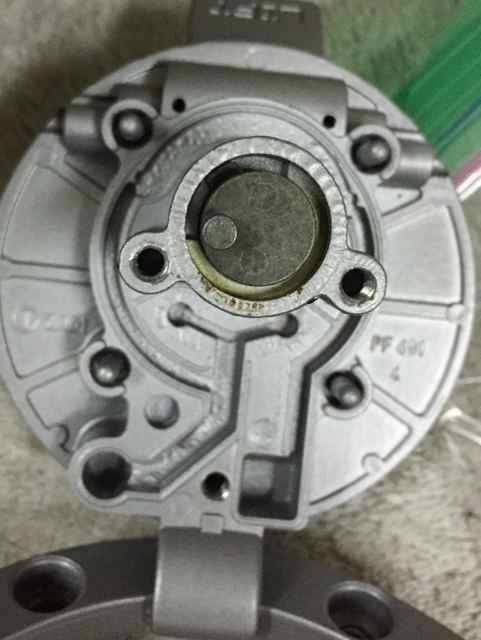
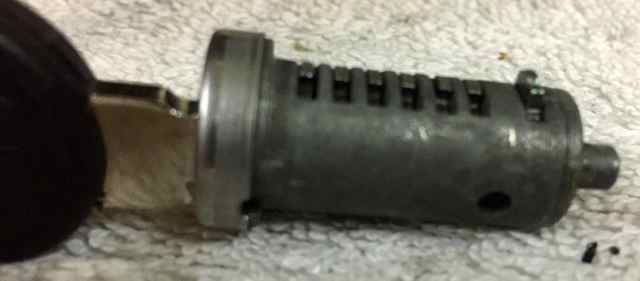
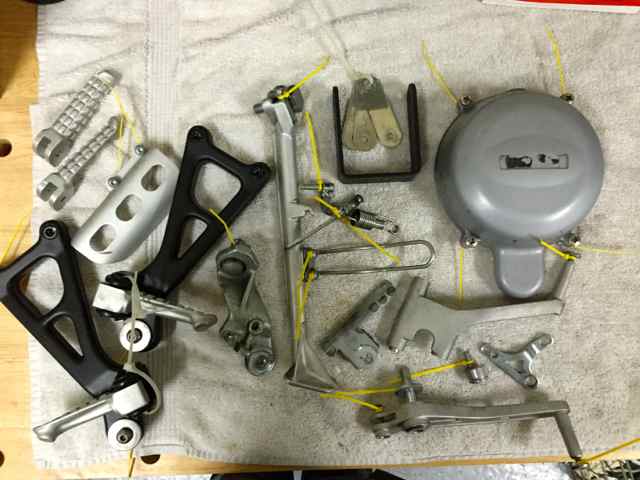
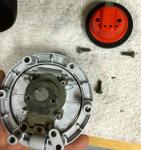
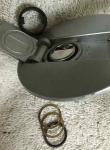
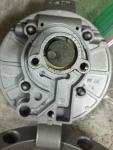
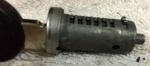
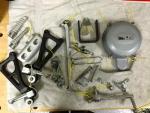
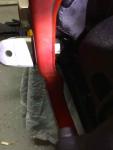
I was motivated to do this for cosmetic reasons. The silver fuel door just seemed wrong on the Scura - and I could not find a black billet replacement. But then I noticed that the paint was peeling pretty badly and got to wondering if those big flakes of paint would be bad for the petcock or fuel pump on the way to the filter. Couldn't find any other info on this, so I took these pics to give myself a chance at putting it back together after powder-coating, where it currently is. The "after" pictures will have to wait a while... To take it apart: 1) Remove 6 outside bolts and one inside bolt. Maybe cover the hole so you don't drop a tool or part in the tank. There is a large base and some gaskets to set aside - nothing tricky (tricks come later.) 2) Take off the latch and seal (red and black bit), revealing more little parts, including 4 tiny springs and a thin plate. (Note that springs and other tiny parts do not roll off towels). 3) Pry up the dark metal piece and remove the rubber gasket beneath it. Here's the part that was tricky to me - getting the lock out. 4) Pry out the O-ring from the bottom and get ready to catch two thin metal washers. Then pry out the top rubber fitting (which has a couple feety-hook-things - a little lube will help ease it out and be sure you don't tear it.) edit: do not remove the top rubber fitting as shown in the photo. It should come out (and go back in) with the lock cylinder. 5) Compress the little retaining tab into the lock cylinder and remove it from the cap. One pic shows where to access it, the other shows it removed. I left three parts assembled for powder coating: the base-ring, the fuel-door, and the flippy-lock-cover-tab (which probably has a real name). There are some retaining pins, and spring-actuated balls holding these three parts together, but I decided not to take them apart.

-
That qualifies as "useful information."
-
If you live in the Southern Hemisphere you're supposed to mount them backwards to account for the difference in gravitational effects of the earth's rotation. This is why water goes the other way around the drain down there too. Seriously - I don't know any useful information. But I figure if there's an arrow for rotation that there must be a valid reason for it. Maybe someone smarter and less sarcastic can help you.
-
A dark glass of stout, a little dark chocolate, a couple hours of wrenching... and I'm just about ready for a visit to the power-coaters. A few observations: 1) The sidestand has a lot of parts... I mean a LOT, and no two parts require the same size wrench. It's a rather intricate piece of work. 2) Many bolts had started corroding - not just from the parts I removed today, but many of the other silver bolts I replaced or painted earlier). So all this obsessive darkening is helping me catch and clean things before they seize up (also using anti-seize on reassembly throughout). 3) Many moving parts either appeared to have had no grease on assembly, or what was there had dried to a nasty white paste. This is great time to get all the moving parts lubed. 4) Powder coating the fork bottoms is not recommended. Dan Kyle (of Kyle Racing) says they don't even do it any more because it is too much of a PITA and they don't like removing all the seals and valves if they are working. If those guys can't be bothered to do it, that's good enough for me. However, I am stuck on the footpeg bracket. The hex-head bolt was not moving and I could not get a wrench on the big nut behind the porkchop. They're having a good soak in penetrating lube right now. My question(s): How do the footpeg brackets come off? Do I have to remove the porkchops to do it? Edit: answered my own question by more searching. What a great forum. I'm leaving the porkchops on (along with the brackets, which I don't think can be removed otherwise) and will not powedercoat the footpegs (at least for now). I was uncertain about black footpegs anyway... I do like the silver on the red. But the passenger pegs definitely have to be black
-
4 brackets, 4 screws... you're done. It appears that a late 70s or early 80s BMW has wandered into your garage... did it follow you home? Can you keep it?
-
Plate ordered. Thanks.
-
Could somebody drop in a link or other details about how/where the Roper plate can be purchased? I've searched and found plenty of discussion, but I cannot seem to find the "buy it now" button. Not planning any wheelies - but I do enjoy some throttle on the way up the mountains (even steep uphill left-handers, which appear to be the moments of greatest vulnerability). Oil in the sump seems like a good idea; a little extra oil capacity would be fine too.
-
Yes. That IS the lesson.
-

re-balancing the crankshaft: down the rabbit hole, again?
Scud replied to sp838's topic in Technical Topics
Who needs a V-2, when you could have an O-7 (radial)? Seriously - balancing the throttle and timing is one thing, balancing the weight of the reciprocating or rotating internal parts of the engine is another thing entirely - same principle as balancing wheels. IMO - if you've got the parts out, you may as well balance them, but it seems like a lot of extra work for relatively small gain if they are not already out. Could you just balance your new pistons to be sure that you don't introduce any new imbalance?