Scud
-
Posts
4,123 -
Joined
-
Last visited
-
Days Won
253
Content Type
Profiles
Forums
Events
Gallery
Community Map
Everything posted by Scud
-
No fun today... but you will win eventually. Have you tried heat on the wheel and freeze spray on the bearing? And there's no shame in having a shop press it out if needed - except you probably want your new tool to do what it's supposed to. I have elongated a few holes on sidecovers to make them fit. Having swapped some stuff around, I noticed that a cover that fits on one airbox does not necessarily fit on another airbox.
-
Here's my "spray-booth." I had to dig the sawhorse out from under the project to pull this off. I think stuff looks cool in primer grey.
-
I have one of those seals on order from Harpers - should arrive later this week. Will get a good photo when I have it in hand. The concerns about appropriate quantity of oil may be limited to that thick Redline Heavy Shockproof stuff. After cleaning that mess, I'm going back to the recommended GL-5 gear oil for my transmissions.
-
The LH bar was slightly bent from going down - which made getting the bar-end weight out a bit "challenging." So I squeezed it back into alignment. Then got the front end back together, including putting the original clip-ons back on, new grips, new-ish reservoirs, some new stainless fasteners, etc. Hand-me-down Omron relays from my Red LeMans. Stripped the bubble-paint from the tranny - then gave it one more flush with diesel fuel because the pink-goo was still slowly oozing out of places. I think it's finally clean. I know I said earlier to conduct an intervention if I start to paint another drivetrain... but I cannot put the bubble paint engine and transmission next to that luscious candy-apple powdercoating. Interventions must be held in person. Bring goggles and a long sleeve shirt... On paint: With my new IR thermometer and portable space heater, I was able to record a 160-degree surface temperature on the fork bottoms. That'll have to do. I'm going to bake the transmission covers in the oven, but will just point the heater at the main case, which still has a lot of oil in it. It's a good idea to harden it as much as possible before assembly.
-
I'm sure Phil has forgotten more about this stuff than I'll never know.. so I doubt that's it. ...and I just re-read Phil's original post... no issues with metal.
-
I'm replacing one now on a bike with 50,000 miles. While I don't know the history, I'd be surprised if the transmission had ever been removed - so I assume the seal was original. There was not evidence of a leak, but I thought I would replace since I had the cover off to clean out the oil, which had solidified. I replaced the one on my Scura with 12,000 miles. It was fine too - but I replaced preventatively since I was painting the cases. If you're replacing a seal after 4,000 km, then I wonder if something is wrong with the metal surface that mates to the seal. If a seal hardens, it can cut a groove into the metal. Or maybe the new seal had a small cut from start. Interesting on the directional seals. Can you post pics or part number when you get a chance?
-
Nothing is easy if the contact is poor.
-
I much prefer visiting the elves than exorcising the gremlins... On the dielectric grease issue - everyone's got to make their own decision when there is a topic with so much conflicting information and knowledgeable people holding opinions on both sides. I've decided that dielectric grease, such as DC4 is fine to use in electrical connections - not only fine, but preferred. I have been persuaded by: Well-researched arguments like the one Marty posted Use in many industries, including aviation My own experience This reminds me of another controversial topic where I was persuaded by data. A lot of people say it's OK to use WD-40 to clean brake calipers. Docc and GStallons warned me about it and encouraged me to soak a caliper seal in WD-40 to see what happened. I did and it swelled by 40% - which would undoubtedly freeze a piston. No more WD-40 near my brakes.
-
It was the faint click.
-
Progress report. Battery voltage at rest: 12.85v (it was on charger night before last, ridden 10 miles yesterday, parked overnight without charger) For comparison - 1-month old Odyssey in Scura reads 12.83 Battery problem ruled out. Relays up next... because Docc kindly sent along some of the supercalifragilisitic up-rated OMRONs, which just arrived - and because that's the next-easiest thing to do. I didn't expect any difference, because I had all new OMRONs in there already - and they were the previously-best-known model.... and to my surprise, (and embarrassment)... the front relay came out much easier than the others. With high hopes I noticed that one of my new relays had the three-prongs already bent-in a bit, so I popped that in the front (which made a nice, tight fit), and also replaced the other 4 with the newbies. Moment of truth.... it just started flawlessy 10 times in a row. And.... the headlight flicker is gone.... And.... I had not previously mentioned another symptom, which was that the high-beam was not working. And... the high beam now works. And... holy crap I was ready to spend the better part of day on this. And... it's time to go for a celebratory rip through the Elfin Forest. I've seen many other people's problems almost magically solved by new relays. So add me to the list. And thanks to everyone for the trouble-shooting tips, I have mixed feelings about not needing most of them. Sorry for all the work you put into writing the tips - but STOKED that I didn't have to do all that. By the way - I put DC-4 on the tips of each prong on the relays before I pushed them into their bases. Please carry on with the dielectric grease discussion....
-
I'd like to read that, but the link gives me a "page not found" error.
-
Thanks gentlemen. I'll do some lubricating and wiggling... and I'm sure we can keep our innuendo to respectable level... And Roy, I'll go through the tests and report as I do. I believe all connections are clean and lubricated - I used vaseline when I last worked on this bike. But I will inspect/tighten. On the lube issue, I have some of that Lubriplate stuff. Since it was not available for direct export to NZ, I helped Marty with his grey-market import and got a tube for myself. I did all the connections on my Scura with the DC-4... so far so good. Many dirt-bikers (self-included), who occasionally submerge their motorcycles, use dielectric grease to waterproof electrical connections. It's no fun to short-out and stall during a water crossing. I too am suspicious of the headlight bulb. The installation of the LED was painfully tight and I was concerned that it might not have been adequately ventilated in the small plastic bucket (I has to cut out a lot plastic from the plastic-chrome reflector back to even get it to close. I rode it to work today, that was fun. Too much BMW commuting lately - started easy this morning, but took three times on the starter button to get it to turn over - and then started easy. It always starts eventually - not been stranded yet.
-
Gave it an 8amp AGM-mode charge with a BatteryMinder charger. Had a weak starter engagement, followed by a good one that worked. Headlight still flickering. Rode to work... makes Friday a little more fun... been commuting exclusively on the BMW lately. Anyway - I cleaned and lubed (with vaseline) the ignition switch and starter button a few months ago, that didn't make any noticeable difference. I'll chase down the other ideas this weekend. I have these parts available: New electrosport ESR515 voltage regulator Complete new headlight (the one on the bike is cracked) And Docc - you mentioned it would nice if charging was at 14.2. Is that because that's what the Odyssey specifies - or because that's what the V11 is supposed to produce?
-
I have used silicone spray and Tri-Flow (a bicycle chain lube). I think the Tri-Flow may be a little better.
-
I've got some electrical problems that are making it hard to enjoy my 2003 LeMans - and I am not riding it at night because of them. Symptoms: Headlight - it flickers, most notably at about 2,000 RPM. It has totally turned off while riding at night on 2 occasions. This was only for a few seconds till it came back on - on it's own - without touching any switches. The headlight is an LED that I got from GuzziTech. I was very happy with it for several months, then noticed the flickering, then the outage. Starting - I have an intermittent hard start. It goes like this - press starter button, just hear a little click and nothing else. Keep holding button in... and then the starter turns slowly and the bike starts. This is probably a 1 in 10 experience. 9 times out of 10 it starts like it should (and starter turns faster). Electrical system is totally stock except for: 30-amp Maxi fuse holder Battery tender cable LED rear turn signals Speedhut gauges LED Headlight Omron 5-pin relays in all 5 positions Battery is Odyssey PC545, less than 2 years old. Docc sent me some battery "homework" and here are the results: Key off (hadn't run for 3 days, and before that only one short errand in the previous 2 weeks): 12.6v Key on after about a minute with headlight on: 12.0v During cranking: 10.8v At about 1,250 RPM idle: 13.8v Af 2,000+ RPM 13.9v FWIW - I started it 5 times during my little homework assignment just now - and it started perfectly every time. Of course, it doesn't misbehave while I'dm trying to diagnose. It seems like I should replace the headlight with a standard unit, and clean up all the wiring harness connections... but I'm still not a proficient electrician. What else, and in what order, would you electrical counselors recommend?
-
For on-bike cleaning I just used throttle body cleaner spray, a toothbrush, and paper towels to wipe out the worst of it. A little compressed air can help at the end. Take the air bypass screws out so you clean the passages and the screws, which can get gummy and mess up your idle. I'd be hard pressed to claim that it made a difference... but I think it's good preventative maintenance. While you're there... It's worth cleaning and lubricating the linkage and the springs under the TBs.
-
That cracks me up. I have shared this experience... and tales are oft-repeated as evidence of my incorrigible immaturity... But she has come to accept that bearings, races, and other small parts may visit the freezer on occasion. And the candy apple red... yeah it fits the champagne bodywork, but it's BOLD. My 60-year old Harley-riding neighbor nearly teared up when I had him carry the alternator cover out of the garage and into the sun. Then I heard about things that were candy-apple red in his life... and some things he always wanted. Quite a good time really. Maybe I should look into a cheap, used oven for the garage.
-
All this talk about IR heat guns left me with a little "gun envy." So I just bought an entry-level unit for 13 dollars (which seems somehow relevant to this thread...) Gonna use it to try to bake the brake caliper paint on the fork bottoms at the correct temperature.
-
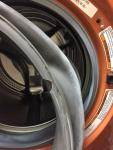
Source of leak discovered, new seal installed. Saved at least $200 for 30 minutes of work (compared to having appliance repair service.) I can fix it. We now return to our regularly scheduled motorcycle show.
-
I'd like to know more about that bare aluminium treatment process too.
-
Fixed it for ya. That is a CLEAN GREEN MACHINE.
-
Thanks, she's coming together nicely - and I've noticed quite a few new parts that you installed. How's Germany? Spring must be on it's way... and riding all over Europe must be on your mind. Your earlier post, where you confirmed that it was Redline heavy in the transmission, got deleted in a server-update. I bet you are glad to have missed seeing that mess in person.
-
I'm not sure they're "supposed" to be that tight, but I like 'em like Bob Seger says... "way up firm and high" (no innuendo at all). It took me a few attempts, I think I finally got it when all parts were loose, then, like footgoose said, I snugged up the exhaust hangers first and worked to the heads. After getting it all snug (but not tight) I could still move it a little - then to final tightening.
-
Thanks - maybe I am being a little to playful in the posts here... I do actually read, and follow the instructions on the can. Primer 2 light coats and one medium wet coat - each separated by 10 mins. Wait 30 mins, then apply 3 coats color in same process. I've even been setting a timer between coats. But I have not paid attention to the heat curing instructions in past (I think I probably stopped reading the instructions too soon). So the heat curing is my big recent lesson, thanks to you guys. Good news is... I tested this VHT caliper and case paint on my K75s before I applied it to the Guzzis. I did not do any heat curing on that bike and it's holding up quite well. And now that I've started painting cases again, there are few more to go...
-
This is as high and tight as I could get it without using any innuendo. Look how far the end of the swingarm is from the tire on the right, compared to the left. The Guzzi definitely hangs to the right.