chamberlin Posted April 19, 2014 Author Share Posted April 19, 2014 Love all the work you've been doing, your bike is looking cherry. I am very much looking forward to the next update. You make me feel somewhat vindicated/less crazy for being ambitious about fixing/cleaning/restoring/modifying the crap out of my bike. Cheers! Thanks very much! I should have another little update this weekend with some luck! I couldn't even begin to take on this project without the help from guys on this forum! Viva La V11! Cheers to you as well- Link to comment Share on other sites More sharing options...
chamberlin Posted April 23, 2014 Author Share Posted April 23, 2014 OK here is a quick update! Bought another quart of RedLine transmission oil for the rear bevel box, and it is now refilled! Also got some heavy weight oil for the motor, nothing but high heat here in AZ, we're already into the 90's! I think this Motul oil also has a decent zinc package, but I don't want to get into an oil debate here...I'll probably change oil fairly often regardless. GenericTaiwanese plastic tailpiece worked out pretty well, just waiting for the LED tail light to arrive now, since the '06 Breva tail light was WAY too big to work, and it was broken as I found out when I took the lens off....binned it. The plate holder (not visible) is the original metal Moto Guzzi plate holder. Decided to install the rocker box covers and silicone gaskets! These gaskets work great, I have them on my Norge too. Also installed a lot of stainless hardware from one of those eBay kits. Be sure to use your anti-seize compunds! And don't get any on the silicone gaskets! And don't forget the arrangement of the washers on the bolts that also go through the head protectors! Sheeesh! BTW, the head protectors are the new OEM parts from the Cafe Sport and other bikes that use black ones. Since this photo was taken, the gauge wiring has been tidied up and the battery re-installed. GPS antenna is mounted on top triple clamp, clear view of the sky, attains signal very quickly....now I just gotta get a tank installed and some gas pumped in!!! Still deciding whether to order another new tank or just screw it... Horns are also re-installed now....be sure to adjust the muting screw on those things, because mine were completely anemic at first...as-in deadly quiet. A quick turn and some locktite, and now both horns will make your ears bleed...glad I checked those things out! Link to comment Share on other sites More sharing options...
simaster Posted April 23, 2014 Share Posted April 23, 2014 Looking good! If you get a chance to post a pic of your GPS mount, I'd love to see it. I'm thinking of going the Speedhut route... Link to comment Share on other sites More sharing options...
chamberlin Posted April 24, 2014 Author Share Posted April 24, 2014 Thanks much simaster! Nothing really to it at this point, just some double sided 3M tape! I can't comment on the performance of the SpeedHut gauges yet, but I can say that the ordering/customization process was very well done and I really felt like they had a personal investment in my project. Link to comment Share on other sites More sharing options...
nobleswood Posted April 24, 2014 Share Posted April 24, 2014 This afternoon I ordered a replacement ITI speedo for my 2004 V11 Naked, from Curtis Harper, who assured me that the newer replacement gauges 'aren't being returned as often as the old replacement gauges!' Having seen you photo I'm second guessing myself now. How much did you have to pay for those very sharp looking gauges? Link to comment Share on other sites More sharing options...
chamberlin Posted April 24, 2014 Author Share Posted April 24, 2014 Man, after seeing the shoddy ITI gauges' internals and the rumours they aren't even calibrated correctly, I just don't think I could do a direct replacement gauge, unless I was restoring a bike for a collection or something. How much did the ITI speedo cost? Here is the post where I first selected the gauges and prices are shown also: http://www.v11lemans.com/forums/index.php?showtopic=18247&page=5&do=findComment&comment=194875 Link to comment Share on other sites More sharing options...
nobleswood Posted May 1, 2014 Share Posted May 1, 2014 The speedo cost around $210. I'm still interested in keeping the bike with it's original equipment. But that may change as the years roll on & the parts drop off! I'm enjoying the story as you re-build this bike. What's it look like now? Link to comment Share on other sites More sharing options...
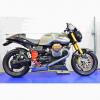
chamberlin Posted May 1, 2014 Author Share Posted May 1, 2014 Thanks nobleswood! I do understand about keeping the bike original! However in my case, there were just too many issues cosmetically speaking that needed attention. If this was going into a living room collection, I would certainly pay the piper for the OEM stuff accross the board. But for a practical bike that I plan to ride for the foreseeable future, the best I can do is just hang on to all the original parts, and build a mild "resto-mod" to taste. Here are some shots for you. I finally heard back from one of the bike painters I contacted, but he's out of the business now...great. So I'm getting close to just bolting on the original tank and having some fun. I may possibly order a new tank from Italy, but I'm still on the fence. I've got enough spare parts now to have fun riding the bike, and as time passes, hopefully find somebody to do the custom paintwork on the spare parts. I plan on keeping all the original body panels as-is regardless of what happens. 1 Link to comment Share on other sites More sharing options...
chamberlin Posted June 1, 2014 Author Share Posted June 1, 2014 OK, time for an update! Been busy building a new PC for the last month, but I finally got some time to work on the Goose this weekend. A wave of OCD came over me again, and I decided to removed the vestigial (1st gen fuel pump?) bracket on the top of the spine. I don't know why I just didn't leave it alone, but it was really starting to bother me. I guess most of you guys aren't used to seeing your bike with the tank off as much as I am! Also, I did hack off the helmet lock bracket (see earlier posts), so why not this bracket which serves no purpose. After some careful cutting, sanding and paint matching, you can hardly tell there was ever a bracket there: Picked up a complete OEM carbon fiber set (there's still a couple on eBay BTW). Not cheap, but I really just got it for the front fender. But then I figured I should replace my faded front fairing of course! I was planning to sell the side covers, but then I decided to see if I could make them work without the stock air-box installed. I already have an aftermarket CF starter cover, which is slightly nicer than the OEM part (larger weave however)...so for now, that is the only left over part. Anyways the results are below! Time to buy some V11 Sport stickers! Top view with both covers installed. One gear clamp per cover, and they are nice an tight and don't move around. Easy to take off as well. Here's some shots of the new CF windscreen and installed fender (still has carbon dust on it from the factory!). I like the clean one piece look (I'm just saying that to make myself feel better about the price and the work I had to do to install it LOL) It sucked having to remove the front wheel to attach the damn fender, but it was a good learning experience. I just jacked up the bike from the pan (using a slab of Poplar wood), had my wife balance the bike while I removed the wheel. It was a bit harder getting the axle back through, but a blow from a rubber mallet fixed that problem. I also bled the rear break and the clutch. I'm gonna wait until I get new reservoirs before bleeding the fronts and moving the clutch line (I don't like the current routing over the top of the triple clamp). A brand new gas tank and some other bits are on their way here from Italy now....It's been a month already, so hopefully they'll arrive soon and I can pour some gas in this pig! Although it's already so farking hot here, I'll have to wait for a cloudy day to ride! Kinda the opposite of the rest of the world. Cheers! Link to comment Share on other sites More sharing options...
chamberlin Posted June 8, 2014 Author Share Posted June 8, 2014 Finally decided to drain the clutch and brake lines in preparation for the new (Rizoma knock-off) reservoirs. While the systems are drained, I figured now's my chance to re-route the clutch line. It is *barely* long enough with the new riser bars, but I found a routing that works well. I was about 2 minutes away from ordering a longer clutch line. Both reservoirs were cracking and yellowed...they had to go. Here is the disgusting routing from before, followed by the newer streamlined setup: Brand new Cafe Sport gas tank has arrived! It has a greyish-champagne color to it, and it generally goes well with the rest of the bike. As you can see, for the time being I have moved away from the custom paint job option, and gone with a carbon fiber theme Just couldn't find any suitable painters. But I still have enough spare parts to do a whole painted setup if I want to. Brand new OEM carbon look rear seat cover backrest to match the new carbon look seat. BTW, the original seat and rest on this bike are the smooth textured type. Also pictured is a brand new pillion cover. Ironically, its color matches bike's original cover/tank (dark grey) perfectly...oh well, sometimes when you get stuff from Italy, you have to just roll the dice! I will keep an eye out for a Cafe Sport cover. The other (3rd) spare pillion cover I bought is another shade of grey, so it's staying in my parts bin for now. Almost ready to go! BTW, I am going to develop a fairly painless method to remove the ethanol from my gasoline.I am not going to put any ethanol blend gas into this new tank as long as I own the bike! There are no pure gas stations anywhere near me, and if anything the GOV'T is going to bump from E10 to E15, not remove ethanol, so I figure I mind as well plan for the corn future. I'll start a new ethanol thread once I get my system up and running. I've already bought a nice big vintage (Italian!) 5 gallon glass jug that has a petcock on it. Should be an interesting experiment. Link to comment Share on other sites More sharing options...
docc Posted June 8, 2014 Share Posted June 8, 2014 Looks like we're mighty close to pictures somewhere other than the driveway! Link to comment Share on other sites More sharing options...
chamberlin Posted June 8, 2014 Author Share Posted June 8, 2014 Looks like we're mighty close to pictures somewhere other than the driveway! YES! And pictures taken with my Nikon, instead of my damn (although extremely handy!) camera phone! Link to comment Share on other sites More sharing options...
Kostarika Posted June 10, 2014 Share Posted June 10, 2014 Beautiful. Great work. Now stop buying all the spare parts on ebay Link to comment Share on other sites More sharing options...
chamberlin Posted June 10, 2014 Author Share Posted June 10, 2014 Beautiful. Great work. Now stop buying all the spare parts on ebay Thanks a bunch man! Sorry about the parts hoarding! Don't worry, I'll have an 'end of project' sell-off to try to recoup some of these costs! Btw, I now have a new fuel pump and complete key/lock set coming...so the whole bike will be on a single key again. Link to comment Share on other sites More sharing options...
Kostarika Posted June 12, 2014 Share Posted June 12, 2014 I liked the grey tank better. But I am biased The bike is awesome either way Link to comment Share on other sites More sharing options...
Recommended Posts
Create an account or sign in to comment
You need to be a member in order to leave a comment
Create an account
Sign up for a new account in our community. It's easy!
Register a new accountSign in
Already have an account? Sign in here.
Sign In Now