Scud
-
Posts
4,123 -
Joined
-
Last visited
-
Days Won
253
Content Type
Profiles
Forums
Events
Gallery
Community Map
Everything posted by Scud
-
What Footgoose said. Same for me when comparing to my (ex) R1100RT. But the original K-bikes (the flying bricks, like Victor has) are unusual enough to be interesting - and their durability/reliability is exceptional. That being said, no motorcyclist who visits my garage wants to talk about the BMW first. They laser in on the Guzzis and say "OMG what are THOSE?" (except, of course the dirt bikers would rather talk about the Husky). Czakky - Having just installed the FBF crossover and took it on a little ride today, I'd say there are some differences, but my butt-dyno is not so finely calibrated as some. Impressions include: Better manners at constant slow speed, such as 2nd gear below 3,000 RPM. I think the occasional 3,000 RPM hiccup I had may be gone, but much more testing is required before rendering a conclusion. Possibly a bit smoother throughout the rev range - like a flatter torque curve. It howls at 5,500-7,000. It did that before, but maybe the howl is a little throatier (less muffled) now. None of these differences are big. Just little things that seem to better.
-
Very weird. I figured it would be a 10 minute job. Old Ti pipes off, new Ti pipes on... but I couldn't get them to slide more than about 1/2 inch over the crossover outlets. However, they went easily over the FBF. I still don't have them positioned equally and haven't figured out how to aim them differently. My left one is hanging a little higher than my right one. Yes, I'm still talking about my motorcycle. The take-offs are already packaged up for Czakky. Sorry. Just got back from a short loop, and yes, they sound great, especially under hard throttle uphill. But they are not obnoxious - I could still hear the Harley (with stock pipes).
-
Yeah, Curtis Harper answered the phone when I called to order. They had quite a few kits. I asked how they got them - apparently, several boxes were mislabeled in the Moto Guzzi warehouse. Harpers bought as many as they could and passed a long a good deal. They all sold within about a week. I'm going for a putt with one of my Harley buddies today. Gonna boast about my luscious exhaust note and denigrate his potato-potato-potato.
-
Sounds like a great trip, starting with a nice truck upgrade. How many miles on the Centauro? It looks a great bike to enjoy over the summer as-is while you think about your project. Turning that into something like a Daytona or your own version of a sports bike looks like fun. I really like those four examples.
-
I got my new Titanium mufflers on today (after sitting in a box for a long time...) Also installed the FBF crossover that I found a while ago. I was just going to put the pipes on, not the crossover, but I couldn't get the fit on the stock crossover (too tight).
-
Pete - everything I know about is on the list in the first post of this thread. As of now, three people in AU/NZ told me they paid you directly (one of which is for the Tonti plate). You may have received up to three other V11 orders from people on the list. Producing 40 V11 plates seems reasonable to me. I'd take at least two more to the US for as-yet-unidentified buyers, but I don't want any extra Tonti plates. You could periodically post ads here and on WildGuzzi till you sell the balance. It would seem at some point that demand would slow or stop, since these bikes aren't being made anymore. But low mileage examples keep coming out of hibernation, or getting sold out of collections, and people are riding them. Restorations/renewals/rebuilds are also happening. You know what's funny (and a testament to the value of your solution) - one guy told me he's buying a plate because he wants to buy a V11 in the future. He's gonna hold onto the plate till he finds the right bike. My V11s spend a lot of time going up mountains at high RPMs. Thanks to you, I don't have to worry about the oil-pump gulping air due to excess sloshing of oil in the broad-sump. I think I will take my LeMans over Sherman Pass to celebrate after the plate is in.
-
Somebody posted a link to some Sport parts on WildGuzzi recently. Here is the thread: http://wildguzzi.com/forum/index.php?topic=83566.0
-
I think there are many good examples, with descriptions of how people did it various posts. A little more searching might turn up some more examples. Here is a template I downloaded from one such post on this forum, but I don't recall who created it. I attached it for you here. V11 Sport Fender Eliminator Bracket (preliminary).PDF I didn't end up using this template, because I was happy enough with cutting the stock fender down a bit and installing much smaller, LED turn signals.
-
Rob brings the ball out of the back-court, drains a 3-pointer at the buzzer, and wins the game for team V11. I suppose if anyone else is interested, you can still post here and Pete can figure out whether it's practical for him to increase the quantity. There are still two of the Tonti/Sport/Daytona style available.
-
Those are gorgeous: http://www.gillestooling.com/cms/shop/products/art-4415/handlebar-variobar?tab=color And yes, Italian mistresses need jewelry - and "hacksaw and hummer work" must be undone. My poor neglected lass got bathed in jewelry: new gauges, stock bars, Pazzo shorty levers (which you sell), and Rizoma fluid tanks. Several people have asked me about the Rizoma tanks. Do you sell those too?
-
Update - almost all payments are either in or en route (details on first post). Thanks to you all for making this work so smoothly so far (although I created an Excel sheet to keep track). Assuming Pete produces exactly 30 V11 plates and 5 Tonti/Sport style, the following remain available: 3 V11 plates: 2 coming to me, 1 in Australia 2 Tonti/Sport plates As the commercials sometimes say: "Supplies are limited." Let me know if you want to claim one of the few that are still available. Edit: That worked. All plates coming to me in the USA are now spoken for. Only one V11 plate remains available, unless somebody currently on the list backs out. I can probably have Pete ship one more to the US if somebody wants it.
-
Lots of technical tips, design ideas, and discussion of options on the Speedhut Gauges here: http://www.v11lemans.com/forums/index.php?showtopic=19038&page=1 I think the Veglia were used on many other Moto Guzzis of the same era - so you may be able to find one from a different bike that will give you the parts you want.
-
You could just spin the bar clamps around about 180 degrees and grind down some spare cruiser bars. That way, when they rust, it won't matter that they're only clamped in place by one bolt on each side. The throttle cable and clutch hose will be fine if you don't mind pinching them in the steering head occasionally. A thin piece of wire makes it easy to position the hydraulic reservoirs wherever you want them. Blue hoses for style points. While the fit and finish left much to be desired, the position of these bars was very comfortable and nothing hit the fairing. Not only were they pulled up and back, they were probably two inches wider than stock. The PO of my LeMans also had the footpegs lower and further forward by a few inches. Also comfy for touring - but I still prefer the stock position and getting into a mild tuck when making time.
-
Here's a Scura masquerading as a Coppa Italia. Those two models must represent the opposite ends of the V11 style scale: http://fresno.craigslist.org/mcy/5582001082.html And this unusual shade of Greenie has been for sale on-and-off for a long time: http://fresno.craigslist.org/mcy/5575313023.html And a fine Silver-Sport: http://sfbay.craigslist.org/sby/mcy/5588184084.html
-
I placed the order for gaskets with MG Cycle today. 25 of these thicker-than-stock gaskets, which should be appreciated by those who remove the lower sump at every oil change. This creates the thin green line below the silver "Roper Line" as in my picture in an earlier post: http://www.mgcycle.com/index.php?main_page=product_info&products_id=33 50 of these "direct replacement" gaskets - 2 needed per kit to "sandwich" the plate. http://www.mgcycle.com/index.php?main_page=product_info&cPath=170_174&products_id=34 They didn't have quite enough on the shelves today, but should be able to fill the order next week. @Pete - do you know how long it will take to get all the plates in from the machinist?
-
Do you mean the yellow and silver thing hanging on the wall? Not a hammer. That's a tool that can shut off the gas and water supply at the street in case of emergency. Public Service Announcement: Does your home have one and does everyone know how to use it?
-
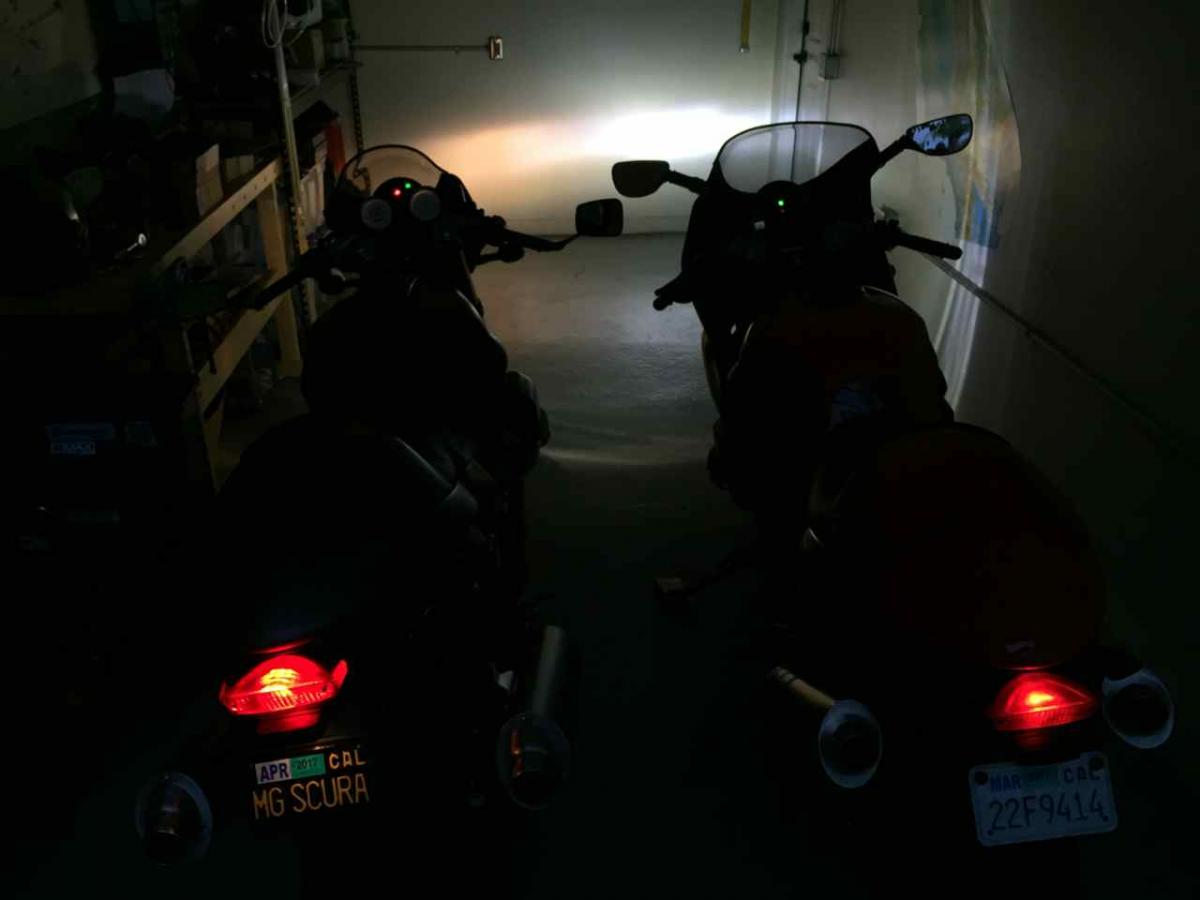
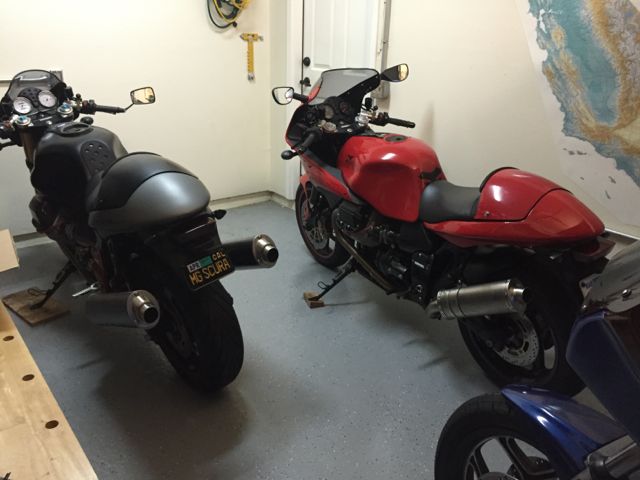
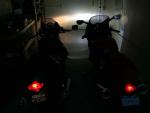
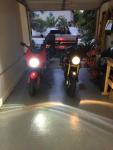
And some side-by-side comparisons: Also note that the Scura taillight (left) is LED, while the LeMans taillight (right) is the stock incandescent. And I just noticed that the LeMans' license plate light is out... And a gratuitous picture, cuz they look better with the lights on, if you know what I mean. But, damn, the footpegs on the Scura are awfully shiny. Something must be done about that...
-
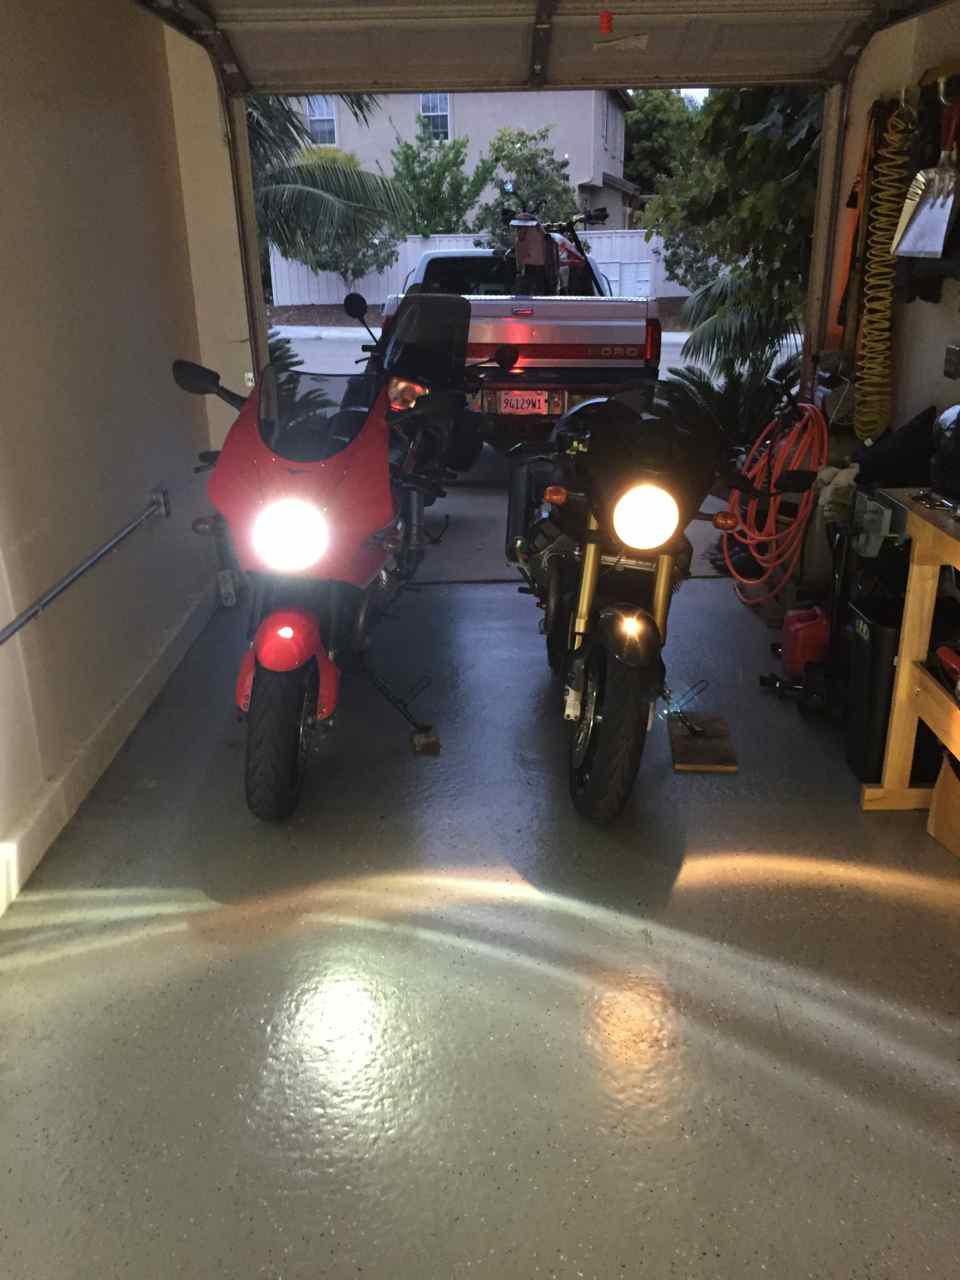
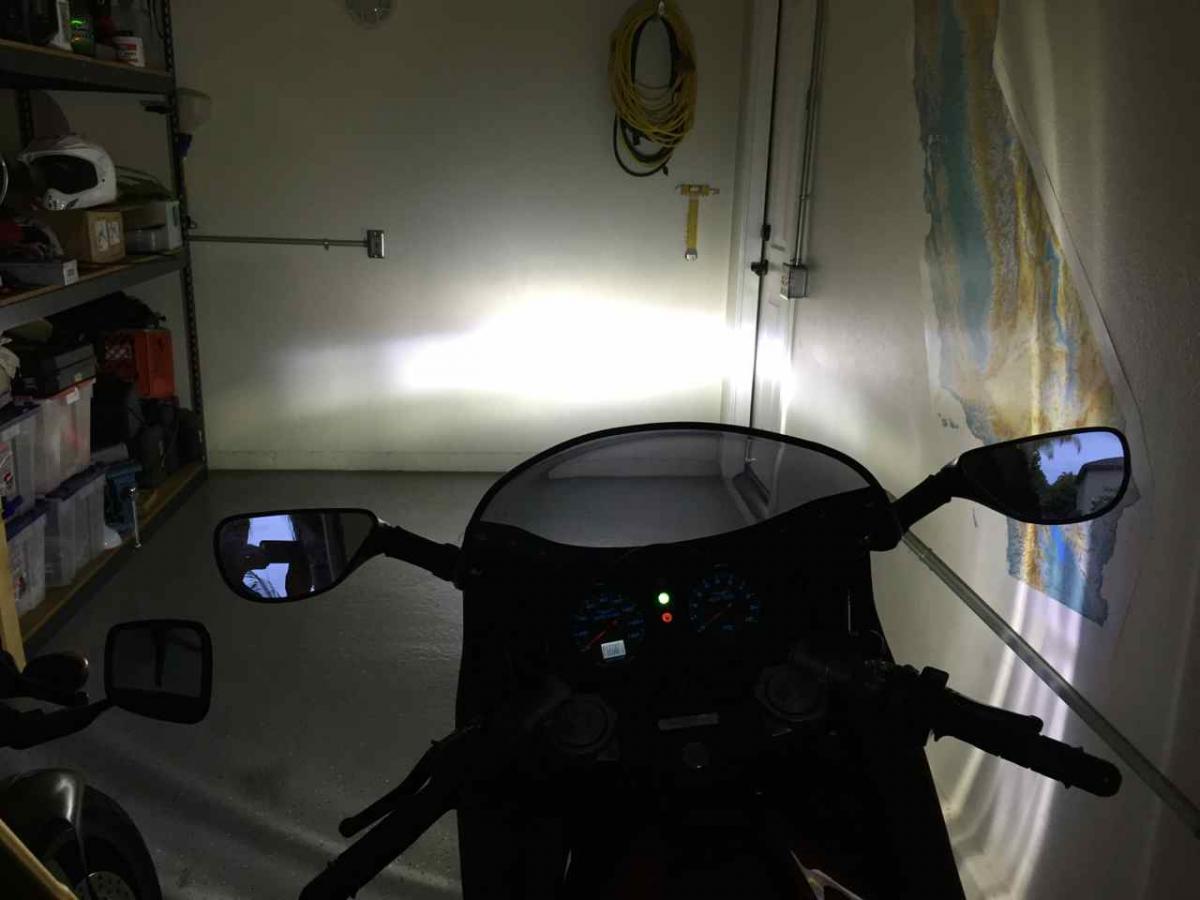
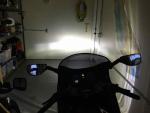
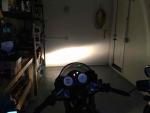
Ken - well-timed request. I was shuffling stuff to get the dirt bike out for tomorrow. Here is the LeMans with the H4 LED from GuzziTech: For comparison, here is the Scura with stock bulb:
-
Thanks Pete, I was also able to find your account in my PayPal history from when I bought one plate from you last year. Let me just add: Thanks again for offering us a discount for our group buy. I know you've mentioned before that it's not really worth the effort to keep these in stock and only sell one at a time. I hope you make a fair profit on this. I just sent payment for 25 V11 plates1 for me 21 for other Europe/Canada/USA members 3 surplus - which can be claimed by members - or I will figure out how to re-sell later 2 Tonti Style plates for other members Extra AU$200 for estimated shipping. If this is not enough, please advise. If this is more than your actual cost, buy yourself some beer... ...wine... ...or whatever... I will forward your PayPal account address to the AU/NZ members advising them to pre-pay for the plate - then you can sort out the shipping and gaskets costs with them later. BTW - I am making logistical decisions on your behalf. Please stop me if/when I overstep my bounds. Enjoy Perth. Note to other buyers: Thanks for the many prompt payments to me. I've advanced money for the balance and would appreciate payment from everyone else as soon as reasonably practical. I will also order the gaskets now - so I'll be ready to kit-up when the plates arrive.
-
Longevity: Yeah, this occurred to me, but the bucket does not get warm, at least not in cooler temps. I haven't had it out in the heat yet. I don't know the answer. However, I don't think the LED makes a lot of heat, I think it only makes intense heat in a tiny spot that needs to be dissipated. Cut down: Take a look at the picture in post 56 on the previous page. There is a cylindrical wall around the bulb opening. I cut that down nearly flush to the curved headlight bucket. Model of light: It was only identified as the H4 on GuzziTech's site = I e-mailed Todd be sure I was getting the right one. I think others have found the same light elsewhere. http://www.guzzitech.com/store/product/led-headlight-bulbs-usa/
-
Pete - I'll need your PayPal address. You can send it in a PM or reply to my recent e-mail if you don't want to post it publicly. I just need to collect a bit more before I can pay for all the plates that will come to the US. FYI - I'm updating the first post of this thread as I receive the payments. OZ and NZ members will also need your PayPal address. Should they send the amount of the plate now - and the balance for gaskets and shipping later? Or would you prefer to figure out the total including gaskets and shipping? Tim
-
I think the numbers are going to work out with a bit left over (unless I get stuck holding several plates). Pete's asking price of AU$120 is about US$88 at the current exchange rate of $AU x 0.73 = $US. I'm asking US$130 per kit. That leaves US$42 per kit to apply toward 3 gaskets, inbound shipping from Australia and MG Cycle (shared charge), and outbound shipping from me to you. As I mentioned earlier, I'll probably ask Canada/Europe members for extra to cover their higher outbound shipping costs (once they are known). I think Pete could have asked for a little higher price and most (if not all) of us would still have bought the plates. If you want to pitch in a bit more, I will pay Pete extra, and make a donation.
- 169 replies
-
- 2
-

-
- roper plate
- windage
- (and 1 more)
-
Done. And I just finished sending PMs to everybody regarding payment. If Pete's going to make 30 V11 Plates, there are still about 5 more available.
-
Close Encounters with Aliens while riding Scuras. This has to be a small club. Welcome.