Lucky Phil
-
Posts
5,449 -
Joined
-
Last visited
-
Days Won
276
Content Type
Profiles
Forums
Events
Gallery
Community Map
Everything posted by Lucky Phil
-
Good pick up Chuck.Although it is a Honda specific kit so maybe they dont need one. Ciao
-
Ok cool thanks. I have some high mount brackets in the workshop I bought years ago but from memory the location mounts are wrong. I must dig them out and check what they are and why they dont work. Ciao
-
Obviously the "Honda" specific toolbox docc Ciao
-
From what I can see the jackal has the 5 speed gearbox and the older style bevel box so I dont think the rear wheel will fit. I believe what you need is California wheel hubs laced to wider rims. Pete Roper will know. In general I really like wide rimmed wire wheels but I've seen a few images of v11's with wide wire wheels and it doesnt seem to suit the bike for some reason for mine. Cant see an issue with the brake rotors thoug docc, maybe I'm missing something obvious. Ciao
-
I would welcome any other solution than the tap in reality. A std readily available QD is 5/16 (8mm) and the V11 outlet is 1/2" (12mm). The other issue is space under there specifically length. There isn't much if any spare distance between the tap outlet and the pump inlet for a 1/2 inch tube with its lack of flexibility to bend in an S shape. Most QD's take up 50mm of more which doesnt leave any room for the hose to bend. half inch rubber hose is way less flexible than 5/16. I spent a lot of time trying to source extra flexible 1/2' hose without luck. Ciao
-
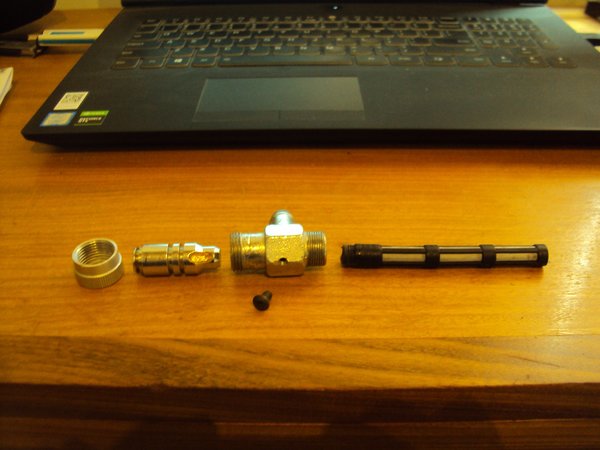
So I got my FKM seals in the not preferred 10x2.5 dimension and they dont work. Just too big. Sizing up orings on a piston into a bore is quite a complicated thing even after I used a sizing programme. My preferred size per the programme is 10.3 x 2.4 but they wanted me to order 25 but when I called today they said that they can get as many as I like overnight no min order....Geeze. So I'm going the Lucky Phil non tech route and getting about 4 different sizes and seeing what works. At 30 cents each for the NBR and $2 each as it turns out for the FKM's I'll just use the scatter gun approach and hopefully be able to learn something and pass it on. My machinist mate recons that with a cheap little XY vice attachment on the pedestal drill and a 2 fluted mill drill you can cut the slot accurately in the plunger. The object here is to develop a process that people can do at home with basic tools to rebuild and upgrade this tap assy. Ciao
-
I just open the image in Paint docc then in the top left click resize which presents horizontal and vertical boxes showing 100%. I just change the first box to 90% and it automatically changes the other box to the same. Then when you hit the X it asks if you want to save the image in the new format which you say yest to. Most of my images go from 2.3mb to 900 odd kb. Then I upload to my album and then just copy image from there into my post like you taught me docc. Ciao
-
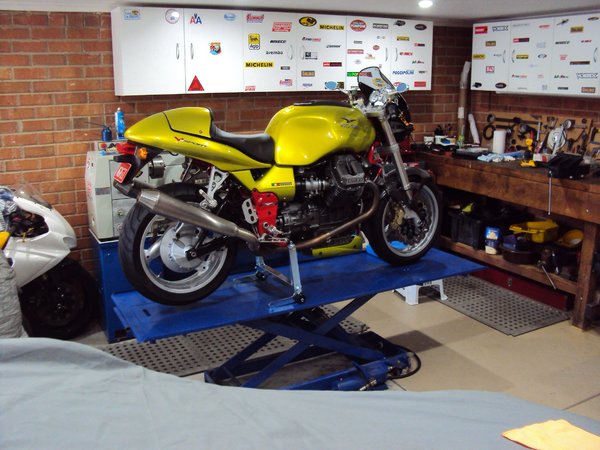
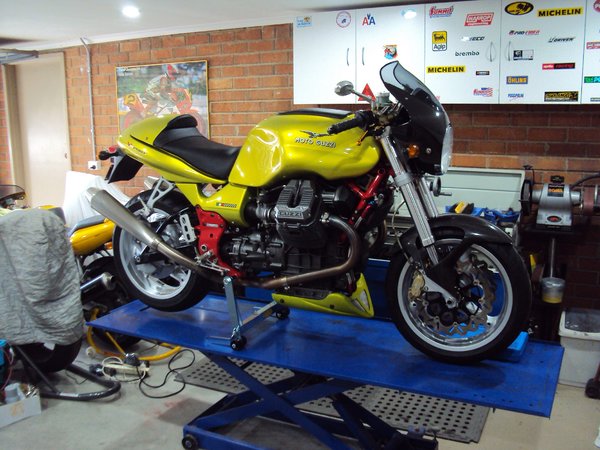
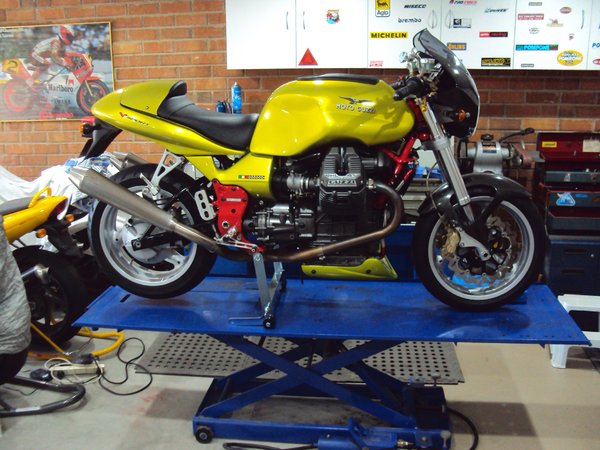
At the risk of being repetitive, here is the final product. The seat fitment and sidecovers finalised,the rack supports removed and everything bolted down and fitted up in the final position. The only tasks remaining are the frame to airbox breather tube for which I have some alloy AN fittings coming for, the tank cap drain line for which I have sourced an accessible joiner to make tank removal easier and hook up the oil pressure gauge for the initial start. I was hoping to maybe get a bin. file from Paul Minnaert before I did the first start. He asked me to let him know when I was ready to fire it up but he's currently in serious condition with the Corona virus so he has bigger things to concern himself with naturally. Hoping he's doing better,anyone have updates on how he's doing?. It would be nice to have a Centauro specific bin. file for the initial start so when he's over this period of illness he may be able to assist with that or something closer than the std V11 map. Here's what started this journey for me. Sorry but I've never been able to find a better image of this bike but I have had it on an A4 print in my garage for years and dreaming. I dont know what muffler hangers he's used but I wouldn't mind knowing as I quite like the higher mounting. Ciao
-
From the album: lucky phils V11
-
From the album: lucky phils V11
-

Corona / Covid19
Lucky Phil replied to Admin Jaap's topic in Special place for banter and conversation
You can write 2020 off I think Pete. cant agree more with regards to the Millennial attitude. I've been ready a biography on Churchills life, it's weighty tomb. It's sobering to considering the suffering and deprivation people suffered through much of the 20th century not to mention the wholesale slaughter of over 100,000,000 people. It's quite sobering to consider what our parents and grandparents went through in their lives and it provides my generation with a baseline when this sort of thing happens. Not sure my kids (17,21 and 32) are quite so philosophical about the present situation though, they've never known a time of wide spread deprivation. Mentioning to them that walking into a supermarket and having 50 choices of just about everything in there wasn't the world I grew up in when I was young does't seem to register with them, or that 25 different variations in a cup of bought coffee is something that maybe you can happily and meaningfully live without. I'm just an old duffer apparently, until something breaks of course,lol. Ciao -
Yep. From someone thats bought a few salvaged bikes at Auction the 2 major moments are string lining the wheels and the first start up. Later model EFI bikes with a tip over sensor relieves some of the later stress. Ciao
-
The motor needs to be removed and completely stripped and most importantly the cause needs to be identified. If this is a crash salvage bike then it could well have lay on it's side running for some time without oil pressure and that's taken out the big ends. See the V11 Daytona project thread, there are a lot of bottom end images there and the crank/rods/main bearings/oiling system and sump are the same. Ciao
-
Pull the selector cover off and do the shift enhancement procedure listed in the How to section and replace the shifter spring. Most motorcycle gearboxes struggle with what you have described though. They need to be rotating for shifting to work effectively. Ciao
-
Very close docc, just waiting on some fittings to come in the post. Ciao
-
Something interesting I found for those that experience AN fitting leaks such as the oil cooler fittings due to damage (not cracking) Ciao
-
- 5
-

-

-

From the album: lucky phils V11
-
Yes I've bought quite a few Dayton engine parts from Paul and was about to ask him for any EFI mapping files and info for the V11/Daytona project. Always helpful and willing to share. Hopefully he recovers ok from this horrid disease along with others affected. The nicest part of the motorcycling community for me has always been the terrific people it brings you together with. The riding and wrenching are just the side benefits. Ciao
-
Corona / Covid19
Lucky Phil replied to Admin Jaap's topic in Special place for banter and conversation
Yes Pete, here. Ciao -
Best wishes to you Paul,fingers crossed for you mate. Ciao
-
Well that's the base line to start proceedings. Ciao
-
Ok so I ordered some Orings. My first preference was 10.3 x 2.4 Viton but they were special order at $3 something dollars each min 25 which would be ok except this is proof of concept so I went with 10X2.5 vitons. I'll need to widen the o ring grooves as well because they are too narrow even for the std orings. I fitted or tried to fit one of the std rings on the plunger after being in fuel and it was hopeless way too big everywhere, no wonder they generally hold fuel but you cant operate them. I also thought bugger it and had an attempt at modifying the unit to my preferred design. I slotted the plunger by hand with a tiny cutter and a porting tool. Turned out better than I expected and works perfectly. So now the stop is internal and the unit can be serviced. I'll use a 4 mm stainless grub screw with a hex socket instead of the steel button head in the image which I had laying around. Some blue loctite on that will seal it and prevent loosening. Seriously someone like Chuck with his skills and machinery could do this mod a lot better and with greater accuracy in under an hour. Ciao
-
From the album: lucky phils V11
-
The issue there is that the plastic strainer threads into the body ID. Do you mean a stop that somehow uses the top surface of the body on the tank side? If so you would need to leave the strainer off and you would also lose inlet flow. I thought of a better solution initially but you need a Mill. Drill a 6 mm hole in the body opposite the outlet and use a screw with a 3mm spigot/projection machined at the end maybe 4 or 5 mm long that engages a 3 mm wide x 2 mm deep x 6 mm long slot machined into the plunger minor diameter. Insert the screw with the spigoted end which engages the slot in the plunger and you have your down stop and a guide to prevent the plunger rotating and you lose no flow at all. Its then dismantleable and all thats needed is a drop of sealer on the stop screw. My only real issue is machining the slot in the plunger. Ciao Edit, sorry just saw your modification in the image. Good idea but as above serious flow issues and loss of the strainer.