Lucky Phil
-
Posts
5,449 -
Joined
-
Last visited
-
Days Won
276
Content Type
Profiles
Forums
Events
Gallery
Community Map
Everything posted by Lucky Phil
-
My grandfather and another friend I had at work that races a Ducati both only had sight in one eye so no depth perception either and I've always wondered how they rode or drove and got braking distances right etc. Ciao
-
Maybe I can wheel it into the driveway and take a shot. I'm a bit over waiting for stuff to arrive from OS. Ordered 5 weeks ago and still no sign...sigh. Ciao
-
If it's got a Guzzi in it docc it's going to be moving all right.......................slow moving:) Nice juxtaposition though. Ciao
-

Looking for Oil Pressure Data for Hi Cams & V11s
Lucky Phil replied to Weegie's topic in Technical Topics
If its not causing an issue then dont worry about it. It's probably an isolated hole. Ducati just used to fill them with Araldite back in the 70's and it lasted for years although there's better stuff around now like JB and Devcon F if you feel the need. Ciao -
Throttle stumble at small throttle opening
Lucky Phil replied to Colorobo's topic in Technical Topics
Clearances are too wide for a road bike. Set them to what I mentioned above and see how it goes. Ciao -
Looking for Oil Pressure Data for Hi Cams & V11s
Lucky Phil replied to Weegie's topic in Technical Topics
I know what the upper red arrow is pointing to John but whats the lower red arrow indicating? none of my 6 heads have any form of hole here.Is it porosity? Ciao -
Throttle stumble at small throttle opening
Lucky Phil replied to Colorobo's topic in Technical Topics
What are Raceco specs? ( 0.004" and 0.006"?)and whats the CO set at? Ciao -
Awesome Ciao
-
Came across an interesting fact about seals today that might be worth remembering Some modern oil seals are made from PTFE and must be installed dry. They rely on transferring some of the seal material to the shaft in the initial running so its a PTFE against PTFE situation. If you install them with lubricant they will leak within a few hours running. Don't think its applicable to older Guzzi's but worth bearing in mind for modern applications. If the install procedures dont specify some grease on the seal then assemble dry. Ciao
-
- 3
-

-

-
Yes it's engineering art. I love engineering, it's science and engineering together that's propelled mankind to where we are now. I was watching a doco the other night on the building of the English canal system in the 18th and 19th century and the men that engineered it and any of those great engineers from back then would be brilliant engineers today as well if you could resurrect them. Ciao
-
Just came across this article. Looks like Kevin and I are on the same page. https://www.cycleworld.com/story/bikes/about-motorcycle-engine-cam-drive-systems/ Ciao
-
Well it can be. I submit as evidence wrapped header pipes on a V11. A hotrod item best left to the hot rod world. I'm taking a broad interpretation of hot rod. Ciao
- 123 replies
-
- 1
-

-
- v11sport
- maintenance
- (and 1 more)
-
Yes docc, I removed the studs on the Daytona engine when it was apart by the old method of a pair of nuts locked together and it was ok to do on the bench but you dont have enough stud length to do that with the gearbox mounted. With the plate fitted and the washers removed the threads end up just a little under flush which isnt aircraft standard and I'd rather it a thread and a half protruding but I know its not going to cause an issue as long as you keep an eye on them for loosening. When I refitted my original studs I used blue loctite and left them a couple of turns from fully bottomed as there's tons of thread engagement in the cases but when I fitted the nuts probably due to their locking feature it broke the loctite and just wound the studs back in to where they were before. In hind sight I should have machined up a little plug to fit down the stud hole so it bottomed on something. Ciao
-
My biggest issue with fine wire plugs is once they are fowled they are junk. Cleaning them is pointless. On an ultra modern lean running engine there're fine and my cars and My 1198 have them but on an older air cooled less sophisticatedly fuelled engine I'll stick with the older cheap plugs. You fowl one you whip it out and clean it and its good to go again. Fine wire are also great for longevity and advantageous where plug access is difficult so increased change out intervals means lower servicing costs. But as I said where's the actual measureable performance stats? I'm sure they're are some somewhere but if the advantages were so amazingly great then it would be everywhere and it's not. I suspect their greatest advantage is in long change out intervals and therefore lower servicing costs. The rest is much more vague and airy fairy. Ciao
-
I've heard of them, expensive from what I remember. I'm a bit more interested in validated scientific data myself as opposed to pretty pictures. Like magic oil and fuel additives and all manner of other mythical additives I need more than silly gimmicky observations. How many GP engines are using them? Ciao
-
Forget about making fuel consumption assumptions based on reading plugs on a road bike. Fuel consumption is measured at the fuel station with mileage V refill qty calculation. Road bike plug readings dont really mean much, too may variables. I'd ditch the fine wire plugs on this engine as well, just stick with the std plugs. I've been recommending Wilbers shocks for years and have the highest spec one on my bike which was custom made for my weight,riding and conditions. I also have a Wilbers on my GSXR1000 track bike and race spec Ohlins on my 1198 and poor mans Ohlins on my 1000ss. The Wilbers is better quality than the OEM Ohlins and a little below the TTX Ohlins on the 1198 in my view. I wouldnt chase a second hand Ohlins for your bike( because thats all thats available these days) for some silly money when you can buy something thats considerable better for less money new. Ciao
-
Just the wear of the chain,sprockets and tensioner and associated timing shift. Plus the fact you have another failure point with the tensioner and when a chain is let wear badly they generally start contacting cases and producing metal. Then of course there is ease of maintenance. I was also surprised that I needed to crank the idle down 200 rpm on my engine when I fitted the gears which i assumed meant that there was less friction but it may have been timing related, dont know. Once you have a quality set of gears they should outlast the engine with regular oil and filter changes so there's no real wear related issues to consider. maintenance is easier in that if you want to remove the oil pump or cam retainer flange your not messing about with tensioners and pulling chains etc you just pull the retaining nut for what your working on etc. The only real advantages I can see for a chain is cost and maybe they are better able to handle debris in the engine oil if your a slack servicer or you have a significant internal failure the causes contamination. There's a reason high end engines use gear drives. You wont find an F1 of MotoGP engine using chain driven cams or chain driven anything really. Like gas turbine engine accessory drive gearboxes, no chains. Ferrari Ducati V4 Desmosedici Ciao
-
Ok I understand. It's either quality gears (only Joe makes them to my knowledge) original steel Guzzi gears from the pre chain days, if you can get a decent set or the chain. Nothing really wrong with the chain except for the usual chain related issues and considerations of course. Ciao
-
Really? OK, lets hear em. Ciao
-
This is worth watching as a bit of a look back to the 500 two stroke days. The guys that rode these things really did have big balls. maybe not the ultimate speed of modern GP bikes but such handfuls. The opening song by Barnsey melds nicely with the slow mo action. Part 2 Ciao
-
Seagulls are the least of your worries at PI. The place can be crowded with Cape Barron geese. They make gulls look like pesky flies. Try headbutting one of these at any speed and you wont have a head. Marty Craghill hit one on the straight many years ago on his shoulder and it nearly finished his racing career permanently as opposed to 18 months out of action. Ciao
-
Yea look at me I've got paper towels to throw around. My wifes still dreaming about childhood where she used to make toilet paper wedding dresses. Times do indeed change I make no comment on the measurement, I'm just the deliverer of the information although I've always thought it was around the figures mentioned previously. Ciao
-
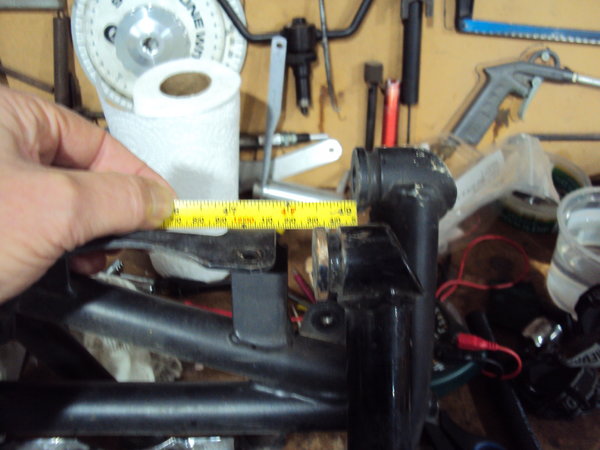
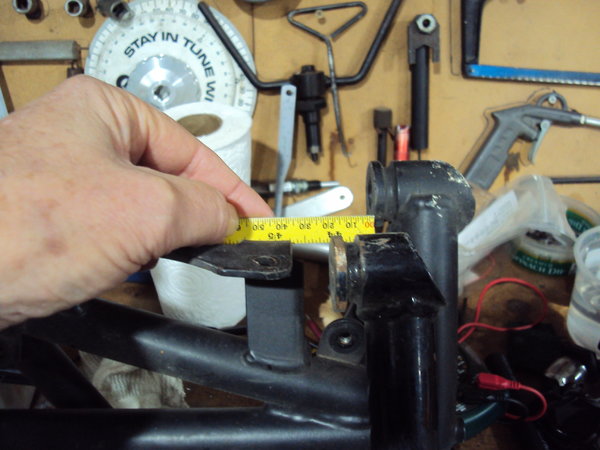
Here is an image of a Daytona RS front frame(foreground) and a later type V11 front frame with the top frame mounts aligned with a straight edge. Sorry about the angle of the shot with regards to reading the measurement. It reads 20mm. Ciao
-
From the album: lucky phils V11
-
From the album: lucky phils V11