Kiwi_Roy
-
Posts
2,378 -
Joined
-
Last visited
-
Days Won
62
Content Type
Profiles
Forums
Events
Gallery
Community Map
Everything posted by Kiwi_Roy
-
You can tell by looking at a fuse if it was a mild overload, (small gap) or a dead short (large gap) The back of the dash on mine is held on with 4 small nuts but you have to disconnect the speedo cable first which is a pain. If there's a loose wire in there perhaps it brushed up against something and blew the fuse. Don't feel bad I spent half an hour trying to start my Goldwing, no spark. It struck me an hour later, the kill switch was off, unlike the Guzzi it will still crank. Roy
-
You are right, but my initial idea with those diodes was to provide alternate feed if a relay fails, not a fuse. And sure, a diode will have a 0.7 V drop, but it will add 12-13 V compared to what you otherwise get with a failed relay. I haven't added diodes myself, but I imagine one should be able to find cheap rectifier diodes that are big enough to cope with 5A without a heat sink. The power at 0.7Vx5A is 3.5 W, that's pretty moderate. I obtained my diodes at Radio Shack, 6 Amps if I remember. To test them I just pulled the new fuse so it reverts back. Even with the additional 0.6 V drop there's still plenty of light. The photo doesn't show it well but I just wrapped the diode leads around the relay pins and soldered. The new heavy gauge supply to the headlight bucket will be useful for other accessories like heated grips but use a sub fuse that will blow with a short instead of taking out the main fuse back at the battery.
-
Yup. Since I'll have about 15k miles on the updated spring by the end of next season I'm planning on replacing it and the other two next winter. The thought of a small broken piece of spring loose in the box scares me. Where does the spring break and would it help to cover the potential break point with heat shrink. I don't mean to re-enforce it, just trap it from working it's way to the bottom of the gearbox along with some expensive crunchy noises. Where is the best place to get a set of springs?
-
Thanks Docc I will pull the cover off and take a look at that before next season. I read somewhere that the spring has been modified, Is there any way of knowing if it's been upgraded. The PO told me he had some gearbox work done and he gave me a few boxy looking parts in a cardboard box but nothing like No 25 spring that I recall. I was riding out of town late in the season and came across the only other V11 Sport I have seen, The rider was bemoaning the fact he had just lost a bar end weight, I said I've got one you can have, (I had seen one in the box of bits), he was happy as a clam. Can't wait for I know i'm getting some heated gloves so I can be back All the best
-
Tom, Which is the spring that breaks 21, 25 or 28 Me thinks I'd better be prepared. Roy
-
I was having a similar problem. I took a close look and i found one of the breather hoses was rubbing on the pedal. It doesn't take much. Roy
-
Bump I thought this might be a fun thread to revive over the winter Cheers Roy
-
Excellent Job I really like your brackets Roy
-
You should be able to unscrew the switch from the dash (two allen bolts if my memory serves me), hopefully you don't have the steering locked. You could also unbolt the helmet lock or the seat release lock and take it to a locksmith (not hardware store) who can make you a new key. I think some can cut a key with just the number that's stamped on the lock. The key blanks are not the sort of thing you will find at a hardware store but if you go to a Triumph dealer, they use the same one. I have a Triumph backup for mine. BTW if you take the ignition switch off it's a good time to pull it apart and clean the contacts. The grease in the contacts goes hard after a few years and holds them apart making bad contact and erratic running. I pulled the switch off mine but I can't recall for sure if the lock came off too. The seat release will come off easy for sure. Hope this helps Roy
-
Just to clarify: How do you hold 2500 using the throttle, as if you were riding or against one of the mechanical stops. (I just noticed it was Mr Bean said 1800 in Step 3, probably not significant) I found using just the LH idle screw resulted in a slightly different TPS mV reading each time the throttle was blipped with a corresponding loss of sync. My bike has over 70k on the clock, perhaps the linkage is a bit sloppy. I set both screws to make contact at idle. To clear up any imbalance at idle, Idle screws or bypass screws? I find riding my bike idling set at 1100 the engine braking effect is much less than I want so I ended up with a lower idle speed but then it tends to sneeze and stall at the lights, it's really hard to get a happy median But what the heck, a V11 Sport was never meant to ride in the city anyway!!!! Cheers Roy
-
Your sport is a nice green one like mine Google Carl Allison Drawings http://www.thisoldtractor.com/guzzi007/schematics/1999_V11_sport.gif 1/ Check first for voltage on both sides of fuse 6 with the ignition on (I suspect it's ok since the indicators go) The power goes from Fuse 6 to the light switch on the handlebars, from there back to the lights. there's a connector in between, I think this is the one under the front of tank at front on LH side. If your bike doesn't have a light switch on the handlebar I suspect the wires still go there. 2/ Check for voltage at the connector, take a good look at the pins for corrosion. 3/ Open up the switch and check for voltage on both sides. Sometimes the grease goes hard and holds the contacts apart. 4/ Look at the wiring loom while you swing the steering from lock to lock if there's a spot where it flexes more than most it's possible the wires are broken inside. Keep us posted Roy
-
It's part of my job to specify control valves, we have a computer program for calculating control valves which are rated in cV. Iiquids are easy but gasses are quite another thing. The data I posted is done with water at 1 psi difference but the throttle body has an ever changing pressure drop. Roy
-
It seems to me that opening the bypass screws must result in a weaker mixture at idle because the ECU thinks the throttle is less open, The throttle angle has very little effect for the first few degrees however at low throttle settings the bypass screw sees the greatest pressure drop It's interesting that the throttle is similar to a typical butterfly control valve. If you look at the chart for a butterfly valve you will see the flow characteristic is very non-linear, very little change in flow for the first few % of angle the flow change for opening angle is greatest around 30 - 70% Further adding to the confusion is the pressure drop, flow is related to the square root of differential pressure and as you open the throttle the pressure drops, the ECU must have a non linear calculation to take care of that. I built myself a little box that allows offsetting the TPS mV while riding, unfortunately mine was so rich I didn't see any change and I ended up buying a MyECU so I could have some control over the mixture. BFly cv.pdf
-
The rev limiter is a software setpoint in the ECU so if you are running a racing ECU it stands to reason it may be set much higher than normal (~8100 for MyECU)
-
Oh no, the Italian sneeze I opened my valve clearences up and it seemed to get rid of most of that. But wait for someone much wiser than me on this issue. Congratulations on the new bike. Roy
-
Updated Dec 3rd I bought a new Yuasa battery late last year. The voltage was all over the map, dropped down below 10 Volts at the lights but it still cranked over sluggishly, finally I took it back to the dealer and told them it was defective. I could tell they didn't believe me but they took it in for an overnight charge and testing. They found it had no capacity and replaced it free of charge with an identical Yuasa which works like a charm. I suspect something must have broken inside one of the cells to give only one or two plates instead of about 5. Another thing I did over the summer was pull my starter apart, I didn't see anything to worry about but changed the grease in it's gearbox, that seemed to improve it quite a lot, certainly quieter. Put your multimeter across the battery and tell us the voltage Key Off Key On While cranking What's the ambient temperature where your bike is stored? Something else you should do sometime is remove the lugs from the battery and scrape the lead to expose shinny metal then apply vaseline, this prevents lead oxide forming between the terminal and lug. Lead oxide is an insulator, light grey in colour, I have seen terminals that are really tight but no electrical contact due to the oxide. This usually shows up in winter when the cranking amps are high the engine will crank for a second then nothing. Check also the battery ground connection (behind the seat release key on my V10) that could be loose and the positive wire at the starter.
-
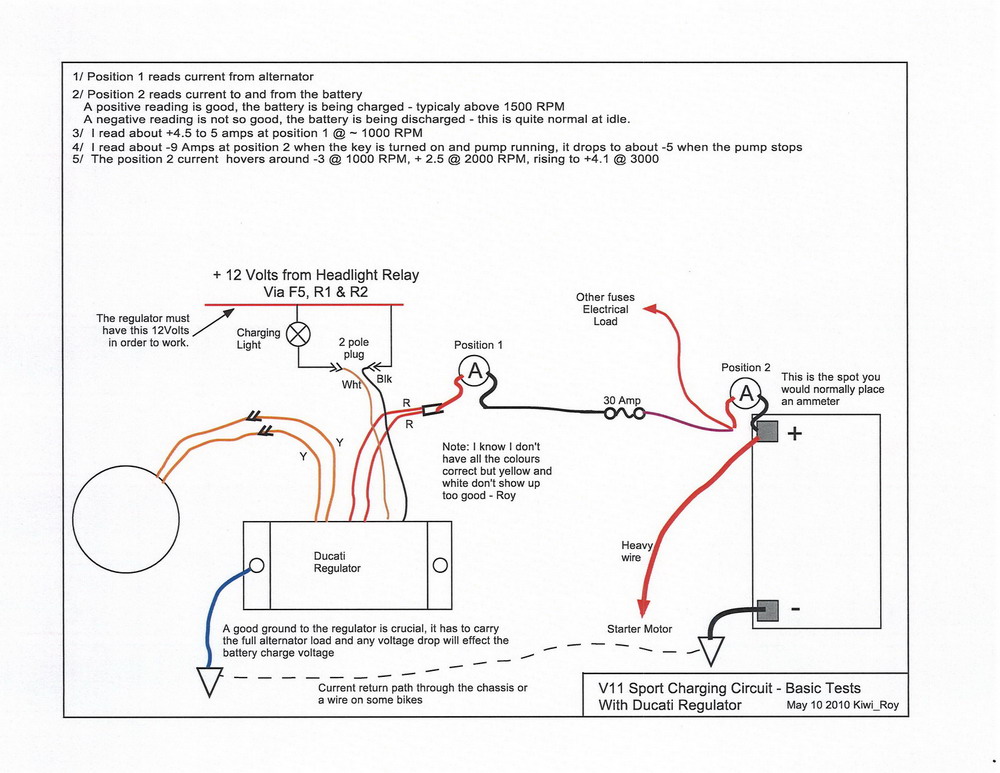
Ha, finally someone has realized what I have been rabbiting on about is correct. The grounding of the regulator is VERY important, All of the alternator current passes back through the ground. Actually the regulator doesn't regulate the battery voltage, it regulates the voltage between it's case and the black wire to 14 Volts or thereabouts. If you have a poor ground at the regulator it's the battery that looses out (1/2 volt lost in the ground is 1/2 Volt less that the battery will charge too) The two spring nuts are not good enough to provide a good ground, you have two dissimilar metals getting sprayed with water and road salt or whatever, that's just asking for electrolysis. For my ground I drilled a 1/4" hole through one of the fins and attached a wire with a bolt slathered in grease. The other end I connected to a timing cover bolt. Charging Circuit.pdf "Recently I have been seeing the red charging lamp flickering on while riding down the road" Looking at the regulator schematic I can see how a bad ground would do that. It's interesting that your bike was running rough with a bad ground, I haven't quite figured that out but I had a similar experience when my ignition switch was making bad contact, the bike behaved as you describe, flicking the switch a couple of times seemed to cure it. I talked another guy who's lemans was running hairy into overhauling his switch, he was amazed at the improvement it made. I haven't quite figured out why the switch contact effected the bike running so much because the ECU gets it's power through a relay, unless it was so bad the relay was dropping out. I also have a theory that a bad ground can lead to the early demise of the Ducati Energia regulator. That reminds me, too much voltage at the battery seems to cause the ECU to cut out, making the bike lurch, I think it must have an internal over voltage cut out to protect itself. It's very easy to check the ignition switch contacts from under the seat. Test Point Layout August 18 2010.pdf Measure between the base of fuse 6 to the 30 contact of R3, it should be ~ 0.5 Ohms each time you turn the switch on. The grease inside the switch goes hard after a few years and it holds the contacts apart. Mine dropped from anywhere from 10 - 16 Ohms down to a consistent 0.5 after cleaning. Raz's point about the injectors is a good one, also if you have a bad connection in the circuit not only does the ECU compensate for the low voltage but also the resistance may prevent the injector opening at all. Each injector is ~17 Ohms so it wants to pull 0.7 Amps The coils are 0.7 Ohms so they will pull an instantaneous 17 Amps, the fuel pump also pulls a whack of current. From memory the current averages out about 9 Amps but the peaks are easily twice or 3 times that. Any resistance will have a huge impact. Another thing to check is the state of the relay base contacts, a high resistance there R4, R5 or a bad contact at the fuses can effect the bike's running. Even R2 the headlight relay base will have some effect because that's where the regulators Black wire gets the battery voltage reference from, the same wire also powers the tacho so it playing up can point to a connection problem that may also cause over-charging. Sorry about raving on here but I love a good electrical mystery. You don't have to be an electrician to own a Guzzi but it helps. I'm glad your bike is running much better, I hope others will take note and do this simple ground strap addition.
-
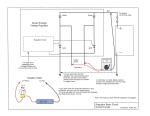
After I repaired my regulator I did some testing, here's the results The ammeter in position 1 only shows what the alternator is putting out In position 2 it shows the net charge ±, you need to stay Positive If you have any additional running lights or heated gear you might be tipping the balance. BTW, did you test your diodes (I thought I asked before but it seems to have dissapeared) Good Luck Roy
-
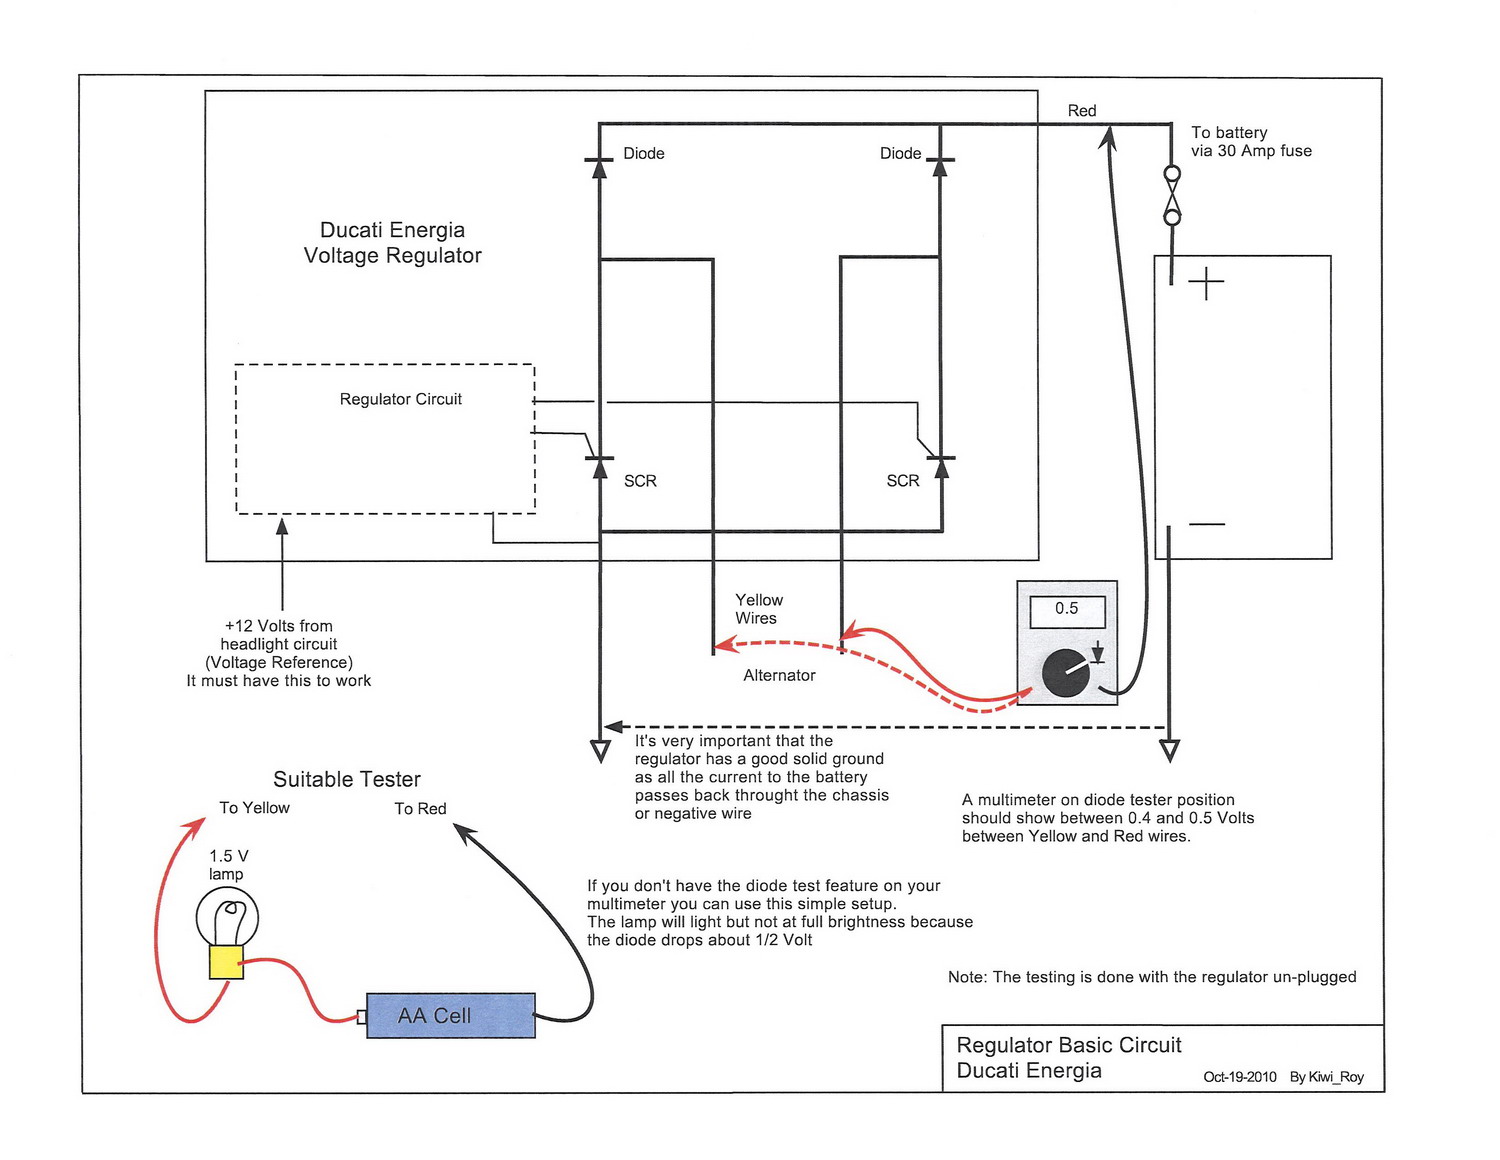
I would think 20 K would give you a good charge unless you spend a considerable time idling at the lights where it's actually discharging the battery. I tested my V11 after fixing the regulator with the ammeter connected between the battery terminal and the positive wires (not starter motor) in the classic position for an ammeter The net charge to the battery was -3 @ 1000 RPM, + 2.5 @ 2000 RPM, rising to +4.1 @ 3000 Having said that I found I had to tweak the regulator voltage setting to get the battery voltage up above 13 Volts after a run with the motor off. Buried just below the surface is a trim resistor that can be changed to raise or lower the voltage setting. BTW, did you test your diodes as I showed, it only takes a second if you have diode test on your multimeter, just unplug the regulator and test from each yellow to red. Roy Regulator Schematic Nov 2010.pdf
-
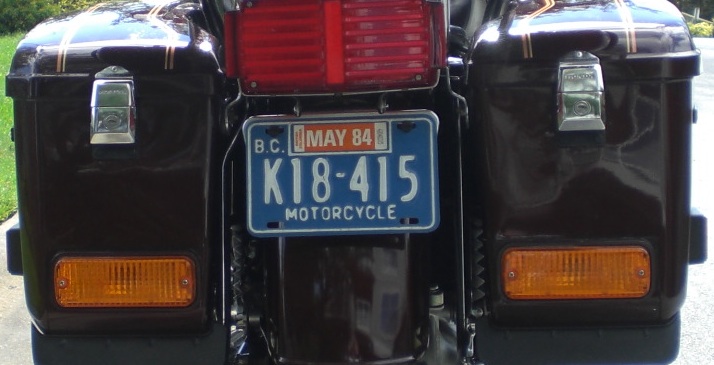
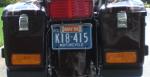
No, I'm sure it's genuine Note the plate sticker expired early 84. Everything is still tight, propstand etc, the original paint is immaculate but the brightwork suffered. Brakes were all gummed up, I had to drill the muck out of some of the carb passages. So the story goes old guy's wife talked him into buying it and the rode to the beach where they laid it down and couldn't pick it up, took it home and parked it. Alloy wheels. I'll never get it back to perfect but it should be a great bike to take my wife along. Roy
-
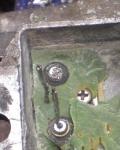
Skeeve, Glad you bought up the Goldwing, I picked one of those up a couple of months ago, an 83 with 305 original km on the clock, it sat in a garage for 27 years. I will certainly deal with the connector as you suggest. Update: I chopped the Molex connector out and soldered the wires with some heat shrink. The pickup wires for the ignition also have a connector right there, I just slathered that in grease. Here's a picture of the two diodes inside the Ducati regulator the one at the top has melted the lead off and you can see the arcing. Cheers Roy
-
Guzzimeister and Photoguzzi are right on. I have pulled 3 regulators apart, each one had a bad connection to one of the diodes. The good thing is it's very easy to check the diodes because the wire directly between each yellow wire and the red wire. See the attached sketch. Photoguzzi pointed out that the regulator ground can be a problem, relying on those captive screw spring clips "dodgy ground connection." His solution of running a wire back to the negative is a good one, I drilled a hole through one of the reg fins and ran a fat wire from there to a timing case bolt. Don't forget to put some grease on the aluminum to copper connections to prevent corrosion. I have a theory that the regulators are damaged because of a bad ground to the case connection. The regulator tries to compensate for the lost voltage (it sets the voltage between black wire and it's case not across the battery) If the connection to the case is bad the regulator still maintains it's setpoint of 13.8-14 Volts between red/black wire to case so whatever voltage is lost between the case and ground is added to the battery. As it tries to push the battery voltage over 14 Volts the current goes sky high until it melts the leads off one of the diodes, after that you limp along on just half the charging. Heres the basic circuit, notice how all the current to the battery has to pass back through the "dodgy ground connection" and back to the alternator. The Voltage reference is the black wire of the black/white pair. Note: The voltage reference the regulator uses is the Red/Black wire that also supplies the idiot lights and tacho via the headlight relay. If you unplug the headlight relay the charging will stop. Something else to check is the 30 Amp fuse, see if it's getting warm or is welded in, a sure sign of a bad connection there. Connect your digital meter to the battery and strap it to the tank so you can check the voltage while riding.
-
They look like a great idea, I think the use of 2 sockets for the mounting would work really well. For winter storage I would tie it back to the frame to prevent accidental unloading. Roy
-
Are you running LEDs, they draw such little current any water around the switch will make the light come on. Mine comes on after a wash or in the rain, i don't worry because I have a pressure gauge fitted.
-
The Mirror extenders look great but surely they put the mirrors further out in harms way. Would they snap off at the extender if dropped? Perhaps the stem could be replaced with a longer one for the same effect.