Kiwi_Roy
-
Posts
2,378 -
Joined
-
Last visited
-
Days Won
62
Content Type
Profiles
Forums
Events
Gallery
Community Map
Everything posted by Kiwi_Roy
-
OK Here is the latest.... Many thanks to Raz who helped with this project by offering constructive comments and proof read the drawing. Between the two of us I think we have managed to capture all the salient points. Roy Regulator Schematic Sept 1 2010.pdf
-
The instructions that came with my new Jell filled Yuasa calls for 12.8 - 13, 2 hours after charging, the most I have seen is 12.86 I'm happy with that I seem to have lots of cranking power.
-
You wouldn't gain anything, 2 diodes and 2 SCRs is as good as you can do for a single phase alternator. Actually on my next winter project I am going to use a bridge rectifier (4 diodes) and just one SCR.
-
When you say 14.6 are you refering to the voltage with bike running, I find as soon as I shut of the voltage drops to around 12.85
-
And heres a Diode Fix........... The Diodes seem to be a common problem, they melt the leads off and go open circuit. When this happens you loose half of your charging, look at the waveform I show on the right hand side or the regulator schematic and imagine every second pulse missing. Your regulator will now not be able to keep up the voltage although it will struggle along for years possibly It's possible with a bit of luck to dismantle the regulator and fix the diodes but you run the risk of doing more damage to the circuit board getting it out. Fortunately the diodes are directly connected to the outside world so you can simply connect another in parallel. Leaving the bad one in circuit is not a problem. I like to use one of the potted bridge type rectifiers because they provide a convenient way of mounting to a heat sink (the bike chassis) without having to worry about accidental shorts to ground. A 20 Amp bridge is big enough because at the most you only use 2 of the 4 diodes so it shouldn't overheat (higher current rating is better) You could use just one diode to replace the bad one but remember it's case is alive (+12 V connected to the 30 Amp fuse F3) so it needs to be isolated from ground. Regulator External Diodes.pdf
-
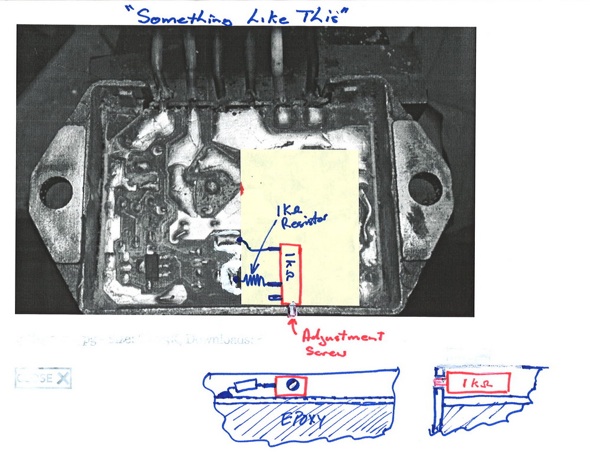
Heres the Circuit...... It's posted elsewhere but this seems like a good spot for a copy. Notes: 1. The part in light brown is just for the charging light and not required for the regulator. 2. Note 2 on the drawing shows a value of 575 Ohms, this was measured in-situ. The actual values I just checked were a resistor 820 Ohms on the component side and a trim resistor 4700 Ohms on the circuit side, I think what they do in the factory is instal the 820 Ohm resistor on the component side, install the circuit board then put it on their test rig and substitute different values of "Trim Resistor" until they get the right voltage. This makes it possible to change the setting slightly if the regulator drifts off with age, you can simply uncover the Trim Resistor and change it for another value, Increasing the resistance will increase the voltage. If you decide to do this, change the value in small steps and do a decent run because it takes a while to reach the new voltage level. Bear in mind changing the value of the trim resistor by 10% won't change the Voltage much because it has little effect on the combined resistance and also it's only one small part of a Voltage divider circuit. I sugest you solder a couple of short wires onto the circuit board so you can test different values easily or add a trim pot as I show in the photo/ The most voltage you will get is with the trim resistor off altogether. If you can't get enough Voltage check your diodes, one may be open circuit. I check my Voltage in a set pattern, by going for a ride then turning off the key before stopping so the headlight doesn't drain the battery down any. I attached a photo showing where the trim resistor connects also shows how you could make an adjustable version. In hindsight I would use a 2K fixed resistor in series with a 5K trimpot, this should give an adjustment range of about 1 Volt Regulator Schematic.pdf
-
That's reasonable. If you get 18V then all components work as they should, besides the regulator circuit wich obviously fails to open the rectifier at 14/15V. The internals get damp after some years, salt and other nasty things get in as well and as a result migration often starts bridging parts and even wires. Putting mine into the kitchen oven at 120°C for some hours cured the 17V problem. Probably temporarily, but for this summer it works. Hubert I can't see how the potting could fail to keep moisture out (looked really tight everywhere and no cracks), but maybe you are right. I'll aim for some active tests. BTW I tried re-soldering most components on the PCB's in case there was hard-to-spot soldering faults. My 40W Weller iron is far too weak for the diodes and external wire solders. I need to buy a cheap-ish heavier iron for them. Not sure how much power is needed. I remember my dad had a huge soldering iron that was probably capable of soldering tin cans, that one would have come handy Are you trying to solder it with the diode mounted or in a vice, if so all the heat will soak away, I did mine with the diode sitting on a piece of wood 40 Watts should be enough.
-
Do you mean I connect 15VDC should give nothing? And then reverse poles on the input. I guess that should work. With a variable supply I could even spot the switch point. No wait, I could put the reference wire to a voltage divider potentiometer! And use a 15VDC or higher source. This might be a plan. Maybe it's better just hooking it up properly to my bike though. This will test all of it at once. It's just that I would need to pull fairing and tank - and then mount the tank again for a test run, and then remove it again, and... The output of a battery charger will be a series of pulses peaking about 18 Volts and dropping to zero but it would only check one pair of the diode SCR bridge On second thoughts I'm just confusing the issue, If you can connect to the transformer inside the charger or find a suitable transformer do it that way. No you don't need a variable supply to check the switch point the regulator will take care of that it will just rectify whatever AC you throw at it until the battery comes up to voltage then it will start to skip half cycles and eventually stop firing the SCRs altogether. Obviously you don't want too large a transformer or the regulator will overheat. Another option would be to use say a 20 - 30 Volt transformer with a lamp in series, say a headlamp bulb then as the voltage comes up you will see it cut back by the lamp brightness. Actually if you can find a reasonable size 12 VAC adapter (Wall Warts they are known as here) they put out a lot more than what it shows on the nameplate. I use a 1 Amp DC one I found as a battery charger. If you want to test it on your bike a good spot is put it on the steering damper bolt, all the connectors are right there.
-
Yes the ones I have seen are usually shorted out but I haven't found a bad one in the regulator yet, they are a pretty rugged device. I test SCRs out using my bench DC power supply set at about 1 amp but you need them out for that. I think you should be able to see the Cathode Gate junction with a diode tester, I will try that tomorrow. Yes an active test using a transformer is an excellent idea, you could put it in place of the alternator and let it charge a battery that should work 12 - 16 Volt or even a transformer 12 - 24 V with a lamp in series to limit the current, The lamp would start to dim approaching the set voltage as the regulator skips half cycles. I couldn't find one the right voltage in my junk. Come to think of it a simple battery charger might do it. connect it one way to check one Diode SCR pair then flip the leads to check the other pair. Or you could open it up and connect to the transformer, even better. Roy
-
OK, now I've also got two busted ones with that green rubber-like potting. Much easier. There is no way I can lift the PCB from the one with black potting without breaking it to very small pieces of debris but I should be able to get to the diodes or fit one diode externally. Another question as I'm a bit rusty (or just plain stupid): The charging system is 350W, or "14V 25A". That means I can use 25A diodes, right? (ignoring margins for the sake of discussion)? Edit: All three busted regulators I have has the same part no, 343637. Except for the potting there is no difference I can see except the voltage trim resistor happened to be 2K7 on both newer ones while the oldest one had a 2K4. That one was damaged so I'm replacing it with a 2K7 too, hoping for a slight voltage boost. Update.... I had a look at the circuit board, there are several components that would be destroyed by cutting the board, i think the only option you have if you can't get the board out is to add external diodes. I think a 25 amp diode is more than enough, the normal current is much less. the problem is keeping the diode cool thats why I like the square potted bridge you can just bolt that on to a chunk of metal somewhere and not have to worry about insulating it from the chassis. Adding external diodes also eliminates the possibility of screwing up the board. Re the trim resistor, I used a trim pot in series with a resistor but I wound up having to turn it opposite to the way I figured so i either screwed up on the wiring or miss-understood how it works. I measured the resistance tonight and it works out More resistance = More battery voltage Regulator External Diodes.pdf
-
Those 2 little angle gearboxes are the pits, I toyed with the idea of doing away with them and having a straight cable, You would have to ditch both so the drive remained in the right rotation. It would probably require a longer cable to sweep around at a decent radius. For now I will just put up with my Heath Robinson repair.
-
I scratched around under the board as best I could before prying off, I assume you also have the SCRs unsoldered, the transistor in the middle of the board is not fixed to the case but it usually stays behind, The other thing is a jumper wire that goes corner to corner, (yellow wire to diode) it will stay behind if you unsolder it. One of your diodes has let go for sure, heating it up must have made it touch again, won't stay that way. They are like a little hockey puck with two leads soldered on. Once you have the leads unsoldered from the circuit board see if one is free to move. If you don't think it's going to come out the other option is external diodes, I would use one of those potted bridge rectifiers and bolt it to something. If you need any parts let me know I have salvaged some you can have no cost. Perhaps instead of taking the whole circuit board out you could break the corner out and just connect back to the diodes with short jumpers, might save some time. Roy
-
I guess there arn't any, you will just have to roll up your sleeves like the rest of us
-

Newbie to Moto Guzzi - Oldie to most stuff
Kiwi_Roy replied to Motocomiot's topic in Technical Topics
This was an interesting problem ...... The Tacho does not work - (it wobbles the needle to 500 rpm then gives up), Fuel low light, charging light and oil light are also out although the Hi beam, Indicator and Neutral idiot lights are working......I am assuming that at least Oil and Charge would come on with ignition on before starting ? - bulbs are OK by the way and everything else works too including the light in the Tacho itself.. For posterity, Did you actually pinpoint the problem, broken wire, burnt wire? How did you fix, just jumper around or join a new length in? BTW, to find a break in the conductor under the insulation pull hard, the insulation will stretch at the break, If it was a broken wire the chances are some of the others in the loom are getting ready to snap also. Wherever wires flex like the headlight area it's best to have them gently twist over several inches rather than bend in one spot, copper work hardens and becomes brittle with bending. Glad you're up and running again. -
Newbie to Moto Guzzi - Oldie to most stuff
Kiwi_Roy replied to Motocomiot's topic in Technical Topics
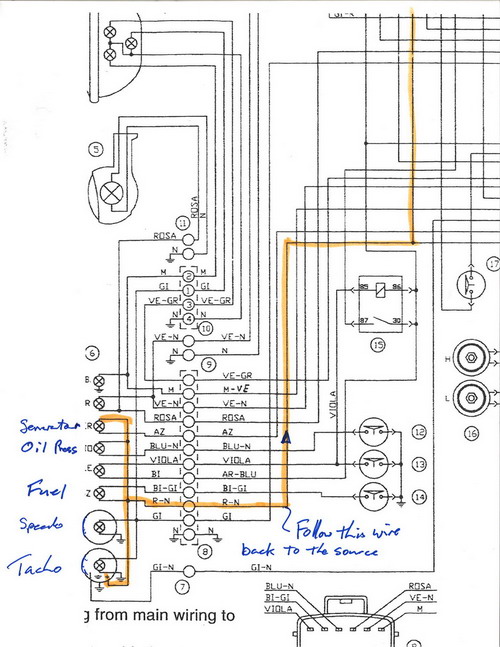
As I suspected there is quite a variance in the wiring however it's probably all the same on the dash. Take your diagram and compare to attached. Follow the R/N (red / black) wire I have highlighted back to it's source, the headlight relay in my case. What Docc says, Another thing to look for would be a break in the red / black wire where it flexes at the headlight area, it shouldn't bend sharply in one spot. Remove the cover from the speedo / tacho and look for +12V on the Red/black wire at the tacho. You should also have a red / black wire at the voltage regulator with +12V if it's missing at the tacho chances are it's broken between the regulator and there, it goes through the large connector on right side of tank. Its a pretty small wire from memory so it's also possible it had a short and burned off. The idiot lamp holders can easily short out, very poor design IMHO.
-
Newbie to Moto Guzzi - Oldie to most stuff
Kiwi_Roy replied to Motocomiot's topic in Technical Topics
Hi I'll scan the schematic when I find the thing Horn works none of the above idiot lights come on at all charging is fine - I have run it for a week and the battery is cranking away just fine Thanks for the help - I will investigate relay 2 - it sounds like the most likely issue - I will test contact tomorrow Thanks for all help so far...... I'm not sure if your R2 does what ours do, that's why I asked for the diagram Here in Canada the headlight is permanently on (we don't have a light switch), Relay 1 breaks the circuit while cranking, Relay 2 powers the indicator lights, headlight, tacho, horn and reference for the voltage reg. I'm sure yours has some suttle differences. Geez, we need spell checking! -
Newbie to Moto Guzzi - Oldie to most stuff
Kiwi_Roy replied to Motocomiot's topic in Technical Topics
On my bike the charging, oil & fuel light and most importantly the tacho electronics are all powered from the N/O contact of the headlight relay, Relay 2, this also goes to the voltage regulator and horn. It might be that the tacho can go part scale with just the pulses from the ECU and no +12V The wiring may be different for UK, can you scan the schematic in the back of your manual, I would like to see it. A few troubleshooting questions Does the horn work Does the light come on when you turn the key on and go off while cranking Is the bike charging battery ok (not going flat) Roy -
When you say it won't take the relay do you mean physicaly can't plug it in or does it cause the fuse to blow? My No 2 has no wire on the 5th pin, in fact it doesn't even have a contact. Have you removed the bases to see if theres a wire in the 87A position? I suspect that some bikes might have the No 1 & 2 switched but that shouldn't change things. Is your headlight behaving normally, turns off with cranking. Perhaps in some countries the wiring is different, here in Canada we don't have a headlight switch on the bars. Roy Test Point Layout August 18 2010.pdf
-
I installed a MyECU, at about the same time I set my valves as per manual and I had the backfiring spitting back issue. On recomendation by Raz and others i opened out the tappets by 0.010 and it completely cured the problem, bike now idles nicely. As I see it the problem with power commander it only allows tuning the injection time whereas MyECU gives you the ignition as well.
-
The 5 pin relays are a direct replacement for the 4 pins, but only the starter relay uses the 5th pin. Like yours mine had several 4 pins because that's all they require so they save some money but when I replaced I used all 5 pin Omrons in mine from these guys. http://search.digikey.com/scripts/DkSearch/dksus.dll?Detail&name=Z2247-ND Click on the "Datasheet" it will give you all the specs. They have another relay Z2001ND that has sealed contacts but that's overkill in my opinion better to use the money on a couple of spares. The 2 critical relays are 4 & 5 (for the motor to run), the others are just for non essential items like starter relay 1 and headlight relay 2, neutral switch / kickstand relay 3.
-
Yes, you loosen the pinch bolt around the body of the damper and slide it through a bit further so it hits the end stop before you get contact. I only know this because mine was perfect until I took it off, when I put it back I wasn't fussy enough Stop it right there. You must NOT use the steering damper as a steering stop! It's not built to take that. Modify the real stop instead if needed. The damper is there to damp quick movements like a tank slapper. If this happens when incorrectly mounted like you describe, you will break the mounts. oohhkaay, I will take a close look, are there some adjustable screws or something. If I ever get into a tank slapper will probably be more worried about my undies He He
-
No, he's not, he's the lone ranger, at least that's what he told me
-
Yes, you loosen the pinch bolt around the body of the damper and slide it through a bit further so it hits the end stop before you get contact. I only know this because mine was perfect until I took it off, when I put it back I wasn't fussy enough
-
IF the turn signal lamps are not on or on dimly replace the flasher unit. if the turn signal lamps are on or on dimly you have a ground wire problem in the turn signal wiring circuit. The grounding was my thought too, perhaps at the rear, it may not show up while parked, perhaps when you are sitting on the seat it breaks the rear flasher circuit. Has to be something simple, I also thought a bad battery/regulator ground might let the voltage float extra high. A new flasher for sure can't go amiss.
-
So I know where to come when mine gives out, glad you are back on the road. Roy