Scud
-
Posts
4,123 -
Joined
-
Last visited
-
Days Won
253
Content Type
Profiles
Forums
Events
Gallery
Community Map
Everything posted by Scud
-
When I replaced one of the micro-switches, the kit came with a little plastic cylinder instead of a ball. Therefore, you could make one out of a bit plastic or metal if you can just find something with the right diameter. For example, you could cut a tiny piece out of the middle of a nail (don't use the pointy part).
-
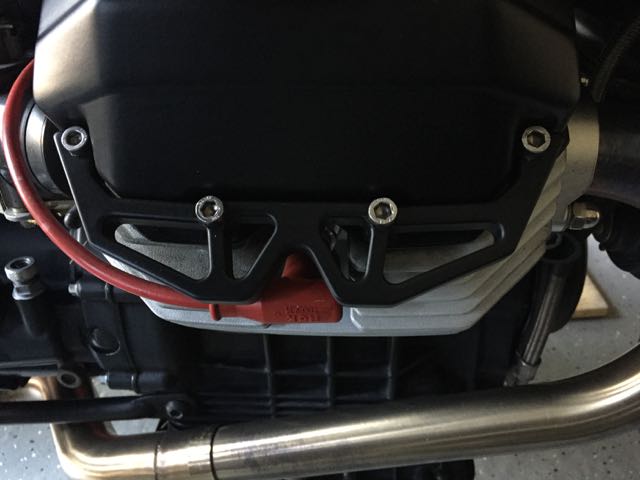
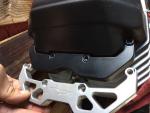
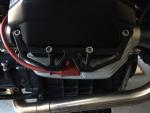
Here is another Joe Kenny style, next to a MotoBits guard that I had powdercoated flat black. Both of these guards are a bit thicker than stock, and have recesses for the bolts. And these trellis-frame guards are available from Harpers in silver or black. I got black, but the anodization went to purple in only a few months... so now they are powdercoated flat black. No recesses for the bolts on these guards. Harpers sells them with new bolts - some of which are extra long to accomodate the thicker guards.
-

Oil on engine case....?cylinder head gasket replacement
Scud replied to plexiform's topic in Technical Topics
I agree that the leak is almost certainly at the timing sensor. I bet you will find a crusty, squared-off, or broken O-ring in there. There's an outside chance that the leak is due to a broken timing cover gasket. The original gaskets were paper, but thicker ones are available. Mine was leaking from both places (timing cover and sensor) at the same time. Your leak looks like low volume. Mine got so bad it was putting oil on the rear tire - and the oil would soak behind the paint bubbles, which made it difficult to get totally clean. I'm in the middle of a crinkle-paint exorcism now. I don't think I would have bothered if I didn't have something else to ride during the project. But I am seeing that the paint problem is not totally cosmetic. There are several areas inside the cases where paint has peeled, bubbled, or flaked - which puts crap in the oil. I don't know how serious that is, but I'm getting it out of the cases while I'm at it. -
I just flushed them - didn't bother checking the before spray pattern. I don't think I would have pulled them out if I didn't already have the engine and tranny out. To me, cleaning the injectors was worth the trouble, because I was already so deep into it and was replacing the fuel lines. However, I grossly underestimated the time and effort required to remove all the crinkle paint.
-
Little update - got the deep socket yesterday. The timing gears are out and I'm going to start stripping the engine paint today. There's nothing like having a proper tool - and I'd be happy to loan it as needed. Yesterday I also received a nifty new fuel injector cleaner (also available for loan): I sent MartyNZ a pair of injector plugs from an old wiring harness and he made them into these fabulous injector cleaning kits. Nice long leads to attach to a battery (even if still on the bike), quick-connectors for the injector plug (so it can be used with other types of injectors) spray bottle adapters, clamps, etc. everything to make it super-easy on this first-timer (me). And here's the super-cool factor: a foot switch so you can hold the injector and spray bottle with two hands. And the super-super-cool factor: Marty put a light inside the wires - so it lights up when the injector is open. I probably over-cleaned the injectors just so I could watch it light up. Thanks Marty.

-
This makes me think about the supplemental ground that many of us have run from the voltage regulator to the engine block. I wonder if it would be better to ground the regulator to the steel spine frame instead? Sorry for straying off-topic.
-
I recently noticed that I had misaligned my driveshaft on reassembly (just by one tooth). The video made me feel much better about the effort required to correct it. I knew there was a reason for the alignment, but never understood the reason before.
-
The heads on my LeMans were discolored as in your pictures - I don't know what's normal, but at least you're not alone. Painting the engine will never be easier than now, while it's on the bench. So if you think you might want to paint it, this is the time.
-
That makes sense. I probably didn't remember the conversation with the Hyperpro builder accurately.
-
Perhaps FotoGuzzi will be along to extoll the virtues of the DR650. Be cautious with the Husqvarna Terra. From what I understand, a well sorted one can a be a real joy - but it's a bit of an orphan bike. It was sold during the short time when BMW owned Husky. The Terra has a modified BMW engine.
-
Sort of like finding Moto Guzzi parts - there are a few dealers who know how to find things - two local dealers in San Diego, plus Hall's Cycle for "mail-order." But it doesn't need much besides normal wear items. That said - I did bend a footpeg and broke a horn bracket (which in turn severed the speedo sensor wire) - so I will test parts availability again soon.
-
If I am going any significant distance, I leave my mapping software on my computer with the tracks I intend to ride displayed. I overview my intent with my wife so she knows where to look if I don't come back. On this particular trip, I borrowed a friend's satellite phone (but didn't use it). I have been thinking about getting a SPOT or similar - also thinking about a Medevac insurance policy. Maybe that's something for the Christmas wish-list. Those are good safety items for street riding too. KLR650 or DR650 would be great choices for TAT... but have you seen the Husqvarna 701? http://www.husqvarna-motorcycles.com/us/enduro/dual-sport/701-enduro/
-
That's an aftermarket IMS tank. I think it's about 3.5 gallons. I can get close to 50MPG on fairly open terrain in 6th gear - but use a lot more fuel over technical sections, because, well, to borrow Chuck's phrase "dirt-bike ridden in anger". You can carry more gas in a roto-pack on the tail. The Italian-made carbureted Huskys are solid, reliable bikes that would be way more fun than either of those heavy (and more comfortable) 650s. I had a TE510 before this TE450. The 510 was a beast, but it ran hot. I like the 450 better. The 450 with the Akropovic exhaust still has more power than anyone realistically needs - and it's got tons of grunt down low. I've done several 200+ mile days (and some 500-mile weekends) on Huskys and I think it would be capable of a cross-country trip. I think the choice of a Husky vs a KLR or DR for the TAT is sort of like choosing between a V11 and a big Harley for a cross-country trip on pavement. You know the Husky or V11 will be more fun - but you know there's more dealer support along the way for the other bikes. The new, fuel-injected KTM and Husqvarna 500s would also be great choices - although much more expensive. @Jester - no injury, but I did bang up the bike a bit - dropped it four times in about two miles of that rocky single track, and again following a spectacular loss of traction while trying make a snow-covered grade. No drops on the long-haul to the Grand Canyon though.
-
If you decide to go with a new shock, consider getting a taller spring*, as fitted to the Ohlins-equipped models. When I got a Hyperpro built for my LeMans, they asked if I wanted the taller (Ohlins-height) spring* or the standard (Marzocchi-height). I chose the stock height, and it sits noticeably lower than my Scura. *edit: should be taller shock, per comments below.
-
We've had some recent conversations about dirt bikes, so I thought I'd share a non-guzzi adventure with you guys. My oldest daughter is attending Northern Arizona University, and this was our third Thanksgiving in the area. We rented a cabin near the base of Humphreys Peak (aka the San Francisco Peaks). There is some fabulous single track that starts only a mile from the cabin. Some of it is rather challenging. I didn't make this sharp, uphill, right-hand turn, so I took a picture while gasping for (thin) air and before wrestling it through the rest of that section. On my last few trips to visit my daughter, I've been intrigued by the possibility of riding all the way to Grand Canyon National Park on dirt roads, and decided to make the attempt Friday. I estimated 75 miles one-way. That morning was 20F (-7C) and some of the first roads I intended to ride were impassible due to snow. Funny thing - I had scouted one of those roads the day before and was making good progress on a snowy uphill, but had to bail because people were sledding down the road. Here's a shot of open forest, looking back on the 12,600 foot Humphreys Peak. My plan was to go round-trip all on dirt, but I had some navigation challenges, some self-inflicted, but others due to roads being closed, too snowy, and most frustrating of all, reality not matching the tracks I had planned in my GPS. I saw deer, elk, and a coyote. By the time I got to the Grand Canyon, I had covered over 100 miles and it was much later than my plan. But I still had time to enjoy the park. I just went back on the asphalt, because I didn't have enough gas or time to go back on dirt. Rolled out this morning before Northern Arizona got hit with a lot more snow. This is probably the last high-altitude ride of the year. Thanksgiving is traditionally the start of the desert riding season here - and the sand dunes near the CA/AZ border were packed with campers - but I just love riding in the mountains, especially if there's some snow.
-
Ha - I unloaded my used one by myself. Big mistake. Was fortunate to avoid injury. A couple bonus features when you have a lift: An adjustable height table for all sorts of other projects. A loading platform for a pickup truck
-
Uhhh, I back the bike up and clamp the rear wheel in the vise. Well, that seems like a pretty obvious solution now that you point it out.
-
I got a used HF bike lift that I found on craigslist. The PO modified the front wheel chock to make it sturdier, but I still strap it on both sides for security. A surprising benefit is that I can move the lift with the bike on it - so I can put it in the middle of the garage while working on it, and move it against a wall while waiting. The lift has a couple of feet that screw down to the floor so it cannot roll accidentally. I have a roll-on wheel chock (from Cycle Gear) which holds the bike very well. I intend to remove all the HF front wheel clamp stuff and modify the lift so I can quickly install/remove the roll-on chock. The lift is great for raising the whole bike to a convenient working height. I've found that I need several different ways to raise the wheels off the ground - but I have not yet figured out how to remove the front wheel while it's on the lift (since it's clamped in). I really like the simplicity and versatility of the platform jack (under the transmission). I use that platform jack a lot.
-
Looks like fun! For the belly pan, I cast my unsurprising vote for black. However, I believe the Nero Corsa has a dark gray diamond pattern over the black. What about using that dark gray for the belly pan - or if you're really ambitious, copy the diamond grey/black pattern to the belly pan? Before you go riding with your new belly pan, put some clear ding-tape over the leading edge - or it will get chewed up by rocks from the front tire. I used a strip of clear tape that is meant for door sills in cars.
-
I haven't had to install new rotors on a V11 yet, but I put EBC stainless drilled and floating rotors on my K75s. They were less expensive than the BMW parts (which are fixed, not floating discs), and I'm happy with them. I agree with all the comments about the importance of buying quality brake components. If you want to buy used, you could increase your confidence in the used parts by using a good caliper and a run-out gauge.
-
Congratulations. My experience is that as soon as my wife got addicted to an evening TV show, I got to use that time productively (aka sit in the garage all night). Wiring? I got nuthin'
-
Hey Stew - I think you were clear, but maybe we only know how to help with the front part, which IMO is the main problem (and which you have already fixed). I don't shy away from rain and dirty roads (although we don't much rain here). When I ride in those conditions, I find the rear fender adequate, even after I chopped off the bit below the license plate.
-
With the right pdf software, you could delete all the non-english pages and save the smaller file. However, the pictures are not duplicated along with the translations, so sometimes you need an Italian language page to see a picture that is referred to from an English language page. When I printed a manual for myself, I kept track of what pages had either English or pictures. Here's a link: http://www.v11lemans.com/forums/index.php?showtopic=19504&hl=
-
That's exactly how I felt about my Scura with the same original aluminum flywheel. The worry about the potential breakup made me not want to ride it.
-
Ratchethack... for President?
Scud replied to ScuRoo's topic in Special place for banter and conversation
Amending my earlier post... Alexander Hamilton (on US $10 note) was never president either. And according to the NY Times, we'll see Harriet Tubman, an African-American female, on the US $20 note - but not for a while yet. http://www.nytimes.com/2016/04/21/us/women-currency-treasury-harriet-tubman.html?_r=0