Scud
-
Posts
4,123 -
Joined
-
Last visited
-
Days Won
253
Content Type
Profiles
Forums
Events
Gallery
Community Map
Everything posted by Scud
-
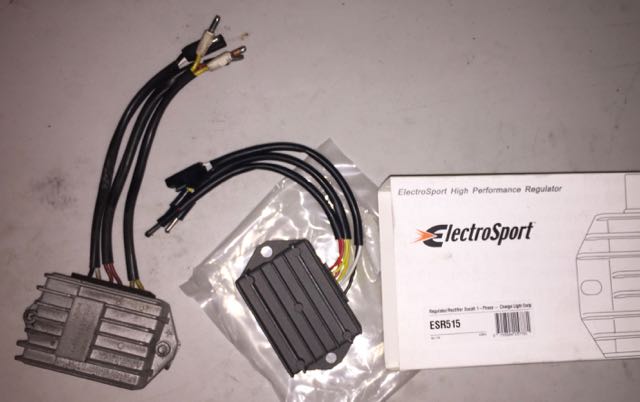
Wondering if I should install this, since I've got the stock one out. I'm not having any problems (just had to disconnect it to get the engine out for clutch replacement). I thought I read that this was an improvement over the stock unit, but I can't seem to find that thread again (maybe it was on wildguzzi). Although I did find some threads about problems with the 510 unit. So... does anybody have experience with the 515? If it's better, can you explain why? Should I put it in - or just keep running the Ducati (OEM) regulator? Plugs and wire colors are identical.
-
It may be no coincidence, but my father-in-law used to swear, too . . . That said, no one swears like *dangerous* . . . he has taken it to an art form. Ha - I was thinking of Dangerous today. I greased the bloody farking uni joints on my driveshaft. It was easy, cuz the driveshaft was on the bench. Now it's ready for when it's time to reassemble (except one should not lube the middle fitting until it's on the bike and the bike is supporting it's own weight.) So carry on... bleed the hydraulic fluids, then move on to the three (find 'em all) grease fittings on the driveshaft. Two are easy to find, then there's that bloody farking front one: http://www.v11lemans.com/forums/index.php?showtopic=18602
-
I think he also designed the Griso. I sure like the Greenie with the LeMans fairing.
-
Speed bleeders are nice, but you can bleed fluid with just a clear hose and a wrench. Just apply pressure, loosen the fitting to expel some fluid, tighten, repeat till fresh fluid starts coming out (be sure to keep refilling the fluid reservoir so your don't suck air into the lines). Front brakes are easiest. Rear brake is best if you take off the caliper and have the bleeder pointing up while you do it. Clutch slave cylinder is hard to reach - but it can be done. There's probably a youtube video.
-
If you're going to remove the cover, check out this thread: http://www.v11lemans.com/forums/index.php?showtopic=19547&hl=%2Bshift+%2Bimprovement While the sift pawl spring is a common thing to replace, I replaced all three springs. I found that they were weaker, and slightly out of shape - compared to new springs. I also put in a roller bearing instead of the standard disc-roller.
-
I've been enjoying the look of it in bare metal too. If I had not already gone so far down the path of darkness, or if I had a silver sport, I would be tempted to paint it with nothing but clear-coat. BTW - that aircraft stripper also removes powdercoat (tested on purpose - not accidental discovery).
-
Aircraft Stripper is the ticket! I think Chuck recommended that. I used Rust-Oleum brand. BBCode (replace photobucket's img with this in your post) And the crinkle paint is gone from the back end and the timing chest (which is a total PITA). The spare final drive is from my 2002 parts bike - so it's clear that the original paint is not only a problem on the engine.
-
Good point. I will get those seals and see what other little bits might be needed.
-
Tempting, and more durable, as powdercoating is - the problem is that the parts get sandblasted and baked at high temperature. That means every bearing and seal has to come out. So if you don't mind a total tear down, it's fine, but I am also going to strip and spray the engine case (without tear-down) and would like the cases to have exactly the same finish. I already powdercoated the alternator cover, swingarm, lower subframe, and driveshaft collars. Benefit of a parts bike is that you can send stuff off for powdercoating and keep it on the shelf till you're ready to install. Back to paint... I've been using VHT satin black engine case paint on my BMW. It gives a really nice finish, very close to the flat black powdercoat. For example, I sprayed this bell housing in place. The crank cover was powdercoated - and you can see how neglected it was when it followed me home.
-
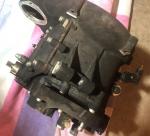
Thanks to everyone for all the help and discussion. Where else can you get advice from so many helpful and knowledgeable people? Norway to Nashville. Finland to Fotoguzzi. To Andy's questions: My tranny is out and 100% intact. Pictures in this thread during process are from people who were showing me how to take it apart. My plan of attack is: Degrease Strip paint (good riddance to wrinkle paint) Remove preselector (and rebuild) Remove rear cover Remove main case (shafts and gears stay with intermediate case). I think this is the only step where I will need a special tool to remove the input hub. Inspect for cracks/source of leak(s) - address if needed/possible Paint Reassemble with Threebond 1211 (it's equivalent to all the the other sealants that everyone likes, I already have a tube, and last, but by no means least.... I think I will be able to swear more profusely if I use what Pete recommends.) Carefully torque everything to spec (and be patient before adding lube and reinstalling on bike). I'll report findings/progress as events warrant.
-
That would be great. PM sent.
-
Oh - now I understand. I assumed it would be easier to remove the small cover, but instead, it's easier to pull the larger case off. So I would need to remove the input hub (the part that mates to the clutch disc) - no special tool for that? The shop manual only describes a complete tear-down, not the minimum steps needed to fix a leak.
-
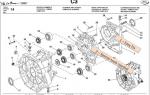
But the shop manual shows restraining ring nuts (Labeled I and L) require a special tool. How do you remove these?
-
OK - the pre-selector and the rear cover can be removed with "normal tools" - but special tools are required for removing the cast part #2 in the above parts diagram. I think the shop manual references 7 special tools for use on the transmission. It would be nice to have a "community" set that we could shuffle around. The tools are expensive from Moto Guzzi. Rolf, do you make and sell these tools, or do you have the MG tools? The crinkle paint is really thick, difficult to clean, and yes, it would probably obscure a crack (if there is one). Don't worry about raining on the parade. I only want to fix this once - so all information is potentially useful. I suppose the next step is to remove the two "easy" covers, strip the paint, and re-assess. Oh sad day, the Scura's gonna be out of service for a while...
-
The fast idle should be the same as opening the throttle a little. It is totally mechanical, not electrical.
-
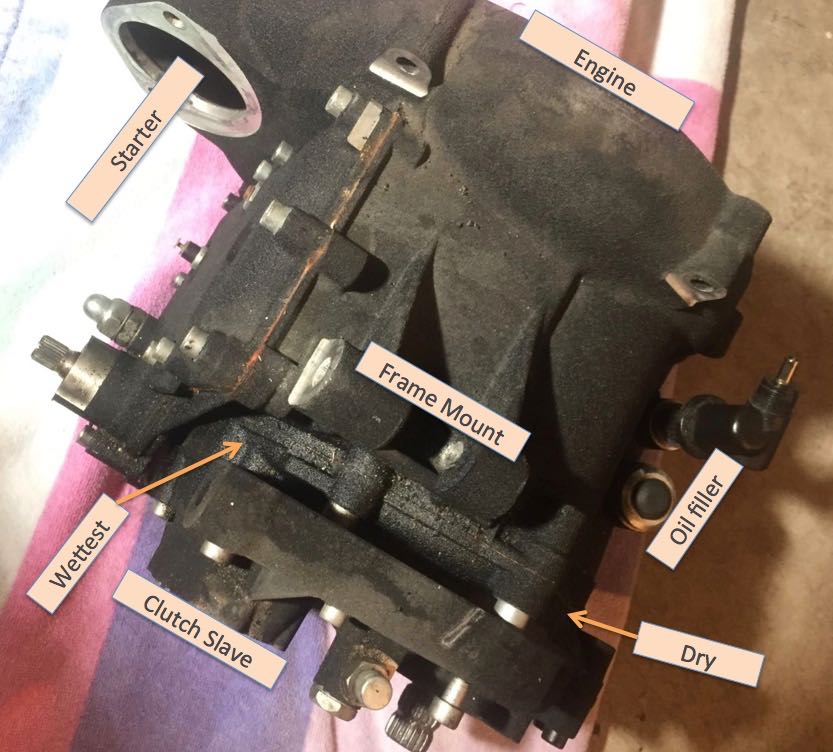
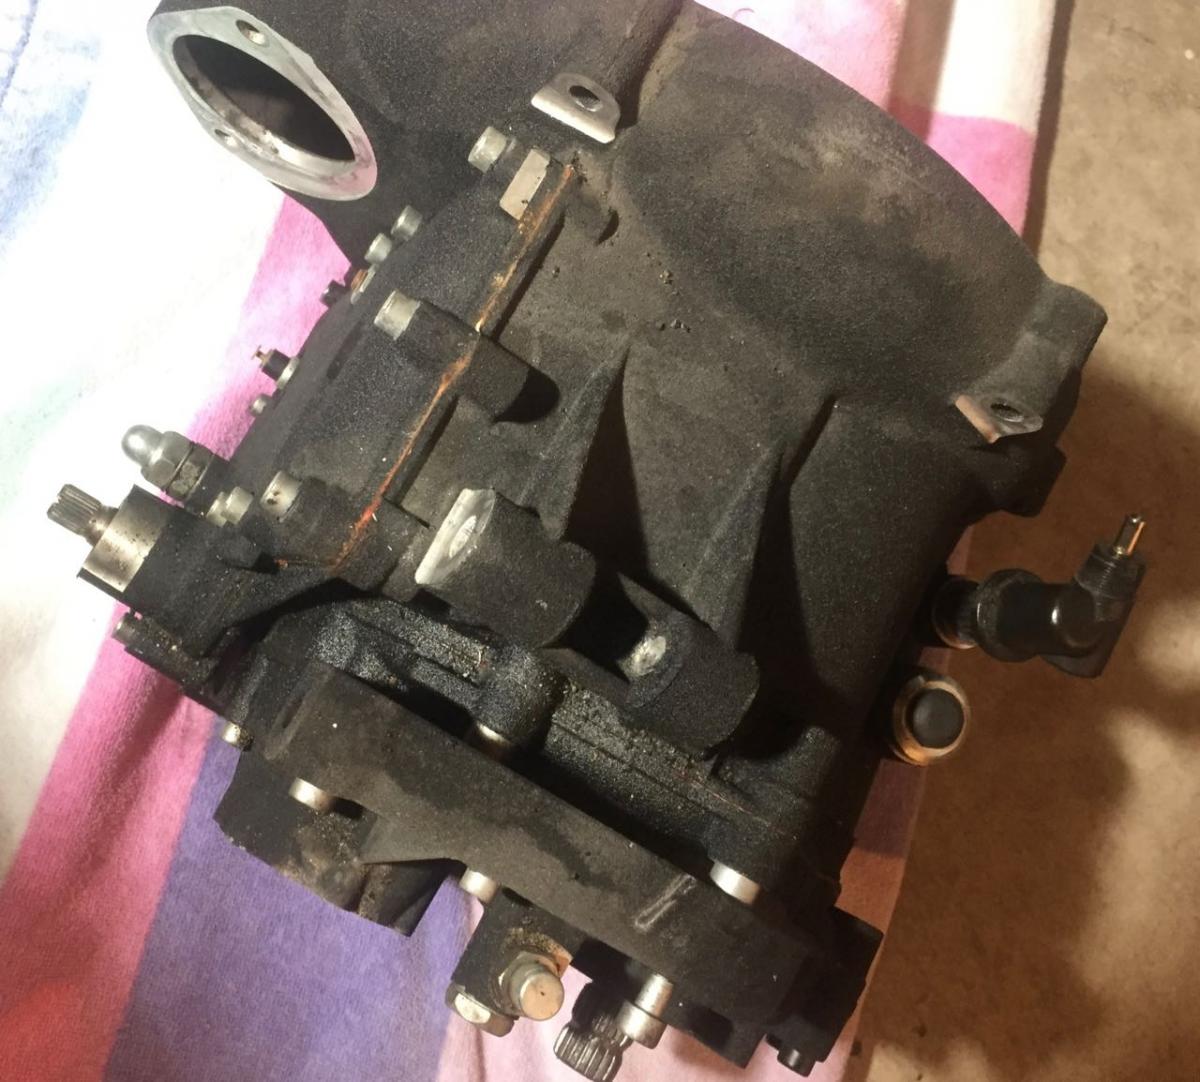
Threebond is like Yamabond. Pete Roper mentioned it as his sealant of choice. There's a white, slow-drying (1211) and a grey, more tacky, quick-drying (1184). I think the 1211 and Loctite 518 are equivalent products. Here's a labeled version to help with orientation/discussion. The oil was all hiding behind the starter, shock reservoir etc. - and dripping onto the crossover, so I didn't notice it until I removed all that stuff. If I was clever, I would have found it earlier, cleaned it, and done some foot-powder leak-sleuthing. I'm pretty sure that it is not leaking from the pre-selector cover. And here's the diagram that shows how the cases go together (other pages show all the gears and bearings) A leak at label 1 in the diagram would be pretty easy to address. But a leak at label 2 requires almost a full tear-down of the tranny and several special tools to remove gears between part numbers 2 and 3. I thought my 12,000 mile service would be a "major" one due to clutch replacement. I already planned to remove the pre-selector for a rebuild/improvement but this takes it to a whole new level of "major."

-
I cleared a few things out of the way so it would be easy to replace the crankcase breather hose and speedometer cable.
-
From what I can surmise, the leak is from one or both of the rear seals. It only migrates down the left side, not the right. It's definitely gear oil. After looking at the shop manual, removing the rear cover looks simple, but removing the thin case that goes to the main case appears to require several special tools to remove several gears. So... anybody been into one of these? Maybe somebody has the special tools that I could borrow? Or is this job for a professional? The orange silicone seems to be a problem - maybe Threebond 1211 would be better? Not what I was hoping to find...
-
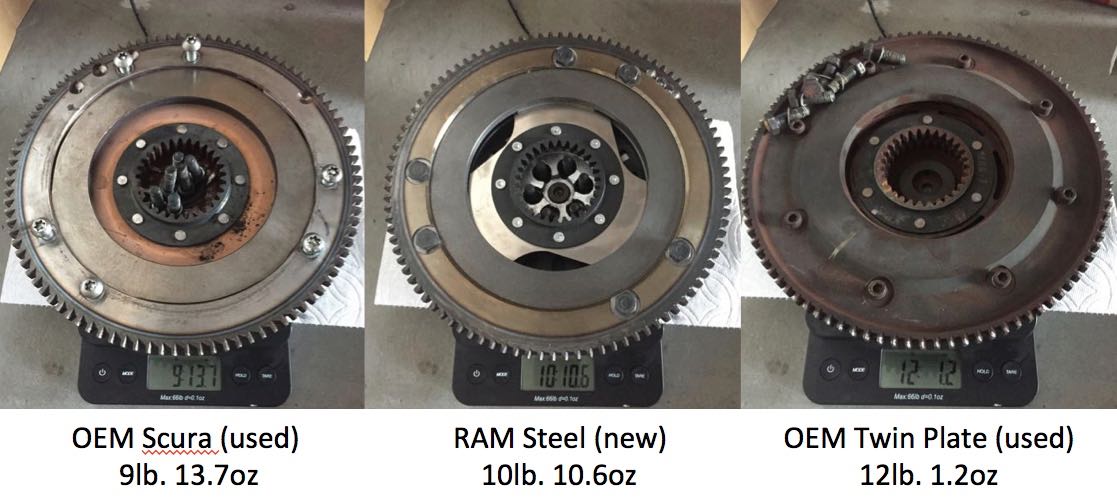
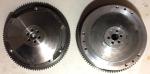
Here's the RAM on the left and the original single-plate on the right. You can see how the steel flywheel's mass is more centralized, because it has three arms, rather than being a disc. This is true for the friction plate too (as you can see in my earlier post). One significant difference between the RAM and original - the RAM comes pre-centered and can be installed like that (and I do not need to take it apart). The original's friction plate covers the flywheel bolts, so the clutch must be disassembled for installation or removal. The RAM install (at least on a bike that originally had a single-plate clutch) should be nothing more than 6 bolts. FWIW - the original aluminum flywheel did 12,000 miles in my Scura and shows no sign of cracking. Maybe it will become collectible one day...
-
FWIW - I got my engine out and flywheel removed in about 4 hours. It takes longer to re-assemble, so I agree that 12 hours is a reasonable estimate. Here are the three clutch options: Used OEM from Scura with Aluminum Flywheel: 9lb. 13.7 oz New RAM unit with Steel Flywheel: 10lb. 10.6oz Used OEM twin-plate: 12lb. 1.2oz It's gonna be a while till I get the RAM installed - doing lots of other stuff at the same time. However, I test-fit the RAM on the Scura transmission hub. It fits the same as the original clutch.

-
Just a matter of time... because the stripper works in 15 minutes. I'm inclined to eradicate the crinkle finish - engine, transmission, driveshaft collars, final drive, and reaction rod. @Paul - I can weigh them both later. edit: posted weights in this thread: http://www.v11lemans.com/forums/index.php?showtopic=19510&page=4&do=findComment&comment=214116
-
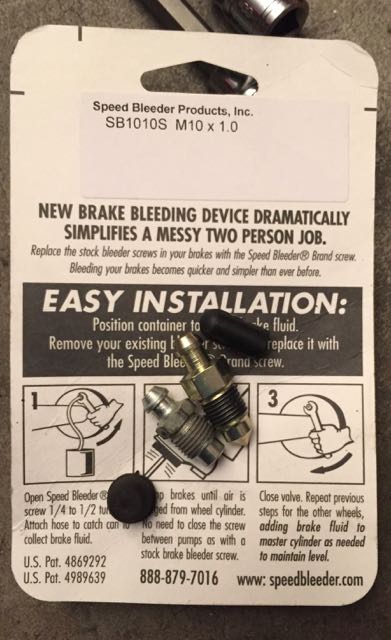
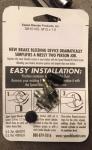
OEM Part Name: Hydraulic Bleeders - for clutch slave and brake calipers Moto Guzzi Part Number: Replacement Part Brand or Source: SpeedBleeder Part number or other identifier: Clutch and Rear Brake - SB1010S M10x1.0 Front Brake Calipers - SB8125 M8x1.25 Differences from OEM (if any): these are one-way valves that make bleeding very speedy (a well-named product). The OEM bleeder for the clutch looks a little different than one for the rear brake, but the same replacement part fits both applications. Thanks to Craig for doing the research on these. I've had them for a while, but just installed all 4 today. OEM clutch bleeder (left) has flat bottom. SpeedBleeder (right) has conical bottom.
-
...but maybe I spoke too soon. I was so pre-occupied with the engine oil leaks that I didn't notice that the transmission also has an oil leak. I think (hope) it's from the output cover and not something deeper. One swingarm bearing is bad (but I've got a freshly powdercoated one with new bearings ready to take over). She's damn near down to the spine and wiring harness at this point. And the little rubber vibration dampers? They just spin right apart, don't they?
-

A new record for me, 4,000 travel to purchase a Lemans
Scud replied to not-fishing's topic in 24/7 V11
Where? I don't see a Rosso Corsa. Pictures - or it didn't happen. My Guzzi buys were local. But I flew San Diego to San Jose for business and rode a brick home. http://www.v11lemans.com/forums/index.php?showtopic=19273&hl=brick -
Thanks, it's a bit of an obsession... I'm still using the original grips. They are quite thin and there is no bump in the bars, so I'm not sure what you've got now. But grips are pretty standard and you should be able to use almost any grips you like. For the manual, check the fileshare section on this website. Lots of other goodies there too, including the Ohlins manuals. I like having a hard copy on the table while I'm working, so I recently printed the whole thing. I kept track of what pages had English or pictures. This thread has all those page numbers: http://www.v11lemans.com/forums/index.php?showtopic=19504&hl=